The LT... Thomas' Luxury Tent

...ask your questions in the appropriate forums BUT document your build here...preferably in a single thread...dates for updates, are appreciated....

Postby wlivesey » Sun Aug 30, 2009 4:49 pm

2bits wrote:My friend is having a BBQ The Sunday of Labor Day weekend and he just finished building a little "shed" in his back yard that he just finished and wants to show off. I think it is more like a little house, but I am going to bring the teardrop out there for it's first road run, it's about an hour drive which should let me know if anything is gonna fly off of it haha

And yup the official first camping date is Sep 19th at Joe Pool Lake! That's a good choice because it is close to home. Need to get my curtains up!


Very cool. You're build is looking great. I'm going to swing by the Joe Pool gathering to see whats going on. Unfortunately, I won't have the Northwestern with me. I can't wait to get it on the road...
User avatar
wlivesey
The 300 Club
 
Posts: 469
Images: 283
Joined: Sun Aug 12, 2007 1:22 pm
Location: DFW, Texas

Postby 2bits » Sun Aug 30, 2009 11:12 pm

Hey guys, just another update.

I realized that once I cut the hatch locking rods, the rods did not sit in the last rib at the edge of the hatch anymore on the open position, so when I locked it, it had to be perfectly lined up which it wasn't, so it kept hitting the rib instead of the hole. I thought I could add another chunk of wood to guide it but then I would have to disassemble the whole lock assembly to get it in place. I tried wallering out the hole a little but it started to get ugly and I was worried about how that was going to change the location of the rod and I had just tweaked the locking clips perfectly. I thought about it and the rod would go the the hole fine if I gently guided it, so I just got a thick plastic tube that was slightly bigger than the rod and slightly smaller that the last hole and that would guide it in. It works great!:

Image

Then I stripped and restained and installed my front "closet" hanger rod:
Image

Then hung up some clothes since I had been waiting so long to see it! I have some classic 1940's hangars from my grandmother's that I am using, I might try to make the hangar hook shorter to keep the shirts as high as possible, I couldn't go much higher with the rod because it gets tight up there and I didn't want to be scratching up the back wall all the time, but hey, we're campin here no need for ironed and pressed clothes here! Oh and that is two t-shirts and a winter jacket in there with plenty of room for more!
Image
Last edited by 2bits on Tue Sep 01, 2009 1:09 am, edited 1 time in total.
Thomas

Image
User avatar
2bits
2bit Member
 
Posts: 5132
Images: 8
Joined: Thu Dec 27, 2007 6:04 pm
Location: Lake Tawakoni, TX

Postby aggie79 » Mon Aug 31, 2009 1:21 pm

Thomas,

I like the front closet. It really is taking shape. Thanks also for showing your suggestions and details for hatch hardware installation.

It's good to see that someone in the area got to work on their teardrop this weekend. Some of us weren't that lucky (although I did get the roof with the hull liner on the ceiling installed.)

Looks like you are pushing hard for September at Joe Pool. I don't think we'll be camping, but are hoping to stop by for a visit.

Tom
Tom (& Linda)
For build info on our former Silver Beatle teardrop:
Build Thread

93503
User avatar
aggie79
Super Duper Lifetime Member
 
Posts: 5405
Images: 686
Joined: Tue Aug 07, 2007 5:42 pm
Location: Watauga, Texas
Top

Postby Woodyperk6 » Mon Aug 31, 2009 2:38 pm

wlivesey wrote:
2bits wrote:My friend is having a BBQ The Sunday of Labor Day weekend and he just finished building a little "shed" in his back yard that he just finished and wants to show off. I think it is more like a little house, but I am going to bring the teardrop out there for it's first road run, it's about an hour drive which should let me know if anything is gonna fly off of it haha

And yup the official first camping date is Sep 19th at Joe Pool Lake! That's a good choice because it is close to home. Need to get my curtains up!


Very cool. You're build is looking great. I'm going to swing by the Joe Pool gathering to see whats going on. Unfortunately, I won't have the Northwestern with me. I can't wait to get it on the road...


Hey Bill, Bring a tent with you & do some camping with us.
Woody & Tammy


One day closer.
User avatar
Woodyperk6
Platinum Donating Member
 
Posts: 1252
Images: 5
Joined: Thu Mar 16, 2006 10:52 am
Location: Texas, Ft. Worth
Top

Postby 2bits » Wed Sep 02, 2009 11:41 pm

Felt pretty sick this morning so I took the day off. I can't stay down long so I went up and got my tags on the teardrop renewed, so I am legal again.

Then I decided to make a short list of the "must-do's" to take an hour drive, and to also show off for the first time. At this point I know it ISN'T done, I just want it to LOOK as done as possible, this included with a list of stuff to do so things aren't flying off haha. I am going to a BBQ with a bunch of aircraft pilots and mechanics so a job well done is recognized.

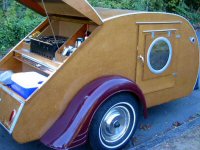
I trimmed the bottom of the galley floor with some C channel aluminum, put in my little round sliding door opener deelies, and built a little box that fits in what will be the pantry to hold up my temporary galley sliding doors. The doors work though, they are just luan so the back sides are not finished and the real sliders will be from real plywood. I put speaker covers and the power outlets in too and although none of them work, it looks much more complete! I also stained the temporary hatch struts, I was sanding them down to try and make them as presentable as possible and my dang sander broke! It is just the "belt" but I need to get it from a service center, so I said to heck with it and stained them anyway, I can resand and stain later! All this is just temporary stuff, but even if it is temporary, it is gonna be as presentable as a spit shine will allow!

I am also gonna get a piece of plywood and cut it to cover all three of the left side galley openings, route two channels where the separations will be, then stain it and put drawer handles on it for a complete "faux" front side. The drawers are going to be an entire project in itself that will take time, and I want it looking like something until that time. I am still thinking about how to get it to "stick" to the galley because I don't want to drill any holes anywhere except on the inside of the drawer walls for this temp solution.

Image

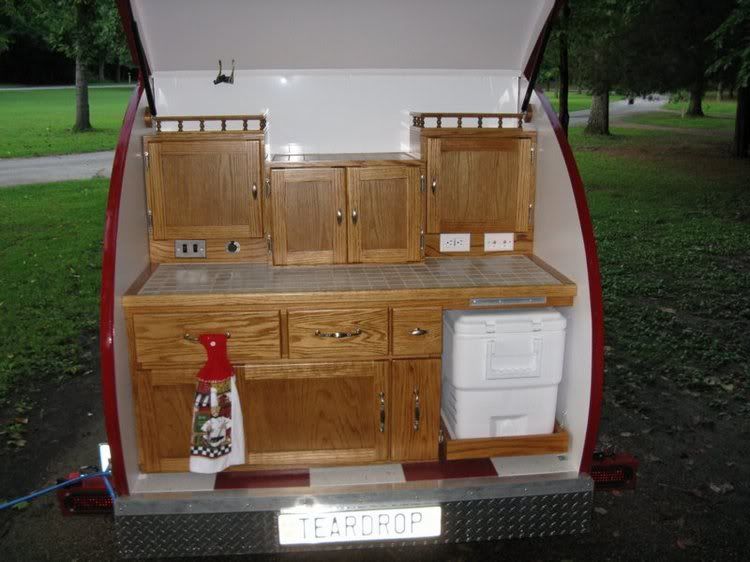
Then I took some advice after feeling the temp of the AC exhaust box after an hour and I pulled out my vent that goes through the floor and cut out the middle so there will be more airflow and put in a screen. Now that I look at the pics, I think I will add another screen over the outside to keep the dirt dobbers from making a home in that little cubby hole!

Image
The duct tube that is clamped to it holds the screen and the vent in, the rubber band is just a placeholder.
Image

I also bought some trailer chains but they were sooo crappy, I took them back and go research the board for how to attach them then just buy chain separately and the end pieces I will need individually.

I also took a trip down to Joe Pool Lake, my local state park and cashed in my gift certificate my mom got me last Christmas for a year pass to all the state parks in Texas! I am gonna take advantage of that!

I think I did more but can't remember!
Thomas

Image
User avatar
2bits
2bit Member
 
Posts: 5132
Images: 8
Joined: Thu Dec 27, 2007 6:04 pm
Location: Lake Tawakoni, TX
Top

Postby green_eyed_diablito » Thu Sep 03, 2009 2:14 am

looking good, thomas. don't be intimidated by the prospect of building drawers. they are super-easy to build and the drawer runners are even easier. i can take detailed pics showing you how i've built drawers through the years if you're interested.
Since this life here and now is all we can know, our most reasonable option is to live it fully.
ImageImage
User avatar
green_eyed_diablito
Teardrop Master
 
Posts: 226
Joined: Tue May 12, 2009 1:17 pm
Location: Los Angeles, CA
Top

Postby planovet » Thu Sep 03, 2009 8:49 am

green_eyed_diablito wrote:looking good, thomas. don't be intimidated by the prospect of building drawers. they are super-easy to build and the drawer runners are even easier. i can take detailed pics showing you how i've built drawers through the years if you're interested.


I agree. It seems intimidating at first but it's not that difficult once you get into it. You can do it!

I will look forward to seeing your build at Joe Pool in a couple of weeks. :thumbsup:
ImageMark (& Cindi)
Visit our website: Little Swiss Teardrop

I was wondering why the water balloon was getting bigger... and then it hit me.

ImageImageImageImage
User avatar
planovet
The Cat Man
 
Posts: 5583
Images: 3
Joined: Tue Nov 27, 2007 4:48 pm
Location: Plano, Texas
Top

Postby 2bits » Thu Sep 03, 2009 11:03 am

Thanks guys, I am not really intimidated about the drawers, I've built them before, just been a while. I just know it's gonna be a project in itself that will take a little time. I would love to see what you have done and how you did it because while I have a general idea about what they will look like, I haven't thought about how I will construct them yet!
Thomas

Image
User avatar
2bits
2bit Member
 
Posts: 5132
Images: 8
Joined: Thu Dec 27, 2007 6:04 pm
Location: Lake Tawakoni, TX
Top

Postby aggie79 » Thu Sep 03, 2009 12:24 pm

Thomas,

Thanks for showing your "interim" galley arrangement. I'm in the galley space planning mode right now but have been hung up because I can't decide where my electrical panel and A/C return air vent/duct will be. I'm think I'm now going to do like you and get something "campable" and not worry about galley layout just yet.

Are you still planning on making it out to Joe Pool Lake?

Tom
Tom (& Linda)
For build info on our former Silver Beatle teardrop:
Build Thread

93503
User avatar
aggie79
Super Duper Lifetime Member
 
Posts: 5405
Images: 686
Joined: Tue Aug 07, 2007 5:42 pm
Location: Watauga, Texas
Top

Postby planovet » Thu Sep 03, 2009 1:07 pm

aggie79 wrote:I'm think I'm now going to do like you and get something "campable" and not worry about galley layout just yet.


Go for it! For our first camping trip our galley was a shell. We were ready to camp and everything but the galley was finished. It was good to finally get out and use the teardrop. It also motivated me to "get 'er done". We finished the galley in time for camping trip #2.

First camping trip:
Image

Second trip:
Image
ImageMark (& Cindi)
Visit our website: Little Swiss Teardrop

I was wondering why the water balloon was getting bigger... and then it hit me.

ImageImageImageImage
User avatar
planovet
The Cat Man
 
Posts: 5583
Images: 3
Joined: Tue Nov 27, 2007 4:48 pm
Location: Plano, Texas
Top

Postby 2bits » Thu Sep 03, 2009 3:27 pm

That is a great before and after shot Mark! NICE!~

Tom, I think my fuse box is going to be too big to fit in my electrical closet :( I could do it, but I want it to be EASILY accessible, we'll see when I get there. I might just put it on the wall under the shelves so it will still be in the same general area and you won't notice it there much at all, I thought about putting it on a slider in the far left galley drawer but space is already limited there and I like being able to get to it from the inside when it is raining and stuff. Point being, you might try to think of a general location for it unless you leave it totally open like Mark's in the beginning that will give you a clean slate to work with. that's why I wait until I am actually doing the job before drilling any holes!

I am definitely still planning on the 19th at Joe Pool! I'm in #61 thanks to Woody!
Thomas

Image
User avatar
2bits
2bit Member
 
Posts: 5132
Images: 8
Joined: Thu Dec 27, 2007 6:04 pm
Location: Lake Tawakoni, TX
Top

Postby Anthony J Grant » Thu Sep 03, 2009 5:47 pm

Thomas,

Looking good! :applause: :thumbsup: :applause:
Where are we going and why am I in this hand basket?

Tony G.
the HOBO HILTON
User avatar
Anthony J Grant
Teardrop Master
 
Posts: 232
Images: 119
Joined: Wed Dec 31, 2008 8:42 pm
Location: Milan Mi
Top

Postby 2bits » Thu Sep 03, 2009 6:26 pm

Just screened in my side AC vent, screwed in the door handles, drilled a hole to bolt in the hitch chains and about to go buy the chain, and then I will be roadworthy!

I just realized my truck inspection sticker is out too, so that will be Saturday morning's job.
Thomas

Image
User avatar
2bits
2bit Member
 
Posts: 5132
Images: 8
Joined: Thu Dec 27, 2007 6:04 pm
Location: Lake Tawakoni, TX
Top

Your Build

Postby norm's tear drop » Thu Sep 03, 2009 7:17 pm

Looking Damm good :thumbsup: :applause:
Image
User avatar
norm's tear drop
Teardrop Advisor
 
Posts: 85
Images: 133
Joined: Sun Apr 19, 2009 5:41 pm
Location: Warrenton , Va
Top

Postby 2bits » Thu Sep 03, 2009 9:07 pm

I am not trying to keep my build at the top of the board honest! It's just been productive for me :R

The Woodyard has been now been retired and The Vagabond King has arisin! I scrambled to get these pics and the sun had already set!

Image
Image
Image

A pic of my chains bolted to the tongue, grade 8 bolts, washers and nuts. chain I just has two 36" lengths cut, then bought screw clamp ends. (too small need to get bigger ones).

Image
Thomas

Image
User avatar
2bits
2bit Member
 
Posts: 5132
Images: 8
Joined: Thu Dec 27, 2007 6:04 pm
Location: Lake Tawakoni, TX
Top

PreviousNext

Return to Build Journals

Who is online

Users browsing this forum: No registered users and 14 guests