Tom & Shelly's build

...ask your questions in the appropriate forums BUT document your build here...preferably in a single thread...dates for updates, are appreciated....

Re: Tom & Shelly's build

Postby Tom&Shelly » Tue Aug 25, 2020 10:01 pm

pchast wrote:I picked up a couple of cheap bar magnets for hanging tools to drag around
after my garage was built. Picked up pounds of nails and screws......


Thank you Pete, I like that idea. We can use it to look for the nails, and later perhaps to hang some tools in there.

We have some peg board left over from our shop (I paneled two walls of our shop with the stuff), so we want to hang some of that too, if I can figure out how to do it in a metal garage without making holes to the outside. (I think they sell clips...)

Tom
174145 170466 173366
Tom&Shelly
Palladium Donating Member
 
Posts: 2466
Images: 2288
Joined: Tue Sep 05, 2017 3:27 pm
Location: New Mexico

Re: Tom & Shelly's build

Postby rjgimp » Tue Aug 25, 2020 10:29 pm

pchast wrote:I picked up a couple of cheap bar magnets for hanging tools to drag around
after my garage was built. Picked up pounds of nails and screws......


Years ago I drove a short wheelbase semi tractor used for switching semi trailers between warehouse dock doors. We had an 8' long bar magnet about the size of a 2x4 suspended from the front bumper about an inch off the ground to pick up nails that had come loose from pallets and other odd bits of metal debris. About every week we scraped enough off the thing to fill a soup can.

At $400 per for even the cheapest steer tires, it was ridiculously cheap insurance.
-Rob


I hope to make it to a Procrastinators Anonymous meeting someday...
just as soon as the steering committee gets around to scheduling one!
User avatar
rjgimp
500 Club
 
Posts: 849
Images: 7
Joined: Fri Feb 22, 2019 3:59 am
Location: Saint Paul MN

Re: Tom & Shelly's build

Postby Tom&Shelly » Wed Sep 02, 2020 9:56 pm

Built the framework around the galley drawers over the past few days

163077 163076

The cubby to the right on top of the horizontal piece will hold the Coleman stove; to the left will be the silverware drawer. There will (of course) be a half inch thick counter over the whole thing, notched in the back where the J-boxes are. On top of that will be an electrical box (built of Baltic birch) for the PD 4045.

Turns out those J boxes will not extend down past the counter behind the silverware drawer, so I'll be able to make a square drawer that is deep enough for our long handled fork and spatula (for use with hot fires).

The drawers to the right hold the water and a large container (to carry food), and I couldn't be more pleased with the fit (not a lot of wasted space)
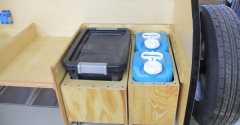
163078

That horizontal piece, and the vertical partition near the middle of the galley, are both made of two sheets of quarter inch plywood glued together. The shinny sides (facing the Coleman stove) are scrap Baltic birch that we'd applied glass and epoxy to, then didn't use (or else they're cut outs from the passenger doors--same end result). I sanded the epoxy and applied varnish to protect it from whatever UV it'll see down there. The other sides of these half inch sheets are AC ply for the horizontal sheet and Baltic birch for the vertical partition.

The little partition between the silverware drawer and the stove is made of three quarter inch sheets of plywood. It has a key in the middle to support notched oak for the end

163079

The horizontal piece also has a key in it's top sheet, and a notched piece of oak, with the lip helping to keep the stove in its cubby

163080

The partition is keyed as well, and has an L shaped, half inch wide, piece of oak.

With the thin sheets, necessary fit everything in, I couldn't build an oak frame with dowel joints, as I had with the clothes drawer in the cabin, so I decided to attach the oak as described. Right now they are just force fitted, but I plan to glue them with epoxy. By rounding over the edges where they join, I hope any small fitting errors will be less obvious.

I was nervous with the kreggery-jiggery necessary for the toe-nail screw joints in the (thin) half inch sheets. Found one inch screws are the right length, but Kreg doesn't seem to sell stainless coarse thread screws that size, so I am using their interior zinc fine thread screws. Guess they shouldn't see too much moisture in there. Incidentally, back in the second picture, you may notice I used a 1 inch Forstner bit to drill some holes in the horizontal piece under the space for the silverware drawer. That is so I can get a screwdriver up to tighten the toe-nail screws into the counter.

Right now, I'm thinking the drawer fronts for the bottom drawers will be made of oak frame, dowel jointed together, with little pieces of varnished Baltic birch in between. Probably just use a solid piece of oak for the silverware drawer.

The battery lid has two drawers on top of it that fit under the stove and silverware

162910

I'm trying to come up with a clever way to lock those two drawers closed when I need to remove that lid, so I can just pull on the the two drawers (after removing screws holding the lid in place) to take the whole thing out. I'm thinking of some discreet holes in the drawer fronts that I can insert screws into, finding hidden nuts attached to the lid. I'm sure that sort of hardware exists somewhere! But I may have to fabricate it out of some junk in our basement. :twisted:

Tom
174145 170466 173366
Tom&Shelly
Palladium Donating Member
 
Posts: 2466
Images: 2288
Joined: Tue Sep 05, 2017 3:27 pm
Location: New Mexico
Top

Re: Tom & Shelly's build

Postby twisted lines » Thu Sep 03, 2020 10:22 am

T-nut ?
Racking up; And Rapin foam
User avatar
twisted lines
1000 Club
1000 Club
 
Posts: 1243
Images: 2
Joined: Wed Oct 10, 2018 4:37 am
Location: Jefferson
Top

Re: Tom & Shelly's build

Postby tony.latham » Thu Sep 03, 2020 10:24 am

I'm trying to come up with a clever way to lock those two drawers closed...


Could cross-bolts work for locking those drawers in place?

Image

:thinking:

Tony
User avatar
tony.latham
Gold Donating Member
 
Posts: 7073
Images: 17
Joined: Mon Jul 08, 2013 4:03 pm
Location: Middle of Idaho on the edge of nowhere
Top

Re: Tom & Shelly's build

Postby Tom&Shelly » Thu Sep 03, 2020 3:00 pm

Problem with using those bolts to solve this problem is what they would bolt into. As currently planned, the drawer faces will be in front of (and cover) the battery lid.

T-nuts, on a block of wood attached to the battery lid, is the right idea, but I think (need to check) the t-nuts I have are too large. Right now, I'm thinking about drilling recesses in blocks of wood for quarter-twenty nuts and holding them in place with epoxy. If I could weld, I'd have another option...

:thinking:

BTW, Tony, we are thinking of using similar bolts, vertically, into the floor of the galley, to lock the drawers while travelling. There are some with a little indent that would hold the bolt up when vertical, so they would be unlocked while in camp. (Of course, to remove the battery lid, I want the drawers locked to it.)

In case this makes no sense to some (all?) readers, I appreciate that. Hopefully, it will become clear as I proceed and show more pics. :pictures:

Tom
174145 170466 173366
Tom&Shelly
Palladium Donating Member
 
Posts: 2466
Images: 2288
Joined: Tue Sep 05, 2017 3:27 pm
Location: New Mexico
Top

Re: Tom & Shelly's build

Postby tony.latham » Thu Sep 03, 2020 3:18 pm

I thought the bolts could insert into your left wall and right partition.

The problem with having them insert into the floor might be dirt that finds the pocket. But hey, a clean galley any-who, right?

Tony
User avatar
tony.latham
Gold Donating Member
 
Posts: 7073
Images: 17
Joined: Mon Jul 08, 2013 4:03 pm
Location: Middle of Idaho on the edge of nowhere
Top

Re: Tom & Shelly's build

Postby Tom&Shelly » Thu Sep 03, 2020 3:48 pm

tony.latham wrote:I thought the bolts could insert into your left wall and right partition.

The problem with having them insert into the floor might be dirt that finds the pocket. But hey, a clean galley any-who, right?

Tony


That might work to lock the drawers for travel. I wanted the drawer fronts flush with the partitions since I didn't want to lose the inch or so for the drawers. So that would mean attaching the bolt receiver to the half inch partition, and most of the receivers I've found seem to be 5/8 inches wide.

But, yes I see the potential issue with dirt in the holes in the floor. If we go that way, I guess we'll see if it's a real problem. (Another issue is that the plywood floor is a half inch thick there--If I make the holes deeper, I'll hit foam.

Knew this would happen, but I'm at the point in the build where my lack of detailed design in the beginning is coming back to bite me! Oh well, makes it more interesting. (And a large part of my engineering career consisted of fixing problems created by a lack of foresight, so I'm on familiar territory.) :)


Tom
174145 170466 173366
Tom&Shelly
Palladium Donating Member
 
Posts: 2466
Images: 2288
Joined: Tue Sep 05, 2017 3:27 pm
Location: New Mexico
Top

Re: Tom & Shelly's build

Postby Tom&Shelly » Thu Sep 03, 2020 7:06 pm

OK, another idea for securing the lower drawers for travel:

We could build some J brackets at either end, less than a half inch thick, which is the clearance I allowed between the sides and the drawers, and we put a bar across the whole thing. Mechanically, I think that will be the most secure method. I had to catch Shelly in the right mood to understand it, and to agree if we do it right, it may not chew up the drawer fronts. We're thinking of maybe a nylon bar, or one lined in thin rubber.

Then there would be the problem of stowing the bar while in camp so it's out of the way, but not easy to forget.... :thinking:

Tom
174145 170466 173366
Tom&Shelly
Palladium Donating Member
 
Posts: 2466
Images: 2288
Joined: Tue Sep 05, 2017 3:27 pm
Location: New Mexico
Top

Re: Tom & Shelly's build

Postby noseoil » Sun Sep 06, 2020 7:15 am

I used sliding "crapper stall latches" on ours & they work well enough for our needs. They're stainless steel, a bit spendy, but work flawlessly. I was sitting in the stall & pondering drawer latches at work one day, when the idea just came to me... Granted, they are set at 90 degrees from their intended use, but hey, if it works, it works!

160234
Build log: viewtopic.php?f=50&t=60248
The time you spend planning is more important than the time you spend building.........

137905
User avatar
noseoil
1000 Club
1000 Club
 
Posts: 1822
Images: 670
Joined: Sun Apr 27, 2014 8:46 am
Location: Raton, New Mexico, living the good life!
Top

Re: Tom & Shelly's build

Postby Tom&Shelly » Mon Sep 07, 2020 11:09 am

I cut out the counter core this morning--two 1/4" pieces of A/C plywood back to back to make a 1/2" thick A/A core with plenty of voids. Actually, with the quality of plywood we have, it's an A-/A- sheet.

We were thinking of buying some Formica (or equivalent) sheet and gluing it on, but it turns out Home Depot and Lowes don't have any in stock, so we'd have to order it. In the meantime, Shelly learned of this technique where you tear craft paper (or brown paper bags) into pieces, soak them in a mix of Elmer's children's glue and water, stick them on the substrate, stain if desired, and then coat with about 12 coats of water based varnish. (Not that I'll admit to ever hearing of water based varnish!)

Anyway

163110 163109 163108

163106 163105 163112 163111

I'm inclined to the stained version (Minwax dark wallnut). Any opinions?

We'll let it cure for a day or so, then see how it stands up to hot coffee cups.

Tom
174145 170466 173366
Tom&Shelly
Palladium Donating Member
 
Posts: 2466
Images: 2288
Joined: Tue Sep 05, 2017 3:27 pm
Location: New Mexico
Top

Re: Tom & Shelly's build

Postby tony.latham » Mon Sep 07, 2020 1:01 pm

I like it a lot and lean towards the darker version.

Tony
User avatar
tony.latham
Gold Donating Member
 
Posts: 7073
Images: 17
Joined: Mon Jul 08, 2013 4:03 pm
Location: Middle of Idaho on the edge of nowhere
Top

Re: Tom & Shelly's build

Postby Homebrewer25 » Tue Sep 08, 2020 5:41 am

Looks great. I agree with Tony on preference for the darker one.
It's 5 o'clock somewhere ... time for a :beer:

Steve
Foam Ranger Build (postponed by COVID - resuming spring 2021): http://www.tnttt.com/viewtopic.php?f=50&t=70159
User avatar
Homebrewer25
Teardrop Master
 
Posts: 114
Images: 19
Joined: Thu Aug 18, 2016 4:08 pm
Location: Flag Pond, TN
Top

Re: Tom & Shelly's build

Postby tony.latham » Tue Sep 08, 2020 8:16 am

and then coat with about 12 coats of water based varnish.


I'm thinking 14. (Sheeeeesh! That's a lotta coats.)

Tony
User avatar
tony.latham
Gold Donating Member
 
Posts: 7073
Images: 17
Joined: Mon Jul 08, 2013 4:03 pm
Location: Middle of Idaho on the edge of nowhere
Top

Re: Tom & Shelly's build

Postby crpngdth2001 » Tue Sep 08, 2020 9:01 am

I like the darker one as well.
crpngdth2001
Teardrop Advisor
 
Posts: 75
Images: 0
Joined: Tue Mar 06, 2012 3:02 pm
Location: Bowie, MD
Top

PreviousNext

Return to Build Journals

Who is online

Users browsing this forum: No registered users and 17 guests