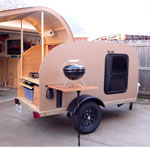
12 ft Winter Warrior build

...ask your questions in the appropriate forums BUT document your build here...preferably in a single thread...dates for updates, are appreciated....

Postby steve smoot » Sun Jun 20, 2010 1:52 pm

Gary, you are lookin' good there... :thumbsup:
I am not a complete idiot, some parts are missing...
User avatar
steve smoot
Lifetime member
 
Posts: 1355
Images: 62
Joined: Thu Sep 17, 2009 5:42 pm
Location: Boone NC

Postby YuGun » Sun Jun 20, 2010 2:49 pm

Perfect, go on...
:thumbsup:
User avatar
YuGun
The 300 Club
 
Posts: 445
Joined: Sun Apr 11, 2010 1:25 pm
Location: Turkey

Postby starleen2 » Sun Jul 04, 2010 7:41 am

Gary - what size plywood are ya' using for the exterior? Something I learned is that if you have a gallon or two of unused paint- paint that "other" side of the plywood before you cover it up with insulation and paneling. it helps keep the moisture from penetrating from the inside of the sheet. This is an old upholsterers trick I learned from covering boat seats - the "high end" manufacturers painted BOTH sides of the wood before upholstery, others just pained one side. On the ones that were painted on both sides, I almost NEVER had to replace the wood - can't say the same thing about the others :thinking:
User avatar
starleen2
5th Teardrop Club
 
Posts: 16272
Images: 224
Joined: Sat May 12, 2007 8:26 pm
Location: Pea Ridge ,AR
Top

Postby RAYVILLIAN » Sun Jul 04, 2010 9:56 am

Thanks for the tip Starleen unfortunately it's a bit to late. :cry: I've already have the sides covered with good old faithful luan. I used that on the WW and it seems to hold up pretty good except that one sheet I keep repainting.
I don't have the inside ply on the back half I think I'll use that idea there but I just glued the last of the inside ply on the front half so it's to late up there.

I've some more pics put haven't gotten them posted yet I'll try to do that this afternoon.

gary
Where ever we raise the hatch is home.
Darn blank states keep getting further away and we keep traveling slower ain't never gona get this map full.
111961Image
User avatar
RAYVILLIAN
Lifetime member
 
Posts: 1434
Images: 109
Joined: Thu Aug 05, 2004 9:33 pm
Location: Rayville MO
Top

Postby RAYVILLIAN » Sun Jul 04, 2010 7:40 pm

It's been a while and I have gotten some things done.

Image
Here's the front wall with the tongue box floor and the pattern of the side of the tongue box

Image
Here is the support for the bed.

Image
This is the bed with battery box on the left.

Nest is the hinge support wall.


Gary
Where ever we raise the hatch is home.
Darn blank states keep getting further away and we keep traveling slower ain't never gona get this map full.
111961Image
User avatar
RAYVILLIAN
Lifetime member
 
Posts: 1434
Images: 109
Joined: Thu Aug 05, 2004 9:33 pm
Location: Rayville MO
Top

Postby RAYVILLIAN » Sun Aug 08, 2010 5:54 pm

Sorry that I haven't posted lately but I have made some progress in the last month.

Image

This is the front view with the tongue box roughed in and the roof on. I'm trying to decide on how I'm going to tie the tongue box into the roof and still have it usable.

Image

This is the back right now with the hinge wall and the door into the bedroom.

Image

This is looking through the door into the bedroom.

I had to make some changes in the roof design 1x2's on side didn't look like it was going to work so I made them into T beams which is why you can see them in the ceiling. I think they look kinda cool that way though.

Hopefully I'll get the time to figure out the tongue box this week and get it finished so I can water proof this much and start on the back wall and hatch.

Gary
Where ever we raise the hatch is home.
Darn blank states keep getting further away and we keep traveling slower ain't never gona get this map full.
111961Image
User avatar
RAYVILLIAN
Lifetime member
 
Posts: 1434
Images: 109
Joined: Thu Aug 05, 2004 9:33 pm
Location: Rayville MO
Top

Postby bdosborn » Sun Aug 08, 2010 6:18 pm

Gary,

Good progress, its starting to look like a camper. :thumbsup: That wall to the bedroom will stiffen up the sides a lot.

Bruce
2009 6.5'X11' TTT - Boxcar
All it takes is a speck of faith and a few kilowatts of sweat and grace.
Image
Boxcar Build
aVANger Build
User avatar
bdosborn
Donating Member
 
Posts: 5512
Images: 778
Joined: Wed May 05, 2004 11:10 pm
Location: CO, Littleton
Top

Postby caseydog » Sun Aug 08, 2010 6:22 pm

Looking good, Gary. Just over two months until LCG5. Tick, tock. :lol:

CD
Image

My build journal is HERE
User avatar
caseydog
Platinum Donating Member
 
Posts: 12420
Images: 515
Joined: Tue Jan 16, 2007 1:44 pm
Top

Postby RAYVILLIAN » Sun Aug 08, 2010 8:24 pm

Yeah CD I know that's why I'm planning on concentrating on the out side and working on the cabinets later. I hope to at least have a shell to sleep in that will keep me dry. :lol:

Gary
Where ever we raise the hatch is home.
Darn blank states keep getting further away and we keep traveling slower ain't never gona get this map full.
111961Image
User avatar
RAYVILLIAN
Lifetime member
 
Posts: 1434
Images: 109
Joined: Thu Aug 05, 2004 9:33 pm
Location: Rayville MO
Top

Postby Miriam C. » Sun Aug 08, 2010 8:50 pm

:applause: :thumbsup: A month to water proof and a month to sit around and congratulate yourself. ;)
“Forgiveness means giving up all hope for a better past.â€
User avatar
Miriam C.
our Aunti M
 
Posts: 19675
Images: 148
Joined: Wed Feb 15, 2006 3:14 pm
Location: Southwest MO
Top

Postby starleen2 » Mon Aug 09, 2010 7:37 am

Makin' some good progress so far - it's really taking shape now :thumbsup:
User avatar
starleen2
5th Teardrop Club
 
Posts: 16272
Images: 224
Joined: Sat May 12, 2007 8:26 pm
Location: Pea Ridge ,AR
Top

Postby Nathan N » Mon Aug 09, 2010 6:54 pm

Gary,
How tall is that front box? I went back and read where it will be hinged on top.... You toting a ladder around to get up there? Maybe standing on the tongue it isn't that tall.

Looks interesting, looking forward to seeing it in person some day.
:thumbsup:

Nathan
User avatar
Nathan N
Lifetime member
 
Posts: 587
Images: 153
Joined: Mon Mar 24, 2008 6:55 pm
Location: mid-Missouri
Top

Postby starleen2 » Mon Aug 09, 2010 7:07 pm

just a thought. . . perhaps a side door on the box? that would eliminate the hinge issue, but would also mean another door on the side :thinking:
User avatar
starleen2
5th Teardrop Club
 
Posts: 16272
Images: 224
Joined: Sat May 12, 2007 8:26 pm
Location: Pea Ridge ,AR
Top

Postby RAYVILLIAN » Tue Aug 10, 2010 5:14 pm

Nathan the tongue box is 47" at the back and 36" at the front that's measured from the tongue so I have to stand on the tongue to get in it. But it's big enough that I could hide in it. That might be where I sleep if Trudy gets mad at me. :lol:

Starleen I'm probably going to put a door on both sides to get in the bottom but not right now I'm trying to keep as simple as I can to get it done then I'll start finishing suff. Sooner of later there will be a AC in there but that will probably be this winter after they go on close out.

Gary
Where ever we raise the hatch is home.
Darn blank states keep getting further away and we keep traveling slower ain't never gona get this map full.
111961Image
User avatar
RAYVILLIAN
Lifetime member
 
Posts: 1434
Images: 109
Joined: Thu Aug 05, 2004 9:33 pm
Location: Rayville MO
Top

Postby starleen2 » Tue Aug 10, 2010 5:22 pm

Gary - why hinge it at all if you're going to have doors in the side anyways? If the premise of the tongue box is for the A/c unit then why not put a gasket around the perimeter of the top and bolt the top on - that way you can remove it when needed to get to the really big stuff that might need servicing. At the top - perhaps insert a flange to over lap the seam at the roof line to allow water to passover without getting into the tongue box :thinking:
User avatar
starleen2
5th Teardrop Club
 
Posts: 16272
Images: 224
Joined: Sat May 12, 2007 8:26 pm
Location: Pea Ridge ,AR
Top

PreviousNext

Return to Build Journals

Who is online

Users browsing this forum: 2004harleyguy and 10 guests