Teardrops n Tiny Travel Trailersor t n ttt for short (tnttt.com) |

silver spaceship
![]() by Cliffmeister2000 » Wed Aug 11, 2010 1:26 pm
by Cliffmeister2000 » Wed Aug 11, 2010 1:26 pm
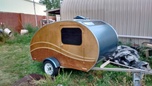
Do you have a photo from the inside of the Stargazer Skylight open? Does it open far enough to see the stars when you are laying down?
-

Cliffmeister2000 - Titanium Donating Member
- Posts: 3622
- Images: 157
- Joined: Thu Jul 26, 2007 10:18 pm
- Location: Phoenix, AZ
![]() by R. W. Alexander » Thu Aug 12, 2010 9:18 am
by R. W. Alexander » Thu Aug 12, 2010 9:18 am
Cliffmeister2000 wrote:Do you have a photo from the inside of the Stargazer Skylight open? Does it open far enough to see the stars when you are laying down?
You be the judge. I am going to add another 6 inches to the side bars that hold the awing up. So the awing for the Stargazer will be 30 inches plus from the closed position.
-
R. W. Alexander - Teardrop Master
- Posts: 108
- Images: 77
- Joined: Wed Jun 02, 2010 9:45 am

 I had the same question; but it sure looks great from here.