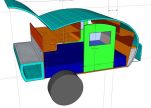
Time to document the galley improvements

This is what the Justintime galley looked like when we took the first trip.
The hatch was not quite stiff enough, so I added a couple of blocks to help.
We got sooooo lucky with this
 Formica "Spectrum Blue" is pretty close to the body color.
We weren't even thinking about the galley counter-top when we picked the body color.
Cutting the laminate.
Top shelf
Bottom shelf with the rubber trim on the face frame
Sorry about the dark pictures.......a light went out and I hadn't fixed it yet.
Wiring for the taillights, marker lights and license plate had to go in before the galley storage box is finished.
Replaced the hideous AutoZone trailer lights (seen in the first picture today) with nice LED lights.
Something is not right here......quick call to the eBay seller (R&P Carriages), and a new one was on the way.
Of course now I needed new side marker lights.
They don't *quite* match the tails....(angular vs. round) but they look nice and you don't really notice the mis-match.
Galley storage box lined with carpet.
Hot water heater, chairs, screen tent, and lots of extra room.
The plan is to open this up first thing when setting up camp, then not needing to get into it until it's time to pack up to leave.
Only "long term storage" stuff in this area.
Battery moved from the tongue box to the rear to help balance.
Blue Sea Systems automatic battery switch and a disconnect.
The auto switch is pretty nice, it works like an isolator. When it senses charge, it will close the switch to both batteries. When is senses a discharge, it will open the switch to isolate the batteries.
Counter-top with flush hinges and lift handle (edges taped cause I was painting the bottom)
Sorry about the dark picture, this was taken the same day the light burnt out. The block at the top / front of the hatch is for the lift handle, it's thicker than the 1/4" plywood that I used for the hatch.
The hinges and lift handles caused me no end of trouble....they were cast pieces, so I had to make templates to match what they are shaped like.......more than a few days were spent making templates and cutting test pieces before I cut the laminated hatches.
Still didn't get a perfect fit....but it's not as bad as the picture shows.
Custom hatch props next!!
More later,
Lee