Travel trailer with slide out build

...ask your questions in the appropriate forums BUT document your build here...preferably in a single thread...dates for updates, are appreciated....

Postby droid_ca » Fri Sep 09, 2011 8:04 pm

wow looks good enough to move in
There is a world, just beyond now,
where reality runs a razor thin seam between fact and possibility;

Anywhere I roam where I lay my head is home....
Image
“Fide Canem”
Please check out my build thread
viewtopic.php?f=5&t=52816
User avatar
droid_ca
Donating Member
 
Posts: 1981
Images: 176
Joined: Thu Sep 30, 2010 5:08 am
Location: Prince George BC Canada

Postby Dmanrick » Fri Sep 09, 2011 9:18 pm

Yeah but it is awful small. :)

Thanks!
Dmanrick
Gold Donating Member
 
Posts: 65
Joined: Tue Sep 14, 2010 8:42 pm

Postby Dmanrick » Sun Sep 11, 2011 8:32 pm

OK We are getting close.

Here's the update for this weekend. Not seemingly a whole lot but we built 2 cabinets and they both kicked my butt. One is finished and the other is still a work in progress.


First of all the window coverings for the slideout.

Image

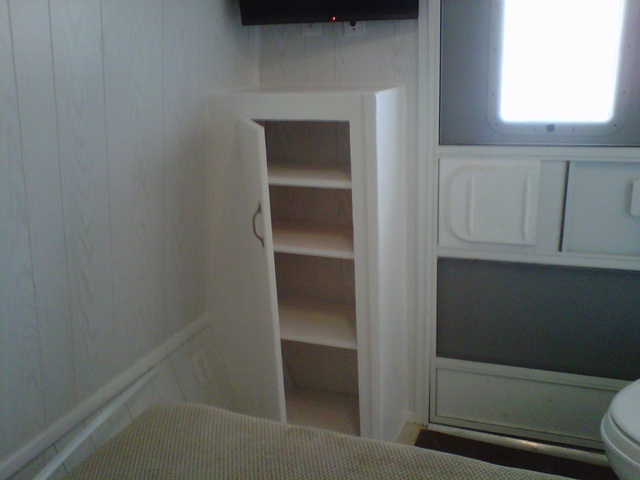
Then mama brought it to my attention that we had no where to put our clothes. Now we do. With the slide out, we have 36" between the foot of the bed and the opposite wall so there is plenty of room for something in that corner. This thing was extremely difficult because of the angled walls. I spent most of the day Saturday on it. The best thing about this is the main room and the kitchen are 100 percent done. Except for cleaning up everything but I am finished with it anyway. :)

Another good thing about this is it will double as the dvd player stand.

Image


Image

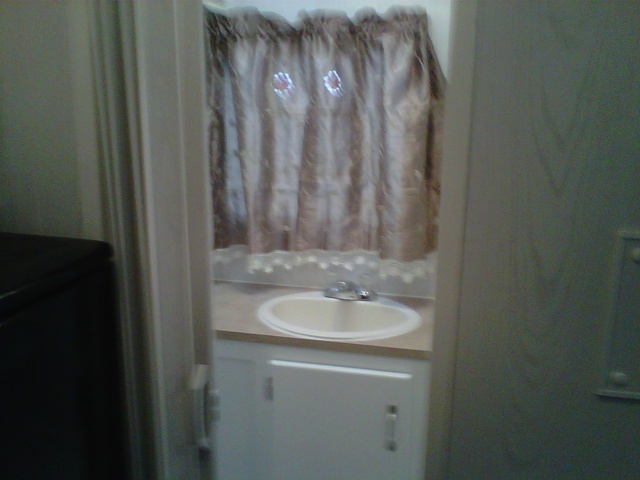
Today I started on getting the bathroom finished. Here is the "almost finished" cabinet for the sink. This one took most of the day today. I had to go around the hot water heater, accommodate for all of the plumbing and wiring and make a space under the lower shelf for the power cord to slide into. Thank God for caulk. Caulk is my friend. :)

Image


Image

I also got the light switch in there and the wall and paneling under the tub edge installed. I made it to where it unscrews if I ever need to get under there. I left a 2" gap between the tub and the counter because we are going to use a shower curtain with an inner and outer layer and that way it will slide right in there all nice and cozy. :)

Image

Here's a better picture of the hot water heater. It is just an under the sink model and it only holds like 3 or 4 gallons but it is enough to take a shower. Just not a long one. :)

Image

And here is the toilet just sitting there. It is not installed, that will probably be the last thing I do in there. That way I can get all of the trim and everything done without having to work around it. I will tell you that this bathroom is not made for a large person at all.

Image
Dmanrick
Gold Donating Member
 
Posts: 65
Joined: Tue Sep 14, 2010 8:42 pm
Top

Postby pjo129 » Mon Sep 12, 2011 4:04 pm

Super nice job! There are definitely some ideas I can glean from your build. Thanks for the detailed documentation.
Pete Olson
Newburgh, IN

"Patrol Box" camper build thread http://tnttt.com/viewtopic.php?f=50&t=55583

It's only dumb if it doesn't work.
User avatar
pjo129
Teardrop Master
 
Posts: 264
Images: 73
Joined: Wed Aug 31, 2011 9:59 am
Location: Newburgh/Evansville, Indiana
Top

Postby campmaster-k » Mon Sep 12, 2011 5:36 pm

Very nice work. Has anyone done a slide out on a teardrop?
-Kirk

>TnTTT ORIGINAL 200A LANTERN CLUB

>CEO Coleman Recovery Inc.

>Nor Cal Camping Pinewood Racing Team


Build thread -

viewtopic.php?t=45307&postdays=0&postorder=asc&start=180

Check out my Pictures -

http://s1199.photobucket.com/albums/aa4 ... 0QQtppZZ24
User avatar
campmaster-k
Lifetime member
 
Posts: 3030
Images: 17
Joined: Fri Jun 17, 2011 5:02 pm
Location: Colusa, California
Top

Postby Dmanrick » Mon Sep 12, 2011 5:58 pm

Thank y'all. And I have seen pictures of 1 teardrop with a slide out. I don't remember where but I think it was on this forum.

Well today was ok. I didn't have a lot of work so I got some more done on the trailer.

I finished the sink cabinet including all of the painting and I got the countertop made. It is just sitting on there right now.

Image

I also built an overhead cabinet above the toilet for towels and stuff. It needs one more coat of paint and the doors mounted. I even wired it in for an undercabinet light. Since the window is directly behind the sink, we are going to put a mirror under that cabinet.

Image


Image

The gfci outlet is thicker than my shallow box that I put in so I made a spacer for it.

Image

I got the 3 cabinet doors made and a couple of coats of paint on them. One more coat in the morning and they will be ready to hang tomorrow. The opening above the hot water heater does not take a door. It is just a place to store magazines, extra tp and stuff.

Image
Dmanrick
Gold Donating Member
 
Posts: 65
Joined: Tue Sep 14, 2010 8:42 pm
Top

Postby crumbruiser » Mon Sep 12, 2011 7:00 pm

You are doing a fantastic job! :thumbsup:
Frank
I am not weird, I am a Limited Edition.
Facebook http://www.facebook.com/profile.php?id=100000303236631
User avatar
crumbruiser
Teardrop Master
 
Posts: 267
Images: 255
Joined: Sun Jul 10, 2011 6:11 pm
Location: Central Ohio
Top

Postby CarlLaFong » Mon Sep 12, 2011 10:12 pm

"The opening above the hot water heater does not take a door."

Why would you want to heat hot water :lol:
Sorry, just another of my pet peeves, like ATM machine :?
http://jkcallin.blogspot.com/
"As I wandered, alone, through the endless fields of corn, I could hear the crows. They seemed to mock me, calling out my name, over and over", said Cawe
User avatar
CarlLaFong
500 Club
 
Posts: 701
Images: 5
Joined: Wed Jul 06, 2011 9:51 pm
Location: Sunny SoCal
Top

Postby Dmanrick » Tue Sep 13, 2011 7:48 am

crumbruiser, thanks!

CarlLaFong - good to know. :)
Dmanrick
Gold Donating Member
 
Posts: 65
Joined: Tue Sep 14, 2010 8:42 pm
Top

Postby Dmanrick » Tue Sep 13, 2011 6:34 pm

Today I actually had to work and when I got home it was 102 outside so I am not into it but we did get a little done.

Mama got the last coat of paint on the trim, cabinets and ceiling so I went to work on the other stuff. Please excuse the blurriness of a couple of the pics. They are off my cell phone and I didn't realize they were blurry until I downloaded them and it's just too hot to go back out there.

Also it is hard to get back far enough in that little bathroom to get much in the picture at all.

First I got the countertop all caulked and the sink installed. I still need to hook up the feed lines and I am waiting on the drain to get here. I also hung the curtain.

Image

I got the doors put together and installed as well as the under shelf light.

Image


Image

I got the shower surround trim installed and a little of the caulking around it but I still have quite a bit of that left to do.

Image


Image


Image

I got the shower curtain rod hung. It folds out when you are in there and folds in when you aren't. I don't know if mama wants to tie the outer curtain back or not. That is her choice. I just do what I am told. It is just hanging for now.

Image


Image


Image


Image
Dmanrick
Gold Donating Member
 
Posts: 65
Joined: Tue Sep 14, 2010 8:42 pm
Top

Postby S. Heisley » Wed Sep 14, 2011 8:56 pm

Beautiful job on the bathroom. I'm jealous....Wanna trade it for a Luggable Loo? :lol:

LOVE the folding shower curtain rod! :thumbsup:
User avatar
S. Heisley
Super Lifetime Member
 
Posts: 8866
Images: 495
Joined: Mon Sep 17, 2007 10:02 am
Location: No. California
Top

Postby Dmanrick » Wed Sep 14, 2011 9:03 pm

LOL Thanks and that wouldn't bother me a bit but the wife, that's a different story.

I got the bathroom finished today. Except for the sink drain. That is on order.

I got the toilet installed, the mirror installed and the tub surround all caulked. No pics though.

Now to do the finishing touches on the outside. I got the trailer light wires all ran as well as the brake wires all ran. All that is left to do is to put the wiring connector on there, the safety chains and do a little plumbing.

Oh yeah, I need to install the decals on the left side and the back and build a back bumper.

Then we will be ready.
Dmanrick
Gold Donating Member
 
Posts: 65
Joined: Tue Sep 14, 2010 8:42 pm
Top

Postby Dmanrick » Thu Sep 15, 2011 6:38 pm

Here are the last couple of pictures of the bathroom. Not much to see, just the mirror and the toilet.

Image

Image

I got the stripes on the left side and took it for a test spin to check the brakes. They worked fine and it pulled good up to a little over 60. I couldn't get it no faster than that on the road I was on but if that's all it will go that is fine with me.

Here it is attached to my 4 runner.

Image

I didn't put a black water tank in, here is what I am going to use for that. I had the same setup on a popup I used to have and it worked good so I don't anticipate any problems with this one.

Image
Dmanrick
Gold Donating Member
 
Posts: 65
Joined: Tue Sep 14, 2010 8:42 pm
Top

Postby Dmanrick » Mon Nov 28, 2011 11:08 am

Well we finally took it out for the first time over Thanksgiving and just about everything was a complete success. Actually the only thing that wasn't great is the 4 Runner got horrible gas mileage while pulling it. It tracked and pulled great but the 4 Runner might be a little small for it with the 6 cylinder in it.

Other than that and we almost lost a piece of trim on the slide out going down the road, everything was good.

Here is a picture of the front platform I threw together for the blue tank.

Image

Here are a couple of pictures of it set up at the campground.


Image


Image
Dmanrick
Gold Donating Member
 
Posts: 65
Joined: Tue Sep 14, 2010 8:42 pm
Top

Postby Dmanrick » Mon Nov 28, 2011 11:18 am

Now for the list of stuff I would do differently if I was to do it again.

I would use an acme rod to screw the slide out in and out instead of a coarse threaded rod. It would go in and out faster but that's not really that big of a deal.

If I were to mount the walls on top of the floor like I did this one, I would install the paneling after the walls were already screwed down. This would have saved me a ton of work. Screwing the walls down with the paneling on there cause the paneling to buckle a lot. I had to take it all off and reinstall it once it was up.

I would make the siding from 14" material instead of 24". I believe that would look way better because with such a large span, you can see some waves but they are not too bad.

I would have used a crank up antenna instead of the dish that I bought.

I would have rounded the top of the front side as to not catch so much wind going down the road. It is angled but it still catches a lot of wind.

I would have put a light in the cargo department.

Other than that I can't think of too much I would do differently.

Thanks for all of the kudos and also for all of the ideas and motivation I got from this site.

Happy camping!
Dmanrick
Gold Donating Member
 
Posts: 65
Joined: Tue Sep 14, 2010 8:42 pm
Top

PreviousNext

Return to Build Journals

Who is online

Users browsing this forum: Bing [Bot] and 16 guests