It's just about one year since we started this project, i.e. last June I started ordering tools and stuff. I didn't actually start making sparks and sawdust until early July, if I recall correctly. We were ambitious. We made plans for autumn camping in the teardrop, LOL. Last autumn!

So incremental progress continues to be made. I made reading lights, and painted them blue. Ultramarine blue, beautiful and deep. It's very transparent however, so you need lots of layers-- most of the blue trim I'm making gets several coats of white primer-- as many as it takes to build a thick, smooth surface-- then five or six coats of ultramarine blue. It's artist's acrylic, mixed with matte medium and thinned with water, so I can get two or three coats on each day, but it's still slow going. I'm using this color on the cabinet turnbuckles and most other trim, too. The reading lights are fixed, not adjustable, but they project over our shoulders like the lights on airplanes, and they're quite bright. Wiring these, I learned that polarity counts with LEDs-- you can't just stick them in series willynilly like incandescent bulbs. Who knew? Much grumbling and rewiring occurred.


Work continued on the galley.

Earlier I complained that the JET cheapo combo jointer/planer I bought was more aggravation than it was worth, but noted that I did make some nice drawer fronts with it. I needed some 1/4 in. cherry slats for the galley, and the JET did a great job on them. This was the second job I used the JET on. Here's the pics, but don't be fooled into thinking this is a worthwhile machine.


Looks good, huh? I thought so too, but the THIRD time I used it some chip accumulation on the planer bed caused one of the bolts used to secure the dust collector nozzle to push upward INTO THE ROTATING KNIVES, shearing a quarter inch from the bolt and trashing the knives, which will need to be replaced before the fourth time this machine gets used. I think it has a date with Craigslist. Admittedly, the user's manual does caution against allowing any chips to accumulate there, but every user's manual contains similar cautions. I would never have guessed that those bolts are unsecured just millimeters from the rotating cutters, and a quarter inch of sawdust and shavings would push them into the knives. Who would design a machine in which such a thing could happen?

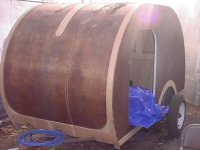
We taped the trailer up and CPES'd it with magic anti-moisture juju. It took a gallon of CPES and some other fluids to complete the job. Man I'm glad I did this outdoors!


When the solvent smell was mostly dissipated I followed the CPES with oil-based primer in the galley. Eventually there will be some other color on those walls, but now it's primer white.

Gluing the face frame on a galley cabinet on the last drizzly day of the year (knock on wood!). I had to move it inside on the floor and off the deck.

Kathy padded two coats of polyurethane spar varnish over all the interior surfaces, which had all been finished but buffed dull in preparation for a final finish.


I built a thingy for the galley. I really have some purpose envisioned for this thing, like holding spices and long handled implements in the galley, but it will likely be repurposed as the Tequila Shrine. Kathy made only one single design demand-- the teardrop trailer must have a place to carry a bottle of fine tequila, for emergencies or breakfast as the case may be. Breakfast tequila is a fine camping tradition. You don't want to do it all day, but nothing gets you out of bed like a hot cup of coffee and a shot of tequila. Anyway, what follows is a bunch of construction pics. I had a lot of fun building this thing. The basic structure is half inch baltic birch ply, the face pieces are maple, and the slats for keeping stuff on the shelves are cherry, cut from the heartwood/sapwood transition, a piece that would ordinarily have a hard time finding a use. I think it works nicely here.
Dry fitting:

Gluing and such:


Tired of that yet? Don't worry, you'll see it some more.
Futzing with the galley layout-- oops, need some more primer behind those open bins! I finally got the draw pulls installed!

Attaching the lower tier of drawers, for good or worse-- these have laminate on top:

Working on the rest of the galley components:


I've made more progress this last week, but Kathy's visiting grandkids in Texas and has the camera, so more pics will have to wait for the next update.
It's proving quite a challenge to find outer skin material locally. That's the next big hurdle! Thanks for watching!
--Mike C.
If it isn't broke, perhaps a more expensive tool is required to break it....