silver spaceship

...ask your questions in the appropriate forums BUT document your build here...preferably in a single thread...dates for updates, are appreciated....

Re: Hatch outside molding

Postby R. W. Alexander » Fri Aug 20, 2010 2:29 pm

Rlowell wrote:This build just gets better and better. :applause:
Can you tell me how you applied that hatch molding and it's dimensions. That is the type that I want to use on my weekender rather than cutting out the ridge on the walls.
Thanks.
Rod


I got some adhesive backed D molding 5/8" tall by 1 1/4" wide from Mcmaster Carr. Item # 1142A82. Just peel off and stick it to the edge of the plywood.

http://www.mcmaster.com/#door-weatherstripping/=8hm9bl
User avatar
R. W. Alexander
Teardrop Master
 
Posts: 108
Images: 77
Joined: Wed Jun 02, 2010 9:45 am

Maiden trip

Postby R. W. Alexander » Tue Aug 24, 2010 3:50 pm

We took off for Yellowstone and Grand Teton Parks this past weekend. They are about a 5 hour drive from our home. We did 600 miles in cold raining conditions. The gaskets in the front and rear areas of the Tear Drop kept out all rain water and water from the towing vehicle. At night the insulated walls kept most outside noise from entering. The insulated walls kept us nice and warm also. We had more than enough room and storage for both of us. The stargazer window was not used due to the rain, but for ventilation it worked great. 8)

Overall the tear drop exceeded my expectations :thumbsup: in most areas.
I will fine tune these areas in my next build.
They will be
1. No need for front storage area next to top of bed. Small storage shelf in corners next to and above head of bed.
2. Eliminated lower storage area at bottom of bed and increase size of upper storage shelf by 6 inches.
3. Increase galley height by 3 inches to allow for stackable plastic storage bins

The first night of our trip the weather was cold winds and rain. We were in our Tear Drop listening to the rain hitting the aluminum skin on the top of the trailer.
We were warm, dry, and happy. Since we knew the next morning, we would not be putting away wet camping gear. 8)

P.S. It took us less than 20 minutes from the time we got out of our Tear Drop to be on the road to our next destination.


Image
User avatar
R. W. Alexander
Teardrop Master
 
Posts: 108
Images: 77
Joined: Wed Jun 02, 2010 9:45 am

Postby AJP » Tue Aug 24, 2010 3:52 pm

What a beautiful teardrop. If you don't mind me asking what did you spend on her total?
AJP
Teardrop Inspector
 
Posts: 18
Joined: Sun Jul 25, 2010 7:15 pm
Top

Postby Ratkity » Tue Aug 24, 2010 3:56 pm

GORGEOUS!! Yay for a great maiden voyage!

Hugs,
Ratkity
Ratkity
Gold Donating Member
 
Posts: 1065
Images: 0
Joined: Wed May 26, 2010 1:01 pm
Top

Postby R. W. Alexander » Tue Aug 24, 2010 4:03 pm

AJP wrote:What a beautiful teardrop. If you don't mind me asking what did you spend on her total?


I need to go through all my expenses but around $2200- $2700. I would have been more, but I had lots of extra stuff from other projects that I took material from to build this tear. :thinking:
User avatar
R. W. Alexander
Teardrop Master
 
Posts: 108
Images: 77
Joined: Wed Jun 02, 2010 9:45 am
Top

Postby AJP » Tue Aug 24, 2010 4:05 pm

R. W. Alexander wrote:
AJP wrote:What a beautiful teardrop. If you don't mind me asking what did you spend on her total?


I need to go through all my expenses but around $2200- $2700. I would have been more, but I had lots of extra stuff from other projects that I took material from to build this tear. :thinking:


Thank you, the price to make a beauty like this is why I haven't done it yet. I have a 21' Travel Trailer that I paid $2500 for and it is in perfect condition with a shower and a toilet. I really want a tear to tow with the car but was hoping to spend 800-1000.
AJP
Teardrop Inspector
 
Posts: 18
Joined: Sun Jul 25, 2010 7:15 pm
Top

Postby planovet » Tue Aug 24, 2010 5:23 pm

The first trip is always the one you remember the most. :thumbsup:
ImageMark (& Cindi)
Visit our website: Little Swiss Teardrop

I was wondering why the water balloon was getting bigger... and then it hit me.

ImageImageImageImage
User avatar
planovet
The Cat Man
 
Posts: 5583
Images: 3
Joined: Tue Nov 27, 2007 4:48 pm
Location: Plano, Texas
Top

Postby aggie79 » Wed Aug 25, 2010 8:15 am

R.W.,

Excellent build and beautiful pictures of your first outing!

Tom
Tom (& Linda)
For build info on our former Silver Beatle teardrop:
Build Thread

93503
User avatar
aggie79
Super Duper Lifetime Member
 
Posts: 5405
Images: 686
Joined: Tue Aug 07, 2007 5:42 pm
Location: Watauga, Texas
Top

Postby S. Heisley » Wed Aug 25, 2010 9:01 am

Congratulations on your first trip in your own personal and unique teardrop. You've added some very nice features, with the star gazing hatch and the oval cubby and matching shape etched window above it. Enjoy Yellowstone! :vroom: :thumbsup: :applause:
User avatar
S. Heisley
Super Lifetime Member
 
Posts: 8867
Images: 495
Joined: Mon Sep 17, 2007 10:02 am
Location: No. California
Top

Postby green_eyed_diablito » Wed Aug 25, 2010 11:05 am

i've been away from the site for a while so i'm just now getting acquainted with your build. the words "wow" and "awesome" come to mind! it's a great design that looks vintage, but it has a modern subtlety. the artist in me appreciates the attention to paid to detail...down to the license plate bracket!

and the engineer in me appreciates your construction methods. i would love a cutter like yours! because of the dovetails, your TD is going to outlive us.

kudos to your excellent build.

-miguel
Since this life here and now is all we can know, our most reasonable option is to live it fully.
ImageImage
User avatar
green_eyed_diablito
Teardrop Master
 
Posts: 226
Joined: Tue May 12, 2009 1:17 pm
Location: Los Angeles, CA
Top

Cleaning up the aluminum skin

Postby R. W. Alexander » Thu Sep 02, 2010 10:09 am

Thanks to everyone's comments in the preceeding posts(I don't know how to do the multi quote thing, and thank everyone with one post)


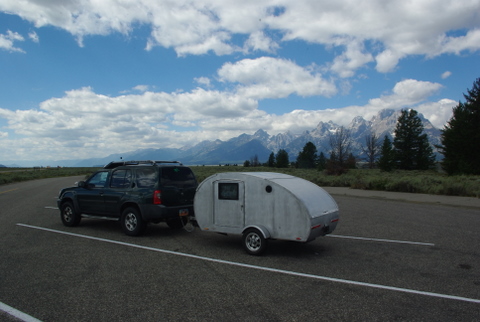
After we did some camping in the Tear Drop, I needed to fix the aluminum skin. There were scratch marks and stains that needed to be cleaned off. I did a acid wash with a weakened solution of Muratic acid. That was not a good idea. I wound up with more stains than what I had at first.

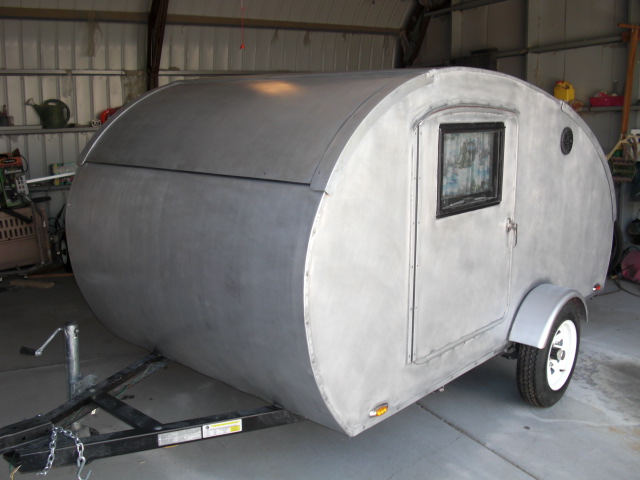
In this photo you can see where the acid concentrated below the rear galley vent.

Image

This was how I got rid of the marks and stains. I started with a 120 grit aluminum oxide sand paper and my 1/4 sheet palm sander. Then I used a 180 grit sandpaper, and then a green scotch brite pad. I then used the same green scotch brite pad and did some final hand sanding in a circular pattern. By doing the final sanding by hand, I can blend in future scratches in with just the green scotch brite pad and avoid using the 120 and 180 grit steps (unless it's a big scratch or mark). By having lighter and heaver areas of sanding on the skin, and random circular patterns it beaks up most of the areas on the aluminum and hides most of the imperfections.
I then cleaned off the aluminum skin and applied a coat of mineral oil.

Image

The aluminum skin is not a maintenance free covering for Tear Drops, but with a few hours each year after the camping season, it is pretty close.The major re- doing the skin on this tear took me about 8 hours to do.

My next posts will probably be about Silver Space ship #2, which is in the design phase right now. I will be 200 lbs lighter, with the use of fiberglass instead of wood, and a lighter metal frame. (I really overbuilt the trailer frame on this build).
User avatar
R. W. Alexander
Teardrop Master
 
Posts: 108
Images: 77
Joined: Wed Jun 02, 2010 9:45 am
Top

Re: silver spaceship update 9/.2/2010, aluminum cleanup

Postby R. W. Alexander » Fri Sep 13, 2013 5:07 pm

Well it's been 3 years for the Silver Spaceship. I have been :D happy with it... but once you build one you want to build another. I plan on building the same size of teardrop but will do it with foam board laminated with wood veneer both sides , then covered with fiberglass mat and a clear epoxy coating, then a automotive clear coat finish on the outside. I am still looking at reducing the weight. Not that I really need to... (The one I have now tows great behind the car) It's just that I want to improve :twisted: on the design. I will sell the one I have and work on my new one during the winter and have it ready for 2014. It's going to be fun!!
User avatar
R. W. Alexander
Teardrop Master
 
Posts: 108
Images: 77
Joined: Wed Jun 02, 2010 9:45 am
Top

Re: silver spaceship update 9/.2/2010, aluminum cleanup

Postby Cliffmeister2000 » Sat Sep 14, 2013 2:31 am

Can't wait to see what you do, and how you do it! :thumbsup:
God Bless

Cliff

♥God. ♥People.
1 John 4:9-11

My Teardrop build pictures
User avatar
Cliffmeister2000
Titanium Donating Member
 
Posts: 3622
Images: 157
Joined: Thu Jul 26, 2007 10:18 pm
Location: Phoenix, AZ
Top

Re: silver spaceship update 9/.2/2010, aluminum cleanup

Postby Junkboy999 » Sat Sep 14, 2013 10:25 pm

Read through your whole build log tonight. Nice TD. The front screen skylight is a nice idea. Love to see what you plan next.
User avatar
Junkboy999
1000 Club
1000 Club
 
Posts: 1259
Images: 52
Joined: Fri Jul 06, 2012 9:18 pm
Location: Wichita, KS
Top

Previous

Return to Build Journals

Who is online

Users browsing this forum: No registered users and 17 guests