The Dog House *It's done!!!! 6/20/2015"

...ask your questions in the appropriate forums BUT document your build here...preferably in a single thread...dates for updates, are appreciated....

Postby jss06 » Sun Aug 14, 2011 1:58 pm

Finished the floor in the galley, It is now a blank canvas ready for that project later down the road.

Image

Started assembling the rear hatch.

Image

While that glue was drying I continued to work on the doors. Cut out the window and latch openings.

Image

Here is a shot of the interior door framing. This will all be covered up never to be seen again. I will probably have to message the window opening a little bit to make sure the outside frame of the window does not interfere with the latch.

Image
Last edited by jss06 on Tue Jun 16, 2015 9:00 pm, edited 1 time in total.
User avatar
jss06
Palladium Donating Member
 
Posts: 663
Joined: Mon May 12, 2008 7:48 pm
Location: Carrollton, TX

Postby stomperxj » Tue Aug 30, 2011 12:14 pm

John-
I can't believe i have missed this build up until now... Great job so far. I'm glad you could get some inspiration from the Sawtooth XL :)

I like your tongue box and all your wire routing. Looks great :thumbsup:
User avatar
stomperxj
The 300 Club
 
Posts: 395
Images: 1
Joined: Tue Jul 29, 2008 12:25 am
Location: Kuna ID

Postby kinto » Tue Aug 30, 2011 12:56 pm

yeah... i hadn't noticed your build til just now, but man that thing looks SLICK!!!

fantastic design! :thumbsup:


kent
:)
Is a hippopotamus just a really cool opotamus?

imay ildbay urnaljay

Image
User avatar
kinto
Gold Donating Member
 
Posts: 228
Images: 465
Joined: Tue Jul 19, 2011 10:20 am
Location: STL
Top

Postby ohbugger » Tue Aug 30, 2011 1:57 pm

I agree. Fantastic build. I love the sawtooth look. I dig the modern angular design. Looks like it is built really well also!
Last edited by ohbugger on Thu Sep 29, 2011 2:01 am, edited 1 time in total.
- Erik -
User avatar
ohbugger
Teardrop Master
 
Posts: 132
Joined: Wed Aug 17, 2011 3:51 pm
Location: Burien, WA
Top

Postby David S » Tue Aug 30, 2011 10:51 pm

John, I really like the way your profile looks with the Jeep.
Your build looks really thought out :thumbsup: Dave.
User avatar
David S
Donating Member
 
Posts: 218
Images: 53
Joined: Wed Aug 05, 2009 9:18 pm
Location: Rose Hill Kansas
Top

Postby jss06 » Sun Sep 11, 2011 8:42 pm

Its been a while since I posted an update.

Finished the doors and the interior door sealing surface.

Image
Image

The door opening from the inside.

Image

I finished the sealing surfaces for the front and rear hatches. The rubber seals will run along the edges and keep water out. Any water that gets in the gap will run off to the sides of the channels. I am finally ready to finish priming the body and apply the top coat.

Front:

Image

Rear:

Image

Finished building the rear hatch. It is prewired for the lights and ready for paint.

Image

There are openings in the inside so I can connect the wiring to the lights.

Image

Finally, I needed a hande to help lift the rear hatch. I had an old 2x4 laying around. Cut out the basic shape. Rounded the edges with a 1/2 round over bit in my router and finished it up with some hand sanding.

Image
Last edited by jss06 on Tue Jun 16, 2015 9:01 pm, edited 1 time in total.
User avatar
jss06
Palladium Donating Member
 
Posts: 663
Joined: Mon May 12, 2008 7:48 pm
Location: Carrollton, TX
Top

Postby aggie79 » Mon Sep 12, 2011 8:54 am

Very nice John! :thumbsup: :applause: :thumbsup:

You're moving along. (Hasn't this cooler weather been a welcome change from the oppressive heat?)

I think you're getting close to being campable. Are y'all going to make the LCG gathering?

Take care,
Tom
Tom (& Linda)
For build info on our former Silver Beatle teardrop:
Build Thread

93503
User avatar
aggie79
Super Duper Lifetime Member
 
Posts: 5405
Images: 686
Joined: Tue Aug 07, 2007 5:42 pm
Location: Watauga, Texas
Top

Postby jss06 » Mon Sep 12, 2011 9:36 am

I am hoping to have the shell finished by this weekend. I am on staycation for 2 weeks. So it will be campable before I go back to work.

Of course, I have to replace my irrigation controller now and take my Jeep in for a leaking tranmission line. So that will eat into my time.

And it's supposed to 103 tomorrow. One last gasp of the blast furnace that has been our summer.
User avatar
jss06
Palladium Donating Member
 
Posts: 663
Joined: Mon May 12, 2008 7:48 pm
Location: Carrollton, TX
Top

Postby jss06 » Tue Sep 13, 2011 5:04 pm

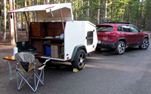
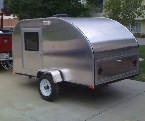
YAY! Major construction is finished.... for now :D

Spent yesterday and today building the hatch for the tongue box.

I really do love this work bench my wife got me.. The hatch set up in the vices for glueing and sanding.

Image

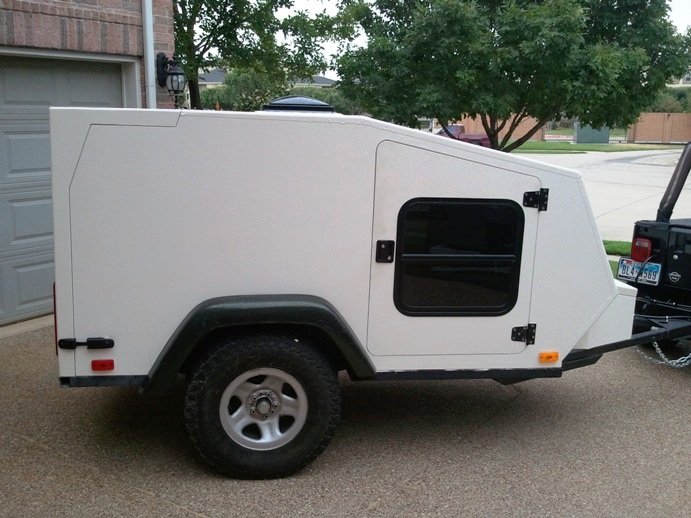
This is the same thickness as the walls of the rest of the trailer.

Image

Then it was on to test fiting and sanding.

Image
Image

And Finally I am ready to prime everything and get ready for the top coat. I have been waiting for this day for a LONG time. The top coat is the same color as the primer so this is what it will look like when it is complete.

Image

The hatch is primed inside the garage sitting on my table saw.

Of course I still have to install the trailer harness to connect to the Jeep, the brake controller in the Jeep, build the interior cabinets and the galley. But at least it will be campable after the top coat is done and all the hardware is installed. :cry:
Last edited by jss06 on Tue Jun 16, 2015 9:02 pm, edited 1 time in total.
User avatar
jss06
Palladium Donating Member
 
Posts: 663
Joined: Mon May 12, 2008 7:48 pm
Location: Carrollton, TX
Top

Postby jss06 » Thu Sep 22, 2011 4:23 pm

Finally, It is usable. Finished up the hatches, installed the doors, door hardware, latches for the hatches, trailer lights, vent fan, battery, AC wiring and most of the DC wiring. It tows vey smooth even at highway speeds.

Took it in to get an official weight certificate. The little piggie weighs in at 1240 lbs. as she sits. It's going to weigh close to 1600 lbs. loaded for camping. Still have to build out the galley, interior cabinets and install the air conditioner.

Here are the finished exterior pics:

Image
Image
Image
Image
Last edited by jss06 on Tue Jun 16, 2015 9:03 pm, edited 1 time in total.
User avatar
jss06
Palladium Donating Member
 
Posts: 663
Joined: Mon May 12, 2008 7:48 pm
Location: Carrollton, TX
Top

Postby Robbie » Thu Sep 22, 2011 5:02 pm

That looks awesome! I must have missed it if you mentioned it before, but what did you use as the final exterior finish?
My aluminum benroy build:
viewtopic.php?t=45640
User avatar
Robbie
Teardrop Master
 
Posts: 250
Images: 86
Joined: Tue May 10, 2011 11:28 am
Location: West Jordan, UT
Top

Postby jss06 » Thu Sep 22, 2011 5:45 pm

Robbie wrote:That looks awesome! I must have missed it if you mentioned it before, but what did you use as the final exterior finish?


Liquid Roof
User avatar
jss06
Palladium Donating Member
 
Posts: 663
Joined: Mon May 12, 2008 7:48 pm
Location: Carrollton, TX
Top

Postby WildTexan » Thu Sep 22, 2011 6:49 pm

WOW!!! Just wow. I really really like it.
User avatar
WildTexan
Teardrop Advisor
 
Posts: 77
Images: 77
Joined: Thu Nov 18, 2010 3:33 pm
Location: Hickory Creek, TX
Top

Postby Sam I am » Thu Sep 22, 2011 7:43 pm

Great build! That 2x4 hatch handle is a clever idea!
User avatar
Sam I am
500 Club
 
Posts: 770
Images: 106
Joined: Sun Jul 02, 2006 9:19 pm
Location: Central PA
Top

Postby Deryk the Pirate » Fri Sep 23, 2011 10:57 pm

Looks Great!
Build Thread lil vardo 1: http://tinyurl.com/baqe6py
Build Thread lil vardo 2: http://tinyurl.com/b3rwffm
User avatar
Deryk the Pirate
500 Club
 
Posts: 809
Images: 158
Joined: Tue Aug 18, 2009 11:03 am
Location: Parlin NJ
Top

PreviousNext

Return to Build Journals

Who is online

Users browsing this forum: Google [Bot] and 17 guests