THE Teardrop Explorer

...ask your questions in the appropriate forums BUT document your build here...preferably in a single thread...dates for updates, are appreciated....

Re: 2013 Grillenium Falcon

Postby celticquetzel » Thu Aug 01, 2013 11:53 pm

I am in awe! Can't wait to see the next "installment".
celticquetzel
Teardrop Master
 
Posts: 124
Joined: Thu May 30, 2013 4:14 pm

Re: 2013 Grillenium Falcon

Postby PubUltraStar » Fri Aug 02, 2013 9:03 pm

Okay, finally a weekend where I have some time to work on the teardrop. When I'm bending wood, I only have enough space for that. I'm taking a couple days off from bending, and trying to get the deck started. I've got the base deck drilled and temporarily attached to the frame. I need to get some torque washers in the morning. Hopefully will get some things done by Sunday night.

Image
Image
There is always risk in being awesome!
http://www.diy-teardrop.com/
http://www.m2-photo.com
User avatar
PubUltraStar
Gold Donating Member
 
Posts: 184
Joined: Thu Jul 26, 2012 8:11 pm

Re: 2013 Grillenium Falcon

Postby bdosborn » Sat Aug 03, 2013 9:53 am

Learned something new, didn't know there was such a thing as a torque washer.
Image
Cool.
Bruce
2009 6.5'X11' TTT - Boxcar
All it takes is a speck of faith and a few kilowatts of sweat and grace.
Image
Boxcar Build
aVANger Build
User avatar
bdosborn
Donating Member
 
Posts: 5512
Images: 778
Joined: Wed May 05, 2004 11:10 pm
Location: CO, Littleton
Top

Re: 2013 Grillenium Falcon

Postby KCStudly » Sat Aug 03, 2013 11:48 am

Is that for spiking into wood to keep a carriage bolt from turning? Cool!

When you said "torque washers" I immediately thought of "pyramid washers". We used pyramid washers under the crank bolt to hold leaf blower impellers on push blower engines. Pyramid Washer Images
KC
My Build: The Poet Creek Express Hybrid Foamie

Poet Creek Or Bust
Engineering the TLAR way - "That Looks About Right"
TnTTT ORIGINAL 200A LANTERN CLUB = "The 200A Gang"
Green Lantern Corpsmen
User avatar
KCStudly
Donating Member
 
Posts: 9617
Images: 8169
Joined: Mon Feb 06, 2012 10:18 pm
Location: Southeastern CT, USA
Top

Re: 2013 Grillenium Falcon

Postby PubUltraStar » Sat Aug 03, 2013 2:39 pm

Unfortunately, I was not able to find any Stainless Torque washers, and had to go with Zinc. You'd think with that Information Super-Highway Digi-Web thingy, that you could track those down somewhere. I painted primer over mine, and since they won't be exposed, I doubt it will ever be an issue. FYI: I recommend pounding the torque washers into the wood before trying to screw them down, as you could potentially get them to spin the spikes level, as I've done this in the past.
Image
There is always risk in being awesome!
http://www.diy-teardrop.com/
http://www.m2-photo.com
User avatar
PubUltraStar
Gold Donating Member
 
Posts: 184
Joined: Thu Jul 26, 2012 8:11 pm
Top

Re: 2013 Grillenium Falcon

Postby PubUltraStar » Sun Aug 04, 2013 5:15 pm

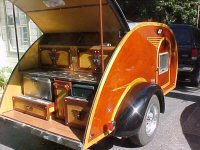
Good progress this weekend, but always slower than I'd hoped. Lots of Hurry up and wait with these things...

Torque Washers
Image

Primed Torque Washers. Probably an unnecessary step, but my teardrop OCD kicked in and painted them anyway. I'm using stainless carriage bolts, washers, and nuts. I have looked for stainless torque washers without success. Since these are not going to be exposed to weather and sealed in the raised deck, I'm sure that they will be fine.
Image

I used a flush trim bit to ensure that my primary deck was trimmed to the same size as the trailer. Nifty little router bit.
Image

I will be creating a raised deck to hide the electrical wiring and A/C return. Here are a few of the side pieces cut and temporarily clamped for fitting.
Image

Since my teardrop is wider and longer than a standard sheet of plywood, I used a biscuit jointer to attach all 3 pieces together. I've sanded down the top of the plywood and will be using fiberglass to seal and strengthen the joint.
Image

Here is the fiberglass cloth before resin. Once the top of this is complete and dry, I'll flip the entire thing over and repeat on the other side.
Image

Once the epoxy resin is applied, you can see through the cloth.
Image

Not sure I've seen this approach, but I'm running the return air duct in the raised floor. I'm using a standard aluminum downspout as the conduit, and needed to use a Dado bit to remove some of the plywood so that it would fit.
Image

I fiberglassed the exposed/recessed part of the deck. Since I removed almost 1/2" of material, this should ensure that it stays strong when I need to flip it over.
Image

Next steps are to flip over and fiberglass the joint on the deck. Sand the entire thing and apply Truck bed liner. Then I can permanently attach the deck to trailer frame. I won't be able to work on this for a few weekends, but I did make some progress.
Image
There is always risk in being awesome!
http://www.diy-teardrop.com/
http://www.m2-photo.com
User avatar
PubUltraStar
Gold Donating Member
 
Posts: 184
Joined: Thu Jul 26, 2012 8:11 pm
Top

Re: 2013 Grillenium Falcon

Postby PubUltraStar » Wed Aug 07, 2013 10:07 pm

2 quick things. I'm getting the parts together to wire up the brakes, marker and brake lights under my raised deck, and plan on using stainless cable glands to get the wire from inside desk to the underside for the electric brakes. I have a couple of different sizes. My question is what do most people use when taking wires form inside to outside? Maybe a cable gland is overkill, but it will provide strain relief as well as the ability to seal the entrance.

Image

My second is related to the Flexiride torsion axle. It was welded to the frame when I ordered my custom trailer frame. The actual axle does have holes for bolts. Is the welding strong enough, or should I add the additional carriage bolts? Doing the second method would require drilling through the frame. I just don't want to get too far and then change my mind. Are the bolts necessary if the welding looks solid?

Image
Image
There is always risk in being awesome!
http://www.diy-teardrop.com/
http://www.m2-photo.com
User avatar
PubUltraStar
Gold Donating Member
 
Posts: 184
Joined: Thu Jul 26, 2012 8:11 pm
Top

Re: 2013 Grillenium Falcon

Postby bdosborn » Wed Aug 07, 2013 10:11 pm

I welded mine, its held for 3 years and thousands of miles.

Bruce
2009 6.5'X11' TTT - Boxcar
All it takes is a speck of faith and a few kilowatts of sweat and grace.
Image
Boxcar Build
aVANger Build
User avatar
bdosborn
Donating Member
 
Posts: 5512
Images: 778
Joined: Wed May 05, 2004 11:10 pm
Location: CO, Littleton
Top

Re: 2013 Grillenium Falcon

Postby Wolfgang92025 » Wed Aug 07, 2013 10:23 pm

PubUltraStar wrote:The actual axle does have holes for bolts. Is the welding strong enough, or should I add the additional carriage bolts? ]


Mine is only welded only too......
Axle flange bolted to a bracket, bracket welded to frame.

48825

First road trip was in July 2010, best guess is maybe 6 or 7K miles and still going strong. :thumbsup:
Wolfgang

Image
User avatar
Wolfgang92025
Lifetime member
 
Posts: 1064
Images: 651
Joined: Fri Apr 18, 2008 10:16 pm
Location: Salt Lake City area, Utah
Top

Re: 2013 Grillenium Falcon

Postby PubUltraStar » Thu Aug 08, 2013 10:33 pm

Thanks for the information, I think I'll rely on the welds alone. I won't be able to work on the tear this weekend, so I got some wood bent on the template. It's amazing how may clamps I've accumulated for his project. Think you have enough clamps? Nope, you need more clamps.

Here is my template clamp pile. Sadly, this isn't all of them.
Image
Image
There is always risk in being awesome!
http://www.diy-teardrop.com/
http://www.m2-photo.com
User avatar
PubUltraStar
Gold Donating Member
 
Posts: 184
Joined: Thu Jul 26, 2012 8:11 pm
Top

Re: 2013 Grillenium Falcon

Postby KCStudly » Thu Aug 08, 2013 11:12 pm

Mild steel has a yield strength of 36k lbs/in^2. Knock that back 2/3 for a reasonable SF of 1.5 and you get 24k lbs/in^2.

So if you have four little welds that are 1/4 inch cross section x 1 inch long, you have 24k lbs capacity. If the welds are only 1/8 inch that's still 12k lbs capacity.

Dynamic loading can be significant, but for a 1500 lb loaded down camper that is still 8x, so reasonable.

Compare to four (4) 1/2 inch nominal bolts that each have a section area of .1499 in^2 thru the threaded area, and you get 9 x 1500 lbs.

My guess is that most builders would use smaller bolts, say 3/8 nominal at .0755 in^2, equal to 4.8 x 1500 lbs. Still probably okay, but maybe not as good for repetitive abuse over time, or that really big hit on a pothole or speed bump when things really bottom out hard.

These numbers go up some for Gr 5 or Gr 8 fasteners, but it is a hell of a lot easier, and much more thrifty to add weld.

I like the welds. They need to be spread in such a way that the loads don't pry them apart, but it is easy to get a lot more strength than you might expect by burning some beads down, rather than drilling holes (making weak spots) and guessing at torque values on bolts.

Of course, I must remind you that I only have an ASME degree, so am not an expert. Also, I slept in my own bed last night. :lol:

I guess it all depends on your fabrication abilities and the configuration of the situation.
Last edited by KCStudly on Thu Aug 15, 2013 10:06 pm, edited 1 time in total.
KC
My Build: The Poet Creek Express Hybrid Foamie

Poet Creek Or Bust
Engineering the TLAR way - "That Looks About Right"
TnTTT ORIGINAL 200A LANTERN CLUB = "The 200A Gang"
Green Lantern Corpsmen
User avatar
KCStudly
Donating Member
 
Posts: 9617
Images: 8169
Joined: Mon Feb 06, 2012 10:18 pm
Location: Southeastern CT, USA
Top

Re: 2013 Grillenium Falcon

Postby PubUltraStar » Sat Aug 10, 2013 9:18 pm

Mild steel has a yield strength of 36k lbs/in^2. Knock that back 2/3 for a reasonable SF of 1.5 and you get 24k lbs/in^2.


I totally know what to do now that I have this information! Thanks for the info. I still have a few weeks until I am at the point of no return for adding bolts. I think that the welds will do just fine without having to drill into the frame.

Working at the rescue station this weekend, and during the downtime, I'm able to work on small projects. I finished filling in the holes, low spots, and gaps on the Tongue Box lid using Bondo. I sanded it down, and am now at the stage of adding fiberglass to seal it all in.

Image

Wet glass and Gougeon.
Image

It's dry enough here to handle. Will spend some time sanding it down a bit tomorrow. Then I'm actually ready to start attaching wood strips that I've pre-bent. Should be interesting to see how it works, or doesn't work. The lid is heavy, but my whole teardrop will be heavy.
Image
Image
There is always risk in being awesome!
http://www.diy-teardrop.com/
http://www.m2-photo.com
User avatar
PubUltraStar
Gold Donating Member
 
Posts: 184
Joined: Thu Jul 26, 2012 8:11 pm
Top

Re: 2013 Grillenium Falcon

Postby PubUltraStar » Sun Aug 11, 2013 1:22 pm

I've been thinking about how I want to do the electrical since I started this project, and it's a project in itself to get this right. I'll be putting some of the wires below the raised deck, and some strung across the top like many others. Here are my preliminary "draft" images, which will probably change many times before I actually go to wire it.

There are many connections missing on these drawings, but it's a start.
Image

I thought I would also create a drawing with images of the parts I was using to help keep it straight in my head. Also, a draft with many missing components.
Image

I'll be organizing the wires under the raised deck using these junction boxes connected by some blue conduit. I've added Cable Glands to the junction boxes where the cable exits. I also have Stainless glands for the wires that leave the chassis to the outside for the brake wires and the trailer connection wires.
Image
Image
There is always risk in being awesome!
http://www.diy-teardrop.com/
http://www.m2-photo.com
User avatar
PubUltraStar
Gold Donating Member
 
Posts: 184
Joined: Thu Jul 26, 2012 8:11 pm
Top

Re: 2013 Grillenium Falcon

Postby DMcCam » Mon Aug 12, 2013 10:30 am

Hi Mike, Your wiring plans look good to me but I'm not an expert by any means. I'm dumbfounded by how much easier it is to see what's going on by using pictures of the parts...duh. Great idea buddy!

One thing about welding a torsion axle. There's a real possibility for torsion axles to toe out over time as they age necessitating replacement. The closer you are to the rated pound weight, the more this becomes an issue. This is why I chose to bolt mine on versus welding.

Man are you doing a great job good Sir!

All the Best,

Dave
User avatar
DMcCam
Gold Donating Member
 
Posts: 883
Joined: Wed Jan 06, 2010 8:30 pm
Location: Reno, Nevada
Top

Re: 2013 Grillenium Falcon

Postby PubUltraStar » Thu Aug 15, 2013 9:09 pm

Finished fiberglass and epoxying the bottom side, roughed up the plywood, and applied the first coat of Truck Bed Liner. I'd like to get the 2nd coat on tomorrow night, and then I can flip it over to permanently attach to the trailer.
Image

Image
Image
There is always risk in being awesome!
http://www.diy-teardrop.com/
http://www.m2-photo.com
User avatar
PubUltraStar
Gold Donating Member
 
Posts: 184
Joined: Thu Jul 26, 2012 8:11 pm
Top

PreviousNext

Return to Build Journals

Who is online

Users browsing this forum: No registered users and 17 guests