Regal Eagle Done! Video Tour 6/29/15

...ask your questions in the appropriate forums BUT document your build here...preferably in a single thread...dates for updates, are appreciated....

Re: Regal Eagle Build for 4 - Wall in progress!

Postby Gunguy05 » Mon Jun 23, 2014 8:14 pm

And now it ON!

We were finally able to take the time off and get down to the plywood place in Jacksonville that I had scoped out a while back. Glad that we took the day off and went down (they aren't open weekends), it was well worth it.

They were the only folks in the area that knew/could get baltic birch. AND they had it in 3/4 and 1/2, 5x5 and 4x8 sheets. We could use both for the 1/2 so, that worked out well. Anyways, this is what $738 of plywood looks like. We also got all of the 1/8 luan that we needed for the skins, and 1/4 for the inside ceiling. We found some prefinished 1/4 for the ceiling that look good so we bought it. Also 1/2 for the cabinet fronts and seals for the galley. 3/4 for the countertop and bulkhead area. We are purposely making that heavy to compensate for the slightly longer tongue and less than ideal balance point. I have struggled with this a bit, but I think it is going to work out ok.


Image

Nice to see too that the trailer rode very well with all that weight on it too. You could barely tell it was back there. Will try and make some progress that week on starting the framing of the cabinets and maybe a spar or 2..
Brian


Checkout my buildThe Regal Eagle Bow front for 4
Image
Also my teardrop updates from blog on Dad Rambles
User avatar
Gunguy05
The 300 Club
 
Posts: 385
Images: 6
Joined: Mon Dec 02, 2013 4:45 pm
Location: South GA

Re: Regal Eagle Build for 4 - Wall in progress!

Postby Gunguy05 » Sun Jun 29, 2014 10:00 pm

ALLLLLmost completely finished with both of the side walls. Had a little time over the weekend to be able to work on finishing the side walls.

Image

You can't see it in this photo, but we ran the pipe for the light switches (inside and porch) also for the running lights down low. We finished with ALL of the insulation in this wall side, and the put the back piece of 1/4 birch to cover the sides that will show in the galley. We decided that we would just finish those off in baltic birch (the 1/2 for the seal) and let that be the wall in the galley sides. That will be put over what you see here (in the galley), so the roughness wont show here.

I had a little supervision on Sat morning... the junior CEO is not a bad motivator :D I told her to smile...

Image

Also, we have decided to go with the Frederick Inside out method for the interior roof. We were going with the aggie "frame it and set it in" method, but decided that my cutting skills on the edges of the inside roof weren't going to be good enough to seal up like the Frederick roof would be able to hide. SOOOO.. we cut out the top (framing + inside ceiling of 1 1/2 + 3/16) of the side wall. That hurt me in my deepest part of my soul... but we made it though and I *think* we did it right.

I've figured out that once you do "one" of anything, the second part takes just a fraction of the time and planning as the first. Should be able to finish the other insulation, 1/4 birch, top cutout, and conduit in the left wall in just a couple of hours.. then it is off to skin the outside of the wall.

The plan is to get this all done, and that is a reasonable plan, by thursday. We are going to work sunup to sundown on thursday and hopefully have some walls standing before the 4th. We shall see.
Brian


Checkout my buildThe Regal Eagle Bow front for 4
Image
Also my teardrop updates from blog on Dad Rambles
User avatar
Gunguy05
The 300 Club
 
Posts: 385
Images: 6
Joined: Mon Dec 02, 2013 4:45 pm
Location: South GA

Re: Regal Eagle Build for 4 - Wall in progress!

Postby Gunguy05 » Sun Jul 06, 2014 9:40 pm

We have gotten a good bit done over the last couple of weeks.

Decided that we wanted a little bit of "cushion" in between the floor and the frame. Things seemed to creek a bit, and we just wanted to have a good stable footing between the two. Put some of this between the floor surfaces that touched the frame.

Image

Once we got the floor worked out, it was on to finish the walls. But wait! Still didn't have the stabilizer jacks in the back. Stopped by big blue and picked up the necessary bolts and got that bolted on in the back.
Image

Up to this point we *thought* we had then done, but there were a few by key things looming that we needed to do to COMPLETELY finish them. We had to put the skins on, finish the corners for the door cutouts, put the conduits in the walls for switches and lights, the drill out the necessary pocket screws for attaching the walls. We had to do some trial and error to account for the overhang of ply at the bottom, but this is what we came up with . My hand was the clamp for the Kreg jig :)

Image

THEN... We were ready to stand the COMPLETED walls up. We only attached them with temp braces as we are going to fit the back pieces of ply (counter, bulkhead wall etc) before we put them in permanently.

Image

Then we stood them UP!!! SUCCESS!!!

Image

Image

Image


It's hard to believe that we started out with this....

Image

Next step is going to be to cut out and mortise the counter top, foot wall (I'm calling it that since it's separate from the bulkhead), and interior cabinet face. That will probably come later this week. After we get those cut, fitted, and finished, then well will permanently attach them and the walls all at the same time.
Brian


Checkout my buildThe Regal Eagle Bow front for 4
Image
Also my teardrop updates from blog on Dad Rambles
User avatar
Gunguy05
The 300 Club
 
Posts: 385
Images: 6
Joined: Mon Dec 02, 2013 4:45 pm
Location: South GA
Top

Re: Regal Eagle Build for 4 - Walls complete and UP!

Postby Tommy2tone_1999 » Fri Jul 11, 2014 7:55 am

Great progress so far! Keep up the great work man
Make time for fitness and it'll make time for you.
http://TommyDoran.com
http://tommydoran.com/favor
Interview: http://goo.gl/Non1oR
Build Journal - http://www.tnttt.com/viewtopic.php?f=50&t=58395
Come find me on Facebook - http://www.facebook.com/tommy.doran
Image
Image
Tommy2tone_1999
Teardrop Master
 
Posts: 236
Images: 148
Joined: Tue Oct 21, 2008 10:54 am
Location: St. George, Louisiana
Top

Re: Regal Eagle Build for 4 - Walls complete and UP!

Postby Gunguy05 » Sun Jul 20, 2014 9:38 pm

Just a quick update. We worked a little this week, and a little today. Got both of the 1/2 " inside wall pieces cut out and fitted. Still need to trim the off, but the router bit threw a bearing, so I will try and pick one of those up tomorrow.


Also, cut out the notch in the top of the back wall for the spar Hatch. We decided to move it back slightly. Originally it was right above the rear bulkhead wall. But this give us a little more clearance for the AC vent in the middle, and will make the hatch a bit shorter (not a bad thing )..

After all this, we cut out the counter top, and I'm happy to say it fits like a glove!

Still need to clean up the back slots in the wall to get it right where it needs to be, but that will happen when get the new bit.

Anyways, here is where we sit now.

Image
Brian


Checkout my buildThe Regal Eagle Bow front for 4
Image
Also my teardrop updates from blog on Dad Rambles
User avatar
Gunguy05
The 300 Club
 
Posts: 385
Images: 6
Joined: Mon Dec 02, 2013 4:45 pm
Location: South GA
Top

Re: Regal Eagle Build for 4 - Walls complete and UP!

Postby S. Heisley » Thu Jul 31, 2014 9:45 pm

It's looking great. Keep up the good work! :thumbsup:
User avatar
S. Heisley
Super Lifetime Member
 
Posts: 8775
Images: 495
Joined: Mon Sep 17, 2007 10:02 am
Location: No. California
Top

Re: Regal Eagle Build for 4 - Walls complete and UP!

Postby Gunguy05 » Thu Jul 31, 2014 10:27 pm

S. Heisley wrote:It's looking great. Keep up the good work! :thumbsup:


Thank you. It's getting there. Once piece of wood at the time.

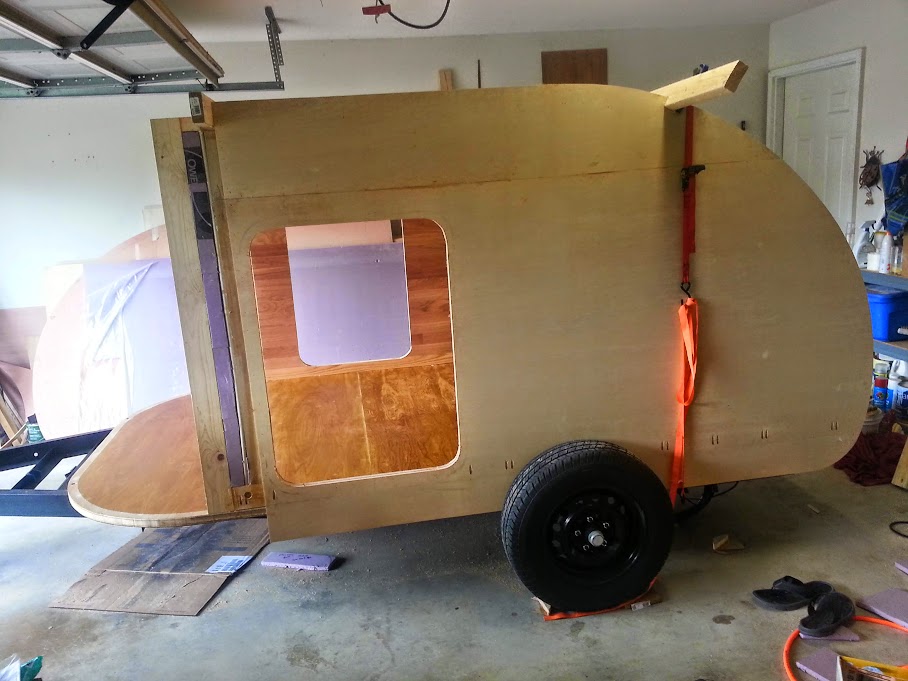
Looks like we *should* have the walls up and permanently attached in the next couple of days. Since the last photos, I have cut the bulkhead wall to fit. That was a little uneasy, but not too difficult. Just had to take me time and the the angle at the top where it meets the roof right. I almost cut it too short as I was trying to decide if it went to the top of the ceiling or the top of the roof. I decided on the roof... and glad I did.

Image

Also, I got some of the back roll pan built. Still need to skin it, but at least the top is in place and we can work off of that for the hatch bottom. Will do more on that once things are closer to aluminum.

Image

We have decided to go camp-inn style on the AC. For those not familiar, Up top, in the middle, vent out the back just forward of the hatch. We have done quite a bit of measuring on this and *think* we have it right. :frightened: :frightened: Basically it is just going to be a box for the AC to sit in right in the middle of the back of the cabin. It will be glued, screwed, sealed, and CPESed, then painted on the inside. There will be a drain in the corner that goes straight down, through the back cabinets to the ground. Basically the entire box will act like a drain pan for the AC and the little bit of rain water that will get it. The top of the entire thing will be sealed with a baffled vent (think reverse hood scoop). Cabinets will be just basic cutouts with push latches. 2 at the top, 2 larger at the bottom. 1 open space in the middle under the AC for drinks, keys etc.. or if we decide to put a TV in at any point.

Image

Anyways, all that to say this. Getting the pieces of that worked out is the next step, then to take it all apart and get ready to glue it up permanently. But first...

Still need to:

* cut out the side wall pieces for the hatch. I have been dreading this since, well, probably since day 1. BUT Now is the time!! :thumbsup:
* There is only 1/8 presently hanging over the edge of the frame at a depth of 4" SO.. I have decided to add a little bit of backing to that, just glue it in place and clamp it. I figure this, along with the AL will give it less chance of getting it by road debris and getting damaged.
* Then seal this overhang piece along the bottom. There is a very tight gap between this and the frame, so I have to do this before the walls are permanently attached to the floor.
* And oh yeah, we need to notch out the overhang as well where the torsion arm makes contact. I have noticed that it is just now touching the overhang (as expected). So, I will take off one wheel and do this and then copy to the other side. While I have the wheels off I think I will take the new chrome wheels up and get the tires switched to them. Time for a little BLING BLING :R
Brian


Checkout my buildThe Regal Eagle Bow front for 4
Image
Also my teardrop updates from blog on Dad Rambles
User avatar
Gunguy05
The 300 Club
 
Posts: 385
Images: 6
Joined: Mon Dec 02, 2013 4:45 pm
Location: South GA
Top

Re: Regal Eagle Build for 4 - Walls complete and UP!

Postby Gunguy05 » Thu Aug 07, 2014 8:24 pm

This past weekend, we did a final walk though (i.e. stared at them for about an hour of "thinking time") of the rear counter top, upper and lower bulkhead, and side galley wall pieces. After we decided we were happy with things we took it all apart to get ready to finish it all off (stain, varnish etc) before we reassemble it.

Also, we have added a 1/4 piece of backing to the overhang that along the sides of the frame. This was only an 1/8 piece of the outer skin, too flimsy in my opinion.

We have gone back and forth (both trying out and to big blue) all week on stain choices, and have decided tonight that we (I) am an idiot. I don't claim to know anything about stain, in fact I don't know anything about stain. I have been wiping on and within a minute wiping off the stain on the test pieces all week. Nothing seemed to look right. Tonight, after the 4th trip to big blue I decided to leave the stain on for about 10 min...

AH HA! 8) The color we were looking for. Amazing what happens when you do things the right way. Anyways, here are some of the reject colors (or at least partial given we didn't leave them on long enough).

[img]https://lh6.googleusercontent.com/-nv51K6GVpc8/U-Kl120Jl7I/AAAAAAAASts/P5ANwSr8Pjc/w1211-h681-no/20140806_180119.jpg[img][/img][/img]

Here is the color that we decided to go with... ah hem... the VERY FIRST COLOR WE BOUGHT 4 months ago... :roll:

Image

Anyways. I think I am going to get some wood conditioner and put that one first. I hadn't considered it, but after doing some more reading tonight I think it is warranted to keep things looking even. Going to try it on a bigger piece, along with the color above tomorrow and hopefully things will be good to go from there.

After that a good couple of coats of varnish to seal things off. Then onward to assembly.
Last edited by Gunguy05 on Thu Aug 07, 2014 9:47 pm, edited 1 time in total.
Brian


Checkout my buildThe Regal Eagle Bow front for 4
Image
Also my teardrop updates from blog on Dad Rambles
User avatar
Gunguy05
The 300 Club
 
Posts: 385
Images: 6
Joined: Mon Dec 02, 2013 4:45 pm
Location: South GA
Top

Re: Regal Eagle Build for 4 - Walls complete and UP!

Postby Sheddie » Thu Aug 07, 2014 9:45 pm

Good work Brian
I will watch this with interest
User avatar
Sheddie
1000 Club
1000 Club
 
Posts: 1499
Images: 1129
Joined: Mon Jul 01, 2013 3:26 pm
Location: Whangarei, New Zealand
Top

Re: Regal Eagle Build for 4 - Walls complete and UP!

Postby OHfam » Thu Aug 07, 2014 10:08 pm

Going to watch this one! Thanks for the encouragement! :thumbsup:
OHfam
Teardrop Inspector
 
Posts: 6
Joined: Mon Aug 12, 2013 5:09 pm
Location: The Buckeye State
Top

Re: Regal Eagle Build for 4 - Walls complete and UP!

Postby KCStudly » Fri Aug 08, 2014 8:56 am

Somewhere on here I read a recommendation to, rather than use sanding sealer, just use the regular stain and sand it back some prior to staining again. I had to do this on my large ceiling panel to correct a few issues, and it seemed to work really well.
KC
My Build: The Poet Creek Express Hybrid Foamie

Poet Creek Or Bust
Engineering the TLAR way - "That Looks About Right"
TnTTT ORIGINAL 200A LANTERN CLUB = "The 200A Gang"
Green Lantern Corpsmen
User avatar
KCStudly
Donating Member
 
Posts: 9617
Images: 8169
Joined: Mon Feb 06, 2012 10:18 pm
Location: Southeastern CT, USA
Top

Re: Regal Eagle Build for 4 - Staining some pieces

Postby Gunguy05 » Fri Aug 08, 2014 11:16 pm

KCStudly wrote:Somewhere on here I read a recommendation to, rather than use sanding sealer, just use the regular stain and sand it back some prior to staining again. I had to do this on my large ceiling panel to correct a few issues, and it seemed to work really well.


Thanks for the recommendation. I had actually already gone and bought the sealer before I read this. SO... I decided to go ahead and give it a try. I didn't do a side-by-side, but it did seem to come out pretty even and blotch free (at least to my untrained eye).

I coated the 2 galley side wall pieces tonight, and then immediately stained them with the cherry stain that we decided on. Looks good to me. I am a little pooped, so about to hit the bed for the night. Will try and get the other pieces sanded and finished tomorrow, possibly a first coat of varnish on them.

I want to get these done and hopefully glued up Sunday afternoon, but who knows, I may still be at this same point on Monday morning. Oh well, it's coming along nonetheless.
Brian


Checkout my buildThe Regal Eagle Bow front for 4
Image
Also my teardrop updates from blog on Dad Rambles
User avatar
Gunguy05
The 300 Club
 
Posts: 385
Images: 6
Joined: Mon Dec 02, 2013 4:45 pm
Location: South GA
Top

Re: Regal Eagle Build for 4 - Walls complete and UP!

Postby Gunguy05 » Sun Aug 10, 2014 12:06 am

Worked off and on today and got the main parts in the back all with 1 coat of stain and varnish, and some with 1 coat of stain and 2 coats of varnish. Should be able to finish those up in the AM before church, and then get them installed permanently (maybe) tomorrow afternoon.

At any rate, they look good to me, or at least good enough from the next campsite. I will be interested to see how the 2nd coat of varnish dries. I put it on pretty thick, not runny, but nice and "stout". I used a foam roller, and topped it off with at sweep of the foam brush. Sanded with 0000 steel wool in between coats, brushed and wiped thoroughly with a damp cloth before applying the 2nd coat.

We will see in the AM.

Wait, it is the (1)AM. I need to get some rest.

Image
Brian


Checkout my buildThe Regal Eagle Bow front for 4
Image
Also my teardrop updates from blog on Dad Rambles
User avatar
Gunguy05
The 300 Club
 
Posts: 385
Images: 6
Joined: Mon Dec 02, 2013 4:45 pm
Location: South GA
Top

Re: Regal Eagle Build for 4 - Walls complete and UP!

Postby KCStudly » Sun Aug 10, 2014 9:20 am

Looks good! :thumbsup:

I found that the poly I used calls for a light wipe with a rag damped in mineral spirits before applying the next coat (after sanding and dusting). On the occasions that I forgot to do this step I could tell a big difference in how the next coat went down.

Not sure if proper varnish has the same requirement, and maybe you did it and just didn't mention, but it is something worth reading the can for. You're probably good; I just felt the need to mention it because I sometimes would speed past this step and forget (more reminding myself).
KC
My Build: The Poet Creek Express Hybrid Foamie

Poet Creek Or Bust
Engineering the TLAR way - "That Looks About Right"
TnTTT ORIGINAL 200A LANTERN CLUB = "The 200A Gang"
Green Lantern Corpsmen
User avatar
KCStudly
Donating Member
 
Posts: 9617
Images: 8169
Joined: Mon Feb 06, 2012 10:18 pm
Location: Southeastern CT, USA
Top

Re: Regal Eagle Build for 4 - Walls complete and UP!

Postby Gunguy05 » Sun Aug 17, 2014 3:23 pm

We got the walls up PERMANENTLY! The back counter top, bulkhead and side galley walls are up. Also, everything is glued, screwed, and (mostly) square.

THAT was a lot of work, but I can honestly say that are looking as good or better than I had hoped. They hard work is paying off!!!! :D :D :? :x 8)

Now on to the front! And the back cabinet face. It is just going to sit in place and attach to the front of the counter top.. so that should be easy enough. Have to frame in the pieces for the AC to sit in at the top. Will piddle with that this week. :beer:

Image

Image

Image
Brian


Checkout my buildThe Regal Eagle Bow front for 4
Image
Also my teardrop updates from blog on Dad Rambles
User avatar
Gunguy05
The 300 Club
 
Posts: 385
Images: 6
Joined: Mon Dec 02, 2013 4:45 pm
Location: South GA
Top

PreviousNext

Return to Build Journals

Who is online

Users browsing this forum: No registered users and 20 guests