"Red Woof Inn" 10-16 update Hubcaps!

...ask your questions in the appropriate forums BUT document your build here...preferably in a single thread...dates for updates, are appreciated....

Re: "The Black Hole" build 9-6 update

Postby S. Heisley » Fri Sep 07, 2012 6:36 pm

WOW! Cliff, It's looking really good! :thumbsup:
User avatar
S. Heisley
Super Lifetime Member
 
Posts: 8773
Images: 495
Joined: Mon Sep 17, 2007 10:02 am
Location: No. California

Re: "The Black Hole" build 9-6 update

Postby CliffinGA » Fri Sep 07, 2012 9:51 pm

Thanks Sharon I call it a 20ft'r, 20 ft away it looks great then when you get closer you see the blemishes but its mine and I did build it and I can always take time this winter and fix the issues I see.

Cliff :thumbsup:
In God we trust, shoot the rest and he will sort out!

My Build:

viewtopic.php?f=50&t=42628
User avatar
CliffinGA
1000 Club
1000 Club
 
Posts: 1499
Images: 207
Joined: Sat Nov 14, 2009 1:29 pm
Location: Jefferson, GA

Re: "The Black Hole" build 9-6 update

Postby CliffinGA » Sat Sep 08, 2012 7:55 pm

Ok alot done today:

Got up early and went to HD and picked handle for hatch, hasp lock, 4 3/4 x 5.5 x8' apex boards for trim at bottom of tear, more black paint and foam rollers. Then to NT for some rubber hood latch for the hatch.

Came home got drivers side door latch mostly installed, need to shim it 1/8 more for offset, and installed window.

Hatch I had to cut part of bottom hangoverbecause when I moved hatch out of garage one corner broke and a long section across bottom cracked. I then got it mounted and then mounted the hinge to the tear. Installed new handle and started working on hatch supports, as I said I'm still working on those but taking same approach as Larry (LDK) did on his but will finish those probablt later in the week.
Then spent 2 hrs working on passenger side door and latch, it doesn't need to be shimmed but is a lil loose but I figure weatherstrip may work on that to tighten it up. I will say not to impressed with the latch set, one works great the second hangs up and you manually have to press handle to get the latch to re pop put! Trying to figure what the white plastic piece is for with the set??

Well about to head to Wal-m,art and pick up some crimp pieces as I'm going to pull a most of an all nighter and get the stuff mounted, trailer lights working, window installed and tear generally cleaned up as tomorrow after church we're driing it to Newnan,
GA so a friend can weld the fenders on for me I originally cut off the trailer. They may not be curved like I wanted but their mine already and when I get te rack on the tear at sometime I can use as a step for helping. Looks like we'l make it for the gathering next weekend after all! I will post pics tomorrow after we get home and fenders will be on it!

Cliff :thumbsup:

ps: I almost forgot Sheri (better-half) came up with the new name as a mix of both teams and our old tear! :lol:
In God we trust, shoot the rest and he will sort out!

My Build:

viewtopic.php?f=50&t=42628
User avatar
CliffinGA
1000 Club
1000 Club
 
Posts: 1499
Images: 207
Joined: Sat Nov 14, 2009 1:29 pm
Location: Jefferson, GA
Top

Re: "Red Woof Inn" build 9-8 update

Postby CliffinGA » Sun Sep 09, 2012 9:14 pm

Ok a good and a bad day! Had to run up to wal-mart to get some connectors as I had this bright idea to pull an all nighter, well lets just say I had a sugar drop in Wally world and after half a box of Chips Ahoy's I came home and crashed! Got up this morning and got started early and skipped church and yep that was a bad idea also. Started out not to long after wife headed out to church and I started installing the handles for the doors I realized that stuff you buy with no instructions sometimes shoots you in the foot. The levers on the handles I got from Vintech has a locking mech that has to be inset in the door so the hole on the exterior of the tear has to be 13/16" and ofcourse all my paddle buts are with the tools I leave in my container in Columbus :x . So one hour wasted so I started on the tail lights and license plate holder, well got one line on and sealed, also received with no instructions, and started looking around for the second one, strike 2 :x . I pulled half the stuff out of the garage and it was no where to be found, great for the garage as it got a quick cleaning :lol: but atlast to no avail, no light just a chrome bezel. So I started on the license plate holder, also no instructions :lol: and I quickly deduced , strike 3, I needed to replace the screws that came with it with longer ones as I used a 3/4" backer support behind the skin for it to attach to. Well by this time the wife came home and we headed out to grab lunch and drive over to the nearest NT and HD 31 miles away! Well picked the items I needed up and came home to start over again and work on the wiring first as I had 3hrs til bible study which I was informed I was not alowed to skip! 2hrs later I had the trailer wired and you guessed it on the older/new light worked! Nothing I tired would get the new tail to work at all, so I started cleaning up and guess what I found, yep the female clerk said that once I got home I would find the other new tail light and I did! Well it didn't work either so tomorrow I will pick up another wiring harness and start over tomorrow night. Didn't get to start on the doors until I got home tonight but the 13/16" paddle bit worked and the exterior handle fits.........almost, I will have to cut the exterior trim for it to be flush :lol: :lol:. Anyway doors are on, windows are installed and sealed, interior latches installed and holes for exterior are cut, now just need to get another dremel cutting attachment as I broke the other one yesterday, rewire the trailer lights and a few other things and maybe will be ready for Friday :lol:.

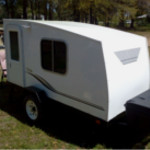
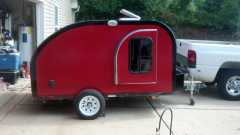
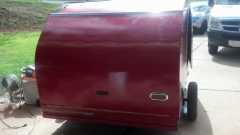
Heres some new pics:
97681


97682

97683

Lesson learned today, don't put God off to do things for yourself, he always wins!

Cliff :thumbsup:
In God we trust, shoot the rest and he will sort out!

My Build:

viewtopic.php?f=50&t=42628
User avatar
CliffinGA
1000 Club
1000 Club
 
Posts: 1499
Images: 207
Joined: Sat Nov 14, 2009 1:29 pm
Location: Jefferson, GA
Top

Re: "Red Woof Inn" build 9-9 update pics

Postby Oldragbaggers » Sun Sep 09, 2012 9:41 pm

It's been while since I've checked your build Cliff and I am amazed at how much progress you've made. Man, you have really left me in the dust!! I see you have overcome your hatch problems beautifully. I hope I can eventually say the same. I am struggling with the exterior skin.

It looks like you are about ready to go. Congratulations. I know it feels good!!
Life is sooooo good.........
Sail...camp....bike...repeat
Becky

Build Journal http://www.tnttt.com/viewtopic.php?f=50&t=45917
Visit our blog at http://www.oldragbaggers.com
Image Image
User avatar
Oldragbaggers
Gold Donating Member
 
Posts: 1842
Images: 331
Joined: Mon Aug 01, 2011 9:22 pm
Location: Essex, MD
Top

Re: "Red Woof Inn" build 9-9 update pics

Postby CliffinGA » Mon Sep 10, 2012 9:43 pm

Thanks Becky! Do we ever get rid of hatch problems??? Mine is still off on the right side but flush on the left but I think when I put the lower trim on maybe tomorrow or Thursday that it will straighten the hatch out some. The trim is not wood but a new trim product called Apex for homes. Has same look as primered wood one side has wood grain and other is smooth, can be routed and every thing else like wood just does not rot! Togight I painted it black with the first coats , will cut the front and hatch tomorrow and will mocj up with fenders held in place and go ahead and mount them. i will finish coat them thursday on the trailer. Right now so much to do that thursday may be an all nighter ;) but hey we will be camping!

Cliff :thumbsup:
In God we trust, shoot the rest and he will sort out!

My Build:

viewtopic.php?f=50&t=42628
User avatar
CliffinGA
1000 Club
1000 Club
 
Posts: 1499
Images: 207
Joined: Sat Nov 14, 2009 1:29 pm
Location: Jefferson, GA
Top

Re: "Red Woof Inn" build 9-9 update pics

Postby CHUNKYMONKEY » Tue Sep 11, 2012 8:29 am

Cliff,

Your tear is looking great!! I know you are so excited being so close to the finish line. I'm sure we all will tweak onging but it looks so good and I love the name!

Angela
User avatar
CHUNKYMONKEY
Donating Member
 
Posts: 70
Images: 55
Joined: Tue Feb 14, 2012 4:49 pm
Location: Fernandina Beach, FL
Top

Re: "Red Woof Inn" build 9-9 update pics

Postby LDK » Tue Sep 11, 2012 6:17 pm

Dang Cliff you're just about done now and it's really lookin great!! :thumbsup: I think you picked a good name and now all you need is a decal of a howling wolf on your hatch lid. Hey that might look cool on mine. :lol:
LDK
Gold Donating Member
 
Posts: 1419
Images: 1
Joined: Fri Jan 22, 2010 8:29 pm
Top

Re: "Red Woof Inn" build 9-9 update pics

Postby CliffinGA » Tue Sep 11, 2012 11:12 pm

Thanks!

Angela we're going to be in it up above your side of town at Cloudland Canyon this weekend at a TJ gathering with some GA, TN and a few from AL. Come on up if your able to, all are welcome!

Larry if Sheri has her way she will get a boston terrier pic on there :lol:! She combined Red from my Red Raiders (Texas Tech 97' ) Woof GA (Bulldogs) and Inn (DoDropInn) our other tear! Coming closer just have a lot of little details and just not going to get the fenders on in time!

Cliff :thumbsup:
In God we trust, shoot the rest and he will sort out!

My Build:

viewtopic.php?f=50&t=42628
User avatar
CliffinGA
1000 Club
1000 Club
 
Posts: 1499
Images: 207
Joined: Sat Nov 14, 2009 1:29 pm
Location: Jefferson, GA
Top

Re: "Red Woof Inn" build 9-9 update pics

Postby cop1406 » Thu Sep 13, 2012 10:41 am

Your build is awesome. I hate when I have a day like you had when nothing seems to go right. The key is a deep breath and then get a blanket and lay down inside the tear and marvel at your accomplishment. :thumbsup: Trust me, you will feel better.
User avatar
cop1406
Donating Member
 
Posts: 63
Images: 14
Joined: Fri Apr 27, 2012 1:03 am
Top

Re: "Red Woof Inn" build 9-9 update pics

Postby CliffinGA » Thu Sep 13, 2012 3:37 pm

Bizie the fenders are going to be welded to the same mounting places they were just pushed out 3/4" from orininal spots. The walls are 48" but have 44" pn inside of head room but its6'6" wide.

Trust me cop its gotten lots better and really only have about half the nights worth of work to do to it. Sheri loves it so all iz good :lol:

Cliff
In God we trust, shoot the rest and he will sort out!

My Build:

viewtopic.php?f=50&t=42628
User avatar
CliffinGA
1000 Club
1000 Club
 
Posts: 1499
Images: 207
Joined: Sat Nov 14, 2009 1:29 pm
Location: Jefferson, GA
Top

Re: "Red Woof Inn" build 9-9 update pics

Postby Forrest747 » Thu Sep 13, 2012 5:00 pm

Another great build for the Class of 2012. Looks great Cliff.
"All the success on the trail can not compensate for having square headlights"

"I've got a fever and the only prescription is more cowbell!"
http://www.tnttt.com/viewtopic.php?f=50&t=37701 Build Journal
User avatar
Forrest747
Cowbell Donating Member
 
Posts: 1327
Images: 447
Joined: Mon Apr 06, 2009 3:40 am
Location: West Valley Utah, Utah
Top

Re: "Red Woof Inn" build 9-9 update pics

Postby CliffinGA » Thu Sep 13, 2012 11:17 pm

We're CAMPABLE!!!! Tonight Sheri got the rope molding up and around the edge of the head liner and then made the bed and loaded the clothes up, while I kicked backand drank a beer.....Uh yeah right..... I can't drink :cry: 
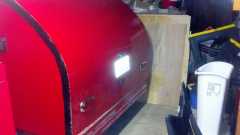
just joking. While she was doing her part I was attaching the rubber latches to the hatch, hooking it up to the truck, loading chocks, main power cord, reg 15amp cord and new stabilizers in the tongue box. I also took the 1"x1" Al angle I purchased and use the cremel with a cutting wheel to cut reliefs in one side of the angle and made my hatch trim! I tried annealing and it bent so much and then it cracked! So I tried this and it worked. I used #6 x 1/2" self tapping screws and I used silicone clear caulk under it as I attached it, I will have a friend weld the cuts up for me and brush it out Sunday when he attaches my fenders to the trailer frame.Last night I installed the battery tie down system from AutoZone, hatch seal, and the first apex piece on the hatch and the recoated it in black, maybe the only trim on the tear this weekend but the sides I;m waiting to get fenders attached so I can get the angles right before cutting, and I wired my hatch lights for the galley. So far all is going as expected :lol:!! In the morning ...er 4 hrs from now... I'll get up and do an hour of work to send to my office and then I will install some excess AL angle to cover the linolieum/floor edge and put more seal down there and wash the tear and the load up rest of stuff and the pups and hit the road! I will have 2 stops in the morning, one at my office for some show n tell as my friend Forrest says and then over to Sheri's school to meet her class and to show the tear off to a few people.Yah know it may not be the most professional job in the world in building it but I did it and its mine and thats somethink most can;t say :lol: .
Night all!

Cliff :thumbsup:

ps: [ics in the morning!
In God we trust, shoot the rest and he will sort out!

My Build:

viewtopic.php?f=50&t=42628
User avatar
CliffinGA
1000 Club
1000 Club
 
Posts: 1499
Images: 207
Joined: Sat Nov 14, 2009 1:29 pm
Location: Jefferson, GA
Top

Re: "Red Woof Inn" Campable 9-13

Postby jbyrd » Fri Sep 14, 2012 7:47 am

Congratulations!!!!!!!!!!! :applause: :applause: :thumbsup: :thumbsup:
Til later, See ya
Jeremy

My build journal #1 "SOLD" : viewtopic.php?t=45945
my build journal #2 "SOLD": viewtopic.php?f=50&t=59216
User avatar
jbyrd
Teardrop Master
 
Posts: 146
Images: 172
Joined: Sun Aug 28, 2011 8:24 pm
Location: marianna, Florida
Top

Re: "Red Woof Inn" Campable 9-13

Postby bc toys » Fri Sep 14, 2012 10:30 am

congratulations on your build i've been watching it come along. nice work and hope you enjoy your trip
bc toys
2000 Club
2000 Club
 
Posts: 2217
Images: 42
Joined: Sun Jun 28, 2009 2:45 pm
Location: LAS VEGAS NV
Top

PreviousNext

Return to Build Journals

Who is online

Users browsing this forum: No registered users and 26 guests