LarryJ - Trailer Build #1 (09/09/15 Update)

...ask your questions in the appropriate forums BUT document your build here...preferably in a single thread...dates for updates, are appreciated....

LarryJ - Trailer Build #1 (09/09/15 Update)

Postby LarryJ » Sun Oct 23, 2011 10:23 pm

It took a bit longer than expected to get all my steel, but I have finally started construction!! :twisted:

While accumulating material for the trailer frame, I kicked up a bit of sawdust and put together a chuckbox that will go in the galley, but will be removable for those sites that we can't put the trailer exactly where we want it.

Image
Image

Yesterday I picked up the last 20' bar of 14ga 2x2 that I needed and today I started welding up a 5x9 frame.

Image
Image

I was actually able to get two cross-members welded up also, but forgot to take a pic before packing everything up.
Last edited by LarryJ on Thu Sep 10, 2015 4:26 pm, edited 24 times in total.
Have Fun!!!
User avatar
LarryJ
Donating Member
 
Posts: 111
Images: 81
Joined: Tue Jul 19, 2011 10:28 pm
Location: Rancho Cordova, CA

Postby Deryk the Pirate » Mon Oct 24, 2011 9:55 am

Nice! How much do you think the chuckbox weighs?
Build Thread lil vardo 1: http://tinyurl.com/baqe6py
Build Thread lil vardo 2: http://tinyurl.com/b3rwffm
User avatar
Deryk the Pirate
500 Club
 
Posts: 809
Images: 158
Joined: Tue Aug 18, 2009 11:03 am
Location: Parlin NJ

Postby LarryJ » Mon Oct 24, 2011 10:16 am

Deryk the Pirate wrote:Nice! How much do you think the chuckbox weighs?


Empty, just a bit over 35lbs - it should be between 50-55 lbs loaded.
Have Fun!!!
User avatar
LarryJ
Donating Member
 
Posts: 111
Images: 81
Joined: Tue Jul 19, 2011 10:28 pm
Location: Rancho Cordova, CA
Top

Postby rebapuck » Fri Oct 28, 2011 6:36 pm

I like that you already plan a #2. This is your "starter" trailer.
Judy
1966 VW camper
1967 VW singlecab
Image
User avatar
rebapuck
.
 
Posts: 2243
Images: 1
Joined: Thu May 14, 2009 1:55 pm
Location: Chapel Hill NC
Top

Postby kinto » Mon Oct 31, 2011 5:30 pm

i'm digging the chuckbox idea! :thumbsup:


kent
:)
Is a hippopotamus just a really cool opotamus?

imay ildbay urnaljay

Image
User avatar
kinto
Gold Donating Member
 
Posts: 228
Images: 465
Joined: Tue Jul 19, 2011 10:20 am
Location: STL
Top

Postby jdarkoregon » Mon Oct 31, 2011 10:39 pm

Chuckbox looks good, but do you think there is a way to build the same basic design and make it weigh less, like maybe half as much?

John
Innovation is essential
The world can be better
ImageImage
User avatar
jdarkoregon
Donating Member
 
Posts: 1237
Images: 47
Joined: Mon Aug 22, 2005 7:07 pm
Location: Oregon, Sublimity
Top

Postby LarryJ » Mon Oct 31, 2011 11:53 pm

Thx all for the comments.

Chuckbox looks good, but do you think there is a way to build the same basic design and make it weigh less, like maybe half as much?


I don't think it's possible to make one out of wood and have it be any lighter - I made this one out of 1/2" ply to keep the weight down, most plans call for 3/4" and it takes almost a whole 4x8 sheet to construct. I figured I could get away with the 1/2" since this one will be sitting in the tear most of the time and won't need to take the abuse of being lugged around.

I've seen aluminum ones that are lighter, but they cost a bit more than the $50 I paid for all the materials to build this one.

It won't help much getting the box out of the tear, but this particular design allows you to use the legs as handles on each end so the box can be carried by two (or more) people.
Have Fun!!!
User avatar
LarryJ
Donating Member
 
Posts: 111
Images: 81
Joined: Tue Jul 19, 2011 10:28 pm
Location: Rancho Cordova, CA
Top

Postby jdarkoregon » Tue Nov 01, 2011 1:07 am

Thanks for the observation, it was helpful

John
Innovation is essential
The world can be better
ImageImage
User avatar
jdarkoregon
Donating Member
 
Posts: 1237
Images: 47
Joined: Mon Aug 22, 2005 7:07 pm
Location: Oregon, Sublimity
Top

Postby LarryJ » Fri Jan 06, 2012 1:38 am

My only new years resolution was to make sure and spend at least a couple hours each week working on something to do with the build.

Tonight I went to my friends place and started putting the tongue on the trailer.

Here we have the main tongue on the frame - off square or center (on 6 points) by no more than 1/32" inch.

Image

My friend is a regular on the DIY show 'Turf Wars' and has a lot more time with a welder than me - so I had him do the welds on the tongue.

Image

With the tongue on it's actually starting to look like a trailer frame.

Image


Hopefully this weekend we'll be able to put in some gussets and mounting brackets for the floor.
Last edited by LarryJ on Sun Jul 20, 2014 6:41 pm, edited 2 times in total.
Have Fun!!!
User avatar
LarryJ
Donating Member
 
Posts: 111
Images: 81
Joined: Tue Jul 19, 2011 10:28 pm
Location: Rancho Cordova, CA
Top

Postby aggie79 » Fri Jan 06, 2012 10:05 am

Larry -

The frame looks great! You have a nice platform for your build. :thumbsup:

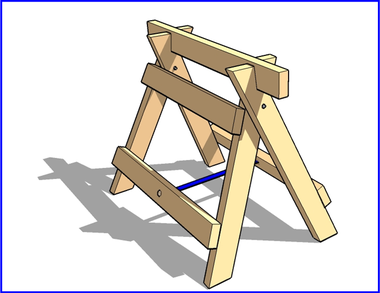
I am curious about the design of those sawhorse supporting the frame. They appear to be collapsible. Some rainy day you may want to show a few pictures of how they work.

Take care,
Tom
Tom (& Linda)
For build info on our former Silver Beatle teardrop:
Build Thread

93503
User avatar
aggie79
Super Duper Lifetime Member
 
Posts: 5405
Images: 686
Joined: Tue Aug 07, 2007 5:42 pm
Location: Watauga, Texas
Top

Postby LarryJ » Fri Jan 06, 2012 10:53 am

aggie79 wrote:Larry -

I am curious about the design of those sawhorse supporting the frame. They appear to be collapsible. Some rainy day you may want to show a few pictures of how they work.

Take care,
Tom


Image

Unfortunately the guy charges $5 for the plans now, I was lucky to get them before he started charging. The plans have a template for cutting the top notch in the legs - other than that the rest of the build is pretty straight forward.

If you watch the video you'll see all the 'attachments' he has made for them.
Have Fun!!!
User avatar
LarryJ
Donating Member
 
Posts: 111
Images: 81
Joined: Tue Jul 19, 2011 10:28 pm
Location: Rancho Cordova, CA
Top

Postby LarryJ » Mon Jan 16, 2012 11:17 pm

Did a bit more work on the trailer this weekend.

Here's a shot of my welding partner letting sparks fly.

Image

Installed tongue gussets,

Image

and corner gussets / mounting brackets for the floor.

Image

Another step down - almost ready for an axle.

Image

Ordered my hitch and trailer wiring kit for the TV, which will be next weekends project.
Last edited by LarryJ on Sun Jul 20, 2014 6:39 pm, edited 1 time in total.
Have Fun!!!
User avatar
LarryJ
Donating Member
 
Posts: 111
Images: 81
Joined: Tue Jul 19, 2011 10:28 pm
Location: Rancho Cordova, CA
Top

Re: LarryJ - Trailer Build #1 (10/23/12 Update)

Postby LarryJ » Tue Oct 23, 2012 6:15 pm

It's been exactly one year since I first started working on my frame.

Shortly after starting, the wife and I made the decision to pay off all our debt (except the house) so fun things, like the teardrop project, were put on hold. Now, after almost a year of no 'extras', we're down to one card and one car - and the card should be gone within the next 6 months.

To celebrate (and because it's my birthday :FNP ), I made the decision that I had waited long enough and put in the order for my axle.

Last Wednesday (10/17), I ordered a #2K (de-rated to #1400) Flexiride axle from Southwest Wheel and today (10/23), less than a week later, it arrived at our shipping dock. Needless to say, I'm just a little excited to get back into this project.

If you are looking into a torsion axle setup - I highly recommend Southwest Wheel. On my initial call I was patched directly over to the guys in the shop to discuss my needs/specifications so they could make sure and build me exactly what I was asking for. When we were done talking specs they patched me back over to sales where I wanted to talk brakes. The sales rep told me that, since the axles were already setup for brakes, I would save money on shipping (and get the axle sooner) if I purchased the brake parts locally and installed them myself - basically he turned down the sale because it wasn't a good deal for the customer (me). Total cost came to $355 - with shipping (TX to N. CA).

I'll be heading over to the shop this Sunday to finish up the mounts and hopefully get the axle mounted up - might actually be able to bring the thing home in a couple weeks (then sawdust will start to fly).

Image
Have Fun!!!
User avatar
LarryJ
Donating Member
 
Posts: 111
Images: 81
Joined: Tue Jul 19, 2011 10:28 pm
Location: Rancho Cordova, CA
Top

Re: LarryJ - Trailer Build #1 (10/23/12 Update)

Postby 225 » Tue Oct 23, 2012 6:57 pm

Looking good!
User avatar
225
Teardrop Master
 
Posts: 198
Joined: Sun Apr 15, 2012 6:07 am
Location: Asheville, NC.
Top

Re: LarryJ - Trailer Build #1 (10/23/12 Update)

Postby Irmo Atomics » Thu Oct 25, 2012 4:18 am

Good call on getting debt free. You might consider keeping one credit card, mostly for buying gas - just pay it off each month. We'll all be looking forward to more pictures of your progress and :new-bday:
Bob
User avatar
Irmo Atomics
Teardrop Master
 
Posts: 195
Images: 64
Joined: Tue Jul 10, 2012 4:58 am
Location: South Carolina
Top

Next

Return to Build Journals

Who is online

Users browsing this forum: No registered users and 9 guests