Lightweight TD build based on Mike's Ultralight design

...ask your questions in the appropriate forums BUT document your build here...preferably in a single thread...dates for updates, are appreciated....

Days 35 & 36

Postby jonw » Thu Nov 10, 2011 6:52 pm

Drilled holes for hatch side latches and install with coated wire to not-yet-installed handle.

Cut kerfs in birch inside ply of 1/4in luan for hatch and dry fitted again to draw where inside ribs can be screwed into when glued.

Attached living hinges to countertop hatch doors via #4 wood screws and put floor tiles on countertop – had to diddle with ring pull cutouts in linoleum tile so they were flush.

Image

Re-dry fitted the hatch frame with the linoleum in place and determined it did not affect the fit.

Image
User avatar
jonw
Titanium Donating Member
 
Posts: 525
Images: 163
Joined: Thu Oct 22, 2009 6:22 pm
Location: Marlboro, Mass.

Days 37 & 38

Postby jonw » Thu Nov 10, 2011 6:57 pm

With Bob’s help glued and screwed 1/4in luan “Revolution Plyâ€
User avatar
jonw
Titanium Donating Member
 
Posts: 525
Images: 163
Joined: Thu Oct 22, 2009 6:22 pm
Location: Marlboro, Mass.

Day 39

Postby jonw » Thu Nov 10, 2011 7:00 pm

Cool fall weather has arrived. Used duct tape to attach two 90 degree PVC pipe elbows and flexible tubing to the battery box and exhaust port, so the tubing is out of the way, which I later replaced with cable ties.

Image

Cut out and fitted roof foam insulation. Binder clips on joists are to keep insulation in place until roof is put on.

Image
User avatar
jonw
Titanium Donating Member
 
Posts: 525
Images: 163
Joined: Thu Oct 22, 2009 6:22 pm
Location: Marlboro, Mass.
Top

Days 40 & 41

Postby jonw » Thu Nov 10, 2011 7:44 pm

Ran kitchen light wiring inside of hatch. Glued and clamped aluminum skin to kitchen hatch.
Image
Image

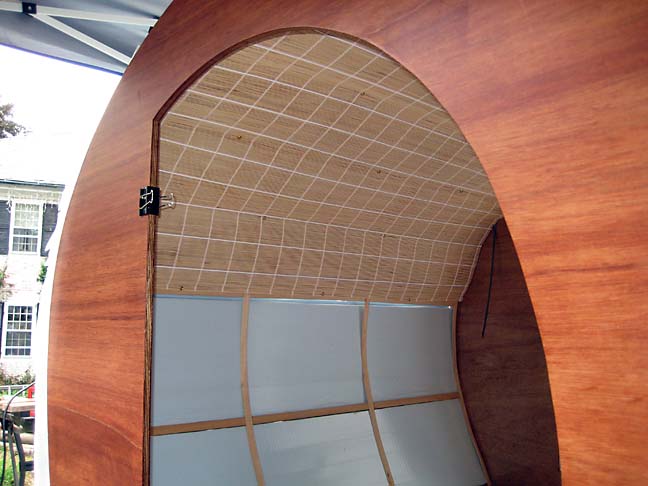
Cut and attached bamboo rollup blinds to interior ceiling
Image

Unpacked aluminum on pallet and discovered it had white stains or corrosion marks on it from sitting inside of wet cardboard :thumbdown:
Image

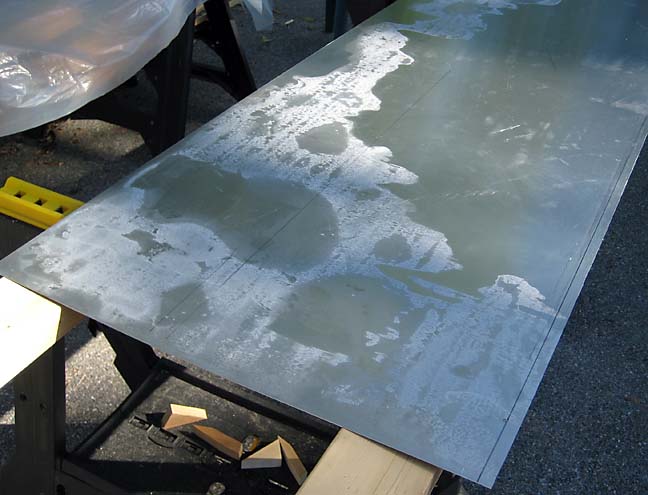
A call to the company I bought the aluminum from and some web research revealed I had stored it improperly. Luckily the back side of each piece was salvageable, only have marks from the wet cardboard on them.

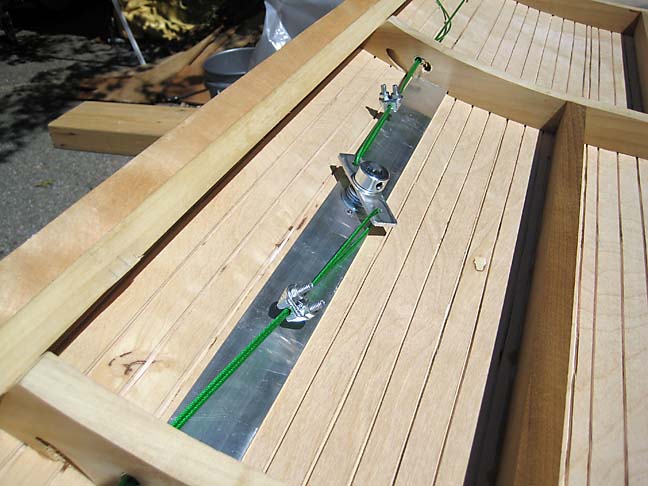
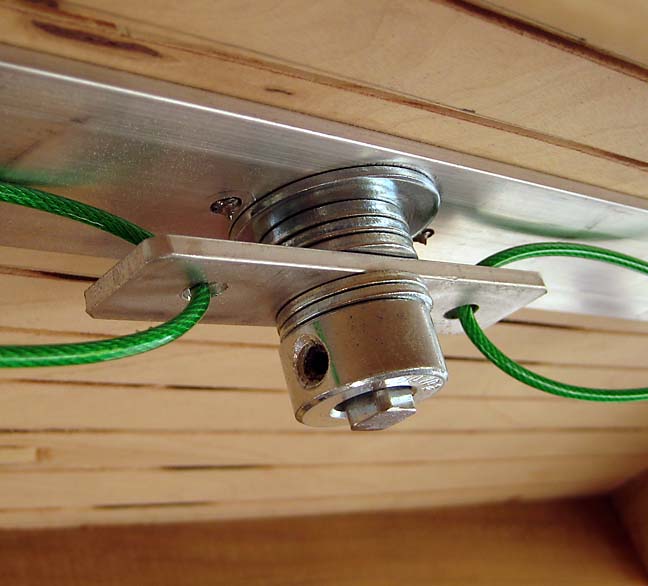
Removed clamps from hatch aluminum skin, drilled holes in aluminum skin for latch and mounted T handle latch mechanism.
Image
Image

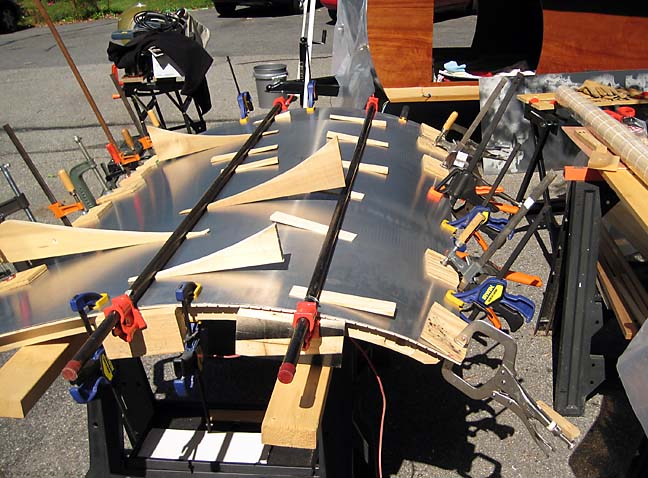
Cut aluminum strips for galley hatch inside edges. Cut aluminum for rear section below countertop.
Used Dremel tool to cut out bamboo ceiling for vent opening, and used pieces of duct tape to keep it the thread/binding from unravelling (they'll be covered by the vent facia)
Image

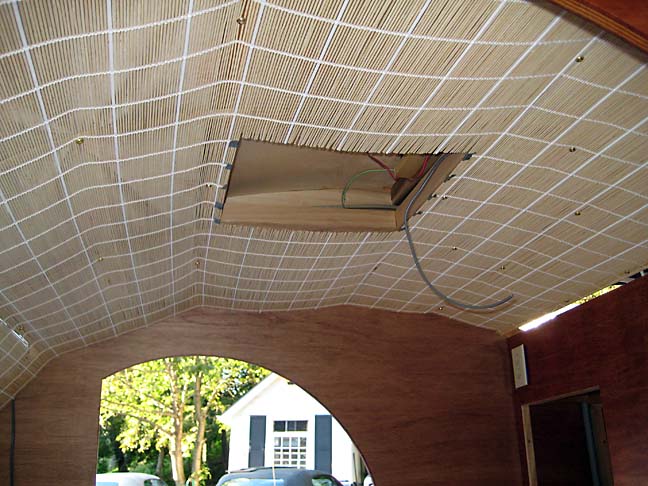
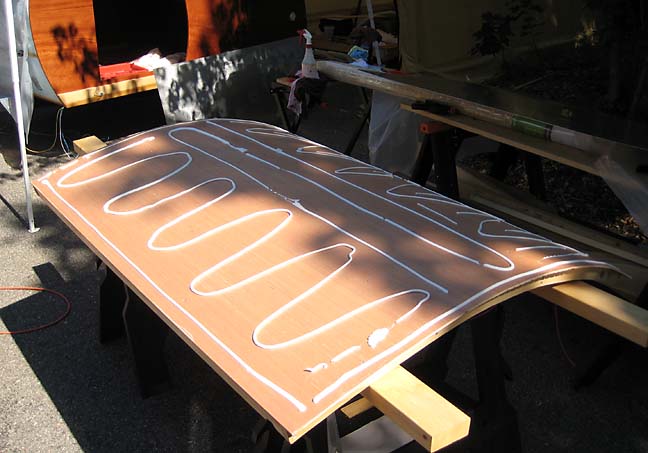
Cut and attached piece of plastic corrugated panel below bamboo ceiling at “headâ€
Last edited by jonw on Thu Nov 10, 2011 9:17 pm, edited 2 times in total.
User avatar
jonw
Titanium Donating Member
 
Posts: 525
Images: 163
Joined: Thu Oct 22, 2009 6:22 pm
Location: Marlboro, Mass.
Top

Days 42 & 43

Postby jonw » Thu Nov 10, 2011 7:52 pm

Cut holes in rear section aluminum for tail lights and for wood trim at bottom (and row of countersunk flush screws at top), then glued and screwed rear section aluminum on. You can see how stained the aluminum is on the right side...
Image

Dry fitted roof aluminum and cut out hole for vent. Also trimmed end and side to fit. Stapled several front foam panels to roof ribs to keep them from constantly falling down. Clamped roof aluminum until able to glue it so bend would be pre-formed. You can see horizontal lines in the aluminum from the cardboard corrugation
Image

Attached LED tail and side running lights, wired them up and tested them
Image

Worked on hatch aluminum stains with auto and then metal polishes and Porter Cable dual action orbital polisher. Very messy but some improvement on the rear panel, as you can see in the above picture. Decided I needed something more industrial, so I ordered some Nuvite and bought a rotary polisher next trip to Harbor Freight.
User avatar
jonw
Titanium Donating Member
 
Posts: 525
Images: 163
Joined: Thu Oct 22, 2009 6:22 pm
Location: Marlboro, Mass.
Top

Days 44 - 46

Postby jonw » Thu Nov 10, 2011 7:58 pm

Glued and (temporary) screwed aluminum roof/front piece using GE Silicone II caulk instead of construction adhesive.
Image

Attached roof vent and wired the it’s 12V fan. Also attached molding along hatch wall and rear sections.
Image

Ordered Nuvite aluminum polishes to remove defects and polish to a mirror finish (if I decide to go that far).

Attached the hatch to the body via the hurricane hinge. Attached striker plates to inside of kitchen area for hatch latch to lock into
Image

Discovered the hurricane hinge puts ¼in space at top of hatch, which changes the way the bottom of the hatch frame rested on the counter top. It wouldn’t close. Had to plane and sand off approx. 1/4in off the hatch frame footer piece to get it to close. Doh!

Attached and wired up the hatch light
Image

Due to rain, urethaned interior molding inside my house
User avatar
jonw
Titanium Donating Member
 
Posts: 525
Images: 163
Joined: Thu Oct 22, 2009 6:22 pm
Location: Marlboro, Mass.
Top

Days 47-49

Postby jonw » Thu Nov 10, 2011 8:06 pm

Worked on hatch molding – not happy with the way it’s going on so I shifted onto something else...
Image

Attached door hinge and put trim around door openingss and cut T molding for one door
Image

Attached T molding to door and put door on hinge. Dry fit closed and everything looks good
Image

With Bobs help attached passenger door hinge to body, T molding to door, and attached door to body via hinge.
Image

Used Dremel to file off pop rivet stems on the hatch edge moulding that broke off in the wrong place.

Attached finish molding to bedroom cabinet openings, and kitchen wall cabinet joints
Image
Last edited by jonw on Thu Nov 10, 2011 8:20 pm, edited 1 time in total.
User avatar
jonw
Titanium Donating Member
 
Posts: 525
Images: 163
Joined: Thu Oct 22, 2009 6:22 pm
Location: Marlboro, Mass.
Top

Day 50

Postby jonw » Thu Nov 10, 2011 8:07 pm

Polished aluminum front/roof (forward of vent) using Nuvite system. Very messy and took a while to get the hang of it, but it did work. Did NOT use polish to make it shiny like an airstream (at least yet)
Image
User avatar
jonw
Titanium Donating Member
 
Posts: 525
Images: 163
Joined: Thu Oct 22, 2009 6:22 pm
Location: Marlboro, Mass.
Top

Day 51

Postby jonw » Thu Nov 10, 2011 8:12 pm

Made custom gaskets from rubberized shelf liner for each door latch. Installed door latches and weatherstripping on both doors. Both latches are keyed the same – yeah!
Image

Attached vertical drip moulding in front of hinges for both doors
Image

Drilled holes and dry fit roof/wall moulding for both walls. Picture above shows it being dry fit - screwed in all the way around sans any caulking

Measured dimensions of fender structure to hold fenders out from body and over wheels. Rough cut poplar pieces to work on tomorrow...
Last edited by jonw on Thu Nov 10, 2011 8:19 pm, edited 1 time in total.
User avatar
jonw
Titanium Donating Member
 
Posts: 525
Images: 163
Joined: Thu Oct 22, 2009 6:22 pm
Location: Marlboro, Mass.
Top

Day 52

Postby jonw » Thu Nov 10, 2011 8:18 pm

Removed, caulked, and re-installed roof and rear edge molding. Installed other side of hatch moulding and molding along hatch bottom edge
Image

Disconnected wiring and removed hatch to cut a slot and install screw to keep it from sliding sideways. Put molding along hatch bottom under edge but it is not touching the body. With a double layer of thick weatherstripping hatch cannot be closed so it latches. Later replaced with different weatherstripping that fit better.

Put weatherstripping on door T aluminum, and inside of door hinges.
Image

Urethaned hatch bottom that was planed last week, as well as notches in front “bumperâ€
Last edited by jonw on Fri Nov 11, 2011 9:07 am, edited 1 time in total.
User avatar
jonw
Titanium Donating Member
 
Posts: 525
Images: 163
Joined: Thu Oct 22, 2009 6:22 pm
Location: Marlboro, Mass.
Top

Day 53+

Postby jonw » Thu Nov 10, 2011 8:32 pm

My laptop needed to be sent out for repair so I was unable to keep a daily diary on it. At this point I was only a few days away from being functionally done. Here's from memory and pictures I do have

Spent the weekend in it at the music festival and realized I needed to do a few more things, like adding door pull handles to make closing the door easier, and curtain rods for some privacy. Here you can also see the screen molding along the bamboo-wall edge that helps the flexible bamboo follow the profile and keep from sagging
Image

The trailer had sat out in rain before without any leaks, but I drove through a torrential downpour on the way to the music festival and found places where there was water leakage.

Installing the drip moulding above the doors certainly helped. Bend carefully...
Image

I hadn't followed Grants instructions on letting the body portion of the hatch hinge stick out over the side because I didn't understand it. Now I do, so I used some leftover drip molding to fabricate some hinge water diverters
Image
Image
Notice also the piece of weatherstripping i put in the gap in the hatch hinge (remember that 1/4in?)
Last edited by jonw on Thu Nov 10, 2011 9:20 pm, edited 1 time in total.
User avatar
jonw
Titanium Donating Member
 
Posts: 525
Images: 163
Joined: Thu Oct 22, 2009 6:22 pm
Location: Marlboro, Mass.
Top

Final Finishing Touches

Postby jonw » Thu Nov 10, 2011 8:46 pm

I needed something to hold the hatch open and I was not enthralled with using gas struts, nor had I seen anything on the forum that I liked. I had been using a dowel with chair leg bumpers on both ends but the wind blew the hatch and the dowel collapsed and nearly went through the bedroom wall. So I designed this simple system that works great:
Image

Here's a picture of the finished kitchen area as we used it on a mid-October weekend campout nearby
Image
Image

I got ideas for pull-down cabinet doors and a pull-out shelf from some other teardrops at that weekend. Here's what I did:
Image
Image

And here's a panorama shot of the finished interior
Image

So, that's it! I hope you find what I did interesting and helpful and useful if you decide to build your own teardrop. And I hope to meet every one of you at campouts in the coming years!
User avatar
jonw
Titanium Donating Member
 
Posts: 525
Images: 163
Joined: Thu Oct 22, 2009 6:22 pm
Location: Marlboro, Mass.
Top

Postby sagebrush » Thu Nov 10, 2011 9:51 pm

:thumbsup: Great trailer!!!!!!!! :applause: Like your hatch latches.
Will
We ain't skeer'd of the dark!

Living large in a small way!
User avatar
sagebrush
Platinum Donating Member
 
Posts: 608
Images: 161
Joined: Tue Feb 23, 2010 9:09 pm
Location: Casper, WY.
Top

Postby canned o minimum » Thu Nov 10, 2011 10:43 pm

Wonderful job ! Did it all come in AT or UNDER budget ? How much does it weigh ?

When I git mine "modified" Imma weigh it again and see jus what weight I saved .. or gained .

She weighed 785 dry.. now she's full of camp gear and clothes..etc.. I'm certain that she weighs a bit more with all the "stuff" in her...we'll see.
canned o minimum
1000 Club
1000 Club
 
Posts: 1266
Joined: Sun Mar 21, 2010 11:54 pm
Location: Riverside,Ca.
Top

RE: Build Journal

Postby mezmo » Thu Nov 10, 2011 10:54 pm

Hi jonw,

Congrats on your build - nice looking TD you've built there!

And a great build journal to accompany it! Your narrative and pics are a
great introduction and example for anyone wondering what a build would
entail.

Since each build has its own interesting details, I especially like your hatch
handle/lock and the hatch supports with the stow clips. But I was curious if
they are" secured" when in the opened position, so the hatch can't get
blown further upwards by a wind gust, since that is what prompted you to
change to the new 'secured for travel' supports. I really couldn't tell by
the pic.

Now, just go out and enjoy it!

Happy Camping!

Cheers,
Norm/mezmo
If you have a house - you have a hobby.
User avatar
mezmo
1000 Club
1000 Club
 
Posts: 1817
Images: 194
Joined: Fri Jan 01, 2010 4:11 am
Location: Columbia, SC
Top

PreviousNext

Return to Build Journals

Who is online

Users browsing this forum: Google [Bot] and 11 guests