2bit build #2 "The Deuce"

...ask your questions in the appropriate forums BUT document your build here...preferably in a single thread...dates for updates, are appreciated....

2bit build #2 "The Deuce"

Postby 2bits » Sun Jun 03, 2012 12:13 pm

Since I won't have the truck camper anymore, I need a replacement. As soon as I get moved in to the land, I had thought about building a "teardrop in a truck" for my new truck, but that will be a hassle to move in and out of the truck bed being so heavy, and since I just got my 74 Monte Carlo up and running again it will look really cool cruising and camping with it, so I decided to build another TEARDROP to camp in while I take my time building the standy.

Yes that means I have #2 and #3 already on the drawing board haha! :twisted:

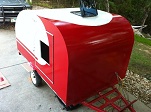
I realized that I have a new AC unit, and 5 sheets of 4x8 black aluminum leftover from the LT build, that's $700 right there. I need to do a budget and quick build but still cool looking. So using what I have learned that I do not need from my last build... my plan is to also use the dimensions of the material I have available to me. It will be a 4x8 design which will greatly simplify the build. To further save money and time, I plan on using the little square harbor freight trailer, and instead of moving the axle back, I will extend the front of the frame. It will have 4x8 plywood walls from the box store, stained on the inside and the black aluminum on the top and sides of the exterior. A 1/8" ply headliner will sit on top of the spars which will be exposed to the interior and the aluminum exterior will sit right on top of that. No insulation and no 110 or 12v power beyond a well placed power strip. I found with the LT that was all I ever needed, that will save loads right there. Another time saver is there will be only one door, no galley or hatch, and have just one shelf inside. The door will be square to ease construction. I'll use Grant's T molding, black crank out window, door latches, and a harsh environment plastic hinge. The AC window unit will sit sideways on the inside shelf on two drawer-slides, and there will be a latching cover on the side of the teardrop so the AC unit can slide in and out as needed, no special ducting needed. All this combined should make for a quick and easy but still very good quality and cool looking build. I'll need to do SOMETHING about those wheels though but for now I'll probably just paint them gloss black since everything else will be black.

I was toying with the idea if building it like a cargo trailer using metal framing because it reduces the rot opportunity, and reduces build time, but I struggled with the door and AC unit areas. I ended up where I was welding a whole frame together. Plus attaching the roof and what kind of spars was leaving me scratching my head so I fell back on the old faithful plywood. Remember the mantra: Seal the grain... Seal the grain... Seal the grain...

The shape will be somewhat of a KIT style with the axle way at the back
Image

The interior is going to be very similar to the Dragon Wagon stylistically with no galley, one shelf, and exposed stained spars:
Image
Last edited by 2bits on Sun Jul 21, 2013 8:19 pm, edited 5 times in total.
Thomas

Image
User avatar
2bits
2bit Member
 
Posts: 5132
Images: 8
Joined: Thu Dec 27, 2007 6:04 pm
Location: Lake Tawakoni, TX

Re: 2bit build #2

Postby High Desert » Sun Jun 03, 2012 5:36 pm

Sounds cool Thomas. I like the whole keep it simple idea and having all the materials on hand already should make for a relatively quick build. Not to mention that's a kewl profile 8)
Shaun

"it's not the years honey, it's the mileage"
High Desert
Platinum Donating Member
 
Posts: 8780
Images: 27
Joined: Wed Apr 08, 2009 1:46 pm
Location: SW Washington state

Re: 2bit build #2

Postby StandUpGuy » Sun Jun 03, 2012 7:25 pm

2bits wrote:Since I won't have the truck camper anymore, I need a replacement. As soon as I get moved in to the land, I had thought about building a "teardrop in a truck" for my new truck, but that will be a hassle to move in and out of the truck bed being so heavy, and since I just got my 74 Monte Carlo up and running again it will look really cool cruising and camping with it, so I decided to build another TEARDROP to camp in while I take my time building the standy.

Yes that means I have #2 and #3 already on the drawing board haha! :twisted:

I am starting to questioning your sanity. :) When I was last posting here a few months ago, you had just gotten the truck camper. What happened to that?
User avatar
StandUpGuy
1000 Club
1000 Club
 
Posts: 1090
Images: 52
Joined: Sun Mar 27, 2011 6:15 pm
Top

Re: 2bit build #2

Postby txcamper » Sun Jun 03, 2012 9:39 pm

Looking forward to your build, I have a buddy thinking of building one and your plans sound like a good option for what he wants. Subscribing to keep up with this one.
User avatar
txcamper
Teardrop Master
 
Posts: 120
Images: 129
Joined: Wed Mar 21, 2012 12:25 am
Top

Re: 2bit build #2

Postby 2bits » Sun Jun 03, 2012 9:56 pm

Haha, Yes I still have the truck camper but I have to sell the truck to get my mobile home moved out to my land, and the camper goes with it since it is designed specifically for that year model truck and won't fit my new one. The truck camper was always to be a temporary deal anyway to bridge the gap between my old teardrop that I sold and my new standy. Since the standy will take a while I need something to camp in for the cool season ahead in a few months so the new teardrop is going to replace the truck camper as a stand in for the standy until it is built. The whole idea is that I MUST have a camper at all times!
:)

On my way home from the land tonight I started rethinking the metal framework too... I started with this idea originally and I might have a solution. This would enable the entire sub structure to be completed in one day. I am thinking about 1/16 square tube for the uprights and spars, and my breakthrough idea of how to attach the exterior aluminum to the roof is a simple 1/16 strip along the edges. My problem was how to make it bend, but tonight I realized that the rest of the frame will be super strong so all I would need is a flat piece to screw into.

This leads me to a question for the group... I have heard (Or remember hearing) that you should not attach aluminum to steel as they will affect each other and bad things happen. Am I thinking of welding the two or am I crazy? What am I thinking about that I can't remember, or better yet, is there any problem with sitting aluminum next to steel?
Thomas

Image
User avatar
2bits
2bit Member
 
Posts: 5132
Images: 8
Joined: Thu Dec 27, 2007 6:04 pm
Location: Lake Tawakoni, TX
Top

Re: 2bit build #2

Postby High Desert » Sun Jun 03, 2012 10:24 pm

Thomas, IIRC Eddie Miller has built more than one trailer with the basic techniques you're thinking about :thinking:

There can be a reaction between aluminum and steel, but a barrier of silicone or plastic will pretty much negate it. On large trucks we install a plastic piece between the duals when mounting an aluminum wheel against a steel one. I bet you'd be fine on a TT.
Shaun

"it's not the years honey, it's the mileage"
High Desert
Platinum Donating Member
 
Posts: 8780
Images: 27
Joined: Wed Apr 08, 2009 1:46 pm
Location: SW Washington state
Top

Re: 2bit build #2

Postby KCStudly » Sun Jun 03, 2012 10:52 pm

It's called bi-metallic corrosion. Essentially the two different metals form a battery with moisture and the effect is more corrosion to both than if either were just exposed to the moisture by themselves.

The plastic barrier (or sealant, or good coating of epoxy paint) should last a long time and be enough of an insulator to stop the corrosion.

However, I think you should stick with your plan to keep things simple and traditional. For the intended purpose (short term goal, quick build, low cost) I think the simple plywood construction that you first outlined would suit your needs best.

I've already started thinking that I should have designed simpler on TPCE.

Anyway, glad to see your land deal progressing, and glad to have you back building, or at least thinking about it. :thumbsup:
KC
My Build: The Poet Creek Express Hybrid Foamie

Poet Creek Or Bust
Engineering the TLAR way - "That Looks About Right"
TnTTT ORIGINAL 200A LANTERN CLUB = "The 200A Gang"
Green Lantern Corpsmen
User avatar
KCStudly
Donating Member
 
Posts: 9640
Images: 8169
Joined: Mon Feb 06, 2012 10:18 pm
Location: Southeastern CT, USA
Top

Re: 2bit build #2

Postby 2bits » Mon Jun 04, 2012 10:58 am

That is great information guys, thank you! I still have it on the drawing board since I have friends with welders and are glad to help. "If" I went the metal route, I am concerned that there is no way to put a barrier on the fastener as there would be a screw going through the aluminum skin through to the steel frame. Would that small of a "touch" be inconsequential as long as a barrier is placed on the majority of the surface? Just trying to think it through.
Thomas

Image
User avatar
2bits
2bit Member
 
Posts: 5132
Images: 8
Joined: Thu Dec 27, 2007 6:04 pm
Location: Lake Tawakoni, TX
Top

Re: 2bit build #2

Postby aggie79 » Mon Jun 04, 2012 1:34 pm

Thomas,

So this is going to built before LCG? :roll:

A steel frame is interesting. Do you know any one that can roll the radii in steel tubing? There are a gazillion steel framed cargo trailers with aluminum skins, so while there is a corrosion potential, I don't think it is that bad unless you're by the coast or live up north where they salt the roads.

I think I'd just builld the box out of wood and seal it with some of GPW's wood seal, particularly if you are skinning it with aluminum.

If you're interested I think I have a 59-60" better than hurricane hinge that I'd donate to the build. I also have some LED clearance & stop/turn/tail lights and miscellaneous hardware you that you're welcome to have. (I'm re-doing the garage and clearing out stuff to get ready for another build to start probably next spring.) Call me if you're interested in any of that stuff.

Take care,
Tom
Last edited by aggie79 on Mon Jun 04, 2012 3:31 pm, edited 2 times in total.
Tom (& Linda)
For build info on our former Silver Beatle teardrop:
Build Thread

93503
User avatar
aggie79
Super Duper Lifetime Member
 
Posts: 5405
Images: 686
Joined: Tue Aug 07, 2007 5:42 pm
Location: Watauga, Texas
Top

Re: 2bit build #2

Postby KCStudly » Mon Jun 04, 2012 2:33 pm

Tom (aggie79) is correct. Some times I forget that there are places in the world that don't have tons of salt dumped on the roads every winter.

Where I live I would either go all steel or all aluminum.

The resto-mod 4x4 Rover project that I am bartering on has a mostly aluminum body with steel chassis and a combination of aluminum rivets and steel fasteners. Most of the aluminum is intact, and the steel isn't bad, but wherever the twain have been fastened together there is at least some pitting and errosion of the aluminum (egg shapped holes with thinned edges).

YMMV
KC
My Build: The Poet Creek Express Hybrid Foamie

Poet Creek Or Bust
Engineering the TLAR way - "That Looks About Right"
TnTTT ORIGINAL 200A LANTERN CLUB = "The 200A Gang"
Green Lantern Corpsmen
User avatar
KCStudly
Donating Member
 
Posts: 9640
Images: 8169
Joined: Mon Feb 06, 2012 10:18 pm
Location: Southeastern CT, USA
Top

Re: 2bit build #2

Postby corncountry » Mon Jun 04, 2012 3:11 pm

Thomas
If you build a steel frame you could use VHB tape to hold the top and sides, ( no metal fasteners). Without a backing I would use .040 or thicker aluminum. This has worked out well for me in Iowa weather. No oil caning. The tape has enough give in it to move with the expansion.

Jim
User avatar
corncountry
Donating Member
 
Posts: 142
Images: 58
Joined: Sun Aug 09, 2009 5:43 pm
Location: S.E. Iowa
Top

Re: 2bit build #2

Postby 2bits » Mon Jun 04, 2012 4:29 pm

Thanks guys!

Regarding the corrosion thing, I thought it through in my head and I realized that I was thinking of the fastener as a "conductor" of corrosion! LOL...

Tom, Yes, one big reason for the Teardrop is due to LCG! I cannot miss that gathering, or camping season in general! I know you had expressed interest in a steel frame before, and this is something I had always wanted to try too, so with my new idea I think it is getting more feasible by the minute. My concern was the radius as well, but I think that once the side frame, bottom rail and spars are welded, the flat strip on top could be tacked at the very front end and then pulled down to each spar/upright by hand and tacked in place around the radius, then to the next and the next spar until done. It would have horizontal crossmembers in the walls for the door on one side and AC unit on the other, otherwise it will only be vertical uprights and roof spars. That's a pretty basic design that could be done in a day with no glue or screw or staining or sealing anything, that is what excites me.

After that, cut and screw in the paneling on the inside, lay in the insulation, then cut and screw the aluminum to the outside, add the trim for the edges and aside from the shelf, roof vent, AC and door I'd be 100% done!

Jim, Thank you for that additional thought, that is good information and it is also true of many wood builds that there are no fasteners, and just use the door/window/vent trim to hold it in place. I don’t know why I forgot that, I guess just having a metal frame available I felt like it should be fastened, I guess I am the one getting “Rusty” hahah. Oh and luckily the aluminum I have is either .040 or .062 I can't recall and my records are conflicting, but it's thick at any rate. Man, we are well on our way to saving even MORE time! Nice! :thumbsup:
Thomas

Image
User avatar
2bits
2bit Member
 
Posts: 5132
Images: 8
Joined: Thu Dec 27, 2007 6:04 pm
Location: Lake Tawakoni, TX
Top

Re: 2bit build #2

Postby 2bits » Fri Jun 08, 2012 10:08 pm

I sold the truck camper last night, I am officially camperless! :shock:
Thomas

Image
User avatar
2bits
2bit Member
 
Posts: 5132
Images: 8
Joined: Thu Dec 27, 2007 6:04 pm
Location: Lake Tawakoni, TX
Top

Re: 2bit build #2

Postby KCStudly » Fri Jun 08, 2012 10:15 pm

Whatever became of your canned ham? I think you said your mother gave it to you; the one in the middle pic of your signature line.

Is that still in the wings?
KC
My Build: The Poet Creek Express Hybrid Foamie

Poet Creek Or Bust
Engineering the TLAR way - "That Looks About Right"
TnTTT ORIGINAL 200A LANTERN CLUB = "The 200A Gang"
Green Lantern Corpsmen
User avatar
KCStudly
Donating Member
 
Posts: 9640
Images: 8169
Joined: Mon Feb 06, 2012 10:18 pm
Location: Southeastern CT, USA
Top

Re: 2bit build #2

Postby 2bits » Fri Jun 08, 2012 10:36 pm

Yup, It is still at my Mom's waiting in line LOL... I am living in a trailer park right now, and I am working 110% to get my trailer moved out to the woods on my land, that will take at least another month, maybe two.

Then I'll need a month to get settled, and that will leave me two months at the most before the first South Central gathering of the season in late Sept, and if I have to miss that one, the biggest gathering in the region; LCG is the end of Oct and I simply cannot miss that gathering so that is my "Drop Dead" date for getting as camper done. The standy build is going to be a major undertaking that will last probably a year and I want to take my time doing it, so I need something cool to tool around in until I am ready to start on it. I realized I already had the Aluminum and could put together a simple design very quickly that would do all I needed to do and thus was born the 2BTD2 ! I always wanted to do a metal frame too so this will be fun, and it will be cool to have a teardrop again!

Once I get it done I will need to focus back on the land for a bit to put up the carport, build a deck around the trailer and the woodshop, finish my driveway, then I will build the standy! Thanks for asking!
Thomas

Image
User avatar
2bits
2bit Member
 
Posts: 5132
Images: 8
Joined: Thu Dec 27, 2007 6:04 pm
Location: Lake Tawakoni, TX
Top

Next

Return to Build Journals

Who is online

Users browsing this forum: No registered users and 14 guests