1955 Benroy - Rebuild (08/20/2013 - Painted! Now reassembly)

...ask your questions in the appropriate forums BUT document your build here...preferably in a single thread...dates for updates, are appreciated....

1955 Benroy - Rebuild (08/20/2013 - Painted! Now reassembly)

Postby TRP » Sun Jul 22, 2012 10:13 pm

Greetings -

After poking around for a few weeks and asking all sorts of questions, I figured I'd better get started on my rebuild. I will try to document my progress in this thread. My goals are to rebuild the exterior of the Benroy to look as close as possible the original design. I will replace the piano hinge with a nice hurricane hinge. The will have a few minor improvements to make it a little be more comfortable.It will be insulated with foam and then I will place a 1/8th inch birch paneling on top of that.

I will be starting with the remnants of an original 1955 Benroy De Lux. The person I purchased it from had taken it apart where it sat stacked in a pile of parts under a tree for more than 10 years. When he dissembled it, He saved all of the trim and the original aluminum skins. He was also able to to save several pieces of the original sides. Both doors are intact. The galley sink and stove are missing. Also missing are the original water tank and rear hatch latch/handle.

At this time I do not think I will be trying to reconstruct the galley with it's original sink, stove, or water tank. I'm torn between having the original skins TIG welded and cleaned up or getting all new skins.

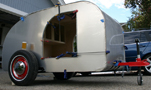
Below are the images of how the trailer used to look before it was taken apart:
942919429294293

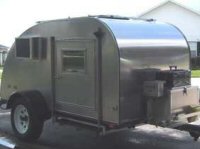
Below are the pictures of how it looked when I found it and how it looked once I got it home:
94294942959429694297942989438494385943869438794388943919439094389943929439394395
Last edited by TRP on Tue Aug 20, 2013 12:54 pm, edited 17 times in total.
User avatar
TRP
Silver Donating Member
 
Posts: 316
Images: 341
Joined: Wed Jun 27, 2012 2:50 pm
Location: Morgan Hill, CA

Re: 1955 Benroy - Rebuild

Postby TRP » Sun Jul 22, 2012 10:17 pm

Once I got everything unpacked and stowed away at the house, the first order of business was to get the trailer out to the sandblaster for cleaning and painting.

Here is the trailer before I drug it out to the sandblaster:
943979439894399944009441194412

After Dennis finished cleaning it up. Much better...
956239562495625

Originally I wanted the frame to be black, with just the tongue, fenders, and wheels in red. Oh well, the critical part is that it's painted and no longer rusty.

Now I can get started on building me a teardrop! :thumbsup:
User avatar
TRP
Silver Donating Member
 
Posts: 316
Images: 341
Joined: Wed Jun 27, 2012 2:50 pm
Location: Morgan Hill, CA

Re: 1955 Benroy - Rebuild

Postby TRP » Sun Jul 22, 2012 10:40 pm

I started my first actual building yesterday afternoon (Saturday July 21st). I started with coating the base with the rubberized coating. I doubled the 3/4 inch birch plywood in one section for a spare tire mount underneath. Once the base was bolted to the frame with 1/4 stainless steel nuts and bolts, it was on to the sides. I had both original sides and even a paper cutout that was supplied from the previous owner. The paper plan and the aluminum skin were off in several places, including the size, shape, and placement of the door. I opted to go with the shape and placement from the original skins. I traced the original skins and cut the sides from multi-laminate birch 3/8" plywood. It was pretty expensive compared to other fir plywood. The multi-laminate stuff was very rigid it looked great. It has 10 pieces of laminate, instead of the standard 3 or 4. It was ridiculously expensive compared to some of the other materials I saw. I probably could have used marine grade plywood and been okay, but that was only $25.00 dollars cheaper per piece. I sprung for the extra $50.00 for the two pieces. In retrospect - the wood won't be seen once everything is done, so maybe I could have saved a few bucks on this step. Oh well, live and learn.

Once the sides were cut, I clamped them together and cleaned them up with the belt sander. I mocked up / temporarily placed the sides on the frame to see how she looked.

I then turned my attention to the rear apron. It's a simple piece of poplar bolted to the rear of the trailer frame. The rounded shape of the rear apron is achieved through the use of 4 formers. The formers are the same shape as the bottom rear corner of the trailer side wall. I was able to trace one of the original formers I had on hand. These 4 pieces are then glued and screwed to longitudinal piece of poplar which gets bolted to the rear of the frame.
957579575895759

957689576495765

Oh, and that's my daughter and our 17+ year old cat, "Beans". She has just been relegated to the 'garage cat' after she started to forget where the litter box is/was.

Thanks for letting me share my progress... i't's really starting to come together.
Ted
Last edited by TRP on Mon Jul 23, 2012 9:21 am, edited 4 times in total.
User avatar
TRP
Silver Donating Member
 
Posts: 316
Images: 341
Joined: Wed Jun 27, 2012 2:50 pm
Location: Morgan Hill, CA
Top

Re: 1955 Benroy - Rebuild

Postby TRP » Sun Jul 22, 2012 10:43 pm

By this time it's Sunday the 22nd...

Once the apron was done I was able to tack the sides in place. At this time I tacked a few of the roof spars in place, just to keep the sides from racking back and forth until I figure out what I'm going to do on the inside:

957669576795764

It was a long day in the garage, I made a lot of sawdust and it was time for a beer:
95773

So that's where she stands at this point...
:beer:
Last edited by TRP on Sun Jul 22, 2012 10:52 pm, edited 1 time in total.
User avatar
TRP
Silver Donating Member
 
Posts: 316
Images: 341
Joined: Wed Jun 27, 2012 2:50 pm
Location: Morgan Hill, CA
Top

Re: 1955 Benroy - Rebuild

Postby TRP » Sun Jul 22, 2012 10:50 pm

Just a couple of shots of the original galley hinge and one of the original galley sides.
957629576195760

I also included a shot of one of the rear apron formers:
95772957709577195774

I also placed the original rear hatch and apron on the trailer for giggles:
9576995763

I'll get back on the build later this week. I'm awaiting some parts from vintage trailer supply. A new tongue jack, a fantastic fan, and some other goodies. Once those arrive I can pick my final spar placement and start lining up some interior paneling.

Until next time,
Ted
User avatar
TRP
Silver Donating Member
 
Posts: 316
Images: 341
Joined: Wed Jun 27, 2012 2:50 pm
Location: Morgan Hill, CA
Top

Re: 1955 Benroy - Rebuild

Postby cop1406 » Sun Jul 22, 2012 11:07 pm

Looks like an awesome start!! :thumbsup:
User avatar
cop1406
Donating Member
 
Posts: 63
Images: 14
Joined: Fri Apr 27, 2012 1:03 am
Top

Re: 1955 Benroy - Rebuild

Postby High Desert » Sun Jul 22, 2012 11:34 pm

cop1406 wrote:Looks like an awesome start!! :thumbsup:

+1, this is looking really good. I like that 3/8 material you used on the side walls. Seem like that should be just right. 8)
Shaun

"it's not the years honey, it's the mileage"
High Desert
Platinum Donating Member
 
Posts: 8780
Images: 27
Joined: Wed Apr 08, 2009 1:46 pm
Location: SW Washington state
Top

Re: 1955 Benroy - Rebuild

Postby stevegsmith » Thu Jul 26, 2012 8:00 pm

Ted,
Looks like you're making quick progress. Nice job.
I'm doing a quick clean-up on my 1954 Benroy. Just pulled the hubs yesterday to repack the bearings. The castings on the hub are pretty rough and it makes me wonder how well balance they are and if the cast iron has sagged over the years. My plan is to find some new inner grease seals, repack, and slap the thing back together with naked rims. Then, I'll throw a turn on them for a little backyard eyeballing. If they look good, I'm going to attempt a spring over conversion to buy 3" of lift.
Just curious, which tires are you using and have you done any bearing work?
Thanks,
Steve
Steve

Green Lantern Corpsmen
User avatar
stevegsmith
Teardrop Advisor
 
Posts: 86
Joined: Thu Jul 26, 2012 7:17 pm
Location: Berkeley, CA, USA
Top

Re: 1955 Benroy - Rebuild

Postby stevegsmith » Thu Jul 26, 2012 8:27 pm

BTW, if you're planning on painting the siding with the original red paint scheme, I'm happy providing you with the measurements if you don't have them.
Attachments
1954_Benroy_Teardrop.JPG
1954_Benroy_Teardrop.JPG (151.04 KiB) Viewed 4300 times
Steve

Green Lantern Corpsmen
User avatar
stevegsmith
Teardrop Advisor
 
Posts: 86
Joined: Thu Jul 26, 2012 7:17 pm
Location: Berkeley, CA, USA
Top

Re: 1955 Benroy - Rebuild

Postby TRP » Mon Jul 30, 2012 12:29 pm

I got a bit more done yesterday.

Sides are up, insulated and skinned. I noticed a really bad bow (front to back) to both walls this morning. I temporarily mouted the inner skins unril I could get more Titebond II. I'm going to need to pull the inner skins off and shore up the walls a bit more on the horizontal axis. Then I'll re attach the inner walls with some more appropriate nails and some glue. The nails I originally used and a really fine head and went nearly clear through the 1/4" Birch skins. I could most likely get away with using the same nails and just dialing down the pressure on the gun a bunch.

Anyway - enjoy the photos:


962069620496205962089620796210

I had an accident with the belt sander and had to go to the E.R. before I could get the trademark "Ice cold beer" photo. I'll try and get one today after I clean up the garage. Regarding the Finger: Lost most of the finger nail 2/3rds of the nail bed and top of the first knuckle / finger tip. 80 grit on the belt will do that...

:beer:

Ted
Last edited by TRP on Mon Jul 30, 2012 1:21 pm, edited 5 times in total.
User avatar
TRP
Silver Donating Member
 
Posts: 316
Images: 341
Joined: Wed Jun 27, 2012 2:50 pm
Location: Morgan Hill, CA
Top

Re: 1955 Benroy - Rebuild

Postby TRP » Mon Jul 30, 2012 1:12 pm

Steve!

Nice looking original Benroy! How long have yo had it? Where did you pick it up? I'd love some photos of the inside. Details of the galley and hatch handle would be great too!

If you had some dimensions of the side graphics that would help a lot. I need to figure out where to get some nice hubcaps for mine.

Thank so much!
Ted
User avatar
TRP
Silver Donating Member
 
Posts: 316
Images: 341
Joined: Wed Jun 27, 2012 2:50 pm
Location: Morgan Hill, CA
Top

Re: 1955 Benroy - Rebuild

Postby stevegsmith » Mon Jul 30, 2012 5:06 pm

Ted, you know you're not supposed to file your nails with those things. :(

Sure, I'd be happy to take some detail pics for you. I found the pink slip the other day and it turns out it is a 1955 as well.

I bought it in '98 with a friend from a guy just north of Berkeley in a little town called Kensington. Nearly intact but the bottom left corner and the outer laminated spars of the rear hatch were mostly disintegrated. New hatch is on the horizon. What's the condition of your rear hatch? I have to make some new laminated spars. The original hatch was pretty delicate. The material sandwich from the inside out was 1/8" ply, spars (two outer, one inner), then just the aluminum. I would have thought they'd have sandwiched the spars with play then just skinned the outside. I'm surprised there aren't more dents. When I remake the hatch, I plan on doing the latter.

Not sure if the water tank is original because I just pulled it yesterday and underneath was a copy of the Berkeley Daily Gazzette from July of 1966. Perhaps someone just did a little cleanup of the old one back in 66. It's 10x12x18, painted it dark green. It's galvanized and has an interior baffle.

The interior was simply clear coated with an upper 2-door cabinet forward and one open shelf aft. After we do a general wipe down, I think we're going to wall paper with old school light plaid on just the walls, not ceiling. My wife's idea. I fought it at first but the walls are so dingy and beat-up that I think it will be very cool and "period" with the plaid. Reminds us of "Moonrise Kingdom". If you haven't seen it, go see it. Such a great flick.

Someone mounted a gerry can holder on the front just above the propane can. Six 3/8" holes through the front wall for mounting the beast. What a bummer. So glad to finally have it off. The bigger bummer about that was that water was able to leak in over the years so there's a little rot and water damage along the bottom of the front wall. Haven't decided how to address that....or not.

By the way, did you repack your bearings? How were the spindles? Where or what did you find for a new inner bearing grease seal?

I think the only thing I'm missing is the original latch/handle for the rear hatch. It might be in the garage, haven't looked yet.

I have a wide angle camera and will try to snap some pics this evening.

Thanks for shouting back and sorry for the finger.

Steve
Steve

Green Lantern Corpsmen
User avatar
stevegsmith
Teardrop Advisor
 
Posts: 86
Joined: Thu Jul 26, 2012 7:17 pm
Location: Berkeley, CA, USA
Top

Re: 1955 Benroy - Rebuild

Postby TRP » Mon Jul 30, 2012 6:52 pm

Hey Steve,

Yeah, kind of a bummer. Not sure how it happened. I was sanding the edge of one of the new sides. I was checking the surface with my left hand. I had the sander in my right hand. I had ear plugs in. I was done sanding and was pretty sure I wasn't holding the trigger any longer. I was setting the sander down and was about to call it a night. Somewhere in the process... my finger wound up in the belt,and somehow it went and got jammed in the back of the belt and the case. Jammed in there really well and essentially sanded away a good piece of an otherwise useful appendage. :oops: (We need a new emoticon/smiley - one with a hurt finger...) In looking at the trailer this morning, I can see where the sander dig into the floor of the trailer after dropped it. Maybe the trigger lock was on? No idea. It all happened pretty quickly. All I know is I broke the number one rule - "Don't put anything near the belt that you don't want sanded...." :o

I can't help with the tank. Mine came without a tank or any of the galley stuff. Debra Kellerman may be able to tell how hers looked when she rebuilt hers. Curiously enough mine is also missing the rear hatch latch. My hatch construction is identical to yours. Mine is made up of the same three laminated ribs. One on each edge and one down the middle. There are also two wooden crutches across the middle by the license plate light and two 1" spars on top, and two on the bottom. No wood between the skin and the ribs. I'll try to get some photos. I plan to rebuild mine with a more conventional style as well.

Bummer about the gas can holes. I've never understood the thought of drilling all sorts of holes in these things. My outer skins had a bunch of holes drilled in them. The worst one was the 1' x 3' hole in the front of the trailer for that gigantic window. Such a shame. if it were not for that monster hole, I may have tried to reuse my skins.

I did repack my wheel bearings. Just before I had the trailer sandblasted... :roll: Now I need to do them again. The rear seals are in good shape. In fact, the bearings, races, spindles, and hubs were all in good shape. I do need 1 new wheel lug and two lug nuts. One of the nuts sheered off while trying to remove the wheel for painting. I also need to figure out which baby moons will fit on this thing. I like thr look of the Mercury style moons. I just don't know if they will fit. Need to measure and remeasure before I order.

I'm going to install a dome light, two reading lights and a vent. I've ordered a bunch of stuff from VTS. Does your trailer have a vent?

Anyway - thanks for the help with the photos. Much appreciated.

Ted
Last edited by TRP on Tue Jul 31, 2012 8:16 am, edited 2 times in total.
User avatar
TRP
Silver Donating Member
 
Posts: 316
Images: 341
Joined: Wed Jun 27, 2012 2:50 pm
Location: Morgan Hill, CA
Top

Re: 1955 Benroy - Rebuild

Postby TRP » Mon Jul 30, 2012 6:53 pm

double post..
User avatar
TRP
Silver Donating Member
 
Posts: 316
Images: 341
Joined: Wed Jun 27, 2012 2:50 pm
Location: Morgan Hill, CA
Top

Re: 1955 Benroy - Rebuild

Postby stevegsmith » Mon Jul 30, 2012 11:00 pm

Okay Ted, here are some details.
I'll get the front paint measured tomorrow.
Note that the top of the paint is in line with the bottom edge of the door window. It appears to be at approx 20" from the bottom at the front and approx 19" from the bottom at the rear.
Attachments
benroy_front_paint.JPG
benroy_front_paint.JPG (179.24 KiB) Viewed 4199 times
benroy_rear_paint.JPG
benroy_rear_paint.JPG (135.33 KiB) Viewed 4199 times
Steve

Green Lantern Corpsmen
User avatar
stevegsmith
Teardrop Advisor
 
Posts: 86
Joined: Thu Jul 26, 2012 7:17 pm
Location: Berkeley, CA, USA
Top

Next

Return to Build Journals

Who is online

Users browsing this forum: No registered users and 15 guests