Hello everyone! My name's Josh. I have been lurking this site for quite a while. I've studied most of the builds and poured through the miscellaneous subjects and tried to retain as much of the knowledge as possible. Well it is finally here. I finally bought me a HF 1720# trailer. I have it temp assembled as I am thinking of trying to stiffen it up a bit by adding some welds and reinforcements. Then she'll be painted black and I'll start the build. I am thinking of doing a 4x8 Benroy but maybe alter it a bit or suit it to my taste. I haven't decided on how I'm finishing the outside yet but I do have a profile picked out. I have a couple of pictures but I cannot for the life of me figure out how! I'll get em up as soon as I can
Josh
Teardrops n Tiny Travel Trailersor t n ttt for short (tnttt.com) |
My Harbor Freight build
19 posts
• Page 1 of 2 • 1, 2
My Harbor Freight build
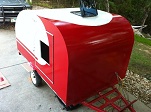
![]() by Clayaway1 » Tue Aug 27, 2013 5:02 pm
by Clayaway1 » Tue Aug 27, 2013 5:02 pm
-

Clayaway1 - Teardrop Inspector
- Posts: 11
- Images: 32
- Joined: Fri Sep 21, 2012 5:14 pm
- Location: Epping, New Hampshire
Re: My Harbor Freight build
![]() by KennethW » Tue Aug 27, 2013 7:19 pm
by KennethW » Tue Aug 27, 2013 7:19 pm
When you bolt the floor down it will stiffen up the trailer. Know need to weld and brace. But I guess it would hurt.
- KennethW
- 1000 Club

- Posts: 1188
- Images: 82
- Joined: Wed Feb 20, 2013 8:01 pm


 So there I started building a deck out of pt 2x4's using PL premium and exterior screws. I used a spade bit to make sure the lumber sat flush on the frame. I also put a layer of 1/4 inch luan on it to fill in the area that you normally need to shim somehow.
  I can't wait for next payday to get the plywood to build the deck. However I have to put some time in at my uncles barn. His original barn burn't down a year ago and we are in the process of building a bigger better one. I am doing the cedar shake siding (I do a ton at work) and I'm halfway done. As soon as I finish that it's all tear time!


 Just for info my walls are going to be the 1/2 inch outer with 1" insulation and 1" frame members and a 1/4 inch inner skin. I was also relieved to get a short return on an email. I emailed Frank Bear on the correct cut out size on the 26x32 doors after I had saw somewhere online to do 26 1/4 x 36 1/4 with a 3 5/16 radius on the corners. I decided to cut any ways and he got back to me same day and it was the right size! I am very happy with this weekends work.

 Any input from folks?