Removable Grumman woody teardrop from downunder

...ask your questions in the appropriate forums BUT document your build here...preferably in a single thread...dates for updates, are appreciated....

Removable Grumman woody teardrop from downunder

Postby Bantam » Mon Feb 17, 2014 2:56 am

Hi guys and girls, I have been reading most of your build threads, slowing building up a list of what I want in my trailer.
A few points to look out for: as this is mainly an American based forum, I will convert measurements and terms for you, but a few may slip through.
We call teardrop style campers teardrop caravans, trailer hitch is a towbar, trunk on a car is a boot. 240 volts instead of 110.
Any way, I am a timber joiner by trade, making windows, doors, staircases. I did this for about 26 years, before selling my business ten years ago. I had enough of working in the trade, New Zealand was in a building slump, and I wanted a change. So my wife and I set up a mobile espresso coffee van company. That went well, and we branched out into catering. Now a days we run a soccer club cafe and bar during winter( the soccer season) and still do a coffee run in the vans in the mornings. So during summer I have plenty of time to do projects.

Right, I have a trailer that I use for taking rubbish to the dump and the odd job I do for a builder friend. As I have quite a few vehicles in my drive, I didnt want another trailer camper parked here.

I thought I would build a TD that can be stored in my garage when not in use, then lifted onto the trailer for those few weekends I want to get away. Im thinking light weight, 16mm ply sides with alumimium and alumimium on the roof. It will have bolts to secure to the trailer frame with locknuts. Poly insulation in the fllor and roof. In new Zealand we dont get the extreme weather you guys are getting now. Im a summer camper, at the most two days. We have two kids, but this is just for my wife and me.
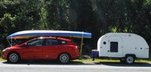
I am involved in classic cars and hope to tow it to club events and shows. I want to have it ready for ' Brits at the Beach' in October. This is a large British car show over four days at a great surf beach in Whangamata. Last year was great.
My play car is a 1970 Ford Escort MK1 2 door. Started life as a1300cc, now has a hot 1600cc, headers, twin Weber sidedraft carbs, etc. its a small car but came with trailer hitch that I have under the house.

Im a lover of all things Weber, so for cooking i think the weberq will be great for camping. 12 volt interior lights, music by ipod or cellphone with portable speaker.
I will put photos in the next post so I dont lose this.
Welcome your thoughts and ideas.
Cheers Jeff :D
Last edited by Bantam on Sat May 24, 2014 7:48 pm, edited 1 time in total.
Bantam
Teardrop Advisor
 
Posts: 51
Images: 6
Joined: Tue Feb 11, 2014 6:42 pm
Location: Auckland, New Zealand

Re: Removeable teardrop

Postby Bantam » Mon Feb 17, 2014 3:07 am

116847116848116849116850
Bantam
Teardrop Advisor
 
Posts: 51
Images: 6
Joined: Tue Feb 11, 2014 6:42 pm
Location: Auckland, New Zealand

Re: Removeable teardrop

Postby Bantam » Mon Feb 17, 2014 3:32 am

Hope those photos are OK?
I got my fathers trailer when he passed 7 years ago. I helped him deck it when I was a boy, but by the time I got it, rust had taken hold. So I listed it on Trademe, a NZ based ebay site. Someone paid $400 forit! I then brought this one secondhand for $600. The lights are set below the deck so one less problem.
If you look closely you will see the sides are bolted on at the corners. I will remove the sides, the ends are just held by a pin. 116851
The deck measures 2180 x 1358mm or 7'4" x 4'6" with the sides off. I like the Superleggera style. With the front curve projecting over the trailer floor, the tailgate finishing flush with the end there should be enough room for my 6'1" self.
3/4" subframe with polystrene, 1/2" ply floor, 16mm ( dont know what that is in inches sorry, about 5/8"?) sides covered in aliminium. The roof will be as per everyone elses with aliminium.
Very basic kitchen, mainly storage. Usual cupboards inside.
Cheers Jeff
Bantam
Teardrop Advisor
 
Posts: 51
Images: 6
Joined: Tue Feb 11, 2014 6:42 pm
Location: Auckland, New Zealand
Top

Re: Removeable teardrop

Postby Vedette » Mon Feb 17, 2014 3:59 am

Well if you get at this with as much enthusiasm as you have in joining in on the Forum, you will do Great! :thumbsup:
Keep it coming!!
Good Roads
Brian & Sandi
Good Roads
Brian & Sandi
Here is a link to my Build Journal
viewtopic.php?f=50&t=50912
Image109106109111109110138766
User avatar
Vedette
Silver Donating Member
 
Posts: 5141
Images: 443
Joined: Thu Dec 01, 2011 4:28 am
Location: Westbank B.C.
Top

Re: Removeable teardrop

Postby KCStudly » Mon Feb 17, 2014 8:11 am

Welcome! Always great to see another Kiwi joining in on the fun. :thumbsup:

Although I am a "Yank", I spent 1982 as a high school exchange student living with a host family in Blockhouse Bay, going to school at St. Peter's. It brings back very fond memories to hear of souped up Escorts and places with Maori names.

Be careful with your design, tho. To keep the trailer truly modular and practical to convert back and forth does take some effort. Many have started with this as a goal and quickly reverted to a fixed cabin design. Others, tho few, have succeeded marvelously, so it can be done. I think the biggest hurdle is the electrical system (i.e. keeping the trailer stuff separate from the cabin stuff... which your trailer seems to be ideal for), and also the fact that most utility trailers these days have angle iron ladder frame side rails that usually interfere with the typical side doors. Since your trailer has removable sides that will not be as big of an issue, but will still take some time when converting.

Keep the posts coming; I look forward to following along with your build. :thumbsup:
KC
My Build: The Poet Creek Express Hybrid Foamie

Poet Creek Or Bust
Engineering the TLAR way - "That Looks About Right"
TnTTT ORIGINAL 200A LANTERN CLUB = "The 200A Gang"
Green Lantern Corpsmen
User avatar
KCStudly
Donating Member
 
Posts: 9640
Images: 8169
Joined: Mon Feb 06, 2012 10:18 pm
Location: Southeastern CT, USA
Top

Re: Removeable teardrop

Postby Bantam » Thu Feb 20, 2014 11:10 pm

Image
Thats the 1970 Ford Escort I want to use for towing duty. The late Paul Walker used one in his last movie, The Fast And Furious 5.

Image
So I cleared a bit of space in the garage. I work from home so its always got plenty of boxes as well as car parts in it.

The sides of the trailer were held by 8 bolts, so didn't take long to remove.
Started to draw some profiles and getting position right on the trailer. Using the Super leggera as a guide.

Image

Brought 3 sheets of Maranti marine 9mm for sides and floor. With the floor, it will be 1360mm (4.4 feet) which means a 1220mm (4 foot) sheet is too small. Im going to add 65mm (2 1/2") too each side using a 75mm x 27mm with a rebate for the ply.
Image
Image

I found enough Pine under the house to make all the floor subframe and joist. Went down to my mates joinery factory to run it through the rip saw and thicknesser, but he had closed early being Friday. Will do it Monday afternoon now.

Checking the profiles and curves. Haven't looked at the hatch end yet.
Image

One concern I have is how the curved front fits onto the floor and the bending and gluing of the bends. Am using 8 x 4 sheets so will have the grain running across. Quite a bit of waste, but im sure it will be used up somewhere.Thinking I will not clad in Ali, but a clear expoy finsih so nail/ screws to be used in skinning.
Bantam
Teardrop Advisor
 
Posts: 51
Images: 6
Joined: Tue Feb 11, 2014 6:42 pm
Location: Auckland, New Zealand
Top

Re: Removeable teardrop

Postby Bantam » Fri Feb 21, 2014 8:36 pm

Saturday morning and no work today!
Last night after a few beers and searching this forum, I have changed design and gone for a Grumman 8 foot camper. The PDF for the design was printed off ready for the morning.
Setting out was easy, people might be upset, but I used my plastic folding rule as a compass. Just drilled fine holes in it where needed. They are dirt cheap and I was on a mission.
Image

I had to clamp this stick on to get the extra length for the ellipse. Marked it out with a pencil then cut the veneer with a Stanley knife to stop any breakout. I had to change the rear bottom curve to fit the length of the trailer. Not as curvy under the hatch. Had to buy a new jigsaw as my old one died 6 inches into the first cut. $39 from Bunnings, since I don't use it much, I couldn't see the need to pay several hundred for a trade quality one.
Image
Image
Image
Image

Real happy with the shape and size.
Im still looking for a window for the doors. Think I will cut the doors once I have the window? Monday I will get the rafters and the floor frame machined at the workshop.
Trying to find the best way to join the rafters to the sides. I want no screw holes on the outside. Maybe pocket screws through the rafter with angle brackets for more strength. Only problem with pocket screwing is the sides are only 9mm ( 3/8 )
Bantam
Teardrop Advisor
 
Posts: 51
Images: 6
Joined: Tue Feb 11, 2014 6:42 pm
Location: Auckland, New Zealand
Top

Re: Removeable teardrop

Postby rowerwet » Sat Feb 22, 2014 7:19 pm

why not make windows yourself? see below in my signature
User avatar
rowerwet
Gold Donating Member
 
Posts: 2075
Images: 521
Joined: Mon Apr 20, 2009 12:52 am
Location: Merrimack River Valley
Top

Re: Removeable teardrop

Postby Bantam » Mon Mar 10, 2014 11:42 pm

rowerwet wrote:why not make windows yourself? see below in my signature


Yeah, think I will.

Update: Being busy. Too much thinking, laying awake at night worried about construction. But thats over now, I am now racing ahead full steam.
Cut out the door, glued subframe to floor, sealed the floor and glued sides to floor.
Image
Cut all my spars, and started gluing and screwing. I was a bit disappointed with the plywood, the surface is only a very thin .5mm veneer. I was cutting all pencil lines with a Stanley knife before cutting but still got breakout. So I glued and screwed the spars. It will now have some Ali trim or something to hide the screw holes.
Image
Image
Got my roof vent from a RV supplier, $100NZ including freight
Image
Found a great woodworking tool shop called Carbetec in NZ how also stocks Titebond $16.80NZ for 500ml/16oz
Image
Got some plywood and cut and test fitted the galley.
Image

I have to get some 3x1" for the spar next to the galley tomorrow. I have cut some inch square timber on a 45 degree for on the front edge of the floor to take the ceiling and outside ply.
Will bring home the ceiling ply tomorrow and start having some more fun. Also brought some 8" portholes. Will use one on mums side, and make the Wiley window in the door round to match.
Thanks for looking.
Bantam
Teardrop Advisor
 
Posts: 51
Images: 6
Joined: Tue Feb 11, 2014 6:42 pm
Location: Auckland, New Zealand
Top

Re: Removeable teardrop

Postby Bantam » Mon Mar 24, 2014 12:51 am

Being busy gluing 3 sheets of 4mm ply for the ceiling together. Needed 52" x 110" for the ceiling panel. Just butt joined with a 4" strip behind to support it. Have left it for a week to cure. Finished all the spars, then cut curved pieces to fit in between them.
Test fitted the ceiling, bit of fun by myself but got there.
Image
Image
Imagehttp://www.tnttt.com/posting.php?mode=reply&f=50&t=58935#

Pretty happy so far. I will get some mastic type glue for fixing the ceiling. Gorilla Glue and Titebond are too runny, maybe No More Nails. Im thinking I will slacken the props, put a thick bead of glue on the ply and push back into position, with lots more props. Have being worried about bending it, but tonight I will sleep with a smile on my dial.
Bantam
Teardrop Advisor
 
Posts: 51
Images: 6
Joined: Tue Feb 11, 2014 6:42 pm
Location: Auckland, New Zealand
Top

Re: Removeable teardrop

Postby Breytie » Tue Mar 25, 2014 2:24 pm

Bantam wrote:I will get some mastic type glue for fixing the ceiling. Gorilla Glue and Titebond are too runny, maybe No More Nails.


I am using Soudal FixAll Hi-Tack for those difficult seal-stick-fill joins. It is quite thick, has impressive initial tack, stands up to long term immersion in water, contains no solvents, and takes almost any paint. But it takes quite a while to cure, but that gives you quite a bit of open work time.

Bantam wrote: but tonight I will sleep with a smile on my dial.

If I were you, I would too! :D

Keep the momentum going!

Andre
Experience is learning from your own mistakes
Here I make mine in public: My build
Breytie
Teardrop Master
 
Posts: 209
Images: 36
Joined: Sun Sep 04, 2011 4:21 pm
Top

Re: Removeable teardrop

Postby Sheddie » Fri Mar 28, 2014 7:57 pm

Hi Jeff.
Dale & Frank here from Whangarei.
Great to see more Kiwis catching the teardrop bug. Even more so as you are a fellow Classic Ford enthusiast. We have Capris, a 1962 Consul Capri, and 1986 Mk3 2.8 injection. Most of the towing so far has been behind the '62, but I finally fitted a towbar on to the 2.8i, and we went to Waihi with the Capri club over Waitangi weekend. Be warned, if you take them to car shows, don't expect to see any of the show your self, as you will get mobbed by everyone wanting to look at your TD.
All the best with your build, and you never know we may even catch up with you at Brits by the Beach.
Regards Frank.
User avatar
Sheddie
1000 Club
1000 Club
 
Posts: 1499
Images: 1129
Joined: Mon Jul 01, 2013 3:26 pm
Location: Whangarei, New Zealand
Top

Re: Removeable teardrop

Postby Bantam » Tue Apr 08, 2014 1:28 am

PMed Frank above. Lives 2 1/2 hours north of me so not far away. Camping adventures in Teardrops and old Fords await.

A few spare hours on Sunday afternoon, so back down in the garage. Rough cut the sunroof hole with the jigsaw.
Image
Then ran around the hole with the router and a ballbearing straight bit.
Image
Test fit the sunroof/vent. Nice


Image
Pushed the trailer outside to get some vitamin D! You can see how small it is, 7 x 4 foot trailer, sides 8 x 4 foot.

Image
Im going to hold off on building cabinets at the headboard end, just because I like to see the curve. Man thats sexy.
Image

Being only 7 feet long, you can see theres not much room in the galley. Thats OK, just means you have to plan it better for storage. I will be cooking on the WeberQ , boil the jug on a primus for tea and coffee, beers on ice in a chilly bin close to where ever im sitting!
Image

Have glued up the wardrobe shelf at the foot of the bed, photos to follow.

Looking out for more rounded mudguards, those ones unbolt easy.

Waiting on my electrical bits to turn up from my mechanic mate. Thinking about the hatch construction. Will be checking lots of build threads tonight.

On another note, I have found this build to be easy on the skill levels and tool levels. Jigsaw, hand planner, battery drill, 7 clamps, chisels, skilsaw, router. If you are still thinking about starting a build, "Just do it". Its great how you only need to spend and hour or so to see progress.
Thanks for looking
Bantam
Teardrop Advisor
 
Posts: 51
Images: 6
Joined: Tue Feb 11, 2014 6:42 pm
Location: Auckland, New Zealand
Top

Re: Removeable teardrop

Postby KCStudly » Tue Apr 08, 2014 8:50 pm

Nice update. :thumbsup: Thanks for sharing. :beer:
KC
My Build: The Poet Creek Express Hybrid Foamie

Poet Creek Or Bust
Engineering the TLAR way - "That Looks About Right"
TnTTT ORIGINAL 200A LANTERN CLUB = "The 200A Gang"
Green Lantern Corpsmen
User avatar
KCStudly
Donating Member
 
Posts: 9640
Images: 8169
Joined: Mon Feb 06, 2012 10:18 pm
Location: Southeastern CT, USA
Top

Re: Removeable teardrop

Postby Bantam » Sat May 24, 2014 2:38 pm

Back again. My wife and I have entered our busy season at work so progress has slowed down

I have fitted the shelves in the cabin for storage of clothing etc. Quick easy and lightweight.

Image

Meet Frank and Dale a few weeks back, who came with their TD. Wonderful source of info on construction. After taking a few photos and plenty of ideas I started the hatch.
Just a basic frame that will have bracing struts added when the shape is fixed.
Image
I hinged it in position, then added temporay ply braces.
After hunting for suitable hinges and having no luck, I did the same as Frank and used SS butt hinges. With two foam seals and a Butynol rubber strip it will work well.
Image
Image
Before gluing I hinged in position to admired the beauty of curves and timber.
Image
Glued up using Gorilla glue.

Had a quite look through the hardware store, but couldnt fine any thing for the hatch handle and catch, Thinking of using a garage door handle, cable and spring bolts. Will look into other trade stores. Wiring is next, off to a marine shop in town for lights. They seem to be $40 each down here.
I pass a foam insulation factory on my daily drive so will order this week. Need to start sealing the internal cavity.

Back soon I hope, thanks for looking guys and girls.
Bantam
Teardrop Advisor
 
Posts: 51
Images: 6
Joined: Tue Feb 11, 2014 6:42 pm
Location: Auckland, New Zealand
Top

Next

Return to Build Journals

Who is online

Users browsing this forum: No registered users and 2 guests