MiniHopper/MegaMini type build

...ask your questions in the appropriate forums BUT document your build here...preferably in a single thread...dates for updates, are appreciated....

MiniHopper/MegaMini type build

Postby anon1 » Sun Jun 22, 2014 6:50 pm

Hello,

I started this build a couple of months ago. I'll try to make several posts over the next day to try and catch up. As I posted in the Intro forum this is how it sits right now and all of the time that it is not being worked on due to regular subtropical rain storms. That's my carport converted to workshop by way of screen enclosure, roll-down shower curtains, and fans.

Image
anon1
Teardrop Advisor
 
Posts: 57
Joined: Tue Jan 28, 2014 4:38 pm

Re: MiniHopper/MegaMini type build

Postby anon1 » Mon Jun 23, 2014 7:50 am

I bought the Harbor Freight non-folding heavy-duty trailer while it was on sale plus the 25%off coupon. I used the savings to buy a spare tire and bearings.

-----------------
NOTE: If you go to HF and buy a trailer and a spare tire it might save time and hassle if the cashier rings up the trailer first. They must enter DOT numbers into the system at the time they ring it up and the spare tire had numbers on it as well. If they ring up the tire first it throws a wrench in their system and prevented them from entering the DOT info for the trailer itself. They were going to leave it at that and only put the tire numbers in. I had them canel the entire transaction and start over with the trailer first so that its numbers were the ones in the system.
-----------------

As for the china trailer itself: I wouldn't use it for a utility trailer that will see any kind of regular use, anymore more than a few times a year. The center tongue reinforcement that I put in did stiffen the entire front half pretty significantly. I'm sure that once a cabin is constructed it will tie it all together well, but as a flatbed utility trailer for a lawn service or something, no way would I use it.

My design is a 5.5' wide by 9' long built on the 4x8 trailer. The cabin will hangover each side about 9" and 1' at the back. I ended up doing pretty much all of the well-known mods to the trailer frame. I used the Excel spreadsheet to estimate tongue weight (and later verified with a real-world simulation by weighting the trailer for another purpose). The axle was moved 10.5" rearward and underslung, shocks were fitted, the center crossmembers were relocated as side-rail stiffeners, a piece of Unistrut was used to replace the center xmembers (unistrut might be a very underutilized material by builders), the tongue was stiffened and lengthened by a foot with a 2" tube and angle irons to the first two xmembers, the tilt feature was disabled and shimmed tight, and fold down stabilizer jacks were added to each corner. When assembling the trailer I found it very useful to use a ratchet strap at each crossmember to pull them in tight to the side rails.

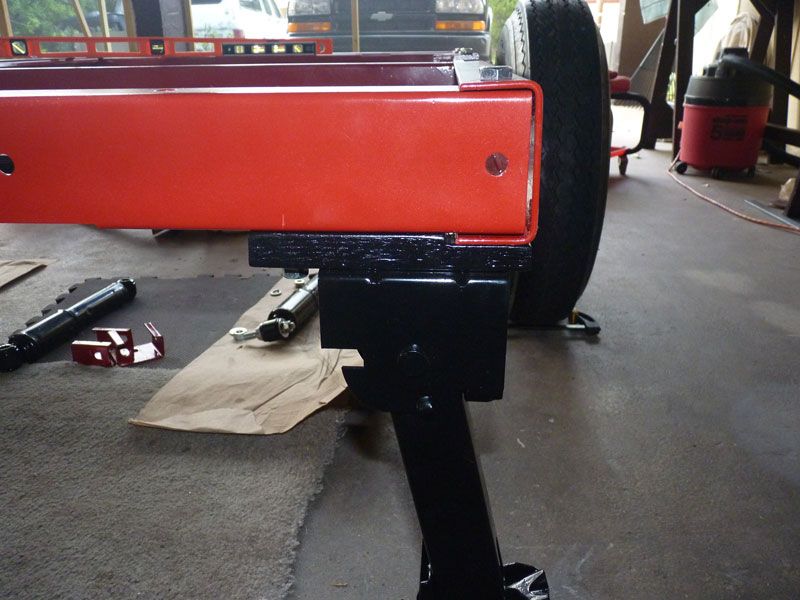
The following picture shows a rear stabilizer. I'm trying a removable setup for the front stabs. The only way to easily mount them at the front corners results in them deploying in a direction that I didn't want. I used two short pieces of unistrut mounted to the frame and bolts and washers mounted in the stabs that slide into the unistrut.
-----------
NOTE: This type of jack has a little tab that protrudes on the inside edge. If you mount the jack directly up flat to your trailer frame that little tab sticks up higher than the rest of the jack and digs into the frame when the jack is folded up. I shimmed the jacks down some to provide clearance.
-----------
Image

Image

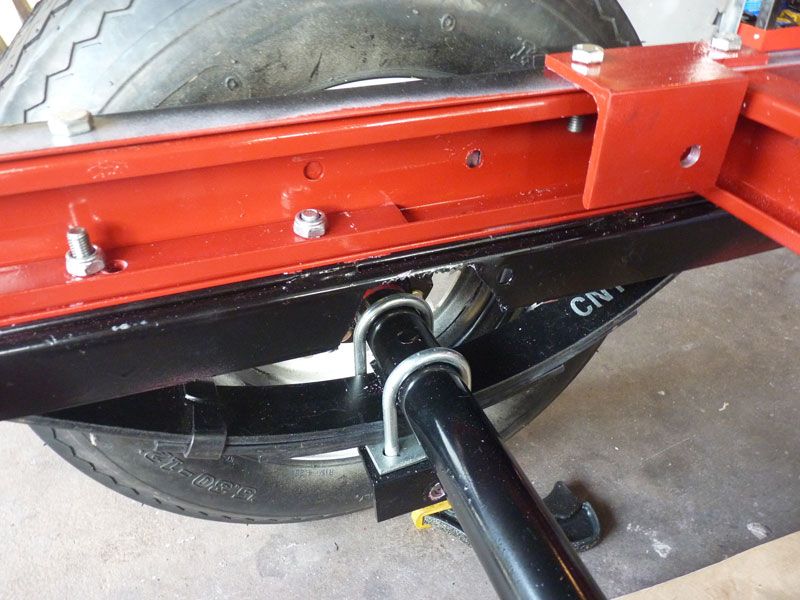
The next picture is of the shock mount. The top is angle bolted to the frame and the bottom is angle bolted to the u-bolt plate.

Image
Last edited by anon1 on Mon Jun 23, 2014 8:22 am, edited 2 times in total.
anon1
Teardrop Advisor
 
Posts: 57
Joined: Tue Jan 28, 2014 4:38 pm

Re: MiniHopper/MegaMini type build

Postby anon1 » Mon Jun 23, 2014 8:15 am

When mounting the shocks a decision needed to be made on how far apart the bolt holes needed to be in order to give the shock adequate travel in both directions once the trailer is at normal weight. I had a good estimation of the final weight of everything but not of how much that would compress the shocks. So I went to the store and bought these 4" thick concrete "trailer pads" in 16x16 and 8x16. The full size ones are 65lbs apiece (I bought a scale so that I could weigh each component going into the camper.) I sat at the computer and calculated the weight of each 1' cross section of the camper. The first foot section has about 5sqft of outer roof skin, 5lf of 2x2, 4lf of 1x2, etc. I did this for the roof component, the wall components, the floor components, and any other items in that foot of camper. Material weights were multiplied to the quantities and a total weight for that one foot section was calculated. The corner stabilizers were raised and the trailer was weighted according to the calculations. The suspension settled in with the weight and I had my distance for the shock mounts. This process also helped to verify my spreadsheet estimates that I used that produced my new axle position and tongue length, as well as total material needs and costs.

Image

I added conduit for wiring that goes from the tongue box to under the floor. One tube for trailer lights, brakes, markers, etc. The other tube for camper electrical from tongue box to an underfloor closet.

Image

Image

The next photo shows a rough outline of the intended profile in wood furring strips.
Image
anon1
Teardrop Advisor
 
Posts: 57
Joined: Tue Jan 28, 2014 4:38 pm
Top

Re: MiniHopper/MegaMini type build

Postby KCStudly » Mon Jun 23, 2014 2:54 pm

Good start! Keep the progress and pictures coming. :thumbsup:
KC
My Build: The Poet Creek Express Hybrid Foamie

Poet Creek Or Bust
Engineering the TLAR way - "That Looks About Right"
TnTTT ORIGINAL 200A LANTERN CLUB = "The 200A Gang"
Green Lantern Corpsmen
User avatar
KCStudly
Donating Member
 
Posts: 9640
Images: 8169
Joined: Mon Feb 06, 2012 10:18 pm
Location: Southeastern CT, USA
Top

Re: MiniHopper/MegaMini type build

Postby Woodbutcher » Mon Jun 23, 2014 4:07 pm

Looking good, the cat seems to approve!
User avatar
Woodbutcher
Platinum Donating Member
 
Posts: 4191
Images: 45
Joined: Fri Mar 10, 2006 10:01 pm
Location: Chicago Suburbs
Top

Re: MiniHopper/MegaMini type build

Postby anon1 » Mon Jun 23, 2014 7:41 pm

Thanks guys. The build is still farther along than this thread shows. Maybe a couple posts tomorrow will catch up. Today I used about everything I have here: the compound miter saw, table saw, benchtop planer, drill press, corded drill at the pockethole jig, cordless drill at the trailer, glue and screws, and many clamps. Progress is happening.

The trailer frame is 4'x8' and my camper will be about 5.5"x9' so the floor will cantilever off of the two sides and the rear of the trailer frame. I made these "frame extensions" that bolt to the sides and back of the frame. They are 2x bolted to the trailer with 1x gussets positioned under where each floor joist will cantilever off the side. Between each gusset support is a 1x for the lower attachment line of the wall outer skin and another 1x for the floor plywood attachment.

I used 2x2s as main floor joists bolted across the top of each metal crossmember and 1x2 intermediate joists and crossbrace framing between joists. The rear and rear-side "frame extensions" are lag bolted together in a couple of places where they meet. This older photo doesn't show the rest of the floor framing at the rear that is now in place. The piece of plywood sticking up is part of the wheel well/fender support mockup.

Image

Image
anon1
Teardrop Advisor
 
Posts: 57
Joined: Tue Jan 28, 2014 4:38 pm
Top

Re: MiniHopper/MegaMini type build

Postby anon1 » Mon Jul 21, 2014 5:01 pm

Hello Everybody,

Not a whole lot of progress to report but some none the less. I got some build time in over 4th of July weekend and just got some photos taken.

This is the support framing for the fenders & wheel wells. I used the factory steel fenders and still want to make a sheet-metal liner that will cover the wood wheel well insides and add a steel angle to the lower-aft edge of the wheel well for impact protection against possible flinging rubber.

Image

Next is a shot of the wheel wells in place:
Image

I worked on the underfloor electrical closet that will take the ac and dc power from the tongue box and distribute it throughout the camper. The AC cable comes in and goes into a RatShack project box. The green goes to a ground bus bar, the white goes to a neutral bus bar, and the black goes to that master switch on the top of the box. Black out of the master switch to a hot bus bar and jumpers from there to each individual branch circuit switch on the side of the box. The master and branch circuit switches are also circuit breakers like you would find on better quality power strips. All bus bars are mounted to a piece of Lexan that is mounted to the stand-offs in the bottom of the box. The left side of the electrical closet is the master switch/breaker and individual branch circuit fuses in a fuse strip with ground bus.
Image

I did this just for the betterment of tnttt harmony (the letters are more red, the flash made it orange):
Image
The workshop has a new mascot. This is Chet. He pretty much lives right here and comes out frequently when stuff is going on. One day when he was molting I scratched the peeling skin with a Kreg pockethole screw and he seemed to really like it. I usually have music playing and I swear that Chet likes it. These lizards will bob their head and extend their colorful underchin thingy when they court other lizards, but Chet does it often to the beat of the music and stops when commercials come on. :thinking:
Image
I also finished up the subfloor framing in the rear which is beefed up more for the weight of the galley and bulhead/storage area. I installed a trailer hitch on the truck and wired it up. Used another RatShack project box and mounted a battery disconnect and RV7 in the front. Ran +&- cables from truck battery to box at hitch with + fused at the battery. + goes into box to the disconnect switch and two jumpers come out, one to 12vAcc lead on RV7 plug and other to a relay inside the box. The relay is switched from the truck cab and feeds the reverse light circuit through the RV7 plug. A trailer T connector plugs in at back of truck and feeds into box and through RV7 plug for brake/turn/etc.

Thanks for looking. I hope to make rapid progress soon with the floor and wall/roof framing. I can also take more photos if anyone is interested in more pictures of the electrical stuff.
anon1
Teardrop Advisor
 
Posts: 57
Joined: Tue Jan 28, 2014 4:38 pm
Top

Re: MiniHopper/MegaMini type build

Postby KCStudly » Mon Jul 21, 2014 6:42 pm

You're doing great quality work, but I'm wondering what your build's target weight is. Isn't that style of trailer only good for 1700 lbs or so? :lol: :lol: :lol:

Sorry to kid around, but truthfully, you are building much much heavier than you need to and it will add up in the end. Just saying, 2x's and 3/4 ply add up fast.

Either way, I like your attention to detail. :thumbsup:
KC
My Build: The Poet Creek Express Hybrid Foamie

Poet Creek Or Bust
Engineering the TLAR way - "That Looks About Right"
TnTTT ORIGINAL 200A LANTERN CLUB = "The 200A Gang"
Green Lantern Corpsmen
User avatar
KCStudly
Donating Member
 
Posts: 9640
Images: 8169
Joined: Mon Feb 06, 2012 10:18 pm
Location: Southeastern CT, USA
Top

Re: MiniHopper/MegaMini type build

Postby anon1 » Mon Jul 21, 2014 7:04 pm

My weight estimate was calculated two different ways, both pretty detailed, and I come out with about 1250lbs including everything but trim, paint, and clothes.

The wheel wells were mocked up in 1/2" ply and built in 3/4" and the 3/4" added less than 1lb per side.

The weight difference between eight floor joists in 1x2 vs. 2x2 was, of course, double but still we're talking about 8 joists at 5' long. I'll have to double check but I think that is like 20lbs vs 40lbs.

I believe in a strong foundation being essential to build on. I've never actually built one of these and watched it age but I'd rather not scrimp on the the foundation especially since it is cantilevered over the sides of the frame and the entire wall and roof weight will be riding out there.
anon1
Teardrop Advisor
 
Posts: 57
Joined: Tue Jan 28, 2014 4:38 pm
Top

Re: MiniHopper/MegaMini type build

Postby anon1 » Sat Oct 25, 2014 1:18 am

Hey Hey,

Nice to see everyone, it's been awhile. Sorry for the delay in updates but unforeseen events happen. :? Maybe it was overbuilt, maybe 'tank like', it all came apart back to the humble little 1780lb capacity frame.

First, it was a cathouse:
Image

Then a 'stationary-detail trailer'. Wait, what?
Image


Soon thereafter, something rare happened. The moon became the closest and brightest:

Image


And then something further happened ...
anon1
Teardrop Advisor
 
Posts: 57
Joined: Tue Jan 28, 2014 4:38 pm
Top

Re: MiniHopper/MegaMini type build

Postby anon1 » Sat Oct 25, 2014 5:05 pm

All of the wood that was hammered to fit in-place was removed and sealed with polyurethane. All places where there would be wood to wood glue&screw joints at assembly was taped off prior to poly. After some further minor modifications and touch-ups,
Image

everything was clean and ready for assembly. This is what 'progress' looks like? :thinking:
Image

More updates to follow, soon.
Last edited by anon1 on Mon Oct 27, 2014 3:40 pm, edited 1 time in total.
anon1
Teardrop Advisor
 
Posts: 57
Joined: Tue Jan 28, 2014 4:38 pm
Top

Re: MiniHopper/MegaMini type build

Postby anon1 » Mon Oct 27, 2014 3:19 pm

The floor was finished with spar poly on the bottom and Glidden Porch&Floor Polyurathane Oil paint on the top side. That paint really works good, flows together very nice and using a roller it made what looks like a whiteboard looking finish. This was to seal it up, there will be other flooring over it. The street side has the sill plate for the wall sitting in place while the curb side does not and shows where the wall will glue and screw into the floor joists and maybe the sill biscuited into the side of the floor ply.
Image

I used aluminum angle to trim the floor hatch opening and the hatch door. The wires coming up will be inside the bulkhead wall with AC/DC going to both sides of the galley and the larger bundle going up to the overhead center console and light and vent fan.
Image
Image
Image

The underside of the floor was insulated with two layers of 3/4" polyiso r5 foam as seen in this partially completed shot.
Image

So now that I have a good solid foundation the walls will be going up using lighter construction.

Image
anon1
Teardrop Advisor
 
Posts: 57
Joined: Tue Jan 28, 2014 4:38 pm
Top

Re: MiniHopper/MegaMini type build

Postby Shadow Catcher » Mon Oct 27, 2014 8:28 pm

Looks very good.
User avatar
Shadow Catcher
Donating Member
 
Posts: 6008
Images: 234
Joined: Sat Apr 11, 2009 8:26 pm
Location: Metamora, OH
Top

Re: MiniHopper/MegaMini type build

Postby anon1 » Wed Oct 29, 2014 12:37 pm

Hello Everybody,

Thanks Shadow Catcher. I really like your trailer.

Not much of an update today but I know how people enjoy photos and I was cleaning up inside of the homemade 120vAC power distribution and took a photo before closing it up.

The shore power comes into the tongue box to a gfci then a triple tap. In one outlet of the tritap is a hd outdoor extension cable that runs underfloor back to this electrical closet in the floor and into this homemade breaker box. It is a RadioShack project box with a piece of lexan mounted in the bottom stand-offs. The incoming power comes in at the top of the picture (edit: where you see the metal nut and some white fuzz) and green ground goes down to the ground bus bar. The white neutral comes in and goes to the neutral bus bar at the top. The hot leg comes in and goes to that main breaker/switch mounted in the lid of the box. Power comes out of that switch to the hot bus bar on the right under the row of breakers/switches and short jumpers loop up from there to each switch. Right now there are two open circuits left in the box.

I figure I saved a few pounds here over using a steel box with a master and five residential style breakers.
Image


By the way, the number of views to this thread seems to have skyrocketed for some reason. It was 600-some then 2200 almost the next day. :thinking: Anyway, glad you could visit and I hope to have more pics soon. :beer:
Last edited by anon1 on Wed Nov 05, 2014 9:05 pm, edited 1 time in total.
anon1
Teardrop Advisor
 
Posts: 57
Joined: Tue Jan 28, 2014 4:38 pm
Top

Re: MiniHopper/MegaMini type build

Postby anon1 » Wed Nov 05, 2014 8:49 pm

Hidee-Ho Everybody,

I think that I know why the thread views skyrocketed before. It was cats. It was National Cat Day that day and I think that somewhere linked to here because of the picture of Cholo and The Lizard Queen in the cathouse, anyway.

I got a couple of hours of build time in today. Wall framing going up. I'm really glad that I made the miter saw infeed table as it allows for precise repetitive cuts using a stop block. I made it with 1x PVC trim board and a couple sets of fences for the saw at the same time, one for wood one for steel. Every cut was duplicated for the other side and progress went quick and smooth.

This photo shows some finished framing and some cutoffs used in mockups.
Image
The next shot from the galley end. With the walls going up the "workshop" shrank considerably in width. Sitting here really gives me a sense of the mega in the minihopper design. This will be spacious, I really like it.
Image
I've got to give a special mention to the two most valuable tools so far in the build:
1. A mini block plane: used for everything from shaving wooden joints flush to epoxy filler, very useful.
2. Cuban Coffee: made at home in a Bialetti Mocha Pot with Cafe Bustelo espresso grind and a Domino Sugar "frosting" crema made with a little of the first espresso "seed":
Image

Thanks for looking. More progress soon.
anon1
Teardrop Advisor
 
Posts: 57
Joined: Tue Jan 28, 2014 4:38 pm
Top

Next

Return to Build Journals

Who is online

Users browsing this forum: No registered users and 4 guests