5X10 on a 4X8 HF trailer - First build - On the Road!

...ask your questions in the appropriate forums BUT document your build here...preferably in a single thread...dates for updates, are appreciated....

5X10 on a 4X8 HF trailer - First build - On the Road!

Postby Barak » Sat Sep 27, 2014 8:34 am

the "Twilight" ON THE ROAD!

So, I have been lurking for almost a year, building since around May 2014, and decided to share my build, and photos. This site is amazing with so much information and incredible people willing to share their experience and tips.
Thank you!
This is where it started: I loved the idea of building a teardrop that I could take camping with my son, AND, have a storage compartment large enough to store my assembled powered paramotor - hence "toy hauler". This would require building a 5 ft. tall, 50 sq/ft teardrop. So this was one of my early sketches:
Image

And where things stand today:
Image

The in-between time to follow...

Barak
;)
Last edited by Barak on Sat Jun 06, 2015 9:02 am, edited 2 times in total.
Barak
Teardrop Builder
 
Posts: 26
Images: 78
Joined: Sun Jan 05, 2014 9:11 am

Re: "Toy Hauler" 5X10 on a 4X8 HF trailer - First build

Postby captbobh2o2004 » Sat Sep 27, 2014 8:45 am

Way Cool !! It's great to know Peg and I will have another "Tear" in the Albuquerque Area and we look forward to camping with you. Your doing a Great Job.
captbobh2o2004
Teardrop Advisor
 
Posts: 76
Joined: Sun Mar 02, 2014 8:43 am

Re: "Toy Hauler" 5X10 on a 4X8 HF trailer - First build

Postby KCStudly » Sat Sep 27, 2014 9:02 am

More please, sir!!! :applause: :thumbsup:
KC
My Build: The Poet Creek Express Hybrid Foamie

Poet Creek Or Bust
Engineering the TLAR way - "That Looks About Right"
TnTTT ORIGINAL 200A LANTERN CLUB = "The 200A Gang"
Green Lantern Corpsmen
User avatar
KCStudly
Donating Member
 
Posts: 9610
Images: 8169
Joined: Mon Feb 06, 2012 10:18 pm
Location: Southeastern CT, USA
Top

building the HF frame

Postby Barak » Sat Sep 27, 2014 6:12 pm

I wanted to keep my first build simple, work with materials and tools I was somewhat familiar with and could afford, so decided on wood. Plus, most of my traveling would be in the southwest, mild to cold temperatures, but mostly dry weather.
Started with the non-foldable HF 4X8 trailer and got my first batch of wood from the big box retailers:
Image

Built the HF trailer
Image

And placed the Paramotor where it would be going (inside) the teardrop. This thing was going to have to be BIG!
Image

Image

Then built a 2 ft extension for the tongue using 2x2 inch steel tube, painted and extended back to the second trailer crossmember. I had to do this given how much the teardrop would be extending forward past the front of the trailer bed - about 2 1/2 feet.
This was messy, and hard, drilling holes in the tube and frame, and bolting it all together. Glad that part was done - no more sharp, messy metal shavings for a while :)
Image

Image
Barak
Teardrop Builder
 
Posts: 26
Images: 78
Joined: Sun Jan 05, 2014 9:11 am
Top

Re: "Toy Hauler" 5X10 on a 4X8 HF trailer - First build

Postby KCStudly » Sat Sep 27, 2014 6:42 pm

Suggestion: install "anti-crush sleeves" (sections of pipe sized to fit your bolts placed inside your tongue tube and xmbrs. The way you have your joints the metal will soon flex and the bolts will become loose. The anti-crush sleeves will allow you to fully tighten the bolts w/o having to worry about the 'C' shape or tube walls relaxing (which otherwise will result in loose bolts).
KC
My Build: The Poet Creek Express Hybrid Foamie

Poet Creek Or Bust
Engineering the TLAR way - "That Looks About Right"
TnTTT ORIGINAL 200A LANTERN CLUB = "The 200A Gang"
Green Lantern Corpsmen
User avatar
KCStudly
Donating Member
 
Posts: 9610
Images: 8169
Joined: Mon Feb 06, 2012 10:18 pm
Location: Southeastern CT, USA
Top

Re: "Toy Hauler" 5X10 on a 4X8 HF trailer - First build

Postby Barak » Sat Sep 27, 2014 8:27 pm

Thanks!
I thought of the C frame crushing so I installed and counter-tightened extra bolts on the inside of the c frame to prevent this from happening.
Barak
Barak
Teardrop Builder
 
Posts: 26
Images: 78
Joined: Sun Jan 05, 2014 9:11 am
Top

the base frame

Postby Barak » Sat Sep 27, 2014 8:39 pm

In order to accomodate the full height of the paramotor, I needed a 5 foot total height. Since I didn't need all of that vertical space in the sleeping cabin, I decided to build a beefy and rigid base frame that consisted of 2X4s and 2X3s screwed and glued together in the shape of an "L". This would give me extra thickness to the floor if I ever wanted, in the future, to install storage compartments and I thought this would offer better flex resistance, and, would make it easier to bolt and glue to the HF frame (since the 2X4s lay flat on the frame).

Image

Image

Image

Image

Getting ready to paint
Image

Made recesses where the HF trailer bolts stick up...
Image

Right before bolting/gluing the base frame
Image

And bolted down
Image

Image
Barak
Teardrop Builder
 
Posts: 26
Images: 78
Joined: Sun Jan 05, 2014 9:11 am
Top

The floor

Postby Barak » Sun Sep 28, 2014 7:30 am

After the base frame, it was time to put down the floor. But I realized that the extra thickness of the base frame would not give me enough height in the rear storage area (beneath the main galley workspace) to fit a cooler without making the galley shelf too high. So by removing a section of the frame in the rear, I was able to drop the floor giving me me an extra 2 1/2 inches of storage height I needed.

Image

Image

I used biscuits and a router to join the two floor pieces
Image
Barak
Teardrop Builder
 
Posts: 26
Images: 78
Joined: Sun Jan 05, 2014 9:11 am
Top

Going "vertical" on the build

Postby Barak » Sun Sep 28, 2014 8:11 am

In Late June, I began working on the walls, starting with the right side. This side was going to be the largest single piece of plywood in the entire build and would require four sections (including the 4X8 piece) and would be too heavy/large to lift myself. Careful planning of a timely family visit gave me the extra muscle power needed to do this without hurting myself :)
I used a router to groove the plywood pieces, then used biscuits and glue, carefully placed ratchet straps and tightened slowly while making sure the pieces remained flat

Image

Image

Sis helping out with drawing ellipses on the templates:
Image

The finished front and rear templates:
Image

Up goes the front bulkhead - this wall separates the sleeping cabin from the front storage. I attempted to shave off some weight so I glued a 1/2 inch plywood to some of my 5mm skin plywood therefore It looks sort of crude.
Then added the floor of the front storage area. This piece rests on the forward extending triangle to the hitch.
Image

Image

Right wall ready to be mounted:
Image

Mounted/glued/screwed/leveled
Image

Image

After it all dried, I carefully backed it out of the garage to take a look at the profile with the truck
Image

Image

The profile felt "chubby" to me, especially in the rear so I decided to shave a portion of the trailing roof line to give it a more "streamlined" look.
So, mounted on the side of the teardrop I experimented with a flexible piece of wood until I liked the result and drew/cut my new rear template
Image
Barak
Teardrop Builder
 
Posts: 26
Images: 78
Joined: Sun Jan 05, 2014 9:11 am
Top

left wall and galley main shelf

Postby Barak » Mon Sep 29, 2014 8:19 am

After taking a break from the build, I continued in early September by erecting the left wall and building the main galley horizontal surface. My windows had arrived so I had a better sense of the door size I wanted, so I cut out the left one - also made it much easier to mount by myself.

This time I "only" needed three plywood pieces to make the left wall:
Image

Started on the galley main work space. The AC in the background is the smallest I could find. I am thinking of building a roll-out shelf that it will reside on, right above the front, right part of the galley shelf, with a door on the right hand side for those hot days I can hook up to external power.
Image

Image

I cut the rear edge of the main shelf at an angle to accommodate the hatch profile. My plan is to have the hatch contact the top of the 2X4 that supports the shelf in the photo. The vertical part of the rear will be a door that will swing open to allow access to the storage area.
Image

Barak
Barak
Teardrop Builder
 
Posts: 26
Images: 78
Joined: Sun Jan 05, 2014 9:11 am
Top

Re: "Toy Hauler" 5X10 on a 4X8 HF trailer - First build

Postby ChasCABQ » Mon Sep 29, 2014 8:56 am

WOW! Amazing job Barak. I'm planning a light weight tear right now and your project is quite an inspiration. I'm going to private message you in hopes you can share some info on local material suppliers, etc.
Thanks, Chas
Build journal: http://www.tnttt.com/viewtopic.php?t=61303
In 2016, I received a kidney transplant, finished my teardrop, and took it on the road! In 2017 I sold it and am back to car camping.
Thanks to all forum members who provided advice about my build and posted info to help me get started.
User avatar
ChasCABQ
Donating Member
 
Posts: 95
Images: 18
Joined: Sat Sep 27, 2014 3:54 pm
Location: Albuquerque, NM
Top

building the front

Postby Barak » Mon Sep 29, 2014 8:39 pm

I figured I should start the harder, curved roof portions, by building the nose section of the teardrop, this way, I would be able to somewhat nail down the technique, when it came time to do the hatch. My rounded portions are not extreme but I still expected I would need to use wet towels and ratchet straps to pre-bend the thin plywood. It ended up being a non-issue. One reason, I think is the relatively high humidity we are experiencing due to the plentiful amounts of recent rain in the southwest.
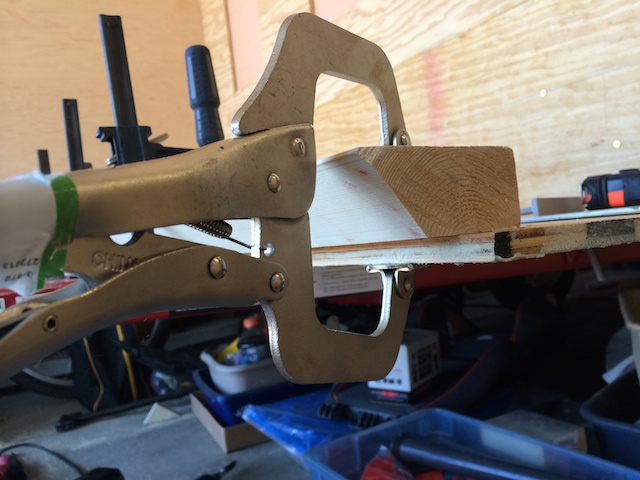
Started with my bottom piece - a 2X4 cut at an angle to form a strong base:
Image

Image

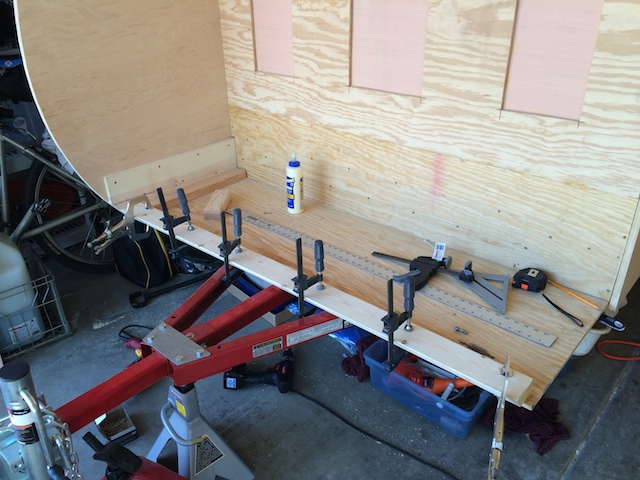
Then, cut the big arc, that will form the door jam to the front storage compartment :
Image

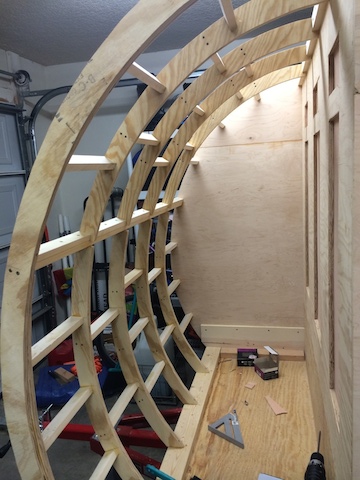
I thought that smaller sections of the rounded, cut plywood, would be more manageable and I also liked the idea of having a solid crossmember about half way up so this is what I did:
Cut and belt-sanded the pieces to form
Image

Installed the lower arcs:
Image

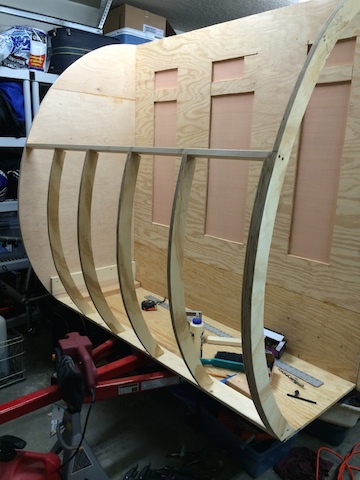
Lower cross members:
Image

repeated with the top:
Image

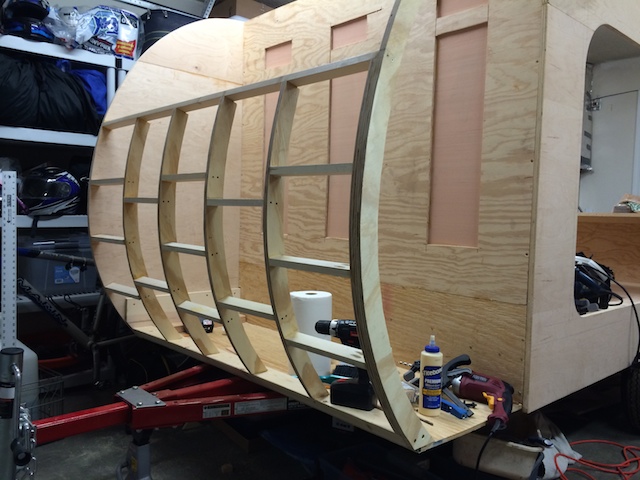
I'm liking how this looks :)
Image

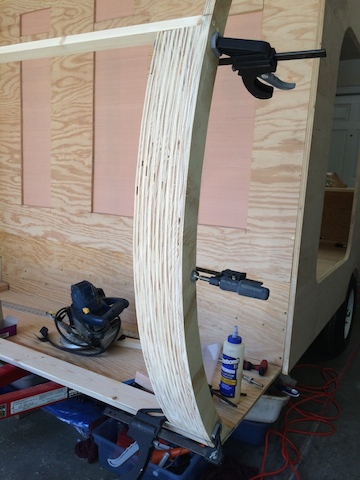
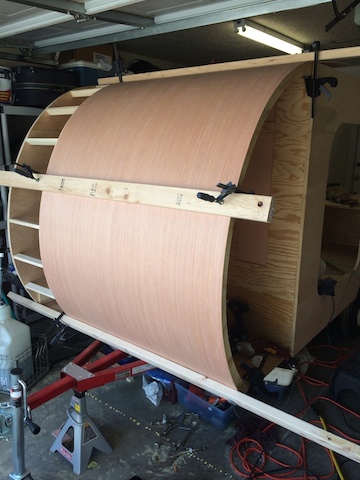
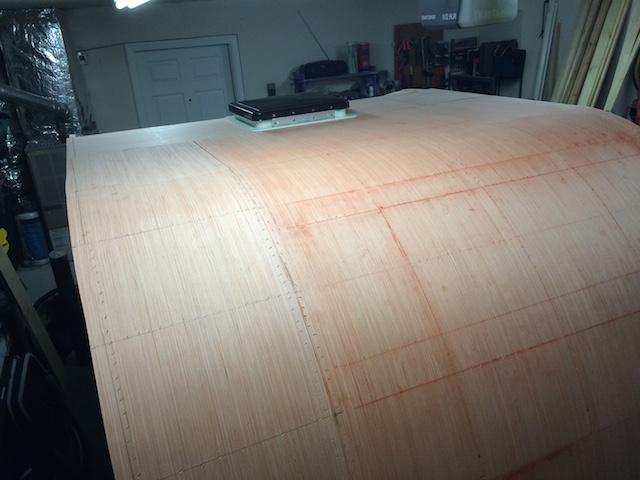
Then aligned the large 5 mm 4X8 sheet as best as I could and glued/stapled the bottom. I let it sit clamped in this position overnight and the next day it remained nice and curved. Then I marked the cross member and vertical pieces with lines so I could work the stapler quickly before the glue set.
Glue was dripping all over the place but besides a couple of nailer jams I had to clear, it went pretty smoothly. The plywood flexed quite easily and I didn't hear a hint of splintering noises in the process.
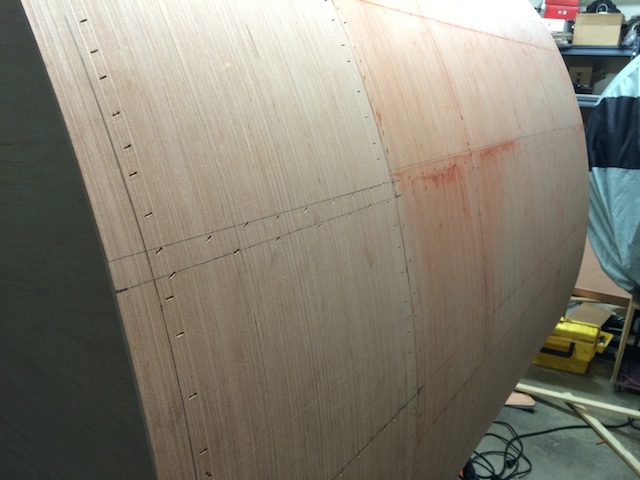
I'm still not sure if it's recommended to skin this curved portion or if it's OK to leave as -is (without an additional skin for strength/protection) and just use varnishes and paints - a question I will ask on the forum at some point.
Image

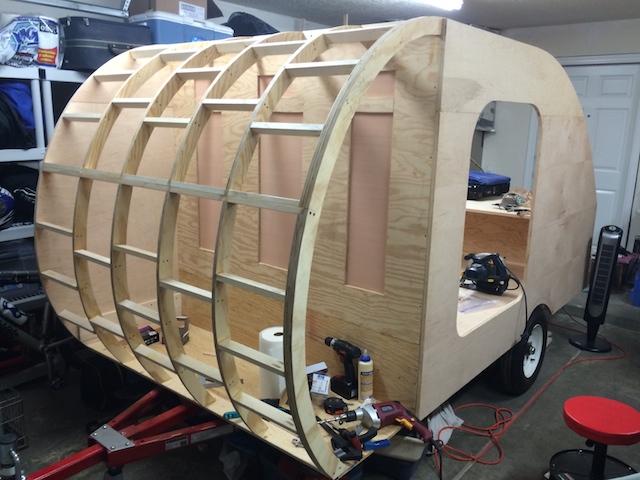
added the remaining strip:
Image

all wrapped and over the roof:
Image

Image

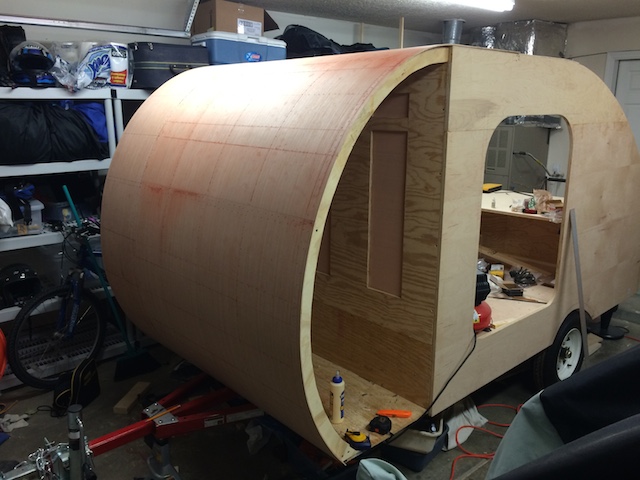
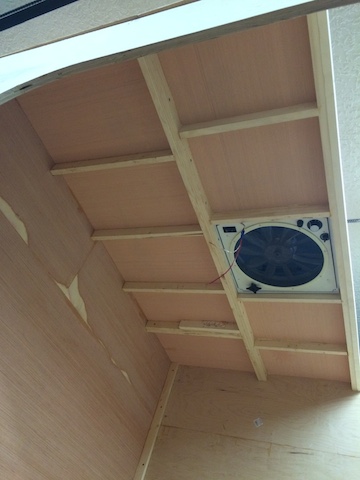
Then measured the fancy fan and installed the adjacent roof panels:
Image

Image

So this is where I am now, more or less:
Image

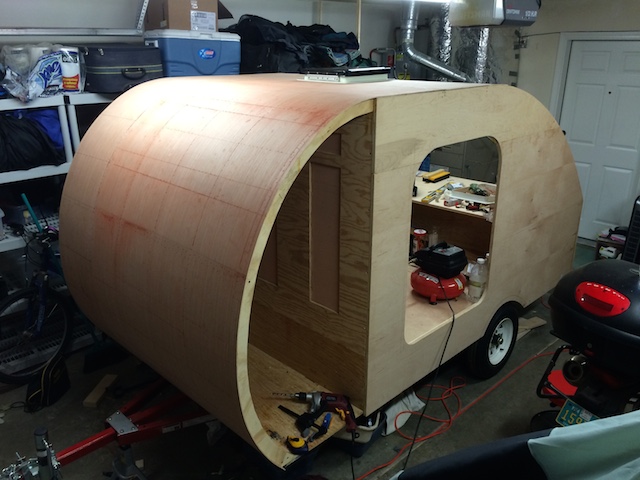
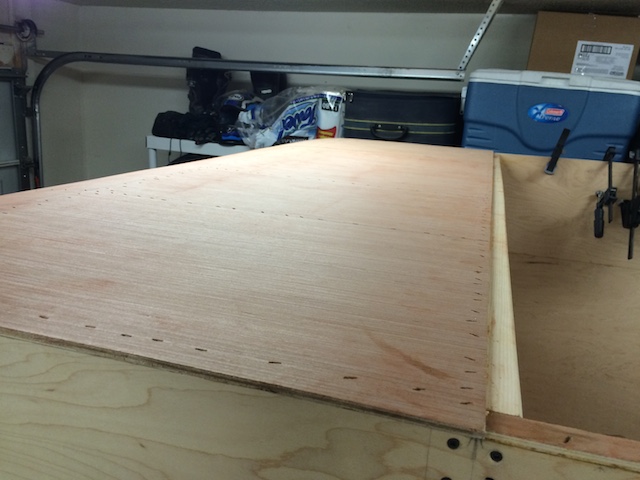
I'm starting to work on the hatch and have been thinking about issues like hinges, and planning for weatherstripping thicknesses, etc.
I think I have spent more time sitting on a stool, staring at this thing, trying to figure out what to do next and how, than actual build time.
I'm loving it!

:)

Barak
Barak
Teardrop Builder
 
Posts: 26
Images: 78
Joined: Sun Jan 05, 2014 9:11 am
Top

Re: "Toy Hauler" 5X10 on a 4X8 HF trailer - First build

Postby rebapuck » Mon Sep 29, 2014 10:19 pm

I like it too. Doesn't look too big for the tow vehicle. The front storage is something I bet a lot of future builders will add in some form or another.
Judy
1966 VW camper
1967 VW singlecab
Image
User avatar
rebapuck
.
 
Posts: 2243
Images: 1
Joined: Thu May 14, 2009 1:55 pm
Location: Chapel Hill NC
Top

Re: "Toy Hauler" 5X10 on a 4X8 HF trailer - First build

Postby KCStudly » Mon Sep 29, 2014 10:20 pm

I would recommend some sort of reinforcing layer to keep the bent wood fibers from splintering later. Many people have had problems with unreinforced bent ply checking and cracking after a while, resulting in water intrusion and wood rot. The reinforcement could be as simple and thrifty as gluing a layer of bed sheet on before paint, or as complex and spendy as laying on glass weave and epoxy (which isn't really that much more expensive compared to the grand scheme and potential down side, nor that much more complicated than the glue and linen sheet).

I had a tighter bend on my front radius and had some cracking issues. I stabilized these with a layer of epoxy and glass.

It looks like you bent your front "the hard way", so it may be less of an issue for you; dunno. :thinking:

I'm sorry, I don't recall if you said what your final skin/finish will be. If aluminum skin some future minor checking probably won't result in a problem, but if you are just planning on painting, or wood finish, then reinforcement is highly recommended (based on numerous other peoples experience).
KC
My Build: The Poet Creek Express Hybrid Foamie

Poet Creek Or Bust
Engineering the TLAR way - "That Looks About Right"
TnTTT ORIGINAL 200A LANTERN CLUB = "The 200A Gang"
Green Lantern Corpsmen
User avatar
KCStudly
Donating Member
 
Posts: 9610
Images: 8169
Joined: Mon Feb 06, 2012 10:18 pm
Location: Southeastern CT, USA
Top

Re: "Toy Hauler" 5X10 on a 4X8 HF trailer - First build

Postby Barak » Mon Sep 29, 2014 11:45 pm

Thanks for the replies.
Yes, I thought it would be harder to bend the ply in this direction, but it was actually much more bendy this way (I guess the middle layer of the ply is more rigid?) don't know.
I'm open to "glassing" the front to prevent future cracking. I have never done this so will just need to read and ask...
The rest of the roof does not have much of a curve so perhaps I can get away without adding an additional protective layer
Thanks,
Barak
Barak
Teardrop Builder
 
Posts: 26
Images: 78
Joined: Sun Jan 05, 2014 9:11 am
Top

Next

Return to Build Journals

Who is online

Users browsing this forum: No registered users and 24 guests