First of all I would like to introduce myself, I am Piter from the Netherlands, 23 years old. One year ago I started thinking about building a teardrop trailer. After some research I found some aspects that I really like, and with that bagage I started sketching and drawing.
After a couple of sketches my design looked like this:
I have been engineering this for a while and the result is the following section:
After this I ordered the first materials:
And got me some nice rims:
With some welding-help from my dad we created the steel frame:
After that I painted some 2 components primer on it and at this moment I am painting the whole frame in RAL 7016. (also 2-component):
From now on I have to produce a couple of CNC files for the miller-guy, so I can start with the plywood.
I am curious for your response!
I will keep you up to date!
Regards piter

EDIT 22 November, 2015
Hi everyone,
The last couple of weeks I've been busy to complete the chassis. After the painting work it was time to put the axle on it, and also the supports on the back. The axle is a KNOTT 850kg, size from flange to flange is 1850mm. At this point the chassis looked like this:
From there on I put the wheels on it, with some aluminium spacers 10mm each, to create some more space between the tires for the wooden body! With the wheels on it, it starts to take shape, have a look:
After that we started with the water resistant plywood sheet on bottom of the chassis, and the wooden frame for the insulation and electronics:
For the insulation we've used some expanded polystyrene (EPS) sheets, 20mm thick. It is a really nice material to handle. The spaces where we did not put any insulation is the space for the electronics, maybe we will top this up later with some insulation!
Thanks for following me and I will keep you up to date!
Piter
EDIT 9 January, 2016
Hello everyone,
I did not post anything since November, but I have been working on the trailer ofcourse. Here a short update!
My brother fixing the electrics! (I have no idea what he's doing, so great thanks
 )
)For the trailer I made design existing of two shells, the inner and the outer. Since the shape of the trailer was hard to cut and because it was a lot of work, I asked a CNC miller around to fix this for me. The result was this:
This is the inner shell, which is also part of the cabinets.
The outer shell will be placed on these pieces and looks like this:
In this picture the primer in the finishing color had already been applied.
Before the painting job I also made the first cabinet + doors:
Painting the inner shell also:
After painting all the pieces 2-3 times, it was time to start building!

It really starts to take shape at this point, great:
Some splits for the electric wires:
And the start with the first cabinets:
As you can see I (actually we, because I got a lot of help from my family) made a lot of progress. All the building really takes more of my spare-time than i thought, but the trailer needs to be finished before July, since we are going camping to Italy or France then.
I am curious if you guys have some ideas and hints for the aluminium skirting around the trailer to connect the roof water-proof to the walls and as a guide for the tent. Did you bend those profiles yourself? I am curious for the answers!
For now you have enough information and pictures, I will keep you up to date. Thanks for following my journal.
Piter
EDIT 12 February, 2016
Hi everyone,
The laste month we've made some real progress. We placed the outer shell on the trailer and the kitchen has also been made. (not finished yet)
The electrics are almost ready, we placed one LED strip at the footboard and one at the headend. It really looks nice. Besides that the sink has been attached and the water pump has been installed, the refrigerator is also ready for use! (very important
 ) Last things to do concerning the electrics are installing the chassis lights, the mark lights etcetera.
 We also placed a piece of aluminium skirting on the trailer as you can see in the pictures. It was just to try if this would work out, and it did, so I will order two times 5m1 aluminium skirting with a tent guide. I think this will look pretty nice.
Next week we'll start with the plywood roof, a critical part of the project!
Enjoy the following pictures:
The outer shell attached:
The kitchen including the refrigerator:
Electrics in the front and the cabinet doors:
The backside including the piece of aluminium skirting and the watertap:
I will keep you up to date,
Cheers!
EDIT 22 October, 2016
Hi guys,
Long time no post. Ofcourse we have been very busy with the Pi-Trailer and finished it just before the summer, so in this post I will show you the progress until the moment of truth, camping! I'll just place the pictures from the building progress, I think they say enough. Enjoy!
The inside
Tow-ready
Electrics
The insulation in the roof
Attaching the poly-ester sheets
Done!
Ready for some real painting
Credits to my father in law
Time to place the hinges with the doors and handles:
The front compartment in the make
The aluminium trims really make the difference in my opinion, although I did not really need them for the trailer to be water proof.
Making the back cover
Done, including the handle, mounted internally
Front compartment is ready, time to place the fresh painted doors
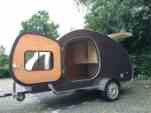
Memorable moment, completed the job!!

Hitting the road!

Also completed the kitchen part
Trying out the tent
First day camping @Italy
Enjoying Corse (yep, a little filter down there
)So cozy
High in the skies
Retro meets Retro
We really enjoyed camping with the Pi-Trailer. There are only a couple of little improvements I want to make, but most of all it was perfect. Thanks for following my build journal, hope to inspire some people to go build one themself.
Cheers!