The Lovie Build

...ask your questions in the appropriate forums BUT document your build here...preferably in a single thread...dates for updates, are appreciated....

The Lovie Build

Postby jlovell25 » Thu Dec 31, 2015 12:27 pm

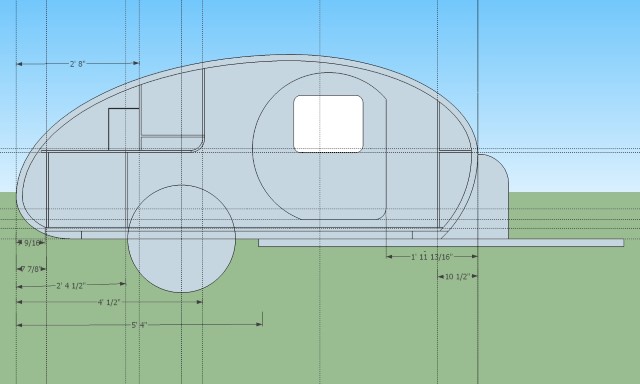
I've been on the site for awhile now and have started my own build so I thought I'd share my progress. I'm building a 4x10x5 custom profile design that I put together from a number of builds (cub, Grumman, Silver Beatle, Atma). Here is a look at what I have so far.

Image
jlovell25
Teardrop Inspector
 
Posts: 19
Images: 34
Joined: Wed Oct 14, 2015 5:25 pm

Re: The Lovie Build

Postby Hitec4you » Thu Dec 31, 2015 12:58 pm

Like the looks of that. I am working on a design that I am thinking about starting next year and this one looks similar to the one i am working on.
User avatar
Hitec4you
Teardrop Builder
 
Posts: 26
Images: 1
Joined: Mon May 03, 2010 1:41 pm
Location: Lavon, TX

Re: The Lovie Build

Postby jlovell25 » Thu Dec 31, 2015 1:02 pm

Hitec4you wrote:Like the looks of that. I am working on a design that I am thinking about starting next year and this one looks similar to the one i am working on.


The thing I struggled with when I was working on mine was how to get the rounded looks of the cub without losing to much interior space. The Grumman and Atma designs have a lot of headroom in the front which is nice for sitting up while inside. Also the true cub design has a harder slope at the rear which reduces the galley space. So the push/pull for me was how much of the cub design/curves could I get without giving up to much functionality inside.
jlovell25
Teardrop Inspector
 
Posts: 19
Images: 34
Joined: Wed Oct 14, 2015 5:25 pm
Top

Frame Pics

Postby jlovell25 » Thu Dec 31, 2015 1:09 pm

Here are a couple pictures of my frame build. I went with 2x2 1/8" construction except for the main tongue which is 1/4". I did study tongue strength calculation spreadsheet way to much and probably over built it but hey, I don't ever want to touch it again.

The torsion half axles were ordered from Ebay. They are supplied by R and P Carriages which seem to be recommended.
http://www.ebay.com/itm/291030697121

Tongue Strength Calculations - http://www.angib.pwp.blueyonder.co.uk/t ... tear84.htm

Image
Image
Last edited by jlovell25 on Thu Dec 31, 2015 8:08 pm, edited 2 times in total.
jlovell25
Teardrop Inspector
 
Posts: 19
Images: 34
Joined: Wed Oct 14, 2015 5:25 pm
Top

Wheels

Postby jlovell25 » Thu Dec 31, 2015 8:01 pm

Here are the wheels I am going with. The rims are 14" Smoothie wheels from Summit Racing. The tires are Coker tires that I also order from Summit Racing.

I got the rims powder coated locally for about $100.

http://www.summitracing.com/parts/USW-51-4710
http://www.summitracing.com/parts/COK-700200

Image
Image
jlovell25
Teardrop Inspector
 
Posts: 19
Images: 34
Joined: Wed Oct 14, 2015 5:25 pm
Top

Floor and Wall Splicing

Postby jlovell25 » Thu Dec 31, 2015 8:22 pm

I don't have access to 4x10 sheets of anything in my area so I had to make some using 4x8 sheets of 3/4" plywood. I decided to use a cabinet grade plywood even for the wall inner structure. My main deciding factor on this was the stability of the material. When I was looking at plywood at the hardware stores everything was warped and uneven except the cabinet grade stuff. Tp join the sections I use my router with a 1/8" slot cutting bit and made two passes to create a 1/4" slot on the end of each piece. I then cut a 1/4" spline and glued it together with some Tightbond II. The joints seem really strong.

Image
Image
jlovell25
Teardrop Inspector
 
Posts: 19
Images: 34
Joined: Wed Oct 14, 2015 5:25 pm
Top

Door Layout

Postby jlovell25 » Thu Dec 31, 2015 10:40 pm

I spent several days trying to figure out how to design the door I wanted. I started out with the basic Grumman II door but after looking at some pictures of completed Teardrops online for galley ideas my wife saw the following picture and wanted a round "D" shaped door. I ended up drawing a 19" 3/4 radius circle and then adding straight lines for the bottom and side. I had to experiment with several sizes to get something that looked good with with profile.

Door idea came from here:
http://www.blessthisstuff.com/stuff/veh ... p-trailer/

Image
jlovell25
Teardrop Inspector
 
Posts: 19
Images: 34
Joined: Wed Oct 14, 2015 5:25 pm
Top

Re: The Lovie Build

Postby tony.latham » Thu Dec 31, 2015 11:31 pm

I think you have a great looking plan going. And it's obvious you––and your wife––are putting in your prep time. The one tiny tweak I'd suggest is your apparent closed (front) upper storage area.

I really like having an open headboard there to keep stuff accessible. Books, glasses, flashlights, meds, whatever. :thumbsup:

Image

Tony
User avatar
tony.latham
Gold Donating Member
 
Posts: 7073
Images: 17
Joined: Mon Jul 08, 2013 4:03 pm
Location: Middle of Idaho on the edge of nowhere
Top

Re: The Lovie Build

Postby jlovell25 » Fri Jan 01, 2016 11:56 am

tony.latham wrote:I think you have a great looking plan going. And it's obvious you––and your wife––are putting in your prep time. The one tiny tweak I'd suggest is your apparent closed (front) upper storage area.

I really like having an open headboard there to keep stuff accessible. Books, glasses, flashlights, meds, whatever. :thumbsup:

Tony


Tony, thanks for the feedback. I haven't finalized that front cabinet section yet and am still looking at tons of pictures/examples for ideas. I do like the idea of have a shelf there to put phones, etc... I was also thinking about adding some USB charging plugs.

One requirement for that area I have is that I want to put a ClimateRight unit (AC/Heat) in my tongue box so I will need to duct a feed and return line into that area somewhere. I've been looking at the SilverBeatle build some for ideas on this.

ClimateRight CR5000 A/C & Heater:
http://www.climaterightair.com/products ... eater.html
jlovell25
Teardrop Inspector
 
Posts: 19
Images: 34
Joined: Wed Oct 14, 2015 5:25 pm
Top

Cutting Doors

Postby jlovell25 » Fri Jan 01, 2016 12:15 pm

I really stressed out about cutting the doors. I actually put it off for about a week before I decided to give it a go. I was originally going to use my jigsaw to make the cuts but I just knew that was not going to give me the kind of cut I wanted. I took an afternoon and drove around to all the hardware stores looking at the different router guides available and found a kit from MilesCraft that Lowes carries.

Milescraft Router Guide Kit:
http://www.lowes.com/pd_328470-41401-12 ... Id=3158869

The router guide kit has a circle cutting tool with it that can cut arcs up to 51 inches. I used a 1/4" spiral up-cut bit and cut the large arc first. The smaller arc in the bottom hinge side corner was a little harder. For that arc the circle cutting guide was to big so I ended up just running a screw through a free hole that was in the edge of my router base and using that as a pivot point for the arc.

Image
Image
jlovell25
Teardrop Inspector
 
Posts: 19
Images: 34
Joined: Wed Oct 14, 2015 5:25 pm
Top

Re: The Lovie Build

Postby KCStudly » Mon Jan 04, 2016 8:32 am

Looking good. :thumbsup:
KC
My Build: The Poet Creek Express Hybrid Foamie

Poet Creek Or Bust
Engineering the TLAR way - "That Looks About Right"
TnTTT ORIGINAL 200A LANTERN CLUB = "The 200A Gang"
Green Lantern Corpsmen
User avatar
KCStudly
Donating Member
 
Posts: 9640
Images: 8169
Joined: Mon Feb 06, 2012 10:18 pm
Location: Southeastern CT, USA
Top

Inner Walls Cut

Postby jlovell25 » Mon Jan 04, 2016 3:24 pm

Got my inner walls cut over the weekend. Couple of tips I figured out after cutting the first one.

1. Router the rabbet cuts for the ceiling and floor overhang first. If you cut out all the voids first the router won't have much of a ledge to sit on when making those cuts.
2. Fender mounting. I forgot to leave in some structure for fender mounts so I'll have to figure that out later.

Image
Image
jlovell25
Teardrop Inspector
 
Posts: 19
Images: 34
Joined: Wed Oct 14, 2015 5:25 pm
Top

Re: The Lovie Build

Postby ibbowhunting » Mon Jan 04, 2016 8:20 pm

what did you use to cut out the skeletonized frame work? how much wood did you leave around most things? looks good
ibbowhunting
Teardrop Advisor
 
Posts: 65
Joined: Sun Mar 22, 2015 12:12 pm
Top

Re: The Lovie Build

Postby jlovell25 » Tue Jan 05, 2016 10:05 am

ibbowhunting wrote:what did you use to cut out the skeletonized frame work? how much wood did you leave around most things? looks good


I used a plunge router with a circle cutting guide to cut the doors. I spent quite a bit of time on the doors because I wanted the cuts to be exactly 1/4" and to be very straight so I could use the cut out piece to make the door. I also used the router for the rabbet joints at the bottom and around the top. The rest of the void cut outs (insulation space) were cut with a jigsaw.

The spacing around most of the edges is 2 inches. There are a couple places where I only left 1.5 Inches of space.

Jim
jlovell25
Teardrop Inspector
 
Posts: 19
Images: 34
Joined: Wed Oct 14, 2015 5:25 pm
Top

Door Hinges

Postby jlovell25 » Tue Jan 19, 2016 12:24 pm

Got my door hinges installed. I tried to account for the space needed for the T-molding that will be installed on the doors. I am going to have a double seal when I'm done with a inside door jam and the outside T-molding with a seal. Because of the seal on the outside T-molding I am probably going to need some spacers to offset the hinges. I'll build those later when I have the seal and know the exact thickness.

Image
Image
Image
Image
Image
jlovell25
Teardrop Inspector
 
Posts: 19
Images: 34
Joined: Wed Oct 14, 2015 5:25 pm
Top

Next

Return to Build Journals

Who is online

Users browsing this forum: No registered users and 14 guests