J.F. 5X5X9 Benroy

...ask your questions in the appropriate forums BUT document your build here...preferably in a single thread...dates for updates, are appreciated....

J.F. 5X5X9 Benroy

Postby Fordh8ter » Sat Apr 09, 2016 10:11 pm

Hey all! Love the forum and finally getting around to posting my freshly started build!

Just the small introduction before getting to the real build! Avid slow pitch softball player, so camping at tournaments and such happens fairly often in the summer time, well what little summer we get here in Alberta Canada. Got sick of tenting, between the exposure to the elements, as well as the set up and tear down time...time for a solution! Thought about tent trailers, came across the a-frame style pop ups, then low and behold....Teardrop trailers!

I was hooked from the get go, now, buy or build...Between availability (very few and far between here) and desired features, build is the way to go! Off to planning, decided a 5 wide is what is commonly desired by everyone, but figured id get a bit of extra space by going 5 high! and 9 long just seemed to be the number to get everything i wanted into the galley and organized the way id like it!

To day 1, well the trailer day! Came across a new 5x8 trailer early October, the perfect start to my build!
Image

Next was on to the planning and design stage, (I jumped around buying a few things along the way to help facilitate the design)
Doors
Image
Cooler
Image
Oven
Image
After i had these i knew the design could be "finalized", or as close as it will ever be
Image
Image
Ended up with a Benroy design, 2 coolers on the bottom corners of the hatch, on slide out drawers, in between those two will be a pull out spice/storage rack, the lower of the upper middle opening will store the oven while in transport; plan on having angled side tables to be attached to the tear to store the oven on while set up at camp. Upper and side cabinets will have cupboard doors on them with adjustable shelving for plenty of storage! 2 pairs of usb/12v outlets in the hatch as well as in the interior. 3 Cabinets on the interior above the feet, and probably a shelf above the head (will determine that once the bed is in place) Lastly there will be the standard fantastic fan in the roof, as well as a tongue box storing the battery, fuse panel and misc storage


So to modify the trailer, i went overkill on the jack stands (its all that was readily in stock locally, and on sale at the time. Not going to have to worry about rocking the trailer off its stands in the roughest of nights! All four corners are on scissor jacks!
Image
Image

Fast forward to last week (start of april) and i picked up some 5x5 ply (3/8) for the floor and walls. and i also picked up some 3/4 to be ripped down into straight, unwarped 1x2's seeing as though we all know lumber is a nightmare now-a-days!
Image
Image
Started with the base, built with the standard 3/4 sandwich construction and roofing tar covered the base, still need to insulate and put the interior floor in place.
Image
Image
Next up was cutting the profile
Image
and test fitting the door opening!
Image
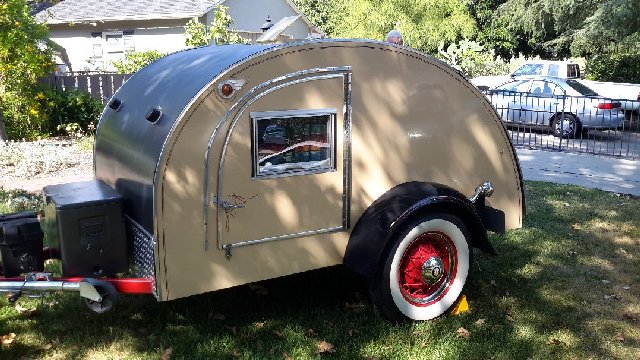
and finally, i got the skeleton for the walls completed for both sides, ready to have insulation cut and skins fitted! Not bad for the first weekend working on the project!
Image
Last edited by Fordh8ter on Mon Apr 18, 2016 4:14 pm, edited 1 time in total.
Fordh8ter
Teardrop Inspector
 
Posts: 9
Images: 68
Joined: Wed Nov 04, 2015 7:08 pm

Re: J.F. 5X5X9 Benroy

Postby Fordh8ter » Sat Apr 09, 2016 10:23 pm

Just to add into things early, some misc. accessories!
12v/usb outlets (2 interior, 2 galley)
Image
interior reading lights
Image
Overhead interior/galley lights
Image


Second weekend (with misc hours during the week)
Walls and base fully insulated!
Image
Image

Wall outside skins getting glued up
Image

And test fitting with the doors!
Image
Image

and the base getting its interior skin applied!
Image
Fordh8ter
Teardrop Inspector
 
Posts: 9
Images: 68
Joined: Wed Nov 04, 2015 7:08 pm

Re: J.F. 5X5X9 Benroy

Postby Fordh8ter » Mon Apr 18, 2016 4:21 pm

next up i got the base put onto the trailer
Image
and showing the foot long overhang off the back
Image

went a little overkill on the holes for the walls to be attached with, every 4 inches, but id rather it not come apart!
Image
these holes will be filled with oak plugs, to give a bit of contrast where visible
Image


Picked up a couple more accessories for the finished product. Exhibit A are cooler lights with built in tilt switches to turn on, as well as auto off switches after something like 15 seconds, so they dont stay on even if the cooler is open. they arent super bright, but will put off enough light to help rummage through a cooler at midnight to find that hard earned cold beer!
Image
and exhibit B - cooler lid props to make drying them out simple
Image
Fordh8ter
Teardrop Inspector
 
Posts: 9
Images: 68
Joined: Wed Nov 04, 2015 7:08 pm
Top

Re: J.F. 5X5X9 Benroy

Postby Fordh8ter » Mon Apr 18, 2016 4:27 pm

this weekend i also got the next major step completed with the help of a friend....Walls are up!
Image


next step was to pick up some 1/2 5x5 baltic birch for the cabinets, some 4x8 birch for the hatch spars, and some 1/8 5x5 baltic birch for the interior and exterior roof skins
Image

got the roof spars cut from the 1x2 plywood strips, doubled up for the hatch hinge location and the fantastic fan
Image
making sure the fan fits....success!
Image
Image
all the spars in place and ready for interior skin
Image


decided to build a template for the hatch lid profile
Image
ribs rough cut out, jigsawed to wide, router with flush trim bit on the template used to clean up and make all 6 uniform
Image
and what remains of a 4x8 after the ribs were cut out
Image
Fordh8ter
Teardrop Inspector
 
Posts: 9
Images: 68
Joined: Wed Nov 04, 2015 7:08 pm
Top

Re: J.F. 5X5X9 Benroy

Postby Fordh8ter » Mon Apr 18, 2016 4:30 pm

Now its time to layout the galley, wanted to get a visual, as well as cut and place the footbed wall just to ensure the trailer is squared up before applying the interior roof skin
Image
and testing to make sure there is clearance for the cooler with gap under and over, as well as a board placed where the end of the bed and back wall will be
Image

i couldnt resist after a long hard weekend in the sun. i had to jump in and dream of the finished product
Image
Image

and its finished! skinned and everything!
Image
Fordh8ter
Teardrop Inspector
 
Posts: 9
Images: 68
Joined: Wed Nov 04, 2015 7:08 pm
Top


Return to Build Journals

Who is online

Users browsing this forum: No registered users and 19 guests