The Coddiwompler

...ask your questions in the appropriate forums BUT document your build here...preferably in a single thread...dates for updates, are appreciated....

Re: The Coddiwompler

Postby eLink » Mon Sep 28, 2020 4:48 pm

lfhoward wrote:Wow your build is really coming along. It’s a beautiful design and I agree with the previous poster about the quality cabinet work. I know how house projects can take precedence and delay a trailer build! Keep on keeping on!


Thank you!
It's gonna get tougher in the next few months too. We decided to put our house on the market and I have to finish the landscaping!
Finally finished this fence...

163299 163300
User avatar
eLink
Teardrop Master
 
Posts: 191
Images: 142
Joined: Mon Nov 12, 2018 3:34 pm
Location: Los Angeles

Re: The Coddiwompler

Postby eLink » Mon Sep 28, 2020 4:59 pm

This is a bit of a milestone: got the headliner for the storage box installed.
I figured I would start here to get the hang of it, before moving on to the main roof.
It wasn't too difficult to bend the 1/8" ply to this 12" radius. But I imagine that it will be much more difficult to do the 6" radius bends at the bottom!
I might try soaking those before attempting the bend.

Image
Image
User avatar
eLink
Teardrop Master
 
Posts: 191
Images: 142
Joined: Mon Nov 12, 2018 3:34 pm
Location: Los Angeles

Re: The Coddiwompler

Postby erfnie » Fri Oct 02, 2020 6:23 pm

I was originally going to use a Cook Partner stove, but was having a hard time deciding how to fit it in. Instead, I opted for a drop-in cooktop from Dometic. It's less expensive and allows a more custom look.
163237
I came up with this funky tab on the back side of the drawer box. One latch to keep it closed and one to hold it open while in use. Am I over-thinking this? Is there another way to do this?
163238

How are you supplying the gas? That might be a factor in how you latch it. A regular cabinet latch seems to hold it shut pretty well, but I also found these that we might try instead.
https://smile.amazon.com/gp/product/B07R7891C8/ref=ppx_od_dt_b_asin_image_s01?ie=UTF8&psc=1
Our drawer stays open pretty well by itself because the quick connect gas line goes in the back.

You have a very nice build going. Love the craftsmanship!
Erfnie (and Azua ;) )
"A Little Tearapy"
http://www.tnttt.com/viewtopic.php?f=50&t=72509
User avatar
erfnie
Teardrop Advisor
 
Posts: 64
Images: 367
Joined: Wed Oct 10, 2018 4:40 am
Top

Re: The Coddiwompler

Postby eLink » Sun Oct 04, 2020 9:58 am

erfnie wrote:How are you supplying the gas? That might be a factor in how you latch it. A regular cabinet latch seems to hold it shut pretty well, but I also found these that we might try instead.
https://smile.amazon.com/gp/product/B07R7891C8/ref=ppx_od_dt_b_asin_image_s01?ie=UTF8&psc=1
Our drawer stays open pretty well by itself because the quick connect gas line goes in the back.

You have a very nice build going. Love the craftsmanship!


Thanks for the compliments!
For a more "built-in" concept, the gas line will be hard-plumbed with a flexible hose and a hoop for slack.
But it looks like I have another challenge: the PD4045 sticks out more than I thought. The stove drawer will have to be open at the back to fit around it. But I think I have found a way to make the bolt latches work.
Another alternative I found was a drawer slide with a lock-in/lock-out feature. Expensive though.

163417
User avatar
eLink
Teardrop Master
 
Posts: 191
Images: 142
Joined: Mon Nov 12, 2018 3:34 pm
Location: Los Angeles
Top

Re: Headliner

Postby eLink » Mon Oct 19, 2020 5:00 pm

Got the headliner in today. But there were lots of lessons learned.
It was supposed to be easy... front edge fits into slot, add a bead of glue to the wall ledge and staple from front to rear. The rear edge then gets glued and stapled to ledger.
163516 163517
I think my biggest mistake was not having a helper. Once the glue was on I switched into panic mode and several things happened:
Missed on my first staple.
163522
Forgot to check the staple depth setting. I think many of them went right through!
163518
Had a really hard time getting the rear edge to stay down. Got a few more shiners in the process (thankfully this area will get hidden though).
163521
The ceiling kept popping off the ledge, probably allowing the glue to prematurely set up before I could staple it down. Hence the gap. Not the tight joint I was hoping for! Guess I will be caulking that joint after all.
163520
Splintering from the staples popping and being pushed back in.
163519
Big sigh. :(
User avatar
eLink
Teardrop Master
 
Posts: 191
Images: 142
Joined: Mon Nov 12, 2018 3:34 pm
Location: Los Angeles
Top

Re: The Coddiwompler

Postby tony.latham » Mon Oct 19, 2020 5:49 pm

Guess I will be caulking that joint after all.


Nothing like a rodeo when you're not expecting it. :frightened: Been there.

I think a little PL3 in that crack and you'll be good to go. :thumbsup:

Tony
User avatar
tony.latham
Gold Donating Member
 
Posts: 6899
Images: 17
Joined: Mon Jul 08, 2013 4:03 pm
Location: Middle of Idaho on the edge of nowhere
Top

Re: The Coddiwompler

Postby eLink » Mon Oct 19, 2020 7:39 pm

tony.latham wrote:Nothing like a rodeo when you're not expecting it. :frightened: Been there.

Yee haw! Seems to be a regular occurrence for me.

tony.latham wrote:I think a little PL3 in that crack and you'll be good to go. :thumbsup:

Thanks Tony, will try that.

I'm my own worst critic. But I must say that it is pretty satisfying to finally reach this milestone! :D
Image
User avatar
eLink
Teardrop Master
 
Posts: 191
Images: 142
Joined: Mon Nov 12, 2018 3:34 pm
Location: Los Angeles
Top

Re: The Coddiwompler

Postby tony.latham » Mon Oct 19, 2020 9:28 pm

eLink wrote:
tony.latham wrote:Nothing like a rodeo when you're not expecting it. :frightened: Been there.

Yee haw! Seems to be a regular occurrence for me.

tony.latham wrote:I think a little PL3 in that crack and you'll be good to go. :thumbsup:

Thanks Tony, will try that.

I'm my own worst critic. But I must say that it is pretty satisfying to finally reach this milestone! :D
Image
You might throw a pad in there and take a nap.

I think it’s looking great.

Tony
User avatar
tony.latham
Gold Donating Member
 
Posts: 6899
Images: 17
Joined: Mon Jul 08, 2013 4:03 pm
Location: Middle of Idaho on the edge of nowhere
Top

Re: The Coddiwompler

Postby KCStudly » Mon Oct 19, 2020 11:06 pm

by MickinOz » Mon Sep 21, 2020 4:01 pm
"Mate - that's some seriously beautiful cabinet making."

I concur. You are doing great work.

"The sign of a true craftsman is how well he hides his mistakes." Don't sweat the little stuff. Those are easy to hide.

Those of us who have tried for perfection recognize good work when we see it! :thumbsup:
KC
My Build: The Poet Creek Express Hybrid Foamie

Poet Creek Or Bust
Engineering the TLAR way - "That Looks About Right"
TnTTT ORIGINAL 200A LANTERN CLUB = "The 200A Gang"
Green Lantern Corpsmen
User avatar
KCStudly
Donating Member
 
Posts: 9611
Images: 8169
Joined: Mon Feb 06, 2012 10:18 pm
Location: Southeastern CT, USA
Top

Re: The Coddiwompler

Postby erfnie » Thu Oct 22, 2020 2:28 pm

I'm my own worst critic. But I must say that it is pretty satisfying to finally reach this milestone! :D
Image

You might throw a pad in there and take a nap.

And what a view! Looks like a beautiful blue night sky :D
Congrats on this milestone. It looks so professional and no one but YOU will notice those...um "mistakes." ;)
Erfnie (and Azua ;) )
"A Little Tearapy"
http://www.tnttt.com/viewtopic.php?f=50&t=72509
User avatar
erfnie
Teardrop Advisor
 
Posts: 64
Images: 367
Joined: Wed Oct 10, 2018 4:40 am
Top

Re: The Coddiwompler

Postby Bezoar » Mon Nov 16, 2020 5:27 pm

I've enjoyed following your build - great work! I look forward to seeing updates when you get the chance.
User avatar
Bezoar
Teardrop Master
 
Posts: 155
Images: 37
Joined: Mon Mar 10, 2008 9:01 pm
Location: Southern Wisconsin
Top

Re: The Coddiwompler

Postby noseoil » Wed Nov 18, 2020 7:49 am

I made some 1/8" X 3/4" molding to cover gaps in my canvas headliner (5' was actually 58"?) at the walls. Worked out fine & closes the gap where the canvas was short along the edges. PL would be fine, or a similar trim to match the walls, even a different wood for accent would be good as well. It's not a problem, it's an opportunity!
Build log: viewtopic.php?f=50&t=60248
The time you spend planning is more important than the time you spend building.........

137905
User avatar
noseoil
1000 Club
1000 Club
 
Posts: 1820
Images: 669
Joined: Sun Apr 27, 2014 8:46 am
Location: Raton, New Mexico, living the good life!
Top

Re: The Coddiwompler

Postby eLink » Wed Nov 18, 2020 9:37 pm

Thank you all for the compliments and encouragement! :)
I took Tony's advice and did my best to squeeze some PL Premium into the gap. It definitely mitigated the squishy joint!
I will go back over all the joints with some wood colored caulk. If that doesn't look right, I'll go with thin wood trim as Noseoil suggested.
Meanwhile, I have begun laying out roof spars. But having trouble making time for it with yard construction going on, and then it gets too dark to work at 4:30 with stupid daylight savings!
Image

More pics to come soon.
User avatar
eLink
Teardrop Master
 
Posts: 191
Images: 142
Joined: Mon Nov 12, 2018 3:34 pm
Location: Los Angeles
Top

Re: The Coddiwompler

Postby lfhoward » Sun Nov 22, 2020 4:10 pm

The Coddiwampler’s ceiling really looks great! Congratulations on getting it to this stage. :applause:
My off-road camper build on an M116A3 military chassis:
http://www.tnttt.com/viewtopic.php?f=50&t=62581
Tow vehicle: 2008 Jeep Liberty with a 4 inch lift.
User avatar
lfhoward
1000 Club
1000 Club
 
Posts: 1369
Joined: Wed Jan 22, 2014 6:10 pm
Location: Philadelphia, PA
Top

Re: The Coddiwompler

Postby eLink » Sun Nov 22, 2020 9:44 pm

lfhoward wrote:The Coddiwampler’s ceiling really looks great! Congratulations on getting it to this stage.

Thanks! :thumbsup:

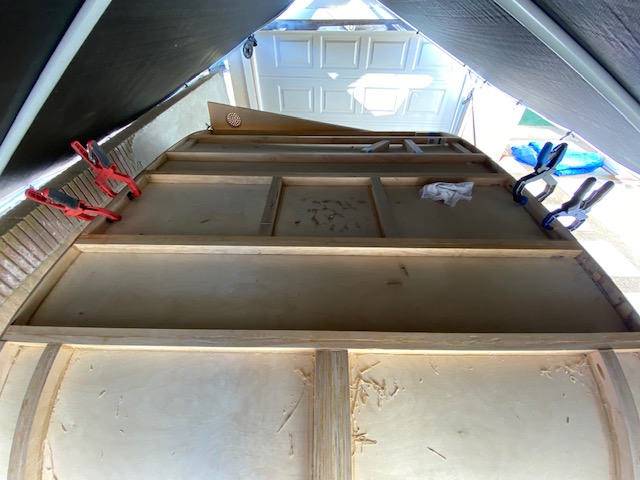
Update: I got the roof framing just about completed this weekend.
I see why a lot of people go on to build more than one camper. That way they can apply everything they learned from the first one!
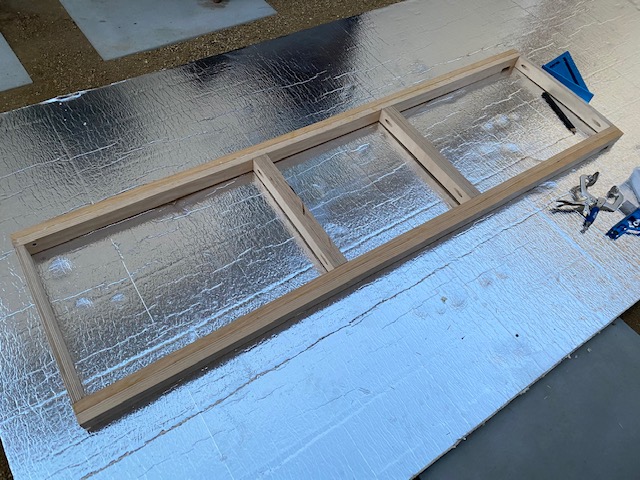
The skylight framing turned out ok, but I found that gluing the pieces "in-place" did not go so smooth. I couldn't seem to clamp things right, so there was a little bit of shifting and misalignment.
Image

So then I decided to build the vent frame assembly separately. This worked out so much better! Everything nice and square!
Image Image

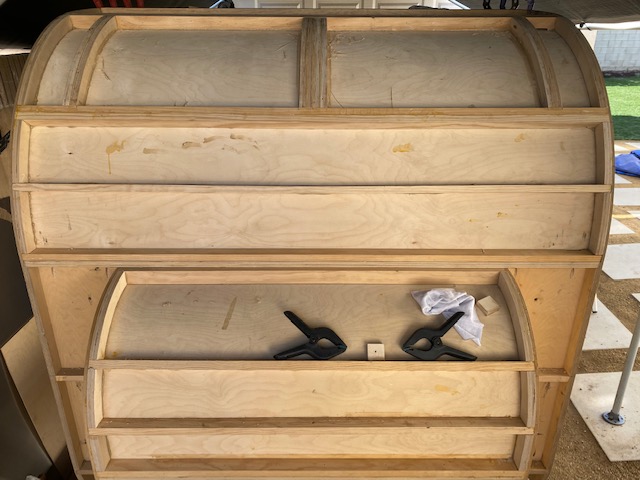
Blocking along the sidewalls seemed to be sitting proud of the roof profile. Probably because of the staples and glue along the wall ledge. At first I just figured I would just have to follow up with a belt sander. But then I realized that all I need to do is give the blocking and spars a slight bevel along the bottom edge. Makes it fit tight to the wall and flush to the roof line!
Image

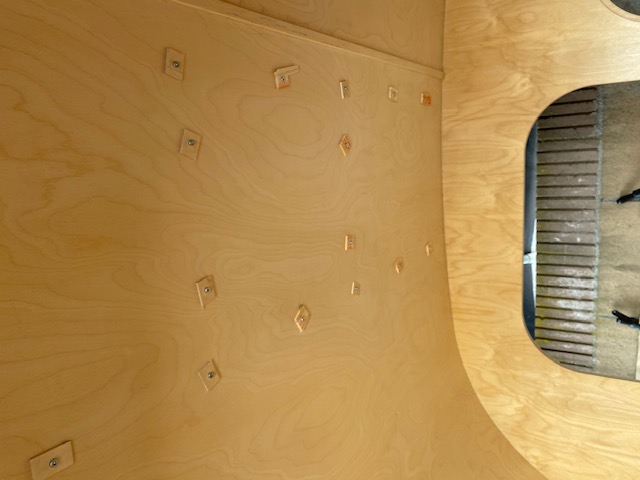
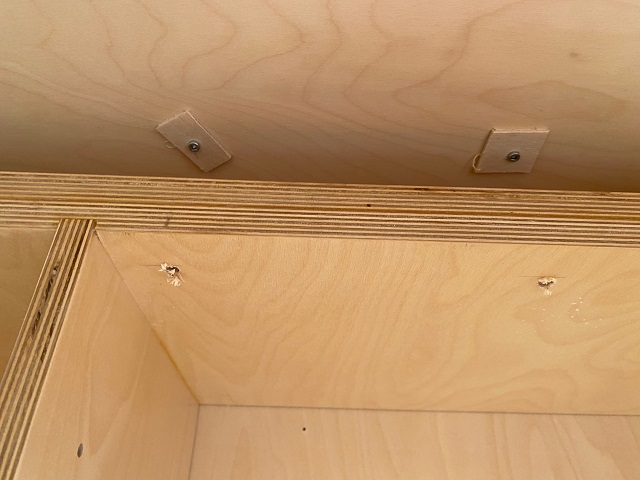
I wasn't feeling comfortable with crown staples for the headliner, so I opted to use 1" Kreg screws to join it with the spars. I will remove them once the glue has cured. Screws alone will dimple the plywood, as I had discovered for the first few spars. Even with the drill set to the lowest torque setting. So I used little pieces of 1/8" ply to prevent that.
Image

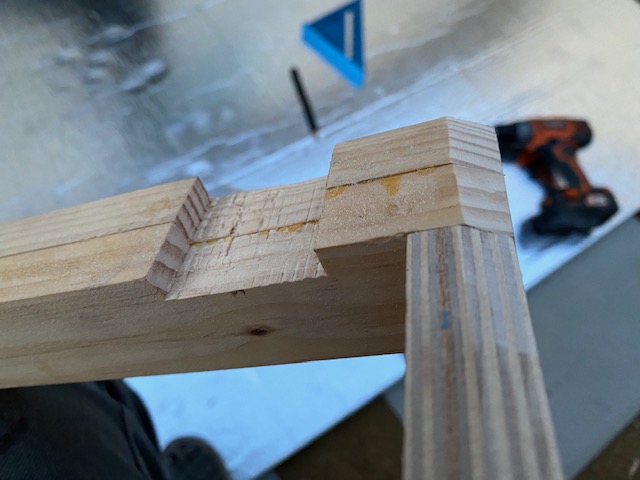
Here is my other moment of panic. See what I had to do there?
Image

Lastly, I won't use single 1x spars again. I used "select" pine, but the few that I used still sagged and warped. The doubled-up spars stayed straight and worked well.
User avatar
eLink
Teardrop Master
 
Posts: 191
Images: 142
Joined: Mon Nov 12, 2018 3:34 pm
Location: Los Angeles
Top

PreviousNext

Return to Build Journals

Who is online

Users browsing this forum: No registered users and 9 guests