The Coddiwompler

...ask your questions in the appropriate forums BUT document your build here...preferably in a single thread...dates for updates, are appreciated....

Re: The Coddiwompler

Postby eLink » Tue Jan 10, 2023 2:02 pm

So many setbacks!
It's great that we're getting some rain in L.A. But my work area just happens to be the lowest point in my yard, creating this muddy mess. Additionally, my garage leaks like a sieve (built in 1924 and suffering from several roofing hack jobs over the years). So I can only work on the camper in fair weather.
I was really hoping to have finished it by now. :(

RainyJan_2023.JPG
RainyJan_2023.JPG (84.51 KiB) Viewed 946 times
User avatar
eLink
Teardrop Master
 
Posts: 191
Images: 142
Joined: Mon Nov 12, 2018 3:34 pm
Location: Los Angeles

Re: The Coddiwompler

Postby Tom&Shelly » Tue Jan 10, 2023 3:05 pm

eLink wrote:So many setbacks!
It's great that we're getting some rain in L.A. But my work area just happens to be the lowest point in my yard, creating this muddy mess. Additionally, my garage leaks like a sieve (built in 1924 and suffering from several roofing hack jobs over the years). So I can only work on the camper in fair weather.
I was really hoping to have finished it by now. :(

RainyJan_2023.JPG


Sorry to hear about the flooding. Living in a 100 year old house must be a mixed blessing, to say the least. Congratulations on living in a part of LA that hasn't been razed and had condos put up. (That's how I lived for about 12 years out there. We had the condo roof fixed one year, and it was two years before we had enough rain to discover they did some things wrong.)

Keep at it with the teardrop. Well worth it once finished! :thumbsup:

Tom
172912 170466
Tom&Shelly
Palladium Donating Member
 
Posts: 2202
Images: 1946
Joined: Tue Sep 05, 2017 3:27 pm
Location: Upstate New York/New Mexico

Re: The Coddiwompler

Postby eLink » Tue Feb 21, 2023 11:25 am

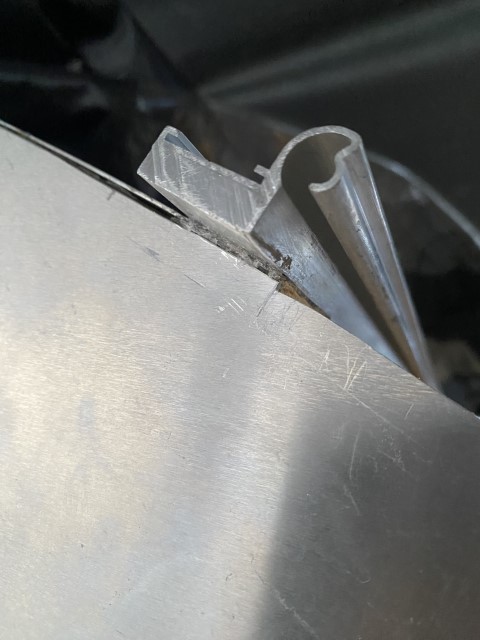
Just about finished with the exterior trim. I have to say, all the teardrop YouTube videos out there make this look easy. But with all the bending, trimming, filing, countersinking, annealing, pounding, fitting, re-screwing, sticky sealant cleanup... I can tell you it is not. At least not in my experience. Not complaining though, it comes with great satisfaction at the end!

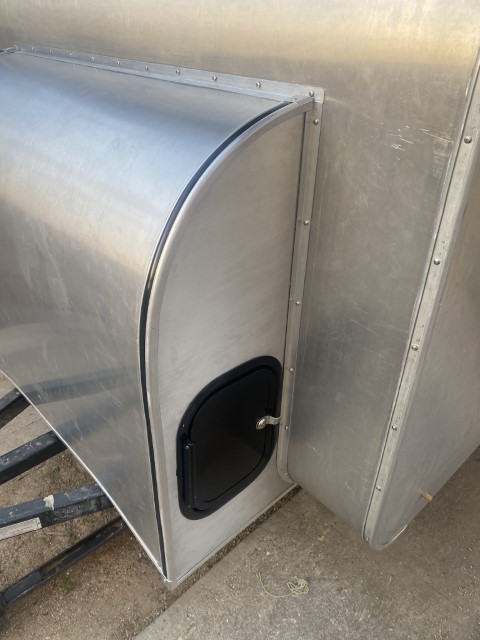
Getting this curved panel installed was exhausting! Mostly because of lying on the ground and working upside down. Pre-bending the sheet over a shipping tube definitely helped.
Image

Here is the forward storage compartment. It worked out pretty well I think. I kind of gave up trying to protect the aluminum sheets. I experimented with a sanded finish on the side panel... or I may just leave the beat-up look.
Image

I needed to shave off a portion of the galley wall to allow the hatch seal to fit better. Just about 1/16" for a foot. I finally found a use for this Dremel planer that I have owned for about 20 years!
Image
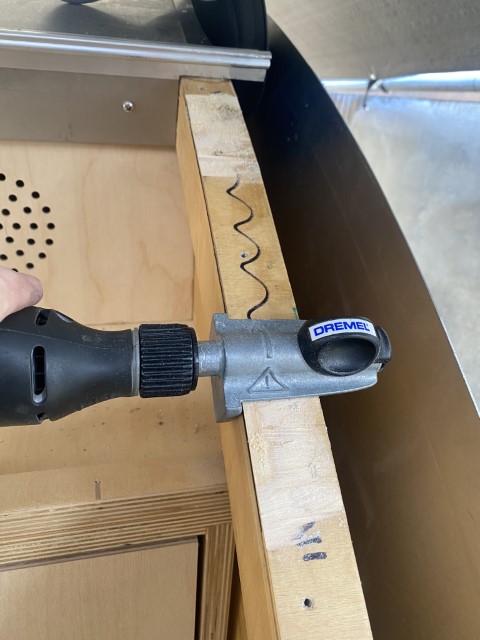
After routing and filing down the sheet I now have a 1/16" step down from the hinge.
Image
User avatar
eLink
Teardrop Master
 
Posts: 191
Images: 142
Joined: Mon Nov 12, 2018 3:34 pm
Location: Los Angeles
Top

Re: The Coddiwompler

Postby eLink » Sun Mar 05, 2023 12:39 pm

Router table? Scroll saw? Bench sander? Who needs 'em!
Behold, my makeshift all-in-one workbench!
Image
Definitely not high-precision (and kind of unsafe!) but it gets the job done!
It took some trial and error to find good techniques to prevent the workpieces from chattering or kicking back while keeping my fingers clear!
Image
Image
Image
User avatar
eLink
Teardrop Master
 
Posts: 191
Images: 142
Joined: Mon Nov 12, 2018 3:34 pm
Location: Los Angeles
Top

Re: The Coddiwompler

Postby lfhoward » Sun Mar 05, 2023 1:46 pm

It looks looks it is coming along good!! Nice work getting those curved sections of aluminum to lay flat without creases or dents. Also, you are using the same hinges I used on my build, and I cut out the same ABS plastic spacers as you! I will say depending on the thickness of the foam gasket you can find for sealing the doors, one or two spacers may be necessary to get a good seal that allows the door to be flat/parallel with the camper sides. If the foam gasket is thick and there is one spacer, closing the door will cause it to bend/bow out slightly at the corners farthest from the hinge, which is not what you want. The bow effect is more pronounced the larger the door is. The concave bending gets worse when humidity is high, which can potentially compromise the door seal at the far corners during rain. So you want even pressure on the foam all the way around the door to make a watertight seal, but not too much pressure to cause it to bend the wooden door over time. Hope this makes sense!
My off-road camper build on an M116A3 military chassis:
http://www.tnttt.com/viewtopic.php?f=50&t=62581
Tow vehicle: 2008 Jeep Liberty with a 4 inch lift.
User avatar
lfhoward
1000 Club
1000 Club
 
Posts: 1370
Joined: Wed Jan 22, 2014 6:10 pm
Location: Philadelphia, PA
Top

Re: The Coddiwompler

Postby Onajourney » Mon Mar 06, 2023 9:15 am

Love the All-in-One workbench ! I made a scroll saw too out of my jig saw for the trim. I also learned to cut the aluminum at top speed from the start.
User avatar
Onajourney
Teardrop Master
 
Posts: 244
Images: 181
Joined: Mon Sep 06, 2021 2:16 am
Location: Central North Carolina
Top

Re: The Coddiwompler

Postby eLink » Mon Mar 06, 2023 12:10 pm

lfhoward wrote:It looks looks it is coming along good!! Nice work getting those curved sections of aluminum to lay flat without creases or dents. Also, you are using the same hinges I used on my build, and I cut out the same ABS plastic spacers as you! I will say depending on the thickness of the foam gasket you can find for sealing the doors, one or two spacers may be necessary to get a good seal that allows the door to be flat/parallel with the camper sides. If the foam gasket is thick and there is one spacer, closing the door will cause it to bend/bow out slightly at the corners farthest from the hinge, which is not what you want. The bow effect is more pronounced the larger the door is. The concave bending gets worse when humidity is high, which can potentially compromise the door seal at the far corners during rain. So you want even pressure on the foam all the way around the door to make a watertight seal, but not too much pressure to cause it to bend the wooden door over time. Hope this makes sense!


Thanks!
The gasket I have is only 1/4" thick so I hope it seals properly... these spacers are cut from 1/8" aluminum and I would hate to have to cut another set!
To prevent door warping I was thinking about adding marine style cam latches at the outer corners. We'll see...

Onajourney wrote:Love the All-in-One workbench ! I made a scroll saw too out of my jig saw for the trim. I also learned to cut the aluminum at top speed from the start.


Yes, higher speeds did seem to work better on the router. But unfortunately, my jig saw is one speed only. After getting my fingers pinched hard by the chattering workpiece, learned to work slowly and steadily. Little bites at a time. I started using a chunk of wood as a push-block to hold down the unruly pieces.
User avatar
eLink
Teardrop Master
 
Posts: 191
Images: 142
Joined: Mon Nov 12, 2018 3:34 pm
Location: Los Angeles
Top

Re: The Coddiwompler

Postby eLink » Tue Apr 11, 2023 10:36 am

Trailer wiring colors are ridiculous!
171702
User avatar
eLink
Teardrop Master
 
Posts: 191
Images: 142
Joined: Mon Nov 12, 2018 3:34 pm
Location: Los Angeles
Top

Re: The Coddiwompler

Postby eLink » Sun Apr 30, 2023 1:06 pm

I have become more worried about this compartment, which contains the PD4045, battery and propane stove.
171816
I think I need to somehow partition off the gas and electric components.
My idea is to add a shelf under the stove with enough room for the hose to coil up horizontally. Cables will pass through a rubber seal at the back. I will probably add a door, or panel to hide everything.
It'll be cramped and I can forgot about using any of that area for stowage.
171820

Am I overthinking it?
User avatar
eLink
Teardrop Master
 
Posts: 191
Images: 142
Joined: Mon Nov 12, 2018 3:34 pm
Location: Los Angeles
Top

Re: The Coddiwompler

Postby Onajourney » Sun Apr 30, 2023 8:24 pm

I assume you have a propane shut off outside so no worries when not using it. you could get a propane detector for extra measure. I had the same concern. I have diesel fuel , propane, and 12V in my utility compartment. If it goes, it will go quick. LOL.
User avatar
Onajourney
Teardrop Master
 
Posts: 244
Images: 181
Joined: Mon Sep 06, 2021 2:16 am
Location: Central North Carolina
Top

Re: The Coddiwompler

Postby eLink » Fri Jun 30, 2023 6:24 pm

Getting close!
The door turned out pretty good, I think!
Image
Image
User avatar
eLink
Teardrop Master
 
Posts: 191
Images: 142
Joined: Mon Nov 12, 2018 3:34 pm
Location: Los Angeles
Top

Re: The Coddiwompler

Postby lfhoward » Mon Jul 03, 2023 9:22 pm

That is a very nice door! The trim just looks precision. Excellent work!
My off-road camper build on an M116A3 military chassis:
http://www.tnttt.com/viewtopic.php?f=50&t=62581
Tow vehicle: 2008 Jeep Liberty with a 4 inch lift.
User avatar
lfhoward
1000 Club
1000 Club
 
Posts: 1370
Joined: Wed Jan 22, 2014 6:10 pm
Location: Philadelphia, PA
Top

Re: The Coddiwompler

Postby Onajourney » Wed Oct 18, 2023 2:37 pm

" You think" It really is fantastic! True craftsmanship. If you had to do it again, would you build them or buy? It looks like a lot of hours went into making them. :beer:
User avatar
Onajourney
Teardrop Master
 
Posts: 244
Images: 181
Joined: Mon Sep 06, 2021 2:16 am
Location: Central North Carolina
Top

Re: The Coddiwompler

Postby Indiana Rambler » Wed Oct 18, 2023 4:34 pm

Your build is looking really nice! I also like the ingenuity on the tool usage!


Sent from my iPhone using Tapatalk
Indiana Rambler
Teardrop Master
 
Posts: 130
Images: 0
Joined: Fri Apr 30, 2021 3:30 am
Top

Previous

Return to Build Journals

Who is online

Users browsing this forum: No registered users and 24 guests