The Coddiwompler

...ask your questions in the appropriate forums BUT document your build here...preferably in a single thread...dates for updates, are appreciated....

Storage Compartment Doors

Postby eLink » Wed Jun 02, 2021 11:36 am

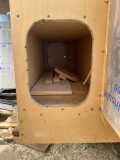
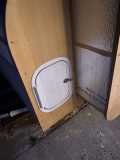
I had originally intended to build my own 8x10 compartment doors. But finally decided ease my anxiety and bought some prefab 9x12 Challenger doors instead.
I re-routed the original cutout so the new door now just barely fits top to bottom.
165812 165799
User avatar
eLink
Teardrop Master
 
Posts: 191
Images: 142
Joined: Mon Nov 12, 2018 3:34 pm
Location: Los Angeles

Re: The Coddiwompler

Postby Bezoar » Wed Jun 02, 2021 7:31 pm

I like the look the skylights give it! That will be nice to lay there and look at the stars.
User avatar
Bezoar
Teardrop Master
 
Posts: 155
Images: 37
Joined: Mon Mar 10, 2008 9:01 pm
Location: Southern Wisconsin

Re: The Coddiwompler

Postby eLink » Thu Jun 03, 2021 9:09 am

Bezoar wrote:I like the look the skylights give it! That will be nice to lay there and look at the stars.


Thanks! No doubt, the skylights are gonna be nice. I just worry about building it right, with smooth curves and weatherproof. :NC
But I have a plan!
User avatar
eLink
Teardrop Master
 
Posts: 191
Images: 142
Joined: Mon Nov 12, 2018 3:34 pm
Location: Los Angeles
Top

Roof Sheathing

Postby eLink » Sat Jun 05, 2021 7:04 pm

The skylight cutouts need to be just slightly smaller than the acrylic panel; about 1/8" overlap all around. Seemed like it would be easiest to cut the holes prior to installing the plywood sheathing. So I made this template with a jigsaw, aligned it to the panel and used an offset router bushing to cut the opening.
165852
First panel glued and stapled!
165853
User avatar
eLink
Teardrop Master
 
Posts: 191
Images: 142
Joined: Mon Nov 12, 2018 3:34 pm
Location: Los Angeles
Top

Re: The Coddiwompler

Postby Capebuild » Sun Jun 06, 2021 5:09 am

I've seen your individual posts but I somehow missed your "Build Journal".... glad I found it. Just went through all your posts.
Your trailer is looking really great! Enjoyed seeing your progress.

John
"Success can be defined as moving from failure to failure without loss of enthusiasm".... Churchill

Visit my Teardrop build here: viewtopic.php?f=50&t=73779
User avatar
Capebuild
Donating Member
 
Posts: 754
Images: 129
Joined: Sun Jan 31, 2021 6:50 am
Location: Massachusetts
Top

Re: The Coddiwompler

Postby eLink » Sun Jun 06, 2021 12:01 pm

Capebuild wrote:I've seen your individual posts but I somehow missed your "Build Journal".... glad I found it. Just went through all your posts.
Your trailer is looking really great! Enjoyed seeing your progress.

John


Thanks John! I look forward to seeing more of yours as well!
User avatar
eLink
Teardrop Master
 
Posts: 191
Images: 142
Joined: Mon Nov 12, 2018 3:34 pm
Location: Los Angeles
Top

Re: The Coddiwompler

Postby eLink » Mon Sep 05, 2022 12:47 pm

Wow, more than a year since my last update! I guess I lost steam on this project, so there hasn't been much progress. But in the last month or so my motivation has returned!
Just to catch you all up, I think the last major milestone was completing the skin (a year ago!).

Pre-bending the curve...
Image

This portion of plywood was threating to crack when I tried bending it dry. Soaking it did the trick!
Image
Image
Image

Here's where it stands today basically. So far, just the tongue box has a coat of poly.
Image

This Labor Day weekend I started cutting aluminum!
FYI, if you ever considered using cheapo Harbor Freight pneumatic metal shears, don't bother. I barely got it to snip more than 4 inches at a time! A jig saw works just fine.
Image

Side walls rough-cut and dry-fit.
Image
User avatar
eLink
Teardrop Master
 
Posts: 191
Images: 142
Joined: Mon Nov 12, 2018 3:34 pm
Location: Los Angeles
Top

Re: The Coddiwompler

Postby Capebuild » Mon Sep 05, 2022 3:17 pm

Hello elink!! I always wondered if you had ever finished. Good to see your progress. Looking really great. ......Nice bends on the ply!
John
"Success can be defined as moving from failure to failure without loss of enthusiasm".... Churchill

Visit my Teardrop build here: viewtopic.php?f=50&t=73779
User avatar
Capebuild
Donating Member
 
Posts: 754
Images: 129
Joined: Sun Jan 31, 2021 6:50 am
Location: Massachusetts
Top

Re: The Coddiwompler

Postby lfhoward » Mon Sep 05, 2022 7:33 pm

That’s a fantastic trailer design! I think it looks really cool and retro, like it would be at home behind a 1940’s vehicle. Anyways, looks like the hardest things are behind you (not that waterproofing and interiors are easy, but it’s basically all built!) Will look forward to future posts.
My off-road camper build on an M116A3 military chassis:
http://www.tnttt.com/viewtopic.php?f=50&t=62581
Tow vehicle: 2008 Jeep Liberty with a 4 inch lift.
User avatar
lfhoward
1000 Club
1000 Club
 
Posts: 1370
Joined: Wed Jan 22, 2014 6:10 pm
Location: Philadelphia, PA
Top

Re: The Coddiwompler

Postby eLink » Mon Nov 28, 2022 4:53 pm

I decided to add wood doorstops. My local hardwood shop will mill the parts for cheap...not much more than the price of the sheet of plywood these were cut from! Totally worth it.
Image
Image

Used Tony's method for locating the hinges. Worked out well!
Image
Image

Discovered that my cutouts were too big for my windows (shouldn't have trusted the dimensions and corner radius specified by the manufacturer). Oddly, the trim ring fit perfectly. To make sure the rubber seal has solid backing I glued in strips of balsa.
Image
Image

I finally decided it was time to throw my acrylic sheets in the oven so they can be bent to a 24" radius. It all went well until...Big surprise, just like Shrinky-dinks from the days of yore, they had shrunk by 1/4" all around!! Thankfully I have a local plastics shop that cut me some new ones while I waited (on a Saturday even!). The new ones fit perfectly!
Image
Image
User avatar
eLink
Teardrop Master
 
Posts: 191
Images: 142
Joined: Mon Nov 12, 2018 3:34 pm
Location: Los Angeles
Top

Re: The Coddiwompler

Postby eLink » Thu Dec 22, 2022 1:21 pm

Progress update... Skylights in!
Image
Image
Image
User avatar
eLink
Teardrop Master
 
Posts: 191
Images: 142
Joined: Mon Nov 12, 2018 3:34 pm
Location: Los Angeles
Top

Re: The Coddiwompler

Postby Capebuild » Thu Dec 22, 2022 4:39 pm

Looks really great! Your skylights came out very well!! Nice!! :thumbsup:
"Success can be defined as moving from failure to failure without loss of enthusiasm".... Churchill

Visit my Teardrop build here: viewtopic.php?f=50&t=73779
User avatar
Capebuild
Donating Member
 
Posts: 754
Images: 129
Joined: Sun Jan 31, 2021 6:50 am
Location: Massachusetts
Top

Re: The Coddiwompler

Postby Onajourney » Thu Dec 22, 2022 4:59 pm

They look fantastic!! :twisted:
User avatar
Onajourney
Teardrop Master
 
Posts: 244
Images: 181
Joined: Mon Sep 06, 2021 2:16 am
Location: Central North Carolina
Top

Re: The Coddiwompler

Postby Onajourney » Thu Dec 22, 2022 5:04 pm

They look fantastic!! :twisted:
User avatar
Onajourney
Teardrop Master
 
Posts: 244
Images: 181
Joined: Mon Sep 06, 2021 2:16 am
Location: Central North Carolina
Top

Re: The Coddiwompler

Postby eLink » Thu Dec 22, 2022 8:38 pm

Onajourney wrote:They look fantastic!! :twisted:

Thank you!

Capebuild wrote:Looks really great! Your skylights came out very well!! Nice!! :thumbsup:

Thanks John,
I was encouraged to get them done after seeing how well they worked out on yours!
User avatar
eLink
Teardrop Master
 
Posts: 191
Images: 142
Joined: Mon Nov 12, 2018 3:34 pm
Location: Los Angeles
Top

PreviousNext

Return to Build Journals

Who is online

Users browsing this forum: No registered users and 11 guests