Joe's Teardrop Build

...ask your questions in the appropriate forums BUT document your build here...preferably in a single thread...dates for updates, are appreciated....

Re: Joe's Teardrop Build

Postby tony.latham » Thu Jun 24, 2021 9:45 am

One - The strut is too long and instead of stopping when the hatch opens fully, it pushes past the ball and lifting it off.


Set a flashlight in the galley (or turn the hatch light on) and video the strut closing with your phone to see if it is bottoming out. If you're using my attachment points, you should have an inch to play with.


:thinking:

Tony
User avatar
tony.latham
Gold Donating Member
 
Posts: 6899
Images: 17
Joined: Mon Jul 08, 2013 4:03 pm
Location: Middle of Idaho on the edge of nowhere

Re: Joe's Teardrop Build

Postby tony.latham » Thu Jun 24, 2021 1:19 pm

Here's what Jim Gizzi said:

I turned them around but the correct fix would be different brackets. They sell a sturdier bracket but it requires a 13mm ball. If they turn the bracket around the screws need to be set flush or there is interference with the strut cartridge at the top bracket, at least in our case.

Me? I'd consider building them from 1/8" steel if I had this problem. Assuming the strut isn't bottoming out.

Tony
User avatar
tony.latham
Gold Donating Member
 
Posts: 6899
Images: 17
Joined: Mon Jul 08, 2013 4:03 pm
Location: Middle of Idaho on the edge of nowhere

Re: Joe's Teardrop Build

Postby JoeGrz » Tue Jun 29, 2021 8:00 pm

Thanks everyone for your insight on things to check with the bracket. My thoughts are in line with Minics04 and the metal is cheap. I had some extra on hand because this has happened before during my initial test. I don't want to be surprised with this while out and about so I did work up a fix. the toolbox props would work if the hatch wasn't more than my wife could easily lift. I think I am better off with the assist from the strut. otherwise it would be something I would have given more consideration to since it is a simpler solution. I did check that the strut wasn't bottoming out. There is a couple inches of exposed strut so there is a little bit of room to tighten up if need be. On that same thought, even though it didn't bottom out, maybe the strut acts like a spring and exerts more force when closed. Thank you Tony for the video idea. In the end, my thoughts were that the strut was stronger than the bracket could withstand so I cut off the leg from the 2 inch angle and fabricated a little washer plate to go over the bracket.
20210624_191946 small.jpg
20210624_191946 small.jpg (31.49 KiB) Viewed 1189 times
20210624_192716 Small.jpg
20210624_192716 Small.jpg (29.72 KiB) Viewed 1189 times
As you can see, my metal working skills aren't the best but I figure no one will be looking at them. Here it is installed
20210624_193437 Small.jpg
20210624_193437 Small.jpg (32.28 KiB) Viewed 1189 times
Everything appears to clear but I will look at it after a few more cycles to see if the ball receiver is wearing.

I made a little bit of progress on the chassis. I was able to attach the receiver and the right angled piece on Saturday. Sunday I lined everything up and as I was getting ready to put the first tacks down, the rain started. I wasn't much but I didn't think it was a good idea to play with electrical toys even in a light drizzle so I took it apart and packed it up. Very disappointing. So that the day was not a total loss, I permanently mounted the fan and put the rain gutters on the doors. I found that the gutter sealant that I used to mount the hurricane hinge is not something that I can use a partial tube of and expect to come back and use the rest later. I tried to put the sealant around the edges of the fan and it had cured down the nozzle. I have another tube but I am going to wait until I am sure everything is ready to be sealed before I start this tube.
JoeGrz
Teardrop Master
 
Posts: 107
Joined: Thu May 28, 2020 4:24 am
Location: Panhandle of Texas
Top

Re: Joe's Teardrop Build

Postby JoeGrz » Tue Jun 29, 2021 8:17 pm

Since I can't upload more than three attachments, I am finishing the previous post here. Here is my chassis all ready to be lined up
20210627_130247 Small.jpg
20210627_130247 Small.jpg (42.04 KiB) Viewed 1187 times
and here it is just before I put it away for the day.
20210627_132701 Small.jpg
20210627_132701 Small.jpg (41.35 KiB) Viewed 1187 times
Since I finished the outside of the cabin, I have moved my welding outside so that I don't have the grinding debris thrown against the trailer.

I still have to finish the galley floor. My intent was to use the remaining epoxy resin on the floor. Since I had to cover my hatch twice, I don't have any resin left. I have looked around the boards and the thinned varnish appears to be the next best thing. I will see how this works this weekend. After raining Sunday and all this week so far, surely it has it out of its system. After all, this is the Texas Panhandle. It's supposed to be dry. On the other hand, maybe the rest of the country is wet, won't burn down and they will let me have a campfire. A possible good side to all this rain. If anyone has any compelling reason not to try the thinned varnish, let me know. Also, would it work to seal the screw holes like the epoxy? Something else to mull over.
JoeGrz
Teardrop Master
 
Posts: 107
Joined: Thu May 28, 2020 4:24 am
Location: Panhandle of Texas
Top

Re: Joe's Teardrop Build

Postby tony.latham » Tue Jun 29, 2021 9:49 pm

Thanks everyone for your insight on things to check with the bracket.


Good job. :thumbsup:

Tony
User avatar
tony.latham
Gold Donating Member
 
Posts: 6899
Images: 17
Joined: Mon Jul 08, 2013 4:03 pm
Location: Middle of Idaho on the edge of nowhere
Top

Re: Joe's Teardrop Build

Postby Tom&Shelly » Tue Jun 29, 2021 10:06 pm

JoeGrz wrote:Thanks everyone for your insight on things to check with the bracket.


Hope the fix works! :thumbsup:

We've had rain the past few days in New Mexico too. After 3 weeks of mid-90's, it feels downright cool, but hopefully it'll keep our fire danger down this Summer.

Tom
172912 170466
Tom&Shelly
Palladium Donating Member
 
Posts: 2202
Images: 1946
Joined: Tue Sep 05, 2017 3:27 pm
Location: Upstate New York/New Mexico
Top

Re: Joe's Teardrop Build

Postby tony.latham » Tue Jul 06, 2021 9:17 pm

Everything appears to clear but I will look at it after a few more cycles to see if the ball receiver is wearing.


These are over twice as thick and have the same attachment hole locations:

Image

Garth found them. He's got a link on his build pages. I've changed the book and the new manuscript is uploading. Sorry about this issue.

Tony
User avatar
tony.latham
Gold Donating Member
 
Posts: 6899
Images: 17
Joined: Mon Jul 08, 2013 4:03 pm
Location: Middle of Idaho on the edge of nowhere
Top

Re: Joe's Teardrop Build

Postby JoeGrz » Wed Jul 07, 2021 8:57 pm

First off - Thanks Tony for showing me Garth's find. I will certainly jump over there and check those out. Not a lot to show picture wise this weekend. I am 24 one inch or so welds from finishing the chassis fabrication - 12 one inch welds on each side to secure the axle brackets. After finding some bend in my frame, I figure I better do small welds with full cooling. It will take some time but I think I will be better off if I don't introduce any more bends or twists to the chassis. Here is what it looked like before I started locating the axle.
20210705_105009 small.jpg
20210705_105009 small.jpg (39.3 KiB) Viewed 1041 times
The pink string is what I used to center the axle left to right. Then I started the tedious process of truing the axle. I attached the mount for the tongue jack. I tell people that I don't think because it gets me in trouble. It did so that day. The tongue jack is supposed to be on the driver side. When I quit last week, I had one more diagonal left to attach. I got to thinking I could attach the jack before I weld the diagonal. That would be an easier weld and quickly knock something off the list of things to do. A quick glance, the drivers side is the one that needs to be attached so I'm good to go. Looking at the picture, all looked right. Then my wife the next day pointed out that the frame is upside down and the jack will be on the passenger side. I lamented that I would have to cut the mount off and reattach it according to the plan but then I got lazy and decided to leave it. If anyone has any compelling reason to cut it off and move it, let me know. Otherwise, it will stay where it is

Some of the smaller items completed this weekend and the last couple days are sealing the galley floor and mounting the drawer slides to the boxes and galley wall. I started two of the days last weekend painting thinned varnish onto the floor. Next up are three coats of varnish to finish it off. I will do that at the same time I varnish the drawers. Tomorrow, I intend to cut the drawer faces and figure out how to put those on the drawer boxes. I am rushing to get as much done in the next two weeks as I can. After that, I will have to walk away from it for a couple weeks to take care of some other commitments. I will be so close but not quite there when it is time to step back.
JoeGrz
Teardrop Master
 
Posts: 107
Joined: Thu May 28, 2020 4:24 am
Location: Panhandle of Texas
Top

Re: Joe's Teardrop Build

Postby JoeGrz » Mon Jul 12, 2021 8:01 pm

This past week we took care of little odds and ends. Last week I mounted the three drawer boxes and put the face and hardware on two. The third one, I messed up. I left a bit that I decided not to use out and drilled the hole for the latch with it. It looked real good until it came time to install the latch and it went right through. I will cut a new face when I cut the pieces for the stove shelf and drawer. Saturday I finished welding the axle brackets, it takes a while to weld those up going an inch and a quarter at a time (half a 2-1/2" weld) then letting it cool completely before adding on to it. Sunday I put together the hitch, the bracket for the electrical box and the pipe for the conduit. Be careful when welding the pipe. It's not as thick as the square tube. I burned through in one of the places. Today was the high point of the weekend. My son came over and, with his help, installed the axle and flipped the trailer. I have a completed chassis! :D
12931 small.jpg
12931 small.jpg (30.58 KiB) Viewed 976 times
20210712_183218 small.jpg
20210712_183218 small.jpg (34.1 KiB) Viewed 976 times

I pulled it around the block and it seems to track straight. From best I can tell at least. As far as I could tell, it didn't try to go off to one side or the other. Once I have lights on it, I may try to find some smooth roads and see if it behaves differently. If all goes well, it may come together this weekend.
I received my brackets for the struts yesterday. I will install those tomorrow. Thanks to Garth for finding them and to Tony for pointing me in that direction :beer:
That's all for now. The race is on to finish it before I have to walk away next week.
JoeGrz
Teardrop Master
 
Posts: 107
Joined: Thu May 28, 2020 4:24 am
Location: Panhandle of Texas
Top

Re: Joe's Teardrop Build

Postby JoeGrz » Mon Aug 02, 2021 7:01 pm

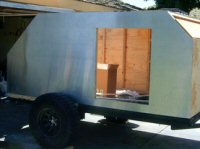
Unfortunately, my last build opportunity had life get in the way. Not as much accomplished before I had to leave as I was hoping. It's been about two weeks since I have done anything to the trailer and hopefully I will have a chance to complete some small task next weekend after I get home. The last thing I did was lay the ground work to mount the fenders. Trailer building is something I have no idea about so I reached out to Tony about how his were attached. Thank you Tony for your help and pictures :beer: What follows is my execution of what he told me.

The first problem I ran into was my fenders were too short. I had 13 inch tall jeep fenders. Looking around, that is the right size for the 15 inch wheels. I guess if I had trailer tires with springs it would have worked but I don't. The recommendation is at least 4-1/2 inches between the top of the tire and the fender. I stacked a 4x4 and some other wood scraps to make that distance and it looked like I could not even attach the fenders to the frame. After searching around the internet, I found that they make taller ones, 18 to 19 inches. Before I committed to the internet store, I ran down to my local trailer supply and was able to pick up a pair of 19-1/2 inch tall fenders. Even better, the pair cost about the same as the single one on line and I could return the short ones. Advantages to shopping local when you can. Now that the fenders reach the frame, how do I attach them? Every trailer I could find had them welded to the frame. That doesn't work because the frame is slightly narrower than the cabin. Tony's method involved mounting a pair of brackets to the side of the frame and bolting the fender to the frame. Here is the bracket I fabricated
20210717_174343 small.jpg
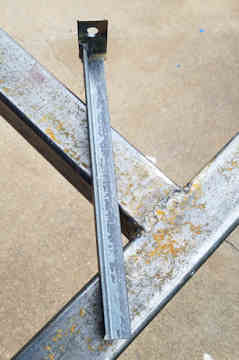
20210717_174343 small.jpg (34.4 KiB) Viewed 869 times
It consists of a 1x1/8 flat bar about an inch and a half or two long with a 3/4x1/8 angle welded to it. The angle is about 10 inches long. Unfortunately, the exact dimensions are slipping away from my memory. The hole in the bar is for a 3/8 bolt.

I placed a 4x4 and 2x4 on top of the tire and placed the fender on the wood. That gave me 5 inches between the wheel and the fender. I then fiddled with the bracket placement until I had it with the hole in the middle of the angle. On each side of the fender, I cut a one inch notch. My speed square didn't have standard 1/8 increments so I can't tell you the exact dimension but it was the first mark past 5 inches and the first past 6 that I cut out. Again, I'm playing with two week old memories so verify on your own build if you follow this. Here is what the notch looks like after I cut it out
20210718_142848 small.jpg
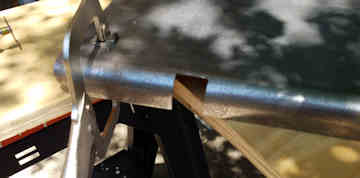
20210718_142848 small.jpg (30.38 KiB) Viewed 869 times
the notch cut out all the rounded edge so that the fender would sit flush with the bracket and I would not need spacers.

Placing the fender back on the wood, I adjusted the first bracket to where the fender looked even and level and clamped it in place.
20210717_174232 small.jpg
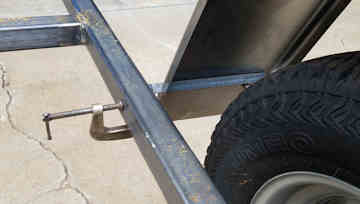
20210717_174232 small.jpg (30.46 KiB) Viewed 869 times
Then I went to the other side Then I went to the other side and repeated the steps. It took a several tries and I actually adjusted the first bracket a couple times before I was happy with the placement of the fender. With it clamped in place I marked the location of the holes, took everything down again and drilled through the square tube.
JoeGrz
Teardrop Master
 
Posts: 107
Joined: Thu May 28, 2020 4:24 am
Location: Panhandle of Texas
Top

Re: Joe's Teardrop Build

Postby JoeGrz » Mon Aug 02, 2021 7:29 pm

Continuing from above, the bracket is bolted to the frame in both places. I then slipped the fender over each bracket and rotated the bracket to where the leg of the angle was in line with the fender and tightened down the bolts.
20210718_135207 small.jpg
20210718_135207 small.jpg (29.41 KiB) Viewed 868 times
One thing that I found is that the bolt/washer combination does not keep the flat bar from bending so I will need to place some welds on the bracket to secure it to the frame and keep it from bending. This is what Tony had shown me but I was really hoping I was done with the welder. Here is what the final product looks like
20210718_135105 small.jpg
20210718_135105 small.jpg (38.14 KiB) Viewed 868 times
The fenders are clamped to the end of the bracket to keep them from sagging.

That brings me to my dilemma. How do I mount the fenders so that they are flush or basically flush with the side of the cabin? I have thought about cutting slots in the angle and then adjusting the placement after the cabin is in place. That would mean I would mount the fenders after the frame is painted. Another option I am considering is moving the cabin on to the frame, mounting the fenders, pulling (rolling?) the cabin off and then painting. I would not have to try to cut slots this way but it sounds like a lot of work. I'm leaning towards the first method and moving the cabin once.

I get home this weekend. Hopefully I will get a chance to start work again.
JoeGrz
Teardrop Master
 
Posts: 107
Joined: Thu May 28, 2020 4:24 am
Location: Panhandle of Texas
Top

Re: Joe's Teardrop Build

Postby tony.latham » Mon Aug 02, 2021 7:48 pm

That brings me to my dilemma. How do I mount the fenders so that they are flush or basically flush with the side of the cabin?


I don't. I want a gap. If you catch a fender on a stump or a rock while parking, you don't want it touching the wall. There's someone on here that had their fender attached to the wall and things went south and severely damaged the wall.

Image

That's my philosophy on fenders and walls. Now if I buffed Flame out, and took her to a car show, I might catch a couple of car people whispering about the gap.

Tony
User avatar
tony.latham
Gold Donating Member
 
Posts: 6899
Images: 17
Joined: Mon Jul 08, 2013 4:03 pm
Location: Middle of Idaho on the edge of nowhere
Top

Re: Joe's Teardrop Build

Postby MickinOz » Wed Aug 04, 2021 2:13 am

tony.latham wrote:
That brings me to my dilemma. How do I mount the fenders so that they are flush or basically flush with the side of the cabin?


I don't. I want a gap. If you catch a fender on a stump or a rock while parking, you don't want it touching the wall. There's someone on here that had their fender attached to the wall and things went south and severely damaged the wall.

Image

That's my philosophy on fenders and walls. Now if I buffed Flame out, and took her to a car show, I might catch a couple of car people whispering about the gap.

Tony

I wrestled with this.
In the end I used plastic boat trailer mudguards.
I bolted them to the wall of the teardrop. I used 6mm bolts (1/4 inch?) with a very small washer under the nut.
My fervent hope is that everything is small enough that when I hit a roo, the fender tears off the bolt, rather than tear the bolt out of the TD.
I hope never to find out how successful my design is.
MickinOz
1000 Club
1000 Club
 
Posts: 1254
Images: 3
Joined: Mon Feb 04, 2019 3:54 pm
Location: Somewhere, in 379,725 square miles of South Australia
Top

Re: Joe's Teardrop Build

Postby JoeGrz » Sun Aug 08, 2021 8:09 pm

Today I mounted the fenders. Thanks for the input Tony & MickinOz. MickinOz, That is an interesting mounting method and the rational appears sound but I think I would have had to build it in at the beginning. Tony, I never really noticed how far off the sides of the cabin the fenders are. Your picture doesn't really show the gap due to the resolution but I got a very good glimpse of the gap at the start of your Galley Tour video. I had set it up, measured across and said this can't be right. Saw the video and decided it is what you were saying.
20210808_192842 small.jpg
20210808_192842 small.jpg (34.98 KiB) Viewed 765 times
20210808_192910 small.jpg
20210808_192910 small.jpg (32.17 KiB) Viewed 765 times
As you can see in the first picture, I went away for two weeks and the chassis decided it needed to be orange. Fortunately, it comes off easily. Hopefully I will get some paint on it next week and the rust won't be a problem

There is 63 inches between the fenders. The outside of the fender is barely out past the tire. I attached the fenders to the cross bar with three 1/4-20x5/8 screws. I probably could have gotten by with 1/2 inch long screws but I wasn't sure, and still not sure, if I wanted a washer in there somewhere. The fenders are about 1-3/4 inches from the side of the frame. The three screws are at 3, 6, and 9 inches from the frame. If I had it to do over again, the angle that I had bolted the fenders to would have been 10-1/2 inches long instead of 9-1/2. It would have allowed the screws to be centered across the face.
20210808_192931 small.jpg
20210808_192931 small.jpg (28.96 KiB) Viewed 765 times

The installation was fairly easy once I figured it out. I marked the outside face of the angle. Started each hole with a small bit then drilled the hole with the 1/4 inch bit. Once I finished drilling the angles, I slid the fenders onto the angle, leveled the fender front to back and side to side and clamped it in place. Then I removed the wheel and drilled the fender through the angle placing a screw as I finished each hole. That way, when I got to the last one, I could unclamp the fender and drill the last hole without it moving. Real simple process except the front inside screw. I could not get the drill in between the angle and the pivot arm for the spindle. That one required the right angle attachment for the drill. Once I figured it out, the process went quickly.
JoeGrz
Teardrop Master
 
Posts: 107
Joined: Thu May 28, 2020 4:24 am
Location: Panhandle of Texas
Top

Re: Joe's Teardrop Build

Postby JoeGrz » Thu Aug 26, 2021 8:21 pm

Since my last post, I have painted and wired. Nothing really picture worthy. First, somewhere along the way, I am sure I saw a post by Tony talking about the beating that the surfaces of the teardrop takes. With that post was a picture of diamond plate on the fenders to protect them. That got me worried so I started looking for more durable paint than the standard rust oleum. I, on the recommendation of a coworker, went to an auto paint supplier. He picked up something for his farm trailer that worked real well. For a durable coating, it was recommended that I use Chassis Saver from Magnet Paints. Home I went and read the data sheet. I found that the color is not UV stable so back for a top coat. I received a top coat and back home I went. Both of these coatings were to be applied by sprayer. The first problem of course is to find the spray gun. I found some but my air compressor didn’t have the capacity to work with any of the sprayers. Next thought was a self contained sprayer. I looked at several and selected one. Reading the instructions for the sprayer, I found that it was not compatible with my coatings. In the end, I brushed on the Chassis Saver. I never did put on the auto top coating. Instead, I got some Rust Oleum Farm and Implement paint and put that on the will be exposed surfaces with a roller. I should have paid more attention to how to paint the Chassis Saver because it doesn’t look as good as it could. Anyhow the chassis is no longer bare metal but gloss black.

Last weekend I wired the chassis. I mounted the junction box and proceeded to run wire to all the different lights. I remembered after the first tail light that the black wire is the negative/ground unless there is a white wire. If there is a white wire, it is the ground. The other thing is that, if I was to do it again, I would put all my mounting clips on first and run the wire through those clips. I went back and secured the wires to the frame after the wires were run and had to rerun some of those because they came out too short.

I am happy to say that, if all goes well, I will have a cabin on a trailer chassis tomorrow or the next day. From there, I still have to put together my stove shelf/drawer unit, wire in the brake and license lights, apply some varnish on the galley carpentry and install diamond plate. My goal is to start the registration process Wednesday. If I don’t get it in Wednesday at 9:00 am, I have to wait until next week. The diamond plate is the only part that I’m wondering when it will come in. I am hoping it arrives Monday and I can get it installed before I start the registration process. Unfortunately, my supplier only had 1/4 inch and that was more weight than I wanted to manhandle.

That’s where I am today. All important things to do but nothing that makes a great picture. I’m hoping that tomorrow or the next day, I have a picture worth seeing.
JoeGrz
Teardrop Master
 
Posts: 107
Joined: Thu May 28, 2020 4:24 am
Location: Panhandle of Texas
Top

PreviousNext

Return to Build Journals

Who is online

Users browsing this forum: No registered users and 11 guests