6x10 for a family of 4

...ask your questions in the appropriate forums BUT document your build here...preferably in a single thread...dates for updates, are appreciated....

Re: 6x10 for a family of 4

Postby bartek » Wed Feb 24, 2021 9:40 pm

The cabinet was finished and installed. I managed to drop it in the process and destroy one corner which then had to be fixed...

Image

Image


I also figured it's about time to finish the inside skins - after all sorts of experiments with stains we decided to go with natural wood color and I simply varnish it over. I used 3 layers of wipe on polly.
They say its a no brainer and you can't really have drips with it, but I managed to raise to the challenge and ended up with a quite a big one in one place. Some light sanding and recoating helped a little, although it's not perfect. I suppose I could sand it all the way down and start over, but the top layer of the plywood I used is super thin, so I didn't want to risk accidentally sanding through it and making things even worse in the process...
Overall, I'm quite happy with how it turned out...

Image
User avatar
bartek
Teardrop Advisor
 
Posts: 72
Images: 84
Joined: Sat Aug 22, 2020 1:44 am

Re: 6x10 for a family of 4

Postby bartek » Thu Feb 25, 2021 6:05 pm

The cutouts for the spares are rounded (due to the router bit diameter I used to route the walls), so I made a simple jig to round the ends of the spars to make them fit.
This way they also kept the walls at a fixed distance from each other. The jig was easy to make, and after than it was less than 30 seconds per spar.

Image

Image

Image
User avatar
bartek
Teardrop Advisor
 
Posts: 72
Images: 84
Joined: Sat Aug 22, 2020 1:44 am

Re: 6x10 for a family of 4

Postby bartek » Sat Feb 27, 2021 12:36 am

Headliner and spars installed - starting to look like a camper :)

Image

Image
User avatar
bartek
Teardrop Advisor
 
Posts: 72
Images: 84
Joined: Sat Aug 22, 2020 1:44 am
Top

Re: 6x10 for a family of 4

Postby Bezoar » Sat Feb 27, 2021 5:44 pm

It's looking good! :thumbsup:
User avatar
Bezoar
Teardrop Master
 
Posts: 155
Images: 37
Joined: Mon Mar 10, 2008 9:01 pm
Location: Southern Wisconsin
Top

Re: 6x10 for a family of 4

Postby bartek » Tue Mar 02, 2021 1:56 pm

Electric took surprising amount of time... I thought it was something I was just going to wrap up in a weekend, but running all the cables, clamping the connectors etc, is a surprisingly long process.

Small control center at the front of the cabin. I'm planning to add a matching frame to the rest of the cabinets (which will hide the screws) and I'll probably attach it from the side with screws to allow for servicing in the future. For now it will need to wait.
I got the dashboard from amazon for about $30, it has a 12v socket, 2x USB, 5 switches (which will control various cabin lights). I also included master on/off switch - AWG10 cable was run from there to the battery.
In my design, I wanted to have a tongue box which would house the battery, fuse box and other electrical components, but the trailer is turning out a little front heavy, so the battery will likely need to go the back.
I ran AWG10 front to back just in case, since all the wiring is already laid out assuming the main fuse box will be in the front


Image
Image

All the wiring before I cleaned it up:

Image
User avatar
bartek
Teardrop Advisor
 
Posts: 72
Images: 84
Joined: Sat Aug 22, 2020 1:44 am
Top

Re: 6x10 for a family of 4

Postby bartek » Thu Mar 11, 2021 12:43 pm

I followed Tony's book to build and seal a hatch. I made a mistake early on and didn't realize the hatch should go all the way to the bottom - this caused possible problems with water pooling, but I was able to fix this (we'll see how well) by adding an angle to the bottom part to allow the water to drain.
All the hatch elements were CNCed - so far seems to fit very well with the body of the trailer. I left a gap of 1mm to allow for sealing the edges with epoxy ang general tolerance issues.

Image

Image

I added blocking for the galley lights and the back lights as well as license plate, license plate light and wiring to power back up camera.

Image
User avatar
bartek
Teardrop Advisor
 
Posts: 72
Images: 84
Joined: Sat Aug 22, 2020 1:44 am
Top

Re: 6x10 for a family of 4

Postby nsfr1206 » Thu Mar 11, 2021 4:14 pm

This build looks very nice. Makes me wish I’d kept my cnc...


Sent from my iPhone using Tapatalk
nsfr1206
Teardrop Master
 
Posts: 191
Joined: Sun Feb 28, 2021 4:32 am
Top

Re: 6x10 for a family of 4

Postby bartek » Mon Mar 15, 2021 12:20 pm

Thanks :)
Yeah, I'm sure it can all be done without CNC, but it's super handy to be able to replicate any part of the plan at any point...
User avatar
bartek
Teardrop Advisor
 
Posts: 72
Images: 84
Joined: Sat Aug 22, 2020 1:44 am
Top

Re: 6x10 for a family of 4

Postby bartek » Mon Mar 15, 2021 1:15 pm

I finally got an axle and was able to install it, and put the trailer on wheels for the first time :)
Also, now the the position of the axle is fixed (I was worried about some unexpected changes) I was able to frame the wheel wells. The inside will be lined with 2 layers of 1/8 plywood, epoxied for waterproofing and then covered with truck bed liner.


Image
Image
Image

Turns out the wheels stick out about 1.5 inch outside of the frame, so some form of thin fender will be needed. I was planning on one for decoration anyway, although didn't expect something quite as thick...
User avatar
bartek
Teardrop Advisor
 
Posts: 72
Images: 84
Joined: Sat Aug 22, 2020 1:44 am
Top

Re: 6x10 for a family of 4

Postby western traveler » Mon Mar 15, 2021 4:24 pm

Looking good. Great progress! Jealous of the CNC :thinking:
western traveler
Donating Member
 
Posts: 396
Images: 264
Joined: Wed Dec 28, 2016 6:59 am
Location: The Front Montana
Top

Re: 6x10 for a family of 4

Postby bartek » Tue Mar 16, 2021 10:25 pm

It took two days of soaking 1/8 plywood to get it to bend to the radius required for the wheel wells, and I broke enough of it in between to seriously consider other types of material, but I finally managed to make it work. Doesn't look great, but it will all be covered with epoxy + truck bed liner + hidden behind wheels, so I call it good enough :)

Image
User avatar
bartek
Teardrop Advisor
 
Posts: 72
Images: 84
Joined: Sat Aug 22, 2020 1:44 am
Top

Re: 6x10 for a family of 4

Postby bartek » Tue Mar 16, 2021 10:28 pm

The insulation was scored on a table saw to allow for bending. I used a router to cut channels for the wiring. The whole thing was tedious and incredibly messy, so I'm quite glad to be done with this part.

Image

I temporarily put the wheels on just to be able to roll it out of the garage for the first time.

Image
User avatar
bartek
Teardrop Advisor
 
Posts: 72
Images: 84
Joined: Sat Aug 22, 2020 1:44 am
Top

Re: 6x10 for a family of 4

Postby nsfr1206 » Wed Mar 17, 2021 5:43 am

Looking very nice!


Sent from my iPhone using Tapatalk
nsfr1206
Teardrop Master
 
Posts: 191
Joined: Sun Feb 28, 2021 4:32 am
Top

Re: 6x10 for a family of 4

Postby bartek » Mon Mar 22, 2021 11:11 am

Spring is here and I'm getting ready to get the camper to the state where we can take it camping for the first time. I've been slow posting photos (and I started the build log late too), so I need to catch up posting a few things.

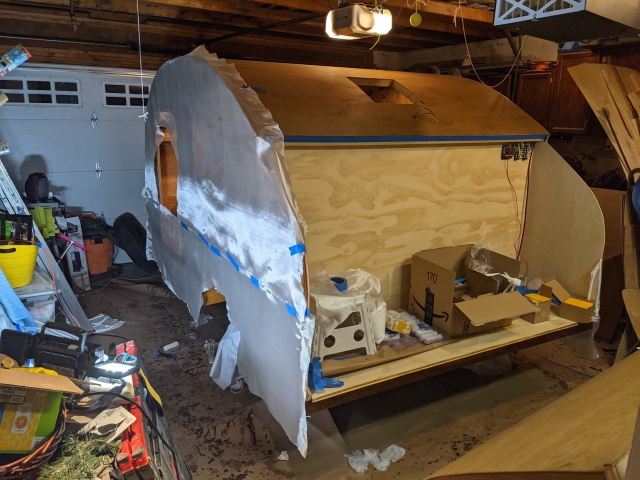
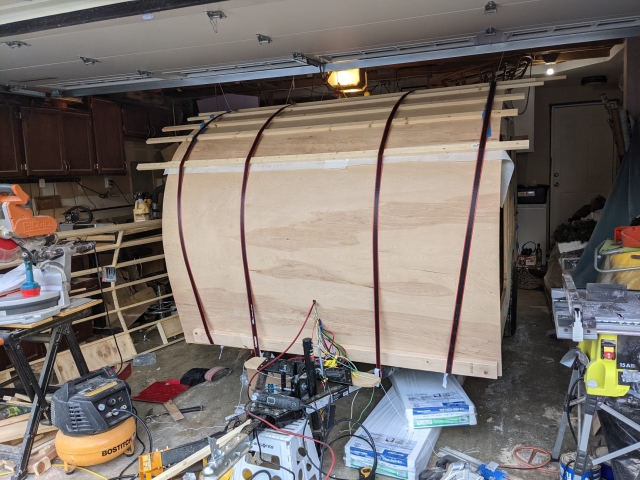
First, I installed the the skins. The top was skinned with two layers of 1/8 plywood, the sides with one layer. The way I went about it was to install the first layer of plywood on the top (I used the cheapest plywood I could find at Home Depot for this layer).
The plywood was clamped with 4 ratchet, a bunch of 1.5x075 and a bunch of shims where ratcheting didn't work quite that well. PL Premium was used to attach this first layer to the frame.

Image

Then sides using 1/8 birch plywood and Titebond III- I struggled finding a good way to clamp the skins on installed walls, but what worked pretty well was to clamp a bunch of 1.5x0.75 scrap wood to the bottom and using any available opening, and then using a bunch of shims. Between the clamping and the elasticity of the scrap wood which pushed hard against the skins, this actually worked really well. Sides could now be trimmed using a router and laminate cutting bit, using the top plywood layer as a guide.

Image

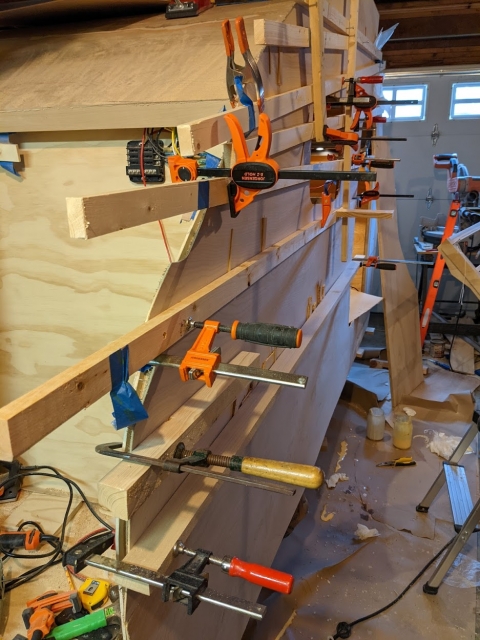
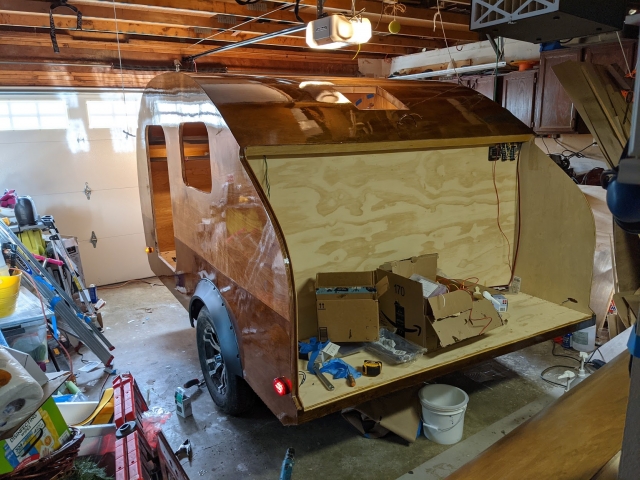
Then another layer of 1/8 plywood on top (this time birch), which could now be trimmed guiding the router using the sides, resulting in a nice, clean joint.
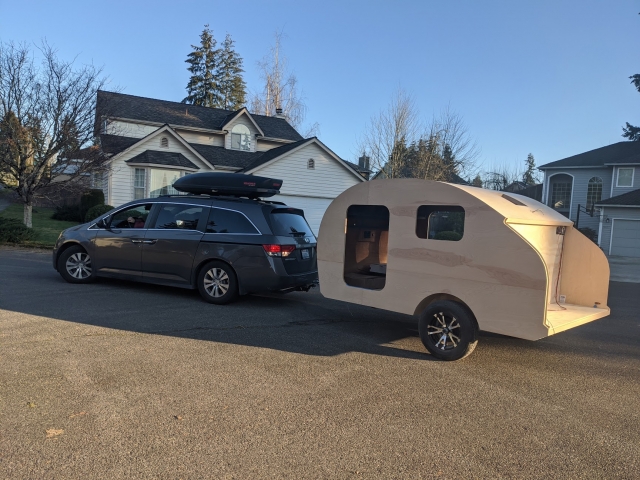
I was able to take the trailer on a first test drive around the house

Image

I used aniline dye for staining - there was a bit of a difference in shading between top and bottom plywood, so instead of trying to mas it, I went with a two color look (I've been toying with this idea anyway). The result ended up quite blotchy - I experimented with sealing the plywood first using some scraps, but it didn't seem to have made any difference - maybe I was just doing it wrong. In the end, I decided to skip the sealer all together - since it makes no difference and I was worried about epoxy adhesion.
The result was somewhat disappointing at first, but after epoxy layer a lot of the blotchiness became much less pronounced.

Image

And finally fiberglass (2oz), epoxy (Raka) and varnish (Varathane Spar) - I've been dreading this part, since I've never done anything with epoxy in my life. Turned out to not be all that complicated and sandpaper was an excellent cure for for most of the problems which developed. While I didn't get a perfect mirror-like surface in the end, it's close enough and I'm happy with the result.

Image

Image
Last edited by bartek on Tue Mar 23, 2021 2:37 pm, edited 1 time in total.
User avatar
bartek
Teardrop Advisor
 
Posts: 72
Images: 84
Joined: Sat Aug 22, 2020 1:44 am
Top

Re: 6x10 for a family of 4

Postby featherliteCT1 » Mon Mar 22, 2021 4:43 pm

Wow does that look good!! :thumbsup:
featherliteCT1
1000 Club
1000 Club
 
Posts: 1125
Joined: Wed Dec 28, 2016 6:54 am
Location: Southern Indiana
Top

PreviousNext

Return to Build Journals

Who is online

Users browsing this forum: No registered users and 40 guests