CapeBuild Build Journal

...ask your questions in the appropriate forums BUT document your build here...preferably in a single thread...dates for updates, are appreciated....

Re: CapeBuild Build Journal

Postby cjlangellier » Fri May 14, 2021 1:31 pm

Capebuild wrote:Thought I'd share the last couple of days progress.
Got the frame tack welded together. Still need to add the rear hitch sleeve and the angle plates which will serve as the cabin attachments. Before that I'll weld up all the seams.
Ordered the Dexter axle last week... takes about 6 weeks to get that fulfilled.
Also received the wheel rims and had the Goodyear Endurance tires mounted on them yesterday.

John


Frame is looking great so far! You got a way better estimate than I did on the Dexter axle. I tried to order a Torflex axle last month and they were quoting me 10-16 weeks :shock:
Cody - Westmont, IL

5x11 Teardrop
http://www.tnttt.com/viewtopic.php?f=50&t=73740
6x12 Cargo Trailer/Ice Shanty/Toy Hauler
http://www.tnttt.com/viewtopic.php?f=42&t=73743
User avatar
cjlangellier
Teardrop Master
 
Posts: 171
Images: 332
Joined: Fri Apr 30, 2021 3:29 am

Re: CapeBuild Build Journal

Postby Capebuild » Fri Jun 04, 2021 3:38 am

After being away for a week in California I got back to work on my trailer. Sharing some photos here.

After much searching I found a supplier for 3/4 inch rigid insulation board. That was delivered yesterday along with some 2 inch.
For the most part finished welding up the chassis frame. As noted in a previous post, frame weight came in at 170 LBS. If I had to do it again I would have mitered the corners. But closed off the open tube ends with welded on caps
rather than using inserted plastic caps. Used 3 inch long sections of welded on black pipe tubing to carry the pig tail from the 7 pin connector. Will screw on other fixtures to hold the various
wires soon as I determine where those wires will be located. Just waiting now for the Dexter axle. Will install that, paint the frame with cold zinc undercoat, and either silver or black
finish coat paint (leaning toward black).

Will start on the floor assembly next, now that I have the rigid insulation board. Also need to add 12 inches to 2 of the MDO board panels to make them 5 feet in height ( (what will be the middle board of the side panel assembly. The two outer 1/4 inch panels are already 5 feet in width). Bought a 1/4 inch rabbet bit to cut a recess for a spline to join the MDO panels. I'm having the side panels CNC'd.

That's it for now. Moving forward. Thanks for looking.
Regards
John
Attachments
insul sheet.jpg
insul sheet.jpg (215.99 KiB) Viewed 2111 times
pipe.jpg
pipe.jpg (730.22 KiB) Viewed 2111 times
frame.jpg
frame.jpg (587.13 KiB) Viewed 2111 times
"Success can be defined as moving from failure to failure without loss of enthusiasm".... Churchill

Visit my Teardrop build here: viewtopic.php?f=50&t=73779
User avatar
Capebuild
Donating Member
 
Posts: 754
Images: 129
Joined: Sun Jan 31, 2021 6:50 am
Location: Massachusetts

Re: CapeBuild Build Journal

Postby Capebuild » Sun Jun 06, 2021 3:15 pm

June 6, 2021

Finished constructing the floor inner framework.

I'm finding, if I had to build it again, I'd make my construction table top a little over 5 feet wide.... instead of it's current 4 feet wide.

Used spline & rabbeted joint and TiteBondI ii to join and glued up members.
Will install and glue up bottom 1/4" okoume closure panel tomorrow and then look to seal all with something....
prior to adding insulation and MDO ply panel for where galley will go.
Attachments
frame 6.6.21.jpg
frame 6.6.21.jpg (506.97 KiB) Viewed 2058 times
"Success can be defined as moving from failure to failure without loss of enthusiasm".... Churchill

Visit my Teardrop build here: viewtopic.php?f=50&t=73779
User avatar
Capebuild
Donating Member
 
Posts: 754
Images: 129
Joined: Sun Jan 31, 2021 6:50 am
Location: Massachusetts
Top

Re: CapeBuild Build Journal

Postby Capebuild » Thu Jun 10, 2021 4:23 am

June 10, 2021

*Floor framing almost completed, minus battery box, 2 foot wells and other side of ply.....
*Shown being coated with 25% / 75% Helmsman Spar satin Urethane and then a coat of 100% urethane.
*A day off today but next will add 3/4 " rigid insulation panels and add 1/4" okoume ply panel to other side of floor framing.
*Being told my Dexter axle should be arriving next week (well, arriving at the place I ordered it from in New Hampshire. I have to go and pick it up)

2 Questions:
1) I'm trying to figure what undercoating to apply to the underside of the frame once floor assembly is installed. Any suggestions would be welcome. Thanks!
2) Should a 2nd coat of 100% urethane be applied to floor framing? (right now it has 1 coat of 25/75 and 1 coat of 100%. The ply on both sides is Okoume. Thanks (again)!!

John
Attachments
IMG_5352.jpg
IMG_5352.jpg (510.43 KiB) Viewed 2015 times
"Success can be defined as moving from failure to failure without loss of enthusiasm".... Churchill

Visit my Teardrop build here: viewtopic.php?f=50&t=73779
User avatar
Capebuild
Donating Member
 
Posts: 754
Images: 129
Joined: Sun Jan 31, 2021 6:50 am
Location: Massachusetts
Top

Re: CapeBuild Build Journal

Postby noseoil » Thu Jun 10, 2021 7:50 am

I used 2 coats of urethane on the bottom, let it dry, then some white elastomeric roof coating was rolled on the bottom side. It's nice to have a light colored bottom when crawling around under the trailer, easier to see with the white surface reflecting the light. Cleans up easily at a car wash to get rid of mud & road grime. The coating is pretty good at bouncing off rocks & gravel without any issues & stays put under there.
Build log: viewtopic.php?f=50&t=60248
The time you spend planning is more important than the time you spend building.........

137905
User avatar
noseoil
1000 Club
1000 Club
 
Posts: 1820
Images: 669
Joined: Sun Apr 27, 2014 8:46 am
Location: Raton, New Mexico, living the good life!
Top

Re: CapeBuild Build Journal

Postby rjgimp » Thu Jun 10, 2021 9:32 am

Wow. Some good things going on here. Nice work, John!

:thumbsup:
-Rob


I hope to make it to a Procrastinators Anonymous meeting someday...
just as soon as the steering committee gets around to scheduling one!
User avatar
rjgimp
500 Club
 
Posts: 785
Images: 7
Joined: Fri Feb 22, 2019 3:59 am
Location: Saint Paul MN
Top

Re: CapeBuild Build Journal

Postby Capebuild » Mon Jun 14, 2021 5:01 am

June 13, 2021

Thanks Rob and Tim.....
after a bit of research I think I'm going to go with the Henry's Asphalt Roof Coating. I had liked the elastomeric paint direction...Something about the henry's product seems like it would adhere better to the wood which has already been coated with varnish.

Yesterday glued the top ply panel onto the floor frame. Didn't use any nails, just a squeegeed a ton of TB on both ply panel and frame surfaces, weighed it all down in the middle and clamped around perimeter.
The footwell boxes and the battery box are completed. I think I'll wait to install them into the floor frame until after I bolt that framing down onto the chassis frame.
Speaking of axle, that might be ready for pick up this week. Need to call today and get status.

thanks for looking.

John
Attachments
frame.jpg
frame.jpg (293.48 KiB) Viewed 1943 times
frame,footwells and batt box.jpg
frame,footwells and batt box.jpg (366.32 KiB) Viewed 1943 times
top layer.jpg
top layer.jpg (354.39 KiB) Viewed 1943 times
"Success can be defined as moving from failure to failure without loss of enthusiasm".... Churchill

Visit my Teardrop build here: viewtopic.php?f=50&t=73779
User avatar
Capebuild
Donating Member
 
Posts: 754
Images: 129
Joined: Sun Jan 31, 2021 6:50 am
Location: Massachusetts
Top

Re: CapeBuild Build Journal

Postby Capebuild » Mon Jun 14, 2021 2:45 pm

June 14, 2021

Removed all the clamps and weights that were compressing the top layer of the floor framing after top layer was glued in place yesterday......and WHOAAHHHH.... What a warp in the assembly! The floor assembly developed quite a warp in the long direction. I guess if it was going to warp like that, it did it in a "good direction" as opposed to warping with the outer edges warping upwards. In the mean time, weighted the frame down to maybe try and reduce the warp. I think to resolve this I'll weld a couple of additional bolt tabs in the middle of the chassis framing so when positioning the floor framing for final attachment, I'll bolt those two tabs first which will pull the floor down flush with the frame and then fasten the outer bolts down. Should (hopefully) solve the issue.

On another note, my axle did arrive at the reseller.... so will do a road trip tomorrow and pick that up.

John
Attachments
warp.jpg
warp.jpg (332.67 KiB) Viewed 1921 times
"Success can be defined as moving from failure to failure without loss of enthusiasm".... Churchill

Visit my Teardrop build here: viewtopic.php?f=50&t=73779
User avatar
Capebuild
Donating Member
 
Posts: 754
Images: 129
Joined: Sun Jan 31, 2021 6:50 am
Location: Massachusetts
Top

Re: CapeBuild Build Journal

Postby eLink » Mon Jun 14, 2021 3:18 pm

Capebuild wrote:June 14, 2021
Removed all the clamps and weights that were compressing the top layer of the floor framing after top layer was glued in place yesterday......and WHOAAHHHH.... What a warp in the assembly!


I'm surprised it did that considering that both sides are now glued. I'm guessing that the large footwell openings had something to do with it, causing some uneven shrinkage. The sidewalls should straighten that out and, like you say, bolting it down will also help.
User avatar
eLink
Teardrop Master
 
Posts: 191
Images: 142
Joined: Mon Nov 12, 2018 3:34 pm
Location: Los Angeles
Top

Re: CapeBuild Build Journal

Postby halfdome, Danny » Mon Jun 14, 2021 5:45 pm

Your foot wells should act like a stiffener and somewhat straighten the warp along with the walls as mentioned before.
:D Danny
ImageImage
"Conditions are never just right. People who delay action until all factors are favorable do nothing". William Feather
Don't accept "It's Good Enough" build to the best of your abilities.
Image
Teardroppers Of Oregon & WashingtonImage
User avatar
halfdome, Danny
*Happy Camper
 
Posts: 5883
Images: 252
Joined: Sun Aug 14, 2005 11:02 pm
Location: Washington , Pew-al-up
Top

Re: CapeBuild Build Journal

Postby Capebuild » Thu Jun 17, 2021 3:30 am

June 17, 2021

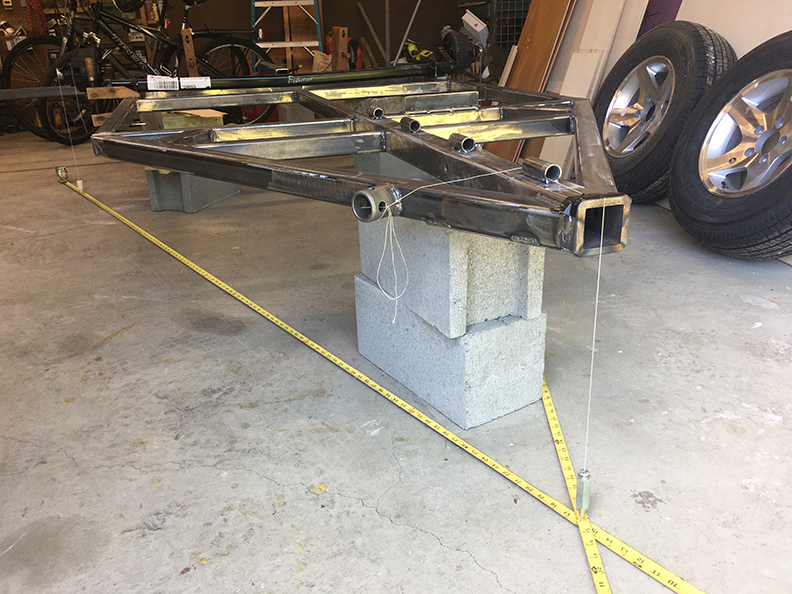
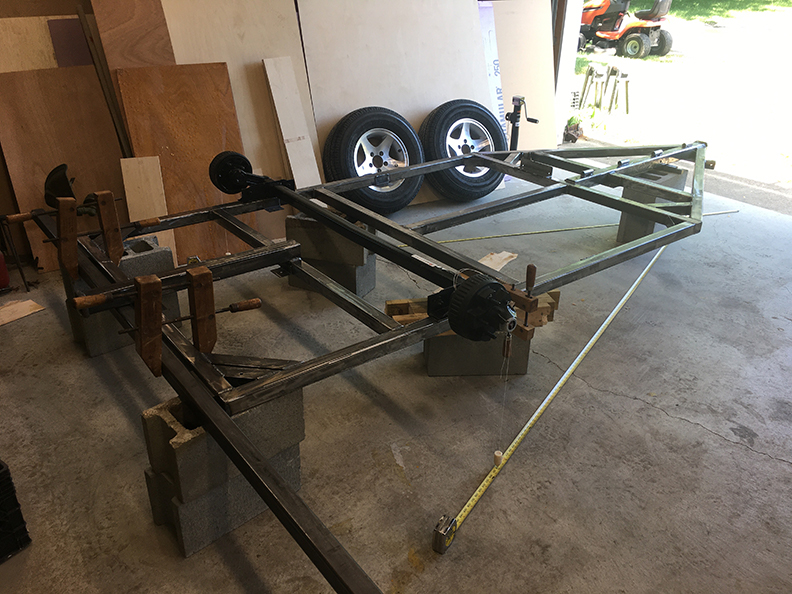
On Tuesday I picked up the axle and yesterday positioned it on the frame. I used Tony Latham's method described in his book to line it up on the frame.
In addition I also clamped a piece of square tubing (2nd image) onto the rear of the frame, extending it out from the sides, so I could have a 2nd way to measure
to the center of the wheel hubs. I only had one plumb bob so turned a couple of pieces of ABS with 60 degree tapers to create the other 2 plumb bobs.

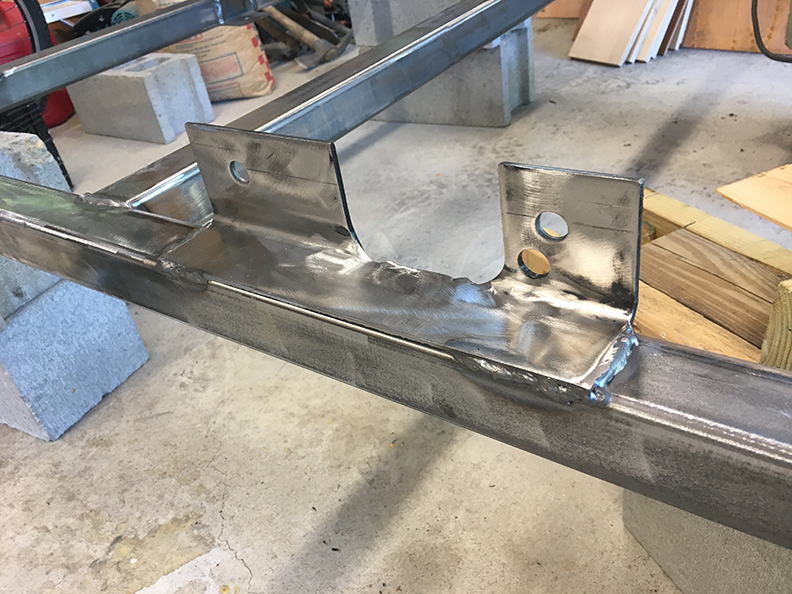
Now that I have the 2 brackets (that hold the axle) welded onto the frame I can't believe the entire weight and structure of the trailer, and the axle that carries it all, relies on these two brackets.
I didn't measure the bracket material's thickness, but seems to be .125" material. Guess I'd feel better if they were a bit heftier, but I suppose this is what everyone's axle uses........

Planning on painting the frame today. 2 layers of zinc spray undercoating and 2 layers of black enamel. Then will bolt the axle in place, and move onto installing the floor deck.

John
Attachments
1a.jpg
1a.jpg (442.43 KiB) Viewed 1841 times
2a.jpg
2a.jpg (394.96 KiB) Viewed 1841 times
3a.jpg
3a.jpg (402.8 KiB) Viewed 1841 times
"Success can be defined as moving from failure to failure without loss of enthusiasm".... Churchill

Visit my Teardrop build here: viewtopic.php?f=50&t=73779
User avatar
Capebuild
Donating Member
 
Posts: 754
Images: 129
Joined: Sun Jan 31, 2021 6:50 am
Location: Massachusetts
Top

Re: CapeBuild Build Journal

Postby TimC » Thu Jun 17, 2021 6:33 am

Very clever measuring jig John! :applause:
Tim
Niagara, WI
My First Benroy Teardrop Build Thread - A 5x8 Woodie - http://www.tnttt.com/viewtopic.php?f=50&t=63575
My Second Teardrop (partial) Build Thread - Started August '16 - http://www.tnttt.com/viewtopic.php?f=50&t=66939
#3 My son's Benroy Foamie team build - Started July '20 - http://www.tnttt.com/viewtopic.php?f=50&t=72877

Image
User avatar
TimC
Gold Donating Member
 
Posts: 1371
Images: 733
Joined: Sat May 23, 2015 4:15 am
Location: WI/MI border
Top

Re: CapeBuild Build Journal

Postby halfdome, Danny » Thu Jun 17, 2021 9:05 am

John, are you planning on doing preliminary wiring before the floor is installed?
:D Danny
ImageImage
"Conditions are never just right. People who delay action until all factors are favorable do nothing". William Feather
Don't accept "It's Good Enough" build to the best of your abilities.
Image
Teardroppers Of Oregon & WashingtonImage
User avatar
halfdome, Danny
*Happy Camper
 
Posts: 5883
Images: 252
Joined: Sun Aug 14, 2005 11:02 pm
Location: Washington , Pew-al-up
Top

Re: CapeBuild Build Journal

Postby Capebuild » Thu Jun 17, 2021 10:11 am

I did not have it in my mind to doing any prelim wiring now. I did weld on a plate to hold the junction box and will bolt that in place
before I install the floor decking. I could probably connect the brake wiring.
If you're suggesting, Danny, there's some wiring I might think about running now, I'd certainly be interested in hearing your thoughts. Thank you, I appreciate it!

John
"Success can be defined as moving from failure to failure without loss of enthusiasm".... Churchill

Visit my Teardrop build here: viewtopic.php?f=50&t=73779
User avatar
Capebuild
Donating Member
 
Posts: 754
Images: 129
Joined: Sun Jan 31, 2021 6:50 am
Location: Massachusetts
Top

Re: CapeBuild Build Journal

Postby swoody126 » Thu Jun 17, 2021 10:43 am

have you considered running your wiring under the trailer in sections of conduit ?

at least the trailer running/brake lights and electric brake wires

in the event of issues they can be trouble shot and fixt easily

sw
"we are the people our parents warned us about" jb
swoody126
500 Club
 
Posts: 769
Joined: Mon Feb 22, 2016 6:11 pm
Location: north of Ft Worth
Top

PreviousNext

Return to Build Journals

Who is online

Users browsing this forum: No registered users and 55 guests