CapeBuild Build Journal

...ask your questions in the appropriate forums BUT document your build here...preferably in a single thread...dates for updates, are appreciated....

Re: CapeBuild Build Journal

Postby western traveler » Tue Jun 22, 2021 2:36 pm

Danny and Twisted it certainly is something I want to add and comes at a perfect time.
Thank You
western traveler
Donating Member
 
Posts: 396
Images: 264
Joined: Wed Dec 28, 2016 6:59 am
Location: The Front Montana

Re: CapeBuild Build Journal

Postby Capebuild » Tue Jun 22, 2021 3:55 pm

June 22, 2021

Finished setting up the preliminary wiring. Wired up the brakes. Again a big thank you for the suggestion to do all this prelim wiring prior to installing floor decking.
Which lead me to the idea of installing a 2nd junction box located in the cabin. Rather than having to solder or connect each light fixture's wiring to the pigtail wires, I will run the pigtail with all the wiring up to this box to supply power to all lighting supplied by TV (turn signals, brakes, marker lights, etc.). This way each light can have its own ground wiring and I think it will make trouble shooting a bit easier.... should there be a need to trouble shoot bad contacts :roll:

Also thought it best to keep the brake wiring in it's own loom and separate to aid in any trouble shooting.

Side note... I have to read it over again but not sure I understand the lighting suggested in previous post. I'm assuming this is an exterior light to illuminate if you and your trailer are parked in a temporary overnight spot....so your trailer can be seen by other motorists....

John
Attachments
box.jpg
box.jpg (316.65 KiB) Viewed 1661 times
wirng box.jpg
wirng box.jpg (315.3 KiB) Viewed 1661 times
wiring in loom.jpg
wiring in loom.jpg (443.51 KiB) Viewed 1661 times
"Success can be defined as moving from failure to failure without loss of enthusiasm".... Churchill

Visit my Teardrop build here: viewtopic.php?f=50&t=73779
User avatar
Capebuild
Donating Member
 
Posts: 756
Images: 129
Joined: Sun Jan 31, 2021 6:50 am
Location: Massachusetts

Re: CapeBuild Build Journal

Postby halfdome, Danny » Tue Jun 22, 2021 7:33 pm

Capebuild wrote:June 22, 2021
I have to read it over again but not sure I understand the lighting suggested in previous post. I'm assuming this is an exterior light to illuminate if you and your trailer are parked in a temporary overnight spot....so your trailer can be seen by other motorists....
John


Exactly :thumbsup:
Since you normally can't park in the auto's parking lot at a rest stop it good to have clearance lights on because of trucks etc. coming and going all night long.
I unplug the trailer from the TV or it's lights will be on too, don't want a dead battery.
I put a reminder on the dash to plug the TD back in, in the morning.
The clearance lights will be running on the TD's battery that gets charged while driving.

Make sure you make provisions to lock your TD doors at night.
There are locking interior door handles from TD parts suppliers but make sure no-one locks them while outside and then shut the doors, you won't be able to get in the TD.
We've never had the problem.
:D Danny
ImageImage
"Conditions are never just right. People who delay action until all factors are favorable do nothing". William Feather
Don't accept "It's Good Enough" build to the best of your abilities.
Image
Teardroppers Of Oregon & WashingtonImage
User avatar
halfdome, Danny
*Happy Camper
 
Posts: 5884
Images: 252
Joined: Sun Aug 14, 2005 11:02 pm
Location: Washington , Pew-al-up
Top

Re: CapeBuild Build Journal

Postby twisted lines » Wed Jun 23, 2021 2:38 pm

I am using Two Junction boxes, one in one out as well and did get the bride to paint the posts :D
If you wired it just as my diagram it would work (If your colors are correct!) add the fuse, I actually thought about putting my switch in the lid of the box because I don't plan to use it much.

WT :thumbsup:

TL
Racking up; And Rapin foam
User avatar
twisted lines
1000 Club
1000 Club
 
Posts: 1223
Images: 2
Joined: Wed Oct 10, 2018 4:37 am
Location: Jefferson
Top

Re: CapeBuild Build Journal

Postby Capebuild » Thu Jun 24, 2021 3:40 am

June 24,2021

-Yesterday routed notches in the floor assembly where the 2 side walls will have corresponding notches to interlock with one another when assembled.
-I didn't want to grind the weld beads flush with the frame. Instead used red powder to transfer the high spots of the welds to the underside of the floor assembly
and ground away material from floor so it would sit flush on the frame.
- I had spent a lot of time trying to decide what undercoating to use. Finally settled on this rubberized asphalt product from Black Jack, Rubr-Seal. The stuff is really thick in the can, I mean really thick.
Certainly not a "paintable" material. Applied 2 layers using a scraper to kind of trowel in on. Applied first layer really thin. It set up pretty quickly.... and by end of day was able to apply a second coat a bit thicker.

Today hope to get the floor decking installed.
Attachments
IMG_5432.JPG
IMG_5432.JPG (141.34 KiB) Viewed 1584 times
powder on frame.jpg
powder on frame.jpg (393.57 KiB) Viewed 1594 times
notches.jpg
notches.jpg (421.91 KiB) Viewed 1594 times
"Success can be defined as moving from failure to failure without loss of enthusiasm".... Churchill

Visit my Teardrop build here: viewtopic.php?f=50&t=73779
User avatar
Capebuild
Donating Member
 
Posts: 756
Images: 129
Joined: Sun Jan 31, 2021 6:50 am
Location: Massachusetts
Top

Re: CapeBuild Build Journal

Postby Capebuild » Sun Jun 27, 2021 2:06 pm

June 27, 2021

Got the floor deck installed along with the 2 footwells and the battery box. Went with elevator bolts.
Ran all wiring from junction box (from TV) up through floor in loom covering. Once walls are installed, will run that wiring up to a 2nd junction box.

Did I say "thank you" for the suggestion to set up the junction box wiring BEFORE installing the floor decking??? Anyway... I'll say it again! :D

Applied the asphalt concoction to the footwells and batt box.
Made up some metal straps to add some further support to the footwells and battery box. Will spray the strapping and fasteners with zinc primer and paint black.

Finalizing the CAD for the side walls and will probably get that started this week.
And looking forward to starting the headboard/galley cabinetry this coming week.

John
Attachments
IMG_5437.JPG
IMG_5437.JPG (131.2 KiB) Viewed 1565 times
IMG_5435.JPG
IMG_5435.JPG (80.15 KiB) Viewed 1565 times
brackets.jpg
brackets.jpg (242.29 KiB) Viewed 1565 times
"Success can be defined as moving from failure to failure without loss of enthusiasm".... Churchill

Visit my Teardrop build here: viewtopic.php?f=50&t=73779
User avatar
Capebuild
Donating Member
 
Posts: 756
Images: 129
Joined: Sun Jan 31, 2021 6:50 am
Location: Massachusetts
Top

Re: CapeBuild Build Journal

Postby featherliteCT1 » Sun Jun 27, 2021 3:28 pm

Everything looks so good! :thumbsup:
featherliteCT1
1000 Club
1000 Club
 
Posts: 1129
Joined: Wed Dec 28, 2016 6:54 am
Location: Southern Indiana
Top

Re: CapeBuild Build Journal

Postby twisted lines » Sun Jun 27, 2021 5:18 pm

Your battery cut out in the picture, came at a good time for me :thinking:
Racking up; And Rapin foam
User avatar
twisted lines
1000 Club
1000 Club
 
Posts: 1223
Images: 2
Joined: Wed Oct 10, 2018 4:37 am
Location: Jefferson
Top

Re: CapeBuild Build Journal

Postby tony.latham » Sun Jun 27, 2021 6:46 pm

Made up some metal straps to add ...


That looks like nuclear-military-grade pipe tape. What is it?

Tony
User avatar
tony.latham
Gold Donating Member
 
Posts: 6905
Images: 17
Joined: Mon Jul 08, 2013 4:03 pm
Location: Middle of Idaho on the edge of nowhere
Top

Re: CapeBuild Build Journal

Postby Capebuild » Mon Jun 28, 2021 4:09 am

The brackets are made from these metal strips I found in the hardware store.
They're 6 feet long, about .070 thick and about 1.5" wide.... with a series of holes punched through along their length.


John
"Success can be defined as moving from failure to failure without loss of enthusiasm".... Churchill

Visit my Teardrop build here: viewtopic.php?f=50&t=73779
User avatar
Capebuild
Donating Member
 
Posts: 756
Images: 129
Joined: Sun Jan 31, 2021 6:50 am
Location: Massachusetts
Top

Re: CapeBuild Build Journal

Postby tony.latham » Mon Jun 28, 2021 7:53 am

The brackets are made...


:thumbsup:

T
User avatar
tony.latham
Gold Donating Member
 
Posts: 6905
Images: 17
Joined: Mon Jul 08, 2013 4:03 pm
Location: Middle of Idaho on the edge of nowhere
Top

Re: CapeBuild Build Journal

Postby Capebuild » Thu Jul 08, 2021 5:57 pm

July 8, 2021

Earlier this week had the Tekonsha P3 brake controller installed on my Outback, which will be our TV.
Will try and hook up the trailer chassis soon as possible to test it and calibrate the controller (and make sure the axle brakes actually work).
Posted a separate question in the Electrical forum regarding the controller.

Today, picked up the plywood (baltic birch, okoume and MDO) from the CNC vendor (luckily, next town over). He did a great job. His CNC set up was really cool.
He can do a 5X12 foot panel. My largest was 5X10. Still need to get the doors cut along with the hatch spars.... but for now I've got plenty to assembly. Concentrating
on the headboard / galley cabinetry, all cut from Baltic Birch.
This will save so much time and the whole thing worked out great. Some photos attached. Will post more in a few days.

Thanks for looking.
John
Attachments
IMG_5471.JPG
IMG_5471.JPG (123.49 KiB) Viewed 1395 times
IMG_5467.JPG
IMG_5467.JPG (134.72 KiB) Viewed 1395 times
CNC Router.jpg
CNC Router.jpg (179.41 KiB) Viewed 1395 times
"Success can be defined as moving from failure to failure without loss of enthusiasm".... Churchill

Visit my Teardrop build here: viewtopic.php?f=50&t=73779
User avatar
Capebuild
Donating Member
 
Posts: 756
Images: 129
Joined: Sun Jan 31, 2021 6:50 am
Location: Massachusetts
Top

Re: CapeBuild Build Journal

Postby TimC » Thu Jul 08, 2021 8:32 pm

Wow. Very cool.
Tim
Niagara, WI
My First Benroy Teardrop Build Thread - A 5x8 Woodie - http://www.tnttt.com/viewtopic.php?f=50&t=63575
My Second Teardrop (partial) Build Thread - Started August '16 - http://www.tnttt.com/viewtopic.php?f=50&t=66939
#3 My son's Benroy Foamie team build - Started July '20 - http://www.tnttt.com/viewtopic.php?f=50&t=72877

Image
User avatar
TimC
Gold Donating Member
 
Posts: 1376
Images: 734
Joined: Sat May 23, 2015 4:15 am
Location: WI/MI border
Top

Re: CapeBuild Build Journal

Postby Capebuild » Fri Jul 09, 2021 4:40 pm

Hi Tim,

Yes... the process was really great to see. Now that I'm starting to assemble parts I'm wishing I had just planned to CNC every piece of wood. I believe that's what several of the
teardrop companies do. Once you've got the files, you can just pump out as many parts as needed.

Anyway... moving forward. Starting to dry fit the pieces. The dados were only machine CNC'd on one side, so I need to router the rest in where needed.

Starting to accumulate lots of small pieces of wood cut offs.

John
Attachments
2.jpg
2.jpg (299.96 KiB) Viewed 1343 times
1.jpg
1.jpg (283.54 KiB) Viewed 1343 times
"Success can be defined as moving from failure to failure without loss of enthusiasm".... Churchill

Visit my Teardrop build here: viewtopic.php?f=50&t=73779
User avatar
Capebuild
Donating Member
 
Posts: 756
Images: 129
Joined: Sun Jan 31, 2021 6:50 am
Location: Massachusetts
Top

Re: CapeBuild Build Journal

Postby Capebuild » Sun Jul 11, 2021 4:44 am

July 11, 2021

Yesterday hooked up the trailer to the Outback and took it out on the road to test 1) that it tracked properly and 2) to make sure the brake controller and axle brakes worked and to set the controller.
With my wife driving behind me with emergency flashers on..... I drove to a local recreation area early in the morning. My wife had her phone on speaker phone, as did I, so we could communicate
with one another. It towed very well.... I couldn't really even tell I was towing anything. Of course this was only the trailer chassis being towed minus the rest of the build. And the brakes worked.
I set the controller up but then realized it didn't really matter what I set it to since factors will change once all gets built, and the cabin installed, making for a big change in weight. But glad I took
the chassis for a test spin to make sure all was good.
:)

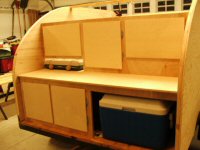
Decided to build the lower portion of the headboard/galley section on the torsion table for a couple of reasons, one of which is that my torsion table is "more flat" than the floor decking. Will then lower the unit onto the floor decking and install in place. Just dry fitting and sanding pieces shown here prior to gluing up.

John
Attachments
a.jpg
a.jpg (300.36 KiB) Viewed 1304 times
b.jpg
b.jpg (303.27 KiB) Viewed 1304 times
"Success can be defined as moving from failure to failure without loss of enthusiasm".... Churchill

Visit my Teardrop build here: viewtopic.php?f=50&t=73779
User avatar
Capebuild
Donating Member
 
Posts: 756
Images: 129
Joined: Sun Jan 31, 2021 6:50 am
Location: Massachusetts
Top

PreviousNext

Return to Build Journals

Who is online

Users browsing this forum: No registered users and 19 guests