Now the fun starts

...ask your questions in the appropriate forums BUT document your build here...preferably in a single thread...dates for updates, are appreciated....

Re: Now the fun starts

Postby twisted lines » Sat Jan 01, 2022 9:29 am

MickinOz wrote:I don't know much about Oregon,
Any thoughts? Is douglas fir good for the job?


I took a apprenticeship millwright coarse in the 80s; when I completed it I knew how to run all the equipment.
Paid more as a relief sawer, moved to each station to give breaks instead of shut down.
I cut so much Piss Fir & Pine you wouldn’t believe it.
It was a Good job :roll:
Racking up; And Rapin foam
User avatar
twisted lines
1000 Club
1000 Club
 
Posts: 1218
Images: 2
Joined: Wed Oct 10, 2018 4:37 am
Location: Jefferson

Re: Now the fun starts

Postby MickinOz » Sat Jan 01, 2022 4:40 pm

Thanks chaps. These are about 8 x 1.5 timbers according to my eye. The garage was demolished in the late 1990's and was an old building then.
They'd have to be 60 to 70 years old.
The guy demolishing the joint ran into scheduling issues - I bought the entire building frame 60ft x 40ft x 13 feet high portal frames, doors, timbers, etc. for $1000. Had 3 days to take it down. What a challenge, but we made it.
Anyway the planks have been in the rafters of my shed ever since.
I think I will sacrifice a piece of one to see if it'll machine up nice and laminate.
I'm worried it'll be too dried out and split for the job, but I guess I'll find out.
MickinOz
1000 Club
1000 Club
 
Posts: 1255
Images: 3
Joined: Mon Feb 04, 2019 3:54 pm
Location: Somewhere, in 379,725 square miles of South Australia

Re: Now the fun starts

Postby MickinOz » Mon Jan 03, 2022 6:19 am

Still dithering about what timber to use for the hinge spar.
Made a minor amount of progress by mixing sanding wood dust with polyurethane varnish and puttying the staples on the front of the trailer.
Using the mix for this purpose really does work well and is beautiful to sand.

Progress in other ways, too.
Being modelled on the Generic 8 x 5 Benroy, there is not a lot of depth under the galley bench.
About 14 inches if one makes the cabin the full 80 inches long.
In the Generic Benroy plans they simply say there is no room for a cooler under the bench.
And there isn't room for a cooler big enough for a week, say.

However, there is an option or two for overnighting, short weekend trips.
Between 1948 and 1973, Clayton Metal Products manufactured Staykold coolers in a factory at Edwardstown South Australia.
They are well and truly Ol' Skool.
Painted steel exterior, galvanised interior. They came in a few sizes.
There was one that was called the GT Mini-set 12.
It was specifically sized to fit in the boot (trunk) of a Morris Mini.
So it was about 20 inches long, 9 inches wide, 13 inches high.
Internal volume 28 US quarts. Not huge but enough to keep a weekend's milk, meat and wine for a couple.

Today, one came up for sale on FB Marketplace.
It was complete. It still had the bottle opener on a chain, the brass drain hole cap, the rack for the food compartment, and room for 12 'big bottles".
A "big bottle" back in the day was a 26 oz beer bottle. About 768 mls. Equivalent to two 8oz stubbies or cans.
The food compartment is water tight so the food doesn't get contaminated with melt water.

The labels are still on the inside, the galvanised interior is not showing any rust and the only rust on the exterior is where the chrome has gone missing on the latches.
These came with line drawings on the front, of 12 of the compact cars that they would fit in. Sadly, the line drawings are barely legible now.
But all in all, it's in fantastic condition for a very collectible 50 year old cooler with a $30 asking price. The seller is a an auctioneer/dealer, so I was a bit surprised he didn't want more for it. I paid the asking price and legged it before he changed his mind.

So, I have a period cooler for the TD. Except the missus has spotted it and is suggesting its "too good to give away". :NC
Staykold in TD.JPG
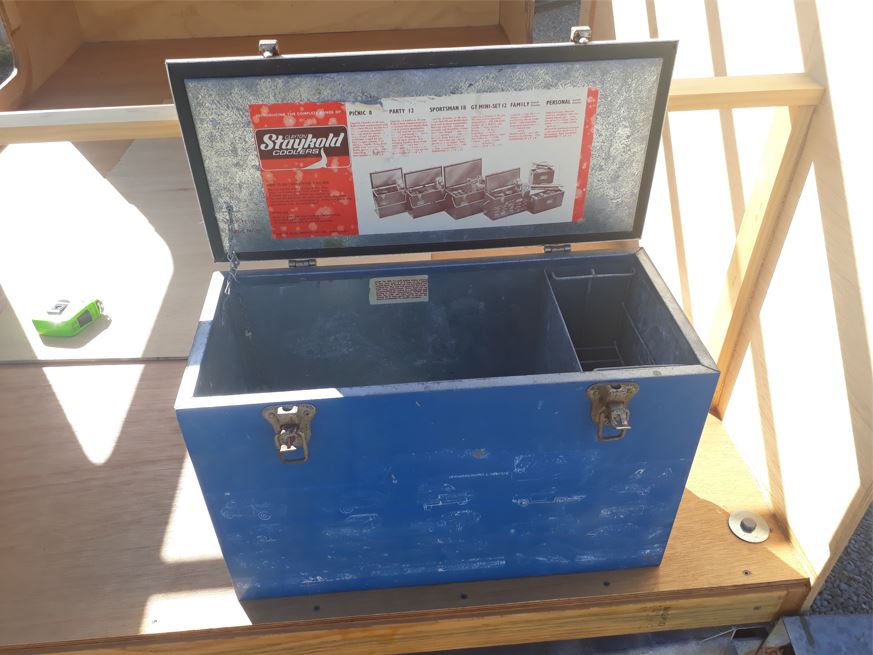
Staykold in TD.JPG (77.4 KiB) Viewed 359 times

Interior.JPG
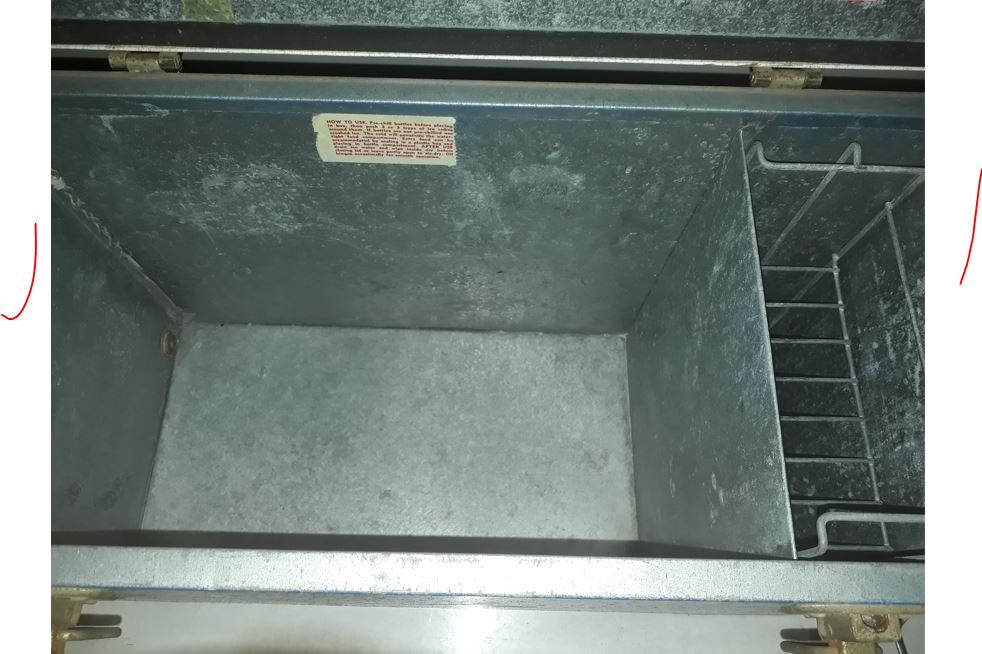
Interior.JPG (90.3 KiB) Viewed 359 times

Lid Closeup.JPG
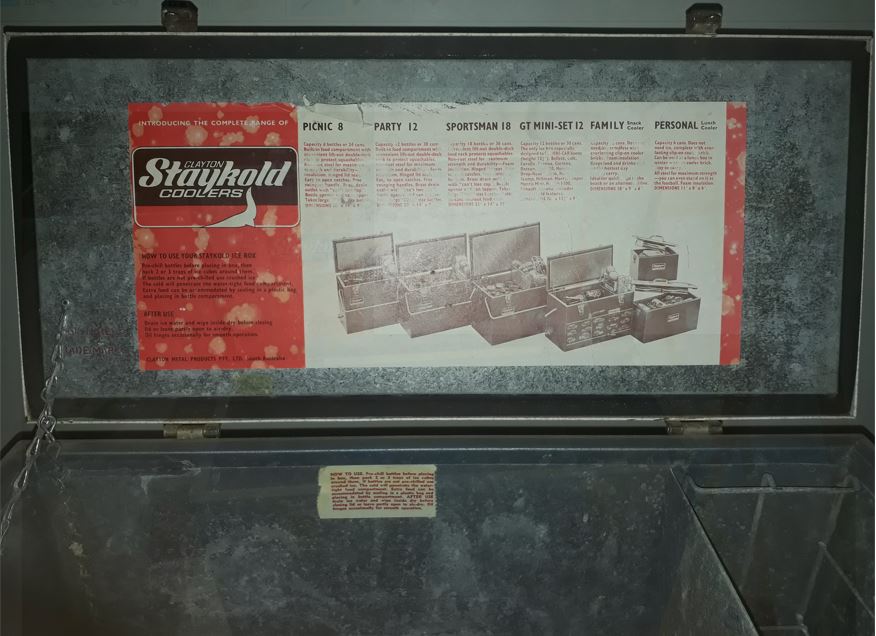
Lid Closeup.JPG (89.54 KiB) Viewed 359 times
MickinOz
1000 Club
1000 Club
 
Posts: 1255
Images: 3
Joined: Mon Feb 04, 2019 3:54 pm
Location: Somewhere, in 379,725 square miles of South Australia
Top

Re: Now the fun starts

Postby edgeau » Mon Jan 03, 2022 7:19 am

MickinOz wrote:Still dithering about what timber to use for the hinge spar.
Made a minor amount of progress by mixing sanding wood dust with polyurethane varnish and puttying the staples on the front of the trailer.
Using the mix for this purpose really does work well and is beautiful to sand.

Progress in other ways, too.
Being modelled on the Generic 8 x 5 Benroy, there is not a lot of depth under the galley bench.
About 14 inches if one makes the cabin the full 80 inches long.
In the Generic Benroy plans they simply say there is no room for a cooler under the bench.
And there isn't room for a cooler big enough for a week, say.

However, there is an option or two for overnighting, short weekend trips.
Between 1948 and 1973, Clayton Metal Products manufactured Staykold coolers in a factory at Edwardstown South Australia.
They are well and truly Ol' Skool.
Painted steel exterior, galvanised interior. They came in a few sizes.
There was one that was called the GT Mini-set 12.
It was specifically sized to fit in the boot (trunk) of a Morris Mini.
So it was about 20 inches long, 9 inches wide, 13 inches high.
Internal volume 28 US quarts. Not huge but enough to keep a weekend's milk, meat and wine for a couple.

Today, one came up for sale on FB Marketplace.
It was complete. It still had the bottle opener on a chain, the brass drain hole cap, the rack for the food compartment, and room for 12 'big bottles".
A "big bottle" back in the day was a 26 oz beer bottle. About 768 mls. Equivalent to two 8oz stubbies or cans.
The food compartment is water tight so the food doesn't get contaminated with melt water.

The labels are still on the inside, the galvanised interior is not showing any rust and the only rust on the exterior is where the chrome has gone missing on the latches.
These came with line drawings on the front, of 12 of the compact cars that they would fit in. Sadly, the line drawings are barely legible now.
But all in all, it's in fantastic condition for a very collectible 50 year old cooler with a $30 asking price. The seller is a an auctioneer/dealer, so I was a bit surprised he didn't want more for it. I paid the asking price and legged it before he changed his mind.

So, I have a period cooler for the TD. Except the missus has spotted it and is suggesting its "too good to give away". :NC
Staykold in TD.JPG

Interior.JPG

Lid Closeup.JPG
Wow that is a find!

Sent from my Pixel 3 using Tapatalk
User avatar
edgeau
500 Club
 
Posts: 513
Images: 2
Joined: Sun Nov 13, 2016 8:21 am
Location: Gold Coast Australia
Top

Re: Now the fun starts

Postby Staryder61 » Tue Jan 04, 2022 2:03 pm

MickinOz,

+ 1 :thumbsup: on the great find for the cooler box.
When I was a kid, my father worked for a company that made Coca-Cola boxes. Some were coolers similar to what you found. Then they also made the machines that dispensed the cokes. We had 3 or 4 of the coolers. My father brought one home that wasn't finished to show me how they were made.
Metal on the outside, galvanized metal inside sleeve, and before putting together and attaching the parts. Fiberglass insulation was pressed inside between the two parts. I remember one was about 8 or 9 inches deep, around 12" tall.
Yours is a great find for sure. A coca-cola one can be found for around $800 to $1000 depending on condition it's in.

Off the subject,
What hinge are you planning on using to attach your hatch? If you mentioned it, I did not see a posting of it.
Stay safe, David


Our CTC
6' X 12' CTC = Texas Sized Tackle Box
http://www.tnttt.com/viewtopic.php?f=42&t=74704
User avatar
Staryder61
Silver Donating Member
 
Posts: 827
Images: 528
Joined: Mon Oct 30, 2017 5:11 pm
Location: In one of 254 Counties in Texas
Top

Re: Now the fun starts

Postby MickinOz » Wed Jan 05, 2022 4:25 pm

The old timey coolers do look great, don't they? And they are more sympathetically dimensioned for this application.
Pity about the insulation on this one. It'd be no more than 1/2 inch thick. :(
Still, it's going to look right.

This time around, I'm going with a big stainless steel piano hinge.
It's 51mm / 2 inches wide when opened out flat.
The material is 2mm/0.08" thick.
I will screw it down over a rubber gasket and see how we go.

I used a hurricane hinge first time round, but
a) They are getting expensive here
b) I had a fitment issue. While the hinge itself has a water proof design, sealing the hinge to the trailer took two shots.

So I figured I'd try a different approach this time.
MickinOz
1000 Club
1000 Club
 
Posts: 1255
Images: 3
Joined: Mon Feb 04, 2019 3:54 pm
Location: Somewhere, in 379,725 square miles of South Australia
Top

Re: Now the fun starts

Postby Staryder61 » Wed Jan 05, 2022 5:42 pm

MickinOz wrote:The old timey coolers do look great, don't they? And they are more sympathetically dimensioned for this application.
Pity about the insulation on this one. It'd be no more than 1/2 inch thick. :(
Still, it's going to look right.

This time around, I'm going with a big stainless steel piano hinge.
It's 51mm / 2 inches wide when opened out flat.
The material is 2mm/0.08" thick.
I will screw it down over a rubber gasket and see how we go.

I used a hurricane hinge first time round, but
a) They are getting expensive here
b) I had a fitment issue. While the hinge itself has a water proof design, sealing the hinge to the trailer took two shots.

So I figured I'd try a different approach this time.


The cooler is going to look great for your camper.
Hope the stainless-steel hinge works for you.
I remember reading somewhere, of someone using contact adhesive to hold down a rubber gasket first under a hinge. It kept the screws from catching and turning the rubber under the hinge. helping with the seal. Maybe that would help.
Stay safe, David


Our CTC
6' X 12' CTC = Texas Sized Tackle Box
http://www.tnttt.com/viewtopic.php?f=42&t=74704
User avatar
Staryder61
Silver Donating Member
 
Posts: 827
Images: 528
Joined: Mon Oct 30, 2017 5:11 pm
Location: In one of 254 Counties in Texas
Top

Re: Now the fun starts

Postby MickinOz » Fri Jan 07, 2022 3:56 am

Thanks for the hint on the contact adhesive. Makes a lot of sense, I'll see what I can find in the way of suitable adhesive.
MickinOz
1000 Club
1000 Club
 
Posts: 1255
Images: 3
Joined: Mon Feb 04, 2019 3:54 pm
Location: Somewhere, in 379,725 square miles of South Australia
Top

Re: Now the fun starts

Postby swoody126 » Fri Jan 07, 2022 7:15 am

maybe the double sided tape used in the auto industry to hold body side moldings on would work

the moldings are some kind of plastic and the sides of the cars are painted metal

sw
"we are the people our parents warned us about" jb
swoody126
500 Club
 
Posts: 769
Joined: Mon Feb 22, 2016 6:11 pm
Location: north of Ft Worth
Top

Re: Now the fun starts

Postby Staryder61 » Fri Jan 07, 2022 1:10 pm

Mick, this stuff works really great for most applications.. I have used it a lot, not sure you can get it there.

https://www.grainger.com/product/400G24 ... 8fea97e8d7
Stay safe, David


Our CTC
6' X 12' CTC = Texas Sized Tackle Box
http://www.tnttt.com/viewtopic.php?f=42&t=74704
User avatar
Staryder61
Silver Donating Member
 
Posts: 827
Images: 528
Joined: Mon Oct 30, 2017 5:11 pm
Location: In one of 254 Counties in Texas
Top

Re: Now the fun starts

Postby twisted lines » Fri Jan 07, 2022 1:49 pm

Auto's; not sure of the term :lol: . Weather striping adhesive

:thinking:Some; O Rings = Super glue :thumbsup:
Racking up; And Rapin foam
User avatar
twisted lines
1000 Club
1000 Club
 
Posts: 1218
Images: 2
Joined: Wed Oct 10, 2018 4:37 am
Location: Jefferson
Top

Re: Now the fun starts

Postby MickinOz » Sat Jan 15, 2022 8:11 am

Old mate Reg from up the street has been dropping in a bit lately.
He doesn't have much choice.
Ever since she discovered our mutt, his old dog does a right turn at my driveway whether he likes sit or not. :lol:
She's a beautiful dog, built a bit like a blue heeler, but she's mostly white.
It's really funny to watch them. She's 10, thumper is a boisterous not quite 4 years old.
She wants to come and say g'day, but within minutes she's had enough of his antics and snaps at him.
It's been good, each visit he's calming down more and she's lasting longer before she arcs up.

The other day he landed just as I finished installing the ceiling panel.
I said that'd be it for a while, as the only staples I had left are too long and I can't find any more at the hardware shops.

I'll be right back he said. He came back with an unused pack of 25mm galvanised narrow crown staples.
Where the heck did they come from?
Apparently one of the auto parts store stocks 25mm and 16mm staples and brads.
It simply did not occur to me to look in an auto parts store for nails.
He'd bought 'em by mistake (he doesn't have a narrow crown stapler) and gave he them to me.
Of course, if he ever needs to narrow crown staple something, he knows where the gun lives.

Fascinating bloke.
I don't think there is much he can't do.
He's got a cochlear implant, I asked him how that worked out for him and he said not too bad since he hooked it to his i-phone via bluetooth!

Running some wires through the ceiling at present then I'll whack the top sheet on and close her up.
Woohoo!
MickinOz
1000 Club
1000 Club
 
Posts: 1255
Images: 3
Joined: Mon Feb 04, 2019 3:54 pm
Location: Somewhere, in 379,725 square miles of South Australia
Top

A tale of woe.

Postby MickinOz » Mon Jan 17, 2022 7:12 am

So today, I cut the roof sheet. The ceiling sheet is in, and its time to get cracking on this build.
Using a piece of marine ply. So 1220mm x 1585mm. All pieces have to go across ways to achieve the 5 wide.
Inspect the long edges of the sheet, and cut to 1585 length. When I lay this sheet in position, butted up against the trailing edge of the front curved skin, I get about 5mm overhang each side and about the same over the back of the last spar. So just enough to run the router around with a trimmer bit to get a nice flush fit.
Mark where the intermediate spars are so I know where to staple.
Put two adjustable saw horses in the cabin and push them up against the ceiling to just put about a 4mm camber in the roof.
Run the glue and nail the sheet on.
All the perimeter nails first, then the spars through the middle.
EXCEPT, I turned the sheet around, front to back. So the lines I marked for the three intermediate spars were off by enough that all the staples missed.
So there it was, glued and stapled perfectly around the entire perimeter, but not stapled at all through the middle.
I wondered why those bloody staples were sinking so far into the ply - because they weren't going into timber behind them. I had to back the gun right off.
I am so glad I put that camber in those spars.
The spars sat proud of the perimeter. the ply pulled down tight on them when I stapled the edges. By the time I realised the mistake, about 4 hours had gone by. The recommended time to clamp the glue I am using.
A couple of loose spots where I could flex the sheet over one spar, the rest tight.
After getting over the shock, I redrew the lines in the right spot and ran in new staples, just for completeness sake.
MickinOz
1000 Club
1000 Club
 
Posts: 1255
Images: 3
Joined: Mon Feb 04, 2019 3:54 pm
Location: Somewhere, in 379,725 square miles of South Australia
Top

Re: Now the fun starts

Postby TimC » Mon Jan 17, 2022 9:58 am

Good recovery Mick. We have all had those little screw ups! Though maybe I shouldn't speak for most of us.

When I was working on the roof of my son's foamie I neglected to glue the TD's front sheet to the headliner. Big mistake. I proceeded to drill 1/4" holes all across the front in a random pattern so I could squirt Great Stuff foam into the void. Then spackled the holes shut. When my son came home and saw it his eyes came out of his head. I assured him none of it would be seen after PMF and paint. It did turn out fine and I think the front wall is better off for it as it is now a solid foam with few voids.
Tim
Niagara, WI
My First Benroy Teardrop Build Thread - A 5x8 Woodie - http://www.tnttt.com/viewtopic.php?f=50&t=63575
My Second Teardrop (partial) Build Thread - Started August '16 - http://www.tnttt.com/viewtopic.php?f=50&t=66939
#3 My son's Benroy Foamie team build - Started July '20 - http://www.tnttt.com/viewtopic.php?f=50&t=72877

Image
User avatar
TimC
Gold Donating Member
 
Posts: 1372
Images: 733
Joined: Sat May 23, 2015 4:15 am
Location: WI/MI border
Top

Re: Now the fun starts

Postby MickinOz » Tue Jan 18, 2022 5:00 am

The roof came up as tight as a drum this morning.
When I released the saw horses that were inducing a few mm of camber in the roof spars, there was very little sag. Got a little bit of camber left.
Pretty happy with the current state of play, except it's going very slowly.
Got two days of decent weather left. Then the forecast is for some pretty solid rain, up to 3 inches, over Friday and Saturday.
MickinOz
1000 Club
1000 Club
 
Posts: 1255
Images: 3
Joined: Mon Feb 04, 2019 3:54 pm
Location: Somewhere, in 379,725 square miles of South Australia
Top

PreviousNext

Return to Build Journals

Who is online

Users browsing this forum: No registered users and 31 guests