Beyond the End teardrop (Tony Latham-style build)

...ask your questions in the appropriate forums BUT document your build here...preferably in a single thread...dates for updates, are appreciated....

Re: Beyond the End teardrop (Tony Latham-style build)

Postby tony.latham » Mon Sep 05, 2022 8:38 am

orourkmw wrote:I may not even use a tow vehicle charge wire. But your third taillight and license plate lights must be connected to the vehicle. I assume that there is a cable gland that comes up through the floor in the galley right at the battery? Or am I misunderstanding?
Mike


Oh... that wiring. I brought mine up through the floor (into the galley) at the corner of the bulkhead --straight up through the countertop and along the corner to the 'raceway' behind the hatch spar.

Capish? I just took it through a 1/2" hole that was later sealed with PL3.

Tony
User avatar
tony.latham
Gold Donating Member
 
Posts: 6899
Images: 17
Joined: Mon Jul 08, 2013 4:03 pm
Location: Middle of Idaho on the edge of nowhere

Re: Beyond the End teardrop (Tony Latham-style build)

Postby Capebuild » Mon Sep 05, 2022 9:14 am

Mike, if it's any help regarding the running of your 7 pin wiring..... I ran the wiring from the junction box on underside of the chassis, ran the wiring along the right side of the chassis and to the right side of the side wall and brought it up through the floor.... and had routed a channel in the side wall to bring the wiring up (to a point inside one of the cubby openings in the back cabinetry). I created a junction box in that area where I connected all that wiring and was able to then continue the runs to the individual lighting fixtures (tail lights, license plate light, 3rd brake light, etc.)....... I don't know how necessary it is to do it this way but I figured it would make trouble shooting easier, if needed. If you look at page 6 of my build journal towards the bottom of the page there's some pictures and explanation of what I did. Again, it's just the way I did it.... and may not be for everyone to do it this way.

John
"Success can be defined as moving from failure to failure without loss of enthusiasm".... Churchill

Visit my Teardrop build here: viewtopic.php?f=50&t=73779
User avatar
Capebuild
Donating Member
 
Posts: 754
Images: 129
Joined: Sun Jan 31, 2021 6:50 am
Location: Massachusetts

Re: Beyond the End teardrop (Tony Latham-style build)

Postby orourkmw » Mon Sep 05, 2022 4:08 pm

Thanks, Tony and John!
User avatar
orourkmw
Teardrop Master
 
Posts: 108
Images: 69
Joined: Tue Jan 25, 2022 12:55 pm
Location: Port Allen, Louisiana
Top

Re: Beyond the End teardrop (Tony Latham-style build)

Postby JoeGrz » Mon Sep 05, 2022 8:28 pm

Mike, as far as the power from the tow vehicle, I planned on it but found I don’t need it myself. I wound up with a 30 amp charger and 20 amp wires in the vehicle so it never finished. I’ve thought about replacing the charger but have not run low on power on my trips. I put my solar panel out when I can and it seems to keep it up. I do have a little 30 watt panel I plan to add to my tongue box so I can add a little charge while on the highway. Unfortunately, the fender replacement has taken priority and the little panel may have to wait until the spring.
JoeGrz
Teardrop Master
 
Posts: 107
Joined: Thu May 28, 2020 4:24 am
Location: Panhandle of Texas
Top

Re: Beyond the End teardrop (Tony Latham-style build)

Postby orourkmw » Tue Sep 06, 2022 5:47 pm

Thanks, Joe. I saw in reading about your trailer registration that the administrator misspelled your name….nobody commented on it, but my guess is that it does have an “a”…?
User avatar
orourkmw
Teardrop Master
 
Posts: 108
Images: 69
Joined: Tue Jan 25, 2022 12:55 pm
Location: Port Allen, Louisiana
Top

Re: Beyond the End teardrop (Tony Latham-style build)

Postby western traveler » Wed Sep 07, 2022 2:07 am

Hey Mike, your build is coming along nicely! Just getting caught up on a bit of reading. Things start moving quickly once the headliner is in. At least it did on mine (but never fast enough).

As to the TV charge wire. My TV is early 90’s P/U. As I understand it the alternator does not stop charging when my AGM reaches 100% charge (not good). Also if I leave my trailer plugged in to the TV and say I play my radio for a long time while the engine is off it pulls down the house battery along with the TV battery. I installed a battery switch in my tongue box to prevent that and overcharging. From what I read not the best method but simplest. (Open to feedback).
I haven’t camped in one place for long stretches so far, moving on frequently. The point being if I know I am going to just be camped for a day or two, or buried in the trees I monitor my charge and disconnect when I near %100 when not using my solar panel and moving on to my next camp.
western traveler
Donating Member
 
Posts: 396
Images: 264
Joined: Wed Dec 28, 2016 6:59 am
Location: The Front Montana
Top

Re: Beyond the End teardrop (Tony Latham-style build)

Postby orourkmw » Wed Sep 07, 2022 6:31 pm

Ralph, I agree about the TV charging....

I got my roof spars on:
170190
Spaced of course for the solar panel and the fan. I ordered the fan but it won't be in till the end of the month. I installed the battery and checked to make sure the Reliant Aquatainer 7 gal water jug would fit. This particular jug was one I've had for about 5+ yrs, and only to hold emergency water in my (mostly) un-air conditioned shop. I haven't actually used the nozzle since I bought it, and today, it simply broke off in my hand. I ordered a replacement for $6 from Amazon, but I just bring this up as a warning for anybody who has an older jug....we certainly don't want it to fail on the road. (And of course I plan to buy a new jug for this build).

No pic, but also kerf'd one section of insulation on the curve just to see how it would go...I think it will be fine. I actually used two pieces of 1" blue board, as I haven't found 2" board locally. The outermost board took more kerfing than the bottom, but it's a good fit.

My ice chest is 27" long, which was the same as Garth's. I bought 24" fully open locking slides, but found that I didn't clear the counter in the full open position, and will barely have room to close the hatch in the slide closed-and-locked position. Here are two views, and my fix....
170143
170191
(The purple popsicle stick in the closed pic is to simply show the edge of the floor....I am building on a support platform, which is the wood below). It was a little tedious to manually "delaminate" the ply, but between a Dremel and an oscillating saw got it done without too much extraneous damage. The slides I bought (which have a lock only on one side) lock closed and halfway out, but not in the fully open position....I am wondering if there is a defect. They don't come apart like the drawer slides, and there is nothing I can see in the tracks....definitely hits a "hard stop" on the locking side. I moved the slides around several times during install, but it came down to being able to clear the counter in the open lid position, and I wanted to have the first screw holes actually penetrate the vertical counter support (and in fact, I through-bolted that side, which is the locking side). Note I also have a spacer just to keep the cooler in position, or else there is an issue with the lid opening against the wall. Probably should have gone with a 45 qt or so cooler, vs this RTIC at 52 qts...or mounted the slides a little more forward, I guess, and not worry about the first of the screw holes...but the weight! I think I'll definitely want to have the cooler in its tray before I load it with ice and drinks....it weighs a ton! But the slide is strong - I can stand on it - so I'm less worried about the weight the slide/screws/wood has to carry.

Another positive note...I inherited a portable air conditioner which, combined with my existing window unit, now brings my shop down to about 78F.....no more sweat pouring straight down on my workpiece! But more equipment doesn't make my workspace any larger..... ;)
User avatar
orourkmw
Teardrop Master
 
Posts: 108
Images: 69
Joined: Tue Jan 25, 2022 12:55 pm
Location: Port Allen, Louisiana
Top

Re: Beyond the End teardrop (Tony Latham-style build)

Postby orourkmw » Mon Sep 19, 2022 2:53 pm

Been making some progress in my galley. Contacted the manufacturer of the cooler drawer slides, and they advised giving them a hearty yank on the pull-out a few times. I did that with some vigor, and now they are operating properly....added a half-inch to open distance, and now locks in only the fully open and fully closed position. So I didn't have to carve out for the cooler the way I did, but what the heck...will help keep it from sliding around in its drawer (along with the cooler spacer block I added on the right side).
170272
I was surprised at the different color of the galley drawers, as they all came from the same 3/4" Baltic for the faces, and the same can of varnish. I guess maybe I have the opposite sides "out", but the inside doesn't appear to be a lot different. Oh well, variety is the spice of life (and I think Tony's kind of looks the same, and it looks good).

I bought the wrong stove...a 23" Ignite Plus. It turns out they have a proprietary propane plug that doesn't have a hose option to the green bottle, and to modify the fitting adds too much dimension at the bulkhead. I am going to sell that stove and have ordered an 18", which is what I should have ordered initially anyway.

I've installed the spar blocking on the roof spars on the passenger's side. As I did not want to penetrate my exterior wall, I used L-brackets to hold the spars in place, along with PL Premium. Here is a pic of the driver's side with the spar clamped in place, waiting to be cut to fit, but also a preliminary fit of my "transition board" between the wood strip upper and the anodized aluminum lower. I haven't fully countersunk the bolt yet, and will glue and epoxy this oak board in place sometime toward the end of this journey.
170273
It seems like I've been doing a lot of "fitting" to make things comes together properly, but I've always worked slow anyway. And I'm still thinking about westerntraveler's Serenity trim....having trim here that adds some relief (even along the lines of the spar blocking in the pic) might add a nice touch....I initially planned to use the standard black aluminum molding that holds vinyl trim insert, but....
User avatar
orourkmw
Teardrop Master
 
Posts: 108
Images: 69
Joined: Tue Jan 25, 2022 12:55 pm
Location: Port Allen, Louisiana
Top

Re: Beyond the End teardrop (Tony Latham-style build)

Postby orourkmw » Mon Oct 03, 2022 2:52 pm

OK, got some things done:
170436
Completed lower half of galley (except for small spacer to be added to keep the water jug from moving). Replaced the leaking original valve with a hose bibb and sealed it with Rectorseal, as per JoeGrz's recent leak and CapeBuild's research. Installed at an angle for slightly more hand clearance. In spite of the new spigot, I still think the Reliance jug is the weak link in the system. Like Joe, I am caulking everywhere between the galley and the cabin.

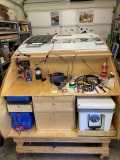
Got the new stove fitted and its slider/drawer installed. It's out from the counter about 1" to allow clearance for the propane regulator in front of the bulkhead, but I think I'll cut the tube down....it adds about 7" to the length coming out of the right side of the Stansport stove. May need a new regulator. The hose will come up through the counter to where the green bottle is standing. I bought a spare propane connection/regulator, in case I carry the stove to a picnic table or something. Added edge banding to the 3/4" (including a piece under the stove I had left over from my exterior wall inlay).

Got all the wiring done and the fixtures installed (except for those in the hatch). The NOCO charger will have a female plug that will be mounted in the hatch so that the battery can be charged from 120V with the hatch lid closed.

I wired the battery monitor and all positive leads to the 50A resettable circuit breaker. This will allow all draws from the battery to be cut off. I wired the solar controller directly to the battery, along with a 20A circuit breaker which will allow its input to be cut off. I replaced the smaller fuse box I initially had with a 12 fuse box, of which 10 or 11 will be occupied: (2) reading lights; (2) "entry" lights inside each door; a 12V outlet just inside the headboard; the fan; a USB outlet at the upper rear cabin shelf (which will also power accent lights in the recess I built behind the last cabin spar; I'll get a pic another time); a 12V outlet for the galley; a pre-wire for a possible future electric cooler (I'll just coil up the wire in the chase that I will install behind the hatch spar); and I plan 1 or 2 galley lights.

There will be a cabinet with a door that hides the fuse box, and will house the battery monitor. Then of course the organization bin that runs across the counter top has yet to be built.

I am glad to be done varnishing for a while!

Finally, got the insulation cut & fitted. I will note that the use of (2) 1" blue closed cell sheets, or (3) 0.75" white open cell foam sheets, both came out at the perfect size to make a nice torsion box out of the roof, per Tony's design. The 0.75" also worked well at the wire runs. However.....they are both a mess, and especially that white stuff...come to think of it, maybe I do prefer varnishing...

So, I hope to start putting the 1/8" Baltic Birch roof on this week. My plan is still to sheath with aluminum, so I need to find a 10' x 5' sheet somewhere. And I will start welding on the trailer with my welder friend sometime in the next few weeks. I kinda feel like I can see the finish line on the distant horizon! :thumbsup:
User avatar
orourkmw
Teardrop Master
 
Posts: 108
Images: 69
Joined: Tue Jan 25, 2022 12:55 pm
Location: Port Allen, Louisiana
Top

Re: Beyond the End teardrop (Tony Latham-style build)

Postby JoeGrz » Wed Oct 12, 2022 8:16 pm

The galley looks great. I like the way you turned the cooler and expanded the drawers. I wish I had installed larger drawers that a rotated cooler would allow. What size is the cooler? I need to build a slide like you have but I am concerned about the cantilever that a slide would have when I slide out far enough to open the lid.

It all looks great and I really look forward to seeing it when you are finished!
JoeGrz
Teardrop Master
 
Posts: 107
Joined: Thu May 28, 2020 4:24 am
Location: Panhandle of Texas
Top

Re: Beyond the End teardrop (Tony Latham-style build)

Postby orourkmw » Thu Oct 13, 2022 12:11 pm

Joe:
Thanks! The cooler is a 52 quart RTIC, which is 27" x 18" x 18", and weighs 31 lbs. I imagine most people must put the cooler in the slide tray and then fill it after, because it will be heavy!

I was also worried about the cantilever, but it worked well for Garth. These are the slides I used: https://www.amazon.com/gp/product/B08DKQKFH9/ref=ppx_yo_dt_b_search_asin_title?ie=UTF8&th=1

The slides are 24" long and rated for 500 lbs, and cost about $55. I used 3/4" BB to make the tray, and I have stood on it when it is fully pulled out and locked, and it feels solid.

As an update, I have finished the roof plywood, and today fiberglassed. I put a seal coat on last night before bed, and then rolled out the fiberglass this morning. I went with 6 oz, but could have used 4 oz because I will have an aluminum sheath. And it is a good thing I will have a sheath, because it is pretty ugly. I haven't epoxied before on a vertical surface, and I went as thin as I could and tried to catch all the drips. I was unable to get all the white spots out and have a few bubbles, and I only dragged my arm through the epoxy once...hard to reach up top! And I even got a new epoxy sole on my shoes...they should last a while!

No pic right now because everything is still taped and covered in newspaper. I'll probably razor cut the edges tonight if it's ready. But I have completed all electrical except the fan and the hatch components. That NOCO battery charger is nice.

And I am on schedule with my friend to weld up the trailer the first week of November. So I have to get the aluminum sheath (I originally was going to butt it up to the diamondplate, but now I think I'll go all the way down and put the diamondplate on top, so it needs to be something like 15' x 5'), and then of course build the hatch. Otherwise, the list of small stuff to do is getting shorter....
User avatar
orourkmw
Teardrop Master
 
Posts: 108
Images: 69
Joined: Tue Jan 25, 2022 12:55 pm
Location: Port Allen, Louisiana
Top

Re: Beyond the End teardrop (Tony Latham-style build)

Postby orourkmw » Sun Nov 06, 2022 8:59 pm

Made some progress. I decided to go with Monstaliner on the roof forward of the hatch, based on VanIsledave's good experience. Tony had good experience as well, but Garth had the problems with the pinholes, which worried me. I gave up on my original idea of a continuous aluminum sheet 5'x11'. The one gallon tintable kit was perfect quantity.
170684
I've got the solar panel wired, but haven't fastened it or the pass-through down. Built the 3rd brake light support. Installed the fan. The galley organizer has dividers every 2 inches, which are removable for both cleaning and to be able to fit them where needed.

I mentioned that I was going to purchase a second propane connection to the stove in case someone wanted to move the stove to a picnic table. It turns out that a shorter arm is available, which meant I didn't have to shorten it to avoid hitting the bulkhead when the slide is closed.

And I'll be welding up the trailer with some experienced friends tomorrow and Tuesday....yay! I'll still have a number of smaller tasks to do (countertop, sealing my "transition" oak strip between the wood strips and aluminum on the side, painting and wiring the trailer, installing edge trim, etc), but the main big one is building the hatch. And the opportunities for spending money are going down....still have to buy the mattress. I will publish my spend numbers when I'm done, but I can tell you I will be 20% higher than those comparable trailers built before the pandemic....probably more than $10K.

By the way, I did have a problem with the vinyl insert on the Challenger Doors....it turns out I was using 1", and needed 3/4". I will say that I have probably spent as much time on these doors...cleaning up the stuck styrofoam from the shipping problem, fitting the doors, trying to get them to close properly, installing the trim, etc....as I have on any single component in the build!
User avatar
orourkmw
Teardrop Master
 
Posts: 108
Images: 69
Joined: Tue Jan 25, 2022 12:55 pm
Location: Port Allen, Louisiana
Top

Re: Beyond the End teardrop (Tony Latham-style build)

Postby tony.latham » Mon Nov 07, 2022 7:51 pm

Made some progress.


:thumbsup: :thumbsup:

Tony
User avatar
tony.latham
Gold Donating Member
 
Posts: 6899
Images: 17
Joined: Mon Jul 08, 2013 4:03 pm
Location: Middle of Idaho on the edge of nowhere
Top

Re: Beyond the End teardrop (Tony Latham-style build)

Postby orourkmw » Tue Nov 08, 2022 5:19 pm

I have had a blast the last two days working with my friends on welding up the trailer. I myself was only willing to weld the non-critical parts (seals plates, etc) or do grinding, buffing or fetching. I let the experienced welders do the structural stuff, and an extremely pleased with the result. We followed Tony's design, except my bumper is 3" square tubing. Here is me, standing on the fender:
170687
I am doing that only to show how strong the fender attachment is. I'll give a little more detail a moment. First, a couple shots of my team in action:
170693
170692

For you techies out there, they used both wire feed and stick. The stick was 6010 followed by 7018 Low Hydrogen (whatever that means!). I think the welds came out great, and far better than I could have achieved myself:
170688

Finally, I was really happy with the fenders, after reading of some other's problems. This is what we did, using 2" angle:
170689
170690

The 3/4" holes on the bevel edge are to house the side clearance amber and red button lights. I have good clearance between the fenders for when I go to slide the cabin on.

I cannot express how grateful I am to my friends for their help. I really think I could not have achieved anywhere close to the same results...I don't have the skills, and I don't have all the right tools. I would have been working on jack stands on the floor. And I think the quality we achieved was higher than what you'd be able to purchase most places. It is nice to have friends....whose motto is "will work for beer!"

As I have said, I will publish full accounting for costs, but I have right at $2000 in materials, parts, and welding supplies on this 5'x10' trailer alone.

A huge milestone behind me. Now just paint and wire, and then the last milestone before launch: building the hatch. All the rest feels like punch list stuff.... :beer:
170691
User avatar
orourkmw
Teardrop Master
 
Posts: 108
Images: 69
Joined: Tue Jan 25, 2022 12:55 pm
Location: Port Allen, Louisiana
Top

Re: Beyond the End teardrop (Tony Latham-style build)

Postby tony.latham » Tue Nov 08, 2022 8:56 pm

A huge milestone behind me.


And only one beer can in site... :frightened:

Tony
User avatar
tony.latham
Gold Donating Member
 
Posts: 6899
Images: 17
Joined: Mon Jul 08, 2013 4:03 pm
Location: Middle of Idaho on the edge of nowhere
Top

PreviousNext

Return to Build Journals

Who is online

Users browsing this forum: No registered users and 9 guests