RollsRice I, in my opinion, was a great success. I had a blast building it and it held up really well. Of course, along the way I made modifications to it, always “improving” it. Well, turns out that was not always the case. Long story short, I extended the trailer, moved things around, added things. At the end of the day, I destroyed my weight balance and introduced leaks. I “improved” it too much.
So naturally, I decided to build RollsRice II. This is the build thread for that.
The first trailer was a learning experience to be sure. The goal of that trailer was to build something I could actually use. It was simple, straight forward. It did the job and I put a bunch of miles on it. Had I left it alone, I would still be using it today.
Where that was the goal for Number One, the goal for Number Two, was vastly different. I came across the term “Glamping.” That triggered all sorts of things for me. I decided to employ one of my favorite sayings, “Too much, is never enough.” I believe I have done a rather decent job of going WAY overboard with Number Two. I’m not sure what the new term would be, but I believe this build will make “glamping” obsolete. Well, at least give it a good run for the money.
I should mention that Number Two is already built and been on the road for many years. I have well over 20,000 miles on it. I was going back through my files, came across the build notes and thought I would share.
I’m sure I will get many comments, both pro and con. Yes, it is a teardrop. And yes, teardrops by nature, are usually lightweight, spartan. They are the next level up from tenting.
Having said that, I might have gone a bit further with this build. In my defense, I will state that Number Two comes in at 1,300 pounds, fully packed and loaded. I still pull it with a convertible, a must in my book. And it pulls like a dream. No waggle, no dancing, even at high speeds.
Fair warning. If you are a teardrop purist, this build may be difficult for you.
I have had a blast with this trailer. It will be my last build. I hope you guys enjoy the build thread. Yes, there are many crazy things in this trailer. But all of them are fun. That’s the name of the game, right?
So, let’s get started.
It starts with a frame. This frame started life as a 5x8 utility trailer with sides and a ramp door. There were many reasons for this frame. One, the fenders were round. I liked the look. Two, it has 13-inch tires.
I took a saws-all to the sides and ramp, stripping it down to just the frame. That’s all I needed. I extended the tongue of the trailer, with channel steel, by 11 inches. Of course, you have to extend the wiring harness once this is done. That changed the center of balance for the trailer, which was needed. As you will see, there is a good deal of weight, in the very back of the trailer. That needed to be offset. More on that later.
I removed the tires that came with the trailer and replaced them with ST185/80R13, load range D. This gives me a buffer regarding total weight, from the trailer point of view. However, the Mustang, which was not built for a trailer, had a GVW that I could not exceed. This trailer, at 1,300 pounds, satisfies all weight considerations, if I don’t eat a big lunch.
The tires have a speed rating of M (81mph), that allows me to go highway speeds for long hours at a time and not worry about heat buildup, tire fatigue, etc. I will say this. I replace the tires every two years, regardless of mileage.
I did have a flat, with Number One. I was coming out of the mountains, on a two-lane road, with no shoulder. I heard a sound, didn’t pay much attention to it. But it persisted. So, I turned down the music, listened. Hmm. I checked both mirrors, things looked good. I lowered the windows. Definitely a problem. I lowered the passenger mirror, saw that the tire had just about returned to the elements. Yep, not sure if you have experienced this, but if you have, it surely wakes you up! I was happy to discover that the trailer simply “sat down”. It did not spin out of control, which I had always worried about. But I digress.
This frame has a metal wire mess, with steel cross members, as a floor. On Number One, I used roofing tar, on the street side, as a waterproofing agent for the wood floor. Big mistake. Messy. Messy. Messy. Gets everywhere. I spent more time cleaning the shop afterwards than it took to apply the tar to the floor.
On this trailer, I used roofing tin. Clean, easy to cut, easy to apply. I overlapped the sections, going towards the rear of the trailer, making it more difficult for water to get to the wood floor. I soaked all wood on this trailer with a clear, penetrating epoxy, making it waterproof. I coated all the interior surfaces with Thompson’s water seal because I believe some things deserve a sledge hammer. I have never had issues with water and wood. As you will see in coming pages, this takes on a whole new meaning. Again, I digress.
I used 4x10, ¾ plywood for the walls. The front storage extends 9 inches over the front lip of the frame, the rest hangs off the back lip of the frame. Given the floor panels need to be basically 5’ wide, it takes three 4x8x3/4 plywood to get it done. Since the back panel will extend past the steel frame underneath, you want that panel to be longer than the others for stability. Make the rear panel 4’ long, and cut the other two equally to make up the difference.
I secured the flooring to the frame using 2-inch U bolts through the wire mess, on each side, front and back.
The frame has two extendible jacks, in the front, on both sides. Number One had four jacks. That was overkill. The tires provide all the balance/stability you need for the rear. I get comfort knowing I have more support with the two jacks in front, particularly when I’m parked on an incline. Hey, losing the weight of the two unneeded jacks in the rear, means I get to have apple pie with my lunch.
The tongue has a jack, with wheel. It also carry’s the spare tire. I had to combine the jack and spare together to conserve space on the tongue.
Now, an interesting note. I pull this trailer with a convertible. To me, there is nothing better than getting to your location for the evening, detaching your home, and then putting the top down and go exploring. After all, you are in the woods, mountains or somewhere beautiful. It simply calls for a convertible.
Now, here’s the issue. The car sits down lower with the trailer. Not terribly so, only about two/three inches. I carry two bicycles on a rack, that plugs into the trailer, just underneath the front storage. It over hangs the tongue, right at the hitch. The rack alone weights 21 lbs. I have not weighed the bicycles, but I imagine another 20 pounds easy. The point is, the jack only goes so low before it is fully contracted. If you are on uneven ground, which most of the time you are, that can be a problem.
So, I mounted the jack and spare together, but reversed the fittings, so the jack fully contracted, goes lower by 1 ½ inches. That makes a big difference when hooking up and flipping the jack in the upright position, out of the way.
Okay, that about wraps it up for the foundation. Next, the walls.
The Walls
The walls are 4x10 sheets of ¾ plywood. The good side will face inwards, as this will be what you see from the cabin.
Measure the front storage cut and draw with pencil. It should have a slant forward, not too much, for runoff. You want the ability to set a glass on the lid and not have it slide off. With string and pencil, draw the curve, from the roofline to the top of the front storage. Now, on the bottom side of the wall panels, in the front, make the cut so that the panel clears the frame rail below. The wall panels will sit flush, within the frame, clearing the top of front rail, and extend forward by 9 inches.
Measure the rear galley cut and draw with a pencil. With string and pencil, draw the curve, from the roof to the middle of the back edge. Now draw the lines for the struts, which will be two inches wide. The back hatch needs to be 4’ long, which allows it to be one piece of wood. So, measure up, from the bottom of the galley, towards the roof, four feet. That is where the top cut, in the side walls, should be for making the struts. If done correctly, that should be roughly 12”, from where the curve starts on the side wall, going down, towards the floor.
Screw both walls together, so that they are exactly equal. Now, make your cuts. Sand edges so that they are exactly the same size.
Door Placement
Separate the two wall pieces. Place one wall piece in place on the frame. Take the door frame and tape it to the wall. The placement of the door will be in relationship to the tires. It should be fairly close to maximize front wall space.
The height of the bottom of the door, from the floor, should be such that the 5” mattress peeks above by an inch or two. When getting in and out, the mattress will depress. You do not want it to depress too much as the door frame will cut into your legs. Pencil in the shape on the wall.
Now secure the two wall pieces together again. Take saw and cut the openings for the doors. Once done, place the door frames in the openings to make sure they fit. You might need to sand the openings for this to happen. Once both frames fit, remove and store for later.
Securing walls
Cut four pieces of 2x4 at exactly 58 ½”.
Mount the two 4x10 pieces in the groove between the frame lip and the floor. Take the four 2x4 and tack to the upper part of the walls. Measure the walls, and the distance between the walls, to ensure that you are square. If you are out, reposition. Any outage will be felt at each subsequent step.
Cut a piece of wood at 2x58 ½ for the front wall of the cabin. This piece will take a load, so it needs to be heavily secured to the sides with screws every six inches. Note: Do not secure this piece as yet. It should be secured after the roof panel has been fitted and screwed to the 2x4 strut. If the wall goes up before, you will have no way to clamp the roof piece for fitting.
Front storage
I have a receiver for the bicycle rack, on the tongue, just below the front storage. The face of that receiver, is lined up, with the front edge of the front storage. Mount your receiver, to the tongue. The floor of the front storage will sit on top of it.
Cut the floor to the front storage area. This piece should have a slight gap along the rear horizontal line, approximately 1/8”, and secured so that it slants slightly to the rear. This allows any water that may get inside, to drain. This piece should be secured heavily as it will take a load.
Now cut the front, external facing, wall for the front storage. Do not secure at this time. You want to get the front, curved roof, in place, before securing other pieces. This gives you room to work.
Cut a solid piece of wood for the lid of the front storage. The back edge, should be slightly curved to the angle, of the roof side.
Roof fitting/measurement
Position a 2x4 roof strut so that it sits at the intersection of the front storage and roofline. The roof skin will be screwed and glued to this piece. Secure it such that the majority of the board is above the baseline.
Cut a piece of ¼ bendy popular. Clamp this piece to the 2x4, and bend it over the front curve. With a pencil mark where this hits on the wall tops. Now position another 2x4 at this junction. This will be the roof strut for two pieces of roof. Make sure the face of the 2x4 is positioned 50/50, so that the two pieces of roof, butt together in the middle.
Clamp the roof skin to this strut and mark where it lands on the wall tops. Position the third 2x4 at this junction. Place it such that the two pieces butt together, in the middle.
This leaves the rear roof strut to be placed. Measure from the middle of the third roof strut to the edge of the cutout for the hatch.
It is now time to place the rear roof strut. Measure from the floor up to the edge of the cutout. You want to make this placement as level as possible, in relation to the floor and walls. The hatch will be secured to this strut, so it needs to be heavily secured to the walls.
You now have your roof struts in place. You want to get this right. If you don’t, it is much like opening a letter from the IRS. So, check your measurements twice, three times.
Cut and place the first roof piece, starting at the front storage and going to the second roof strut. Secure this piece, but do not glue. This piece should end exactly in the middle of roof strut 2. If not, reposition. Think IRS letter (and they spelled your name correctly). Any outage will affect the other roof pieces.
Whew! Okay, that was a lot of work. Just writing it down was a lot of work. (It helps if you move, and don’t give the new address, to the IRS.)
Fan frame and roof
The second roof piece will contain the fan. The fan should be located directly in the center of roof strut 2 and 3, which also puts it in line with the door windows, for air flow. Cut and place shorter struts, between 2 and 3, which the fan will sit on. Place these struts so the fan sits directly in the middle and secure.
Take the second roof skin and clamp in place. From inside the trailer, draw the fan frame on the skin. Remove skin and cut out the fan opening. Secure the external skin to the struts with clamps.
Now place the interior roof veneer in place and clamp. Now draw the fan frame, from outside, to the veneer. These two pieces must line up exactly. Once cut, place to the side from later installation.
Run a piece of wire, down the right side to the hatch. This wire will be connected to the fan leads when fan is installed.
Place the first piece of veneer from roof strut 1 and 2 and secure.
Take fan and set in external hole. Run the wires to the right side of trailer, right next to the lights wire, and run to the back hatch.
Take internal roof piece 2 and place around fan and secure.
Secure the base of the swivel, dimmable reading lights, to roof strut 2. Push the wires to the right side of the trailer and run to the back hatch.
Now, for a glimpse of things to come. (It gets so much worse than this. Purist beware!)
Any teardrop trailer worth its salt should have mood lighting. Any mood lighting worth its salt, should have a remote control and 24 programmable scenarios to capture any mood you might find yourself in. The good news is mood lighting weighs next to nothing.
The LED mood lighting strip should be secured to the ceiling where roof pieces 3 and 4 come together. Now, everyone knows how uncouth it is for lighting to shine in the wrong direction. So, cut a piece of L trim, and secure to the ceiling, to shield the lighting from your eyes, while sitting in bed.
Once you have the internal roof pieces installed, it’s time to add the insulation. Trim insulation pieces and cover between the roof struts.
Now you can secure the external roof pieces. I used gorilla glue and then screws at the struts. I used roof puddy strips around the fan and screwed the fan, through the roof, and into the fan frame.
Now it’s time to waterproof where the external roof pieces meet. I used fiberglass with rosin, pouring nice, smooth flows over the joints. Once it hardens, you can sand as needed, for a pleasing site line.
Awning
I went through many designs before arriving at the one I am sharing with you. Awnings are much like sails. They catch wind, which applies pressure to the awning mounts. Too much pressure and bad things happen. The trick is to have an awning, that allows the wind to go through it freely, minimizing the pressure on the awning mounts.
I was camping at Monahans Sandhills State Park. It was a sunny day and I had the awning up. The sky was clear, very little wind. The awning did its job perfectly. I did not think to put the awning down when I went to bed. Being West Texas, a storm rolled in out of nowhere. Huge winds, big rain. There was no way I was going outside. I laid in bed, thinking of ways to repair the roof, which surely was in the process, of being destroyed.
When I woke up the next morning, I was prepared for the worst. I went outside to check the damage. The awning was still in place. More importantly, the roof, was still in place. You could have knocked me over with a feather. It was the last thing I was expecting.
It starts with a tarp. I bought a 5x7 tarp, that just happens to match the color of my trailer. I built a frame, of ¾” pipe, that is the exact size of the tarp. I mount 2, 1” pipes, to receive the awning pipe frame. I cut these pipes to the width of the trailer roof. They are held to the roof by conduit supports, with a single screw each. There are two supports, one on each end, for each pipe. The pipe frame is cut to a length, such that the frame, in closed position, is flush against the roof edge, and out of the way. The frame has three screws that extend up. These screws are located such, that the tarp holes align.
When I get to camp, and it is time for the awning, I remove the clip that keeps the pipe frame, securely inside the 1” pipe, and pull outward. Once fully extended, I put the clip back in, to keep it in this position. I then retrieve the tarp, from the front storage, and place the holes down on the three extended screws. On the other end of the tarp, I secure a bungie cord hook, inside the tarp hole, and secure the other bungie cord hook, to the end of the 1” pipe.
This design allows the wind, to go under and around, the tarp, minimizing the pressure on the supports. It acts more like a flag, then a sail. Another benefit of this design, allows you to deploy the awning on either side of the trailer. If the view is better on the other side, simply pull the pipe frame out, walk around, and slide it in on the other side. Easy, quick, efficient.
Okay. Now you have a trailer with an insulated, watertight roof and a very flexible awning. I would strongly suggest celebrating with an adult beverage.
Cabin
We will now approach building the holy of holies, the cabin. This is your refuge from the storm, the mountain lions, the bears, snakes, the ex-wives, the pigmy’s with poisonous darts, the heat, the cold, the rain, the international bad guys who have searched high and low, trying to assassinate you. Let’s face it. It’s a cruel, hard world out there.
The cabin is your cocoon. In this case, it is your luxurious cocoon.
I believe this is an appropriate time to remind you of my favorite saying, “Too much, is never enough.”
Allow me to share some insights here. I grew up watching James Bond movies. As a young impressionable boy, these movies were the things dreams were made of. Well, now I am an old impressionable boy. As such, I channeled James Bond at every turn, designing this trailer.
Whether it be the two swivel, dimmable reading lights, the two library shelves of DVD’s and books, the 24 mood lighting scenarios with remote control, the swivel, extendable TV with surround sound and of course, remote control, the extendable bar with crystal decanters and ice bucket, complete with cigar caddy, the pull out service table for eating when inside, the space heater, the electric blanket, the A/C with you guessed it, remote control, the hidden laptop with wireless keyboard and wireless mouse, that plugs into the swivel, extendable TV.
Yes, I agree. Most people would say this is a lot. After all, it’s a teardrop.
But wait a minute. Let’s think about James. You have to ask yourself, what would Q provide James?
I’m not sure what Q would provide, but this teardrop, has a linear actuator, underneath the bedding, which at the press of a button, turns the bed, into an elevated chaise lounge!
Trust me, there is nothing better than reclining on your chaise lounge, cut and fit to the measurements of your body, elevating your knees, reclining back at 45 degrees, with built in pillow…while watching a movie, with mood lighting, enjoying an adult beverage, and possibly a cigar…hidden from all the super villains, out to get you.
Well…there is one thing better.
Hold tight purest! This might hurt.
The one thing better, is having two, custom made, built-in live waterfalls, fully tunable, on each side of the TV, which fills the cabin with soft, melodic sounds.
Yeah, didn’t see that one coming, huh? ;^)
So, I amend the previous statement.
There is nothing better than reclining on your chaise lounge, cut and fit to the measurements of your body, elevating your knees, reclining back at 45 degrees, with built in pillow…while watching a movie, with mood lighting, enjoying an adult beverage, and possibly a cigar…being bathed by the sweet melodic sounds of waterfalls…while hidden from the all the super villains, out to get you.
I think James would be proud.
I know, I know.
Live waterfalls? In a wood trailer? Dude! Were you dropped on your head as a baby? Did you stand a little too close to that nuclear reactor? I mean, you know…you need help, lots and lots, of serious professional help!
Yeah, too late.
I admit, I’m a bit touched.
There is one other feature of particular note on this build. I will share that later, once we get outside.
For now, it’s build time for the cabin.
Chaise lounge
There is a fully adjustable headboard, with four-inch foam. When in sleeping mode, this headboard folds flat against the front wall, and out of the way. While in chaise lounge mode, it can be tilted out, at any angle, comfortable for viewing TV, working on laptop, reading, etc.
Measure the wood pieces for the chaise lounge. They should be the length of your legs, and just shy of the width, of the interior trailer. Secure the two pieces together with a hinge.
The placement of the chaise lounge pieces, to the floor, is directly related to your upper body size. I find a 45-degree angle on the headboard is just about right. So, depending on your body size, place the chaise lounge pieces, where the headboard meets the floor, at 45-degrees. Be sure to allow for the thickness of the foam.
Lineal Actuator
I used a 12-inch DC lineal actuator with a two-way switch to manipulate the chaise lounge. This allows for any degree of inclination, for the chaise lounge. Attach the arm to the piece closest to the rear wall. Now attach the base of the actuator to the floor, while in the contracted position. In my case, I wired it to a DC converter, as the trailer is all AC. Hold the switch down, extending the arm, thereby moving the two pieces, to V up, underneath your knees. When arriving at a comfortable inclination, let go of the switch.
You are now relaxing in a queen sized, chaise lounge!
At bed time, simply lower the bed to the flat position, and move the headboard flat against the front wall. The sleeping area is actually bigger than the queen-sized bed in my house.
Lower Wall - step 1
Note: the lower wall contains cutouts for the A/C unit, the two water feature drains and notches for wiring. All of these things should be done before securing.
Cut a piece 24”x58 ½ for the lower galley wall.
Cut a notch, in the top middle, for wiring. It should be large enough for a power strip to go through. This notch should line-up with notch in Upper wall and notch in cabin shelf.
Do not secure the wall at this time.
Lower Wall – step 2
Note: See galley notes regarding second floor. You will need this height measurement, before cutting the square hole for the A/C, in the lower wall. The galley has two floors, the cabin only one.
Once the upper floor is in place in the galley, take the A/C unit and ice chest and place directly in the middle of the upper floor. Place the A/C on mounts that are at least 5” tall, so that it clears the bed, on the cabin side. With the unit pressed against the lower back wall, trace the shape. Now remove everything and make the cut in the lower wall.
Do not secure at this time.
Cabin Shelf
The shelf should be 48x58 ½. The cabin shelf should be exactly 2’ from the floor. The lower cabin wall that secures this shelf should be 7.4’ from the front wall.
Service table
Cut a piece of ¾ wood for the service table. It should be just shorter than the distance of the back wall, and the shelf front edge.
Cut two boards for the tracks. Now cut two ¾x1x3’ as spacers.
Flip the cabin shelf upside down. Place service table in position. Place spacers. Now place tracks. Secure the finished mechanism to the cabin shelf.
Yokes
Cut 2 pieces of ¾ plywood 24” x 5”. It should be wide enough to receive the 1” steel pipe, used to prevent the shelf from sagging, and still have plenty of strength. Once these are cut, place the pipe in the middle and make a mark, to get the width. Now make another mark 1 ½” down from that. This allows for the serving table and its slider. The bottom of the slider should rest against this pipe, which will give strength to the cabin shelf.
Now, with the lower back wall up, but unsecured, slide in the cabin shelf. The end of it should be just inside the hatch wall. Make a mark where the front of the shelf rests, cabin side.
Now determine where the 2 yokes should be secured.
Cut notch for wiring in the shelf. This notch should be large enough for a power strip to pass through. It should be lined-up with lower wall and upper wall notches.
Space heater
Cut square ¾” shelf for space heater. Cut notch in the inner corner. This will allow wires for electric blanket, lineal actuator and any other wiring, to go up the wall, and through the back wall, to power supply.
Secure shelf in the corner. Now secure heater to shelf. Now run a wire, to the switch on the dashboard, to activate the heater.
TV
The TV should be mounted on a flexible arm, so that it can be moved forward and backward, and also be tilted to reduce glare from lights. It should be fixed, so when the TV is all the way back against the wall for travel, it fits evenly between the water features.
Clothes hooks
The hooks should be secured to the wall high enough for a coat not to drag on the bed, and far enough away from the door, as to not restrict entrance and exit.
Upper back cabin wall
The placement of this wall sets the measurement for many things. The galley area should be just big enough for all appliances to fit. This will maximize the interior shelf space. Take the longest appliance, in the galley, to set that distance.
Notch large holes for wiring. That hole should allow a power strip to go through. This notch should line-up with notch in lower wall notch and notch in cabin shelf.
Water features
I’m going to assume that most of you have not built waterfalls for the inside of wood trailers. So, let me share some insight.
One: You should be able to go down the road, at 75 mph, for as long as you wish, hitting bumps, dips, small children. Your water feature, with all its adjustments, must stay perfectly intact. When you come to a stop, you flip a switch, the cabin fills with melodic sounds. No leaks, no adjustments. Perfect, worry-free operation, nothing less.
Two: Pads at campsites are seldom level. There are times where you are boondocking and have no pad at all. The operation of a water feature, inside a wood trailer, should anticipate such conditions. It should not rely of the ground being level, neither front to back, nor side to side. These things will impact the operation of your water features. You want both water features to be in harmony, soothing, delightful. You want the left feature to operate exactly the same as the right feature, regardless of incline, levelness, water pressure, flow rate, outside weather, stray objects from foreign planets, etc. Basically, anything less than being upside down, your water feature should operate with the greatest of ease, producing the desired results, much like synchronized swimmers at the Olympics, same water flow, same soothing sound. No leaks, no adjustments.
Three: Controlled splash. Waterfalls have splash. When that waterfall is inside a wood trailer, it has to be controlled. You cannot have the wood getting wet, or even damp. The water has to be contained, always.
Four: Leaks. It is considered bad form to have an interior water feature, that leaks. The simply answer is: Have no leaks. Not in the galley, not in the cabin, not within ten feet of the trailer.
Five: Achieving the above requirements is no easy task. Let’s face it. We are talking about running water, directly above your bed, inside a wood trailer. I would underline that water and wood have a precarious relationship, but that would be unnecessary. Therefore, to achieve the desired effect, you need a pump, valve, water reservoir, piped recirculating system…for each feature. This allows complete control of your indoor waterfall, regardless of inclination, water pressure, water level, etc.
Yes, I know. Sounds like a lot. Well, that’s because it is a lot. Here’s the deal. I cannot describe the endless amounts of pure joy and relaxation, I receive, listening to my water features, watching a movie, reading a book, taking a nap. Simply, the best!
So, here we go.
They say a picture is worth a thousand words. Well, I hope so because it is very difficult to put this in words.
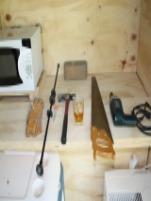
Basically, you buy the tile that will be the basis of your waterfall, and then build around it. In my case, it is the fake rock design you see here, which is 12” wide. I built a wood structure around that tile, then lined the structure with roofing tin. So far, so good. The base/drain, is 2” PVC. I cut the top 50% of that off, then positioned the wood structure, so that the tin sleave, would funnel into the top part of the PVC. The water feed, is a ¾ “ PVC. I drilled some holes in it, to feed water down over the rock. You’ll notice the feeder pipe, can pivot, allowing you to get the right angle of feed.
The water reservoirs are located in the galley. They are large glass jars, large enough to stick a pump, through the top opening. The pump should be strong enough to pump water 7’. It will not go 7’, but it will go through a few valves, and 90-degree fittings, so you want plenty of horse power. The hose, coming out of the pump, has a valve on it. That valve allows you to set the rate of water you wish, picking just the right sound that pleases you. The feeder hose, goes up the back galley wall, behind the microwave, then through the wall, to connect to the ¾” PVC. The 2” PVC, cabin side, goes underneath the cabin shelf, through the back lower wall, and drains in the top of the glass jar. The piece of insulation helps block the sound of the pump. The glass jar is hidden behind a drawer, once complete, keeping the site lines of the galley nice and clean.
Thus, a closed, recirculating water system, with full control.
Now, take a drink, and a deep breath, and we will proceed.
You’ll recall our discussion about splash.
Buy a wood framed picture. The opening of the picture frame, should be large enough, to see the ‘rocks’ of your waterfall, yet small enough, so the plumbing does not show. Take the glass, from the picture frame, and attach it to the wood structure, that contains the rock tile. The glass, deflects the splash, into the drain, right along with the rest of the water. Being glass, and mounted on a slant, so as to direct the water, becomes invisible, behind the outer veneer, that holds the picture frame.
You mount the picture frame, on a piece of wood veneer that looks nice, therefore framing your indoor waterfall!
Hopefully, it will look something like this. The mood lighting, going across the top, behind the TV, is positioned such, that it highlights the water feature, without glare on the glass.
You can set the mood lighting based on the type of movie you are watching.
Dashboard
The dashboard, much like a car, should be organized and functional. The appearance is largely a personal thing, based upon what you can actually build. My dashboard holds two electric blanket controls, two dimmable light switches for reading lights, a center grouping of switches to operate the space heater, the chaise lounge and of course, the water features.
Cabin Drawers
I decided to use store-bought baskets for the drawers in the cabin. Let’s face it, unless you are a trim carpenter, you most likely cannot build something that looks as good as store-bought. You are going to be looking at it for the rest of time, so it should be pleasing to the eye. Not only does it look good, but it is way easier to deal with. If something happens, just buy another. Simple.
Cabin Bar
Now we come to the bar. Some of you may decide to use this for more storage. That works too. I converted one of the baskets into a bar. What you don’t see from the picture are the wood inserts, inside the basket, that hold the glasses in place, along with the cigars and decanters.
The bar slides out, which is very convenient, while in chaise lounge mode. After all, who wants to lean forward, to refresh an adult beverage?
Now, this is very important. You don’t want the bar to slide out, while bumping down the road. One, it is a waste of good booze, because it will spill all over your bed. Two, you have to sleep in a booze-soaked bed. Now that may sound like a dream come true to some, but people tend to look at you, when they can smell you, long before they can see you. Not that I would know. But I know a guy, who knows a guy, who said this actually happen to him, so…
You will see a large bolt, going through the shelf, in front of the bar. That keeps bad things from happening while you are bumping down the road.
The one thing left is the library. It holds books and DVDs. I have one on each side. You will notice an elastic band going across the front. This keeps the library where it should be while allowing easy access to its contents.
In the picture, you see the headboard, tilted out, away from the wall. When it’s time to sleep, it moves up flat, underneath that black strut. Because this teardrop is a Swiss army knife, you have to ensure the width of the headboard, in relation to the libraries, allow clearance for that upward movement.
Electrical wiring
Electrical should be power cords, power strips and remote switches. You should not splice any wires. Why? It is much easier to replace with store-bought.
I use power cords with switches. The appliance/device plugs into the power cord, the power cord into a power strip, located in the galley. The switch, on the power cord, turns it on/off. I cut that switch off, on the power cord, and run that wire to the dashboard, and connect it to a switch there. Much easier to use, visually pleasing, etc.
Power station
Everything in the trailer runs off AC current, with the exception of the lineal actuator and ceiling fan, which is DC. So, on the top shelf, in the galley, is the power station, which is a collection of power strips and a DC converter.
Now, when you turn this trailer on, it tends to suck all the energy out of the entire camp ground. There you are, sitting in your chaise lounge, watching a movie, TV on, DVD player on, sound system on, mood lights on, air conditioning on, two water features on, enjoying an adult libation, possibly a cigar.
You are blissfully unaware that the huge fifth wheel next door just went dark.
People tend to get upset when their fifth wheel goes dark, especially when they learn it’s the tiny little teardrop next door that caused it.
So, trust me when I say, this bad boy brings a whole new meaning to “load balancing”.
The second thing of import, regarding power, are the power strips themselves. The shape, of the plug, for the power strip, should be in line with the cord itself. Some, these days, are offset at a 45-degree angle. I don’t have that kind of room.
Third, I mount all the power strips, right next to each other, on a board. The mounts, allow the power strip to be slipped in and out easily. The mounts also keep, the space the power strips require, to a minimum.
I pulled into Memphis TN, right after a tornado swept through the night before, taking out huge portions of their power grid. It would have been nice if the governor of Tennessee called my cell to give me a heads up, but I guess there are just some things you have to live with.
The campsite still had power, so I didn’t think much of it. Well, something happened, and my power strips started popping like dominoes falling. At the time, my power strips were just lying on the top shelf in the galley. It was a real bird’s nest of wiring.
I went to the local Home Depot, stood in line with everyone else who lost power, and bought 6 new power strips. I went back to the campsite, and with nothing more than twisters and a paperclip, started rewiring the trailer. Not exactly a great experience. In fact, if you are given the choice between rewiring your trailer in a camp ground or say, dragging an eighteen-wheeler, with flat tires, across the desert with your teeth, go with the eighteen-wheeler.
When I got home, I decided once was enough for that experience. Hence, the power station and mounts. Now it is plug and play when it comes to repairs. Heck, now I don’t even need the twisters or paperclip. Of course, I have not had an issue since. But if I happen to pull into a tornado ravaged area again, I’m ready!
Bringing it all together
Once all the “pieces” of the cabin are obtained/built, it’s time to wire this bad boy up. Hook up the switches and run the wires through the notches to the power strips in the galley.
Galley
Now, some design features of the galley.
There are two shelves positioned in the middle. The two middle shelves are separated by ¾”. There is a table top, that is held underneath this bottom shelf. That table top comes out, and is placed, between the two middle shelves. This design doubles the kitchen counter space, allows the table top to be on the left or right or in the middle, depending on where you want it, at the time.
There is an upper shelf. That shelf is positioned, just enough below the top of the hatch, so that it can be accessed. This shelf will hold the power station, paper towels, cloth towels, and the vanity slide out.
You will recall, that earlier in these notes, I teased that there was another item, in the galley, of special interest.
Wait for it. Wait for it. Okay, here we go.
That item, inspired directly by James Bond, is a hidden, spring-loaded device, when activated by the press of a button, will dispense his-and-her blowguns, from the roof of the galley.
Oh MAMA!! Did he just say… Yep!
Okay, be honest. Tell me you wouldn’t want the ability, to summon weapons, by the press of a button! Every teardrop should have it. And it adds less than two pounds to the build. It’s freaking genius. Eat your heart out, Mr. Bond!
In all seriousness, I like to play darts. The difference is, I use blow darts. Sooo…why not have those bad boys coming out from their secret hideout in the roof?
Okay, time to build.
Floor
Now that the lower wall is placed, it is time to reinforce the galley floor. You’ll recall that the existing floor, overhangs the frame. It is secured to the side walls, but still needs to be reinforced. Take two 1” diameter steel pipes and place evenly across the existing floor. Secure the pipes to the floor so they do not move. Cut a piece of ¾ plywood, that covers the existing floor, from the back edge of the galley, to the lower back wall, shared by the cabin.
Now cut a piece of ¼ plywood to cover the gap between floor 1 and 2.
A/C
The galley floor will hold two heavy items, the ice chest and the A/C unit. The two of these put together, should sit exactly in the middle of the floor.
Place two 4x4 blocks in the correct position against the back wall for the A/C unit to sit on. You want the bottom of the unit to be above the mattress level inside the cabin. We made the measurement and cut for this, earlier in the build.
Lower Galley shelf
The lower galley shelf will support the appliances in the galley. It will also support the placement of the portable table top. Therefore, the supports it sits on has to be ¾ inch wood with a 1/8” slice of wood on top of that. The placement of these supports should allow for wiring and water hoses to go against the walls leaving the inside side of the supports for the swing out table.
The Microwave should be positioned in the middle of the shelf for weight distribution.
The water jars, will be against the side walls, and hidden by drawers, holding kitchen equipment.
Upper Galley shelf
The upper galley shelf should be fixed so that the tallest appliance is snug to the underside. The opening, between the upper shelf and the edge of the roof, should be such, that you can get things in and out, for maintenance and have clearance for the blowguns to be dispensed cleanly.
The right side of the shelf will hold the power station. That should be a piece of ¼ wood that is screwed to the back wall. The power strips should fit in holsters, which allows them to be replaced easily. Once the power board is secured, it will be easy to see what appliance is plugged into what power strip. It is also easy to check to ensure power strip is working, the light is on, etc.
There should be a clearance in the middle of the shelf, for the blowguns to be deployed. The left side of the shelf will hold the vanity slide out, towels, etc.
Hatch
Earlier in the notes, while doing the roof, we made cuts for the hatch. The important thing then, and now, is the hatch will be 4’ in length. This allows it to be a single piece of wood, therefore, no leaks. If you made those measurements correctly, this part will be a breeze. If you missed those measurements, join the witness protection plan, beside you are out of luck.
The hatch should be made of ¼ Bendy Polar Wood. This is very lightweight wood that is easy to affix to the hatch frame. The frame needs to have additional support, a strut going down the middle, to support pushing the trailer by hand.
The side struts will be cut from the side 4x10 panels and should be at least 2” thick. The roof will be skinned with ¼ plywood, which is slightly thicker, than the ¼ bendy poplar. Therefore, the strut has to be cut slightly thicker, to make up the difference. If not done, the living hinge will not sit flat, in the closed position. Not good. So, the upper arch of the side strut needs to be 1/8 inch thicker to correct this. Cut a small piece of 1/8 Bendy and use it to trace your line on the strut.
It is smart to create a second set of struts and keep for insurance if you have to recreate the hatch.
The hatch frame should sit on stacked brick, exactly where it is desired. The cross members, created from 2x4, should be measured in place. Drill a hole through the cross member and strut. Counter sink strut and drive screw in place.
Once frame is created, create the side wings. These will prevent water from getting into the galley while on the road, at the carwash, etc. They will match the curve of the hatch struts and will be two inches wider than the hatch frame.
Once your wings are cut, attach to the hatch frame sides. Make sure hatch, with wings, sits correctly on the trailer before skinning.
Measure twice, get it right. Once satisfied, skin the hatch with the bendy popular, covering all of the frame, and the wings. The skin should be positioned so that it covers the outside tip of the top 2x4.
Now drench the hatch, inside and out, with clear soak epoxy. Allow to dry.
Once dried, chalk inside and outside seams.
Set the finished hatch on stacked brick, so that the hatch sits flush with the trailer roof 2x4.
I use a 3” thick living hinge. It can be bought at Monroe, online. This is the only way to go. Other teardrop hinges are problematic, to say the least. Living hinges are easy to install, very important, extremely strong, very important, and can be chalked preventing leaks, very important. That’s three very importants! Can’t beat that.
Screw in the top half of the living hinge first, into the trailer roof 2x4.
Now screw in the bottom half of living hinge, into the hatch 2x4.
Once in place, chalk both top and bottom of living hinge to make water tight.
Secure the bolt/latch to keep hatch closed.
Secure clothes line between center strut and outside strut. It should be far enough ‘in’ as to not interfere with the operation of the hatch.
Mount Doors
The last thing to do is mount the doors. They just get in the way beforehand. Cut ¾ plywood, to insert around door frame to make it type with the body. Now screw door frame pieces together, which mounts the door assembly.
Once installed, put tape, on the body, around the frame, so the chalk line will be straight. Now chalk the outside.
Once chalked, remove tape.
Now your doors and mounted and waterproof.
Shoe Caddies
Shoe caddies on each side. Should be black. They should be secured a few inches inside the outer frame rail, and aligned with the door, so that they are easy to use, while inside the trailer. The drawer should be secured with a bolt while traveling.
Paint
One of the advantages of a home-built wood trailer is the ability to paint it, to match the tow vehicle. If you get a new tow vehicle, it takes all of an hour or two, to paint the trailer to the new color.
Use an external, oil-based paint. Helps protect the wood. I paint my trailer every year. Keeps the wood protected, and the trailer looking new and clean.
Towing
How the trailer pulls depends on what you put in the trailer.
Yes, the backend is heavy. So, I add weight to the front. My front storage carries two folding chairs, a TV table, a port-a-potty, swimming gear, and tarp for the awning. In addition to that, I have a bicycle rack and two bicycles, in front, of the front storage.
In my case, due to the weight of the items I have, I have discovered that 25 additional pounds, in the front, makes all the difference in the world. Therefore, I had a 25-lb dumbbell, on the floor, in the middle, of the front storage.
The difference in the pulling experience, with and without, this additional weight, is night and day. With the dumbbell, I don’t even know I’m pulling a trailer. Smooth, easy. I hit a bump in the road, there is a slight reverberation, and literally a second later, back to smooth and easy.
Without the dumbbell, and depending on the bump, I will experience the dance. We all know the dance. It’s looking in your rearview mirror, watching all your hard work, swing from side to side. Nobody likes the dance.
So, for your trailer, it might be more than 25 pounds, it may be less. But I can tell you this. Once you get the front to back weight balanced, towing is not an issue.
Final thoughts
The trailer should be totally unique. It should fit you like a glove, have everything you want. You are not building a trailer; you are building future experiences.
Simple, well-designed, light weight, pulls like a dream, luxurious beyond compare. Old world charm, built with real wood, with the functionality of today. Incredible comfort, elegantly fitted. It is your personal cocoon of luxury. Can be towed anywhere, by anything. Take your dream to the location of your choice.
- CabinC.jpg (11.75 KiB) Viewed 208 times
- TrailerC.jpg (21.1 KiB) Viewed 208 times