Construction will be baltic birch with filon skin.
Truck Cap Build for my Toyota 4x4
11 posts
• Page 1 of 1
Truck Cap Build for my Toyota 4x4
![]() by Bryan1971 » Wed Nov 02, 2022 9:08 pm
by Bryan1971 » Wed Nov 02, 2022 9:08 pm
Howdy. I'm starting a truck cap build for my off-road Toyota. I rebuilt the truck a few years ago with a more powerful motor and upgraded just about everything. The vision for this camper is to be able to drive into the mountains or wilderness and camp anywhere that strikes me at the moment. It will have a single bunk with storage underneath and a slide out drawer system for cooking. The design will allow me to take out the lower half to be able to use the truck for other things besides camping. Basically, it will be three pieces; the cap, the bunk unit, and a storage unit. Here are some snap shots from the sketchup design. 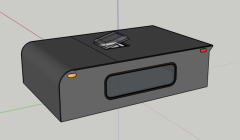
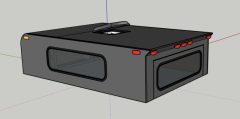

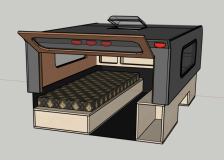
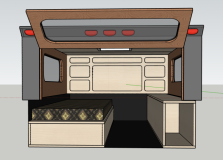
Construction will be baltic birch with filon skin.
Construction will be baltic birch with filon skin.
- Bryan1971
- Teardrop Inspector
- Posts: 8
- Images: 35
- Joined: Mon Sep 28, 2020 3:49 am
Re: Truck Cap Build for my Toyota 4x4
![]() by RJ Howell » Thu Nov 03, 2022 8:12 am
by RJ Howell » Thu Nov 03, 2022 8:12 am
I figure you've already looked at this, but I'll mention it in case. I built a lift-top camper for my truck, yet if I was younger (or single) I would have gone this way.
https://ripcordhq.com/collections/camper-blueprints-cut-files
Several versions of this are out there now. Me, being a maker, I'd approach the build a little different..
https://ripcordhq.com/collections/camper-blueprints-cut-files
Several versions of this are out there now. Me, being a maker, I'd approach the build a little different..
My YouTube Vlogs
https://www.youtube.com/channel/UCJduGeZNFgtptH67leItRFQ
https://www.youtube.com/channel/UCJduGeZNFgtptH67leItRFQ
- RJ Howell
- 1000 Club

- Posts: 1170
- Images: 36
- Joined: Sat Jul 27, 2019 6:08 am