Gunter L'il Standy Build

...ask your questions in the appropriate forums BUT document your build here...preferably in a single thread...dates for updates, are appreciated....

Re: Gunter L'il Standy Build

Postby Mark Gunter » Thu Feb 09, 2023 12:36 pm

A shout out to Chicago Canvas … I went shopping for large sections of canvas with no seams, found their site, and chatted online about my needs. The salesperson was very helpful. He’s ending some free canvas samples for me to compare.

My lil standby build needs some very large sheets. For the top alone, I need a sheet 8’ x 20’ with no seams. For the sides, I’ll need two seamless sheets at 8’ x 12’. Then I’ll need a shorter 8’ x 5’ sheet for the hatch. That seems to me to be a lot of canvas to find without seams.

Chicago Canvas can easily provide this raw material I need for about $195 (don’t know shipping cost yet).

This seems to me a great deal since I won’t have to worry about finding retail tarps or covers without seams. They sell the material in various weights, by the yard, in different widths including 8’ widths. The material comes without hems, grommets or seams.

I wanted to mention it here, because when I searched the forum for Chicago Canvas I only found one post. Could be because I don’t know how to finesse the search tool … but that’s what I found at this company. If anyone has better tips/prices elsewhere, I’d love to hear from you. I’m not ready to order yet.

Link: https://www.chicagocanvas.com/product/1 ... r0QAvD_BwE
I'm a happy man, I love my life!

My Gunter Li’l Standy build journal:
https://www.tnttt.com/viewtopic.php?f=50&t=75291
User avatar
Mark Gunter
Teardrop Advisor
 
Posts: 76
Images: 211
Joined: Tue Nov 29, 2022 9:54 am
Location: Cleburne, Texas

Re: Gunter L'il Standy Build

Postby Mark Gunter » Mon Feb 27, 2023 1:23 pm

Been busy building on this lil standy.

Image

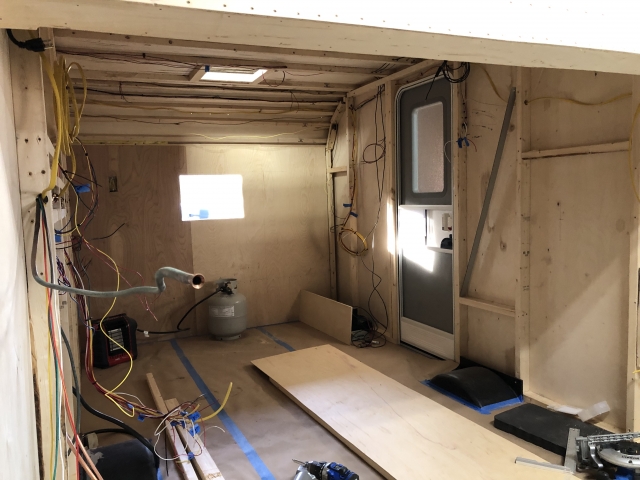
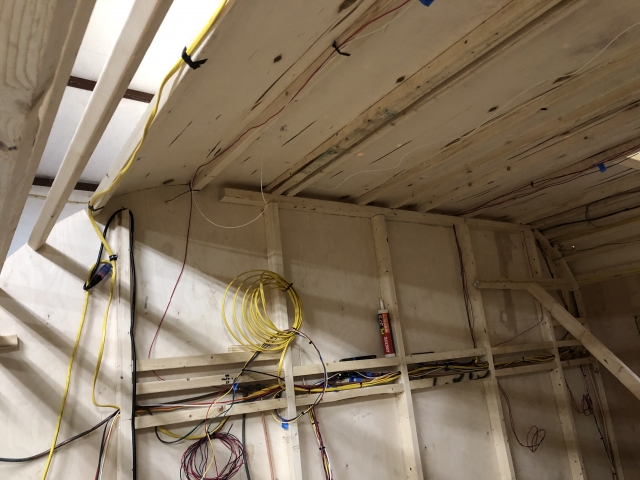
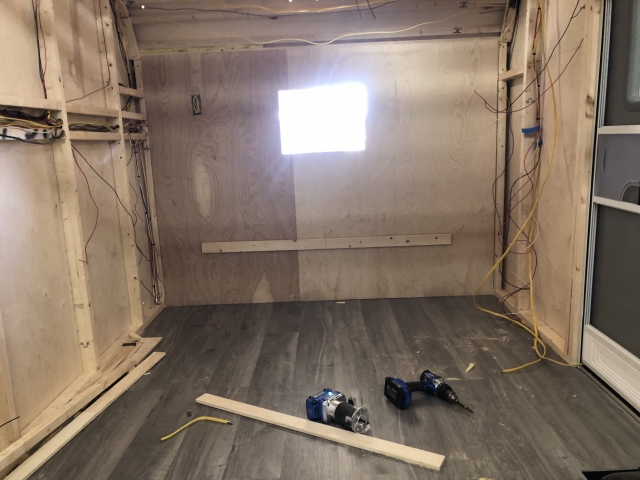
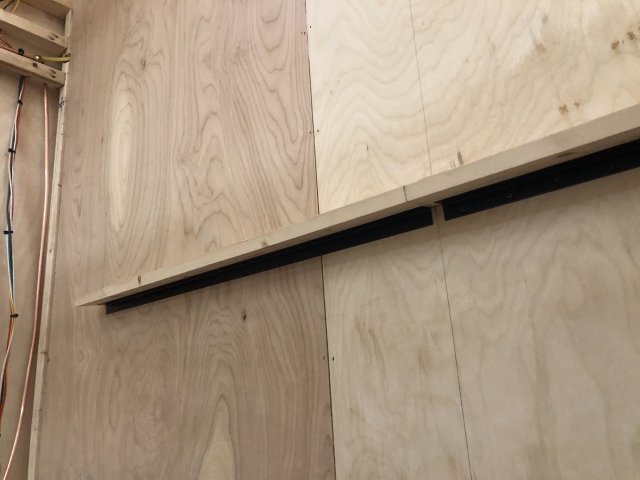
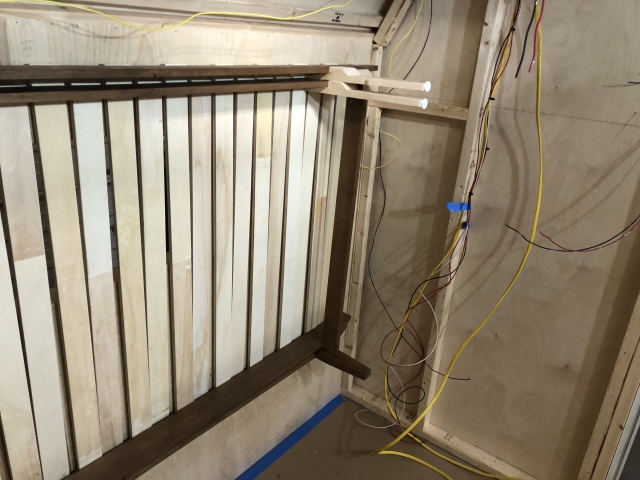
One of the unusual features I decided to incorporate early on is a post-accessible wiring race in the wall. The finished wall will have a decorative rail over the race that can be removed with screws and allow access to the majority of the wiring, etc. at any time. I chose to do this rather than running wire below the trailer, just another idiosyncrasy. Spent a little more on wire to do this.

Image

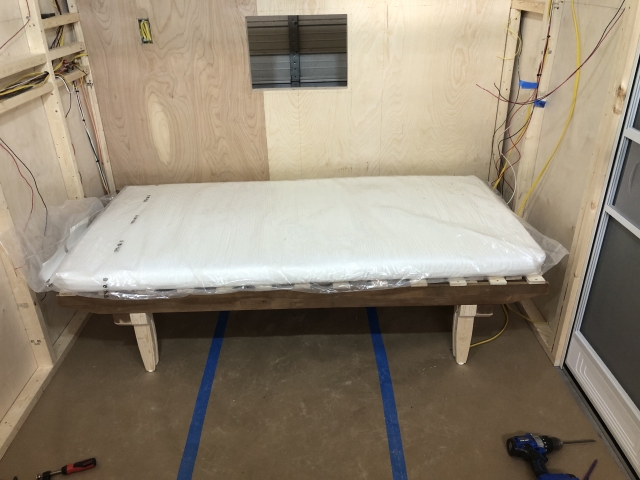
For bedding: The wife and I decided to use an expanding slat bed system. The bed will utilize two twin size mattresses from Ikea. It will be a sitting area during the day, and will expand to king size at night. I'm mounting the bed on a piano hinge along the front wall so that it can be raised for access to storage below. I decided NOT to build a slat bed myself, since I have so much work to do already in building this ttt, so we opted to purchase a $200 expanding slat bed which I modified to suit our needs. 1) mount permanently on front wall with piano hinge, 2) make new legs tom achieve 16" optimal height for my wife to sit. I needed to go ahead and assemble the bed and test my modifications, and measure for under-cabinets and structures with it in place.

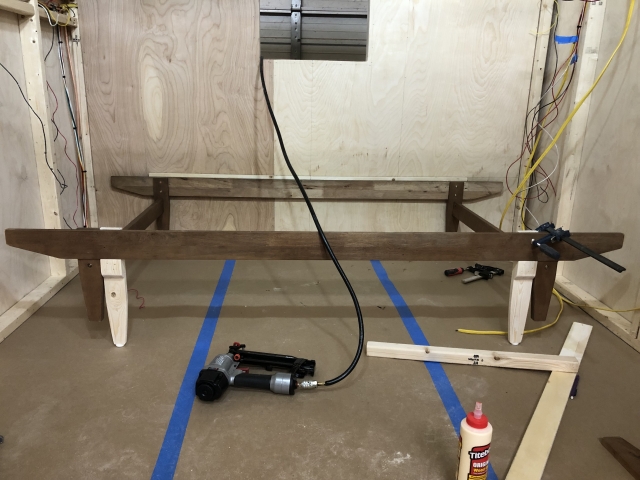
Hinge assembly on wall:
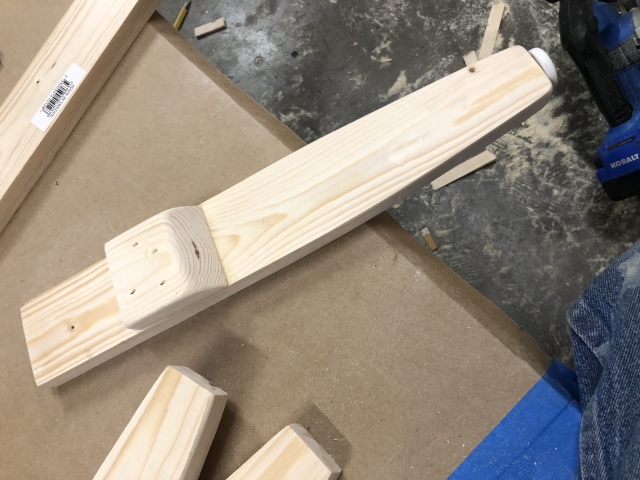
Image

Image

Making new legs:

Image

Image

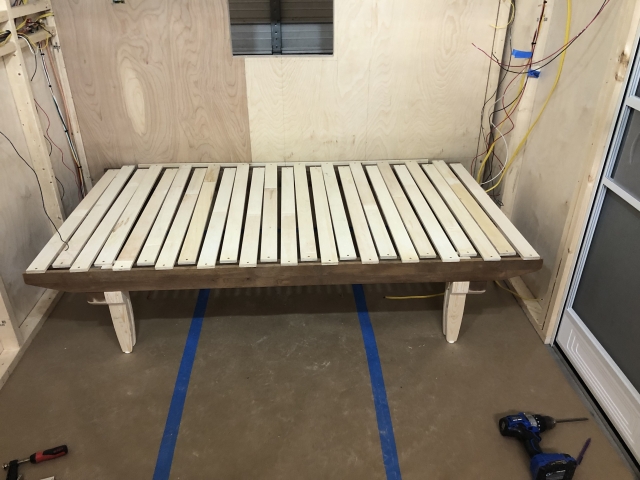
Completed bed mock-up:
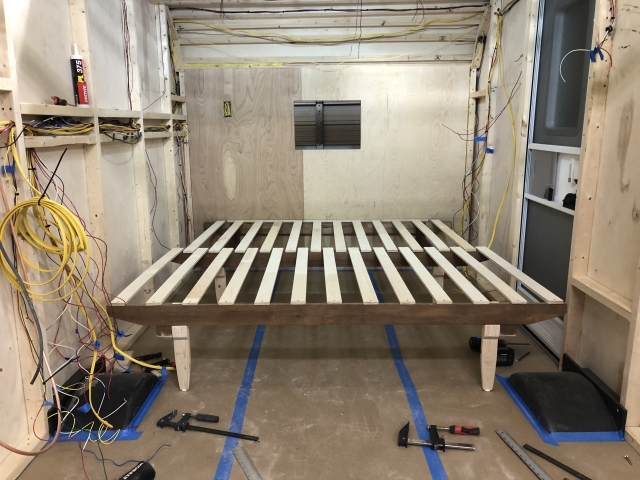
Image

Image

Image

Hinge in action:

Image
I'm a happy man, I love my life!

My Gunter Li’l Standy build journal:
https://www.tnttt.com/viewtopic.php?f=50&t=75291
User avatar
Mark Gunter
Teardrop Advisor
 
Posts: 76
Images: 211
Joined: Tue Nov 29, 2022 9:54 am
Location: Cleburne, Texas

Re: Gunter L'il Standy Build

Postby Mark Gunter » Mon Feb 27, 2023 1:50 pm

Then, my canvas arrived. Time to stop piddling with the interior and get this ttt ready for skinning. Again, a massive amount of work as I wanted to get all exterior holes cut. I have an AC opening up front, a maxxaire fan opening on top, and I needed openings for exterior outlets, shore power inlet, vents for my batteries, inverter and for the cavity containing my copper propane line, etc. I also needed to complete the rooftop panels and the hatch opening. So I did all that the last couple weeks.

Makeshift protractor in lieu of the correct sized hole saw:

Image

Image

Shore power

Image

Image

Exterior outlets - these can be useful, so I'm including two. The white one utilizes campsite shore power. The dark one can be switched on when boondocking, it will be wired to my inverter to run off the solar/battery array. I don't use DC to AC often, but like having the option.

Image

Image

After doing those tasks and a bunch of others, I turned to the galley hatch opening:

Image

Image

Image

Image

Image

Image

The rest of the week was spent on body work. So many screw holes, filling seams and screw holes with bondo. I finally moved to the roof yesterday, and will continue up there today. This week: PMF!
I'm a happy man, I love my life!

My Gunter Li’l Standy build journal:
https://www.tnttt.com/viewtopic.php?f=50&t=75291
User avatar
Mark Gunter
Teardrop Advisor
 
Posts: 76
Images: 211
Joined: Tue Nov 29, 2022 9:54 am
Location: Cleburne, Texas
Top

Re: Gunter L'il Standy Build

Postby Mark Gunter » Thu Mar 16, 2023 10:49 am

Time for another update on my build ...

I've been at it nearly every day since the New Year, but I just had 6 days away from the build due to family fun stuff and business stuff. My PMF work is what I've been on recently. I have the canvas skin on, and put my first coat of barn paint on one side before I had to quit for six days. I've borrowed a pro airless sprayer from a friend, so today I'll put up a plastic surround for a makeshift spray booth and get to work adding layers of barn paint to the whole shebang. I'm using barn paint to saturate and then cover the canvas to smooth things out a bit, then I'll switch to a more expensive semi-gloss paint for the topcoats.

When I left off in my last post I had just started the body work, which mostly consisted of finishing a few construction details concerning the exterior and filling hundreds of screw holes with bondo:

Here, I'm notching a rail that goes across the bottom front in back of the 1/4" ply skin. It's being notched to account for the trailer tongue

Image

Here is a backing piece that needed to be install at the wheel well openings, so that the trim which is salvaged from my sacrificial popup can be mounted later. Screw holes, screw holes, screw holes. As you can see, I had a lot of body work to do after I made all the final construction details, this is just one of the many tasks that had to be completed shown for example.

Image

Image

These next two images just show some of the body work being done up on the roof. In my usual business, I only use Bondo occasionally, and I like to mix it hot so it sets very quickly, but on this project I mixed it cool to allow for extended window of use. I bought extra hardener out of habit, but in usage I actually had a little left over from what came with the cans. Due to the size of the standy and the many joints and screw holes to deal with, I used somewhere between 3 quarts to a gallon or so of Bondo (a quart at a time).

Image

Image

I bought my canvas in two large pieces, one piece was 8' wide and 26' long to cover the two sides, and had to be cut to 13' lengths for each side. The other piece was 10' wide to cover the front, top and hatch. I laid the canvas out on my deck to measure and cut as needed. A big shout out to Chicago Canvas for providing me with good, inexpensive, seam-free canvas in the sizes I wanted!

Image

Here's a pic of the right side after application and initial trimming ... this piece I washed and ironed before applying. I found this to be a huge mistake, I would never pre-wash the canvas if I had this to do again. I found it impossible to get a good wash & dry on pieces this large, resulting in too many wrinkles and folds which got set real good in the dryer. The only pieces I washed were the left side and the hatch cover piece. After applying both sides and the roof, I've learned that the pieces installed unwashed went on easier, wrinkles came out easily, and after drying the shrinkage was minimal ... just enough to make my canvas smooth and tight as a drum head!

Image

My process was to use Titebond II thinned 10 - 20% with water, rolled on in workable sections, rolling the canvas on and smoothing it out with an iron. The next few pictures show some detail work which made the installation look sharp and pretty

Image

Image

Image

Image

Image

Then came the left side

Image

After installation, the left side was smooth, slick, and tight as a drum. The right side, having been washed, looked good but there were a lot of creases that wouldn't come out. You can see how awful this was by looking at the crease in the photo above of the electrical box detail.

This is how I dealt with them to improve the look of the right side. Titebond is a thermoplastic glue, meaning that it can be re-activated with heat. This is true of aliphatic resin glues, like the original Titebond, and I've found it to be true with Titebond II as well. I'm not sure of the chemical makeup of TII, but I assume it is an aliphatic resin with some additional properties added. I know that TII Premium is a PVA ... anyway ... I was able to smooth the creases pretty well with a hot iron, but they tended to come back before it was fully cool. So I had better succes using a chill bar. I would iron a section out nice and flat, then rub over it with a chill bar until it was cool.

Image

Image

Image

Image

The left side, being unwashed, needed none of this extra labor!

Image

Image

As you can see in this photo, the top of the side pieces was trimmed flush to the top after glue was fully cured and canvas allowed to shrink a tad. I wanted a clean look and no ridge on top to collect moisture. The top will overlap the sides by 1-1/2" and there will be no ridge on top.

Image

Door and other details

Image

Image

Image

Image

Finally, top piece is applied

Image

Marked for 1-1/2' overlap

Image

Trimmed with sharp scissors

Image

Masked for gluing

Image

Glued down, ironed, and cleaned up ... then coated with barn paint

Image
I'm a happy man, I love my life!

My Gunter Li’l Standy build journal:
https://www.tnttt.com/viewtopic.php?f=50&t=75291
User avatar
Mark Gunter
Teardrop Advisor
 
Posts: 76
Images: 211
Joined: Tue Nov 29, 2022 9:54 am
Location: Cleburne, Texas
Top

Re: Gunter L'il Standy Build

Postby chopperwalker » Thu Mar 16, 2023 12:38 pm

Super clean work. I'm very impressed. Also, thanks for the tidbits on Titebond glue and it being a thermoplastic. I had never considered heat being able to affect it that way.
chopperwalker
Teardrop Builder
 
Posts: 25
Joined: Sat Jul 31, 2021 1:29 am
Location: IA
Top

Re: Gunter L'il Standy Build

Postby Mark Gunter » Thu Mar 16, 2023 3:21 pm

Thanks for the kudos chopperwalker. I’m one of those infamous Jack of all trades, so few problems have been encountered and none that couldn’t be overcome so far in this lil standy build, despite the lack of drawings, etc. It has been great fun, keeps me motivated, but pretty tough on my 68 year old body, lol. I’ve really learned a lot about so-called PMF, which is new to me, but will probably never exercise those skills again. This one project is killing me!
I'm a happy man, I love my life!

My Gunter Li’l Standy build journal:
https://www.tnttt.com/viewtopic.php?f=50&t=75291
User avatar
Mark Gunter
Teardrop Advisor
 
Posts: 76
Images: 211
Joined: Tue Nov 29, 2022 9:54 am
Location: Cleburne, Texas
Top

Re: Gunter L'il Standy Build

Postby featherliteCT1 » Thu Mar 16, 2023 5:34 pm

Looking great! :thumbsup:
featherliteCT1
1000 Club
1000 Club
 
Posts: 1125
Joined: Wed Dec 28, 2016 6:54 am
Location: Southern Indiana
Top

Re: Gunter L'il Standy Build

Postby Mark Gunter » Mon Apr 10, 2023 4:13 pm

Time for another update.

After I got the canvas done it was time to finish the exterior, so that lights, vents, etc. could be installed and wired before closing up the interior walls. I started rolling on paint, but after two coats on one side I decided to use an airless sprayer.

I reached out to my protege whom I had taught finishing, and who now operates his own finishing business. He had an airless I could use for latex, so I set up a portable "spray booth" with plastic and started the finishing. I used an inexpensive exterior white "barn paint" spraying about eight coats, thinned 10-20%, which cost me about 10 gallons of paint. Then I sprayed two coats of lifetime warranty white paint at full viscosity. I sanded between coats at most stages. The result was awesome in my view.

Image

Image

Image

Image

Image

Image

Image

Image

Image

Image

Image

Image

Image

Once all this was done, I removed the plastic and masked for the secondary color. I rolled this color on full strength in two coats. I left the first coat just shy of the masking tape so as not to build a dried layer of plastic paint which may peel with the tape. On the second coat, I rolled over the tape, and pulled the tape while paint was wet.

Image

Image

Image

Image

Image

Image

Image

Image

Image

Image

Image

Image

Since then I've been working on the interior. Pics of that coming soon!
I'm a happy man, I love my life!

My Gunter Li’l Standy build journal:
https://www.tnttt.com/viewtopic.php?f=50&t=75291
User avatar
Mark Gunter
Teardrop Advisor
 
Posts: 76
Images: 211
Joined: Tue Nov 29, 2022 9:54 am
Location: Cleburne, Texas
Top

Re: Gunter L'il Standy Build

Postby ScottM » Mon Apr 17, 2023 7:08 am

The paint job and finish look phenomenal! Good job.
ScottM
Teardrop Inspector
 
Posts: 11
Joined: Tue Nov 29, 2022 9:26 am
Top

Re: Gunter L'il Standy Build

Postby pchast » Mon Apr 17, 2023 9:37 pm

Beautiful! :thumbsup:
pchast
Platinum Donating Member
 
Posts: 2027
Images: 97
Joined: Mon Jan 28, 2013 5:47 pm
Location: Athens, NY
Top

Re: Gunter L'il Standy Build

Postby aggie79 » Fri Apr 21, 2023 10:55 am

Wonderful job! You have impressed all of us! :applause: :thumbsup: :applause:
Tom (& Linda)
For build info on our former Silver Beatle teardrop:
Build Thread

93503
User avatar
aggie79
Super Duper Lifetime Member
 
Posts: 5405
Images: 686
Joined: Tue Aug 07, 2007 5:42 pm
Location: Watauga, Texas
Top

Re: Gunter L'il Standy Build

Postby S. Heisley » Fri Apr 21, 2023 9:14 pm

You are doing an awesome job! :thumbsup: :thumbsup:
Great detail both on the project and in your descriptions of how you are doing everything.
User avatar
S. Heisley
Super Lifetime Member
 
Posts: 8774
Images: 495
Joined: Mon Sep 17, 2007 10:02 am
Location: No. California
Top

Re: Gunter L'il Standy Build

Postby TimC » Fri Apr 21, 2023 9:41 pm

Top notch craftsmanship!
Tim
Niagara, WI
My First Benroy Teardrop Build Thread - A 5x8 Woodie - http://www.tnttt.com/viewtopic.php?f=50&t=63575
My Second Teardrop (partial) Build Thread - Started August '16 - http://www.tnttt.com/viewtopic.php?f=50&t=66939
#3 My son's Benroy Foamie team build - Started July '20 - http://www.tnttt.com/viewtopic.php?f=50&t=72877

Image
User avatar
TimC
Gold Donating Member
 
Posts: 1371
Images: 733
Joined: Sat May 23, 2015 4:15 am
Location: WI/MI border
Top

Re: Gunter L'il Standy Build

Postby Mark Gunter » Sat Apr 22, 2023 5:00 pm

Wow guys, thanks to all for the comments & encouragement! I’ve been having a blast with this build, there are new challenges practically daily. Front portion of the main cabin is about finished inside now, and I’m working on the ceiling. Next big scary thing will be the hatch door.
I'm a happy man, I love my life!

My Gunter Li’l Standy build journal:
https://www.tnttt.com/viewtopic.php?f=50&t=75291
User avatar
Mark Gunter
Teardrop Advisor
 
Posts: 76
Images: 211
Joined: Tue Nov 29, 2022 9:54 am
Location: Cleburne, Texas
Top

Re: Gunter L'il Standy Build

Postby Mark Gunter » Mon May 08, 2023 1:38 pm

Taking time out for another build update ...

Since my last posting I've been busy working on the interior

Image

I guess I'm a really lucky guy. I've always been crazy lucky --- my luck is really, really good, or really, really bad --- Well, when it comes to insulating this build, I've been really, really lucky. I found a bunch of insulation on the shoulder of a nearby highway back in November, before I started this build. I used it in the floor, and on the front wall. When it ran out, I was able to score all the insulation I would need from the person I'm renting this shop from. They have another, unused building on the property in which the interior walls were demo'd and I was told I could have as much as I needed of the insulation.

Image

Here, as you can see, I started putting in wall panels first, then I began building the boxes for under the bed. You can just see the corner of one in the foreground, it houses two 100ah deep cycle batteries as well as the solar charge controller and a 1000 watt inverter (which will rarely be used, hopefully, I hate these amp-hungry babies, but I have one in case I really need AC current off the batteries). The other box, which you can see in the raw here, is merely storage. I also started some paint work and molding work as I went along, as well as some work on the air conditioner housing.

Note the removable, decorative panel to hide my wiring chase! You can see my wife's touch on that.

Image

I built a small boxed in area on top of the A/C surround, for cell phone and stuff to go in while we sleep, it's not visible here.

Image

Painted the parts for our expandable slat bed black. Colors throughout this build are white, turquoise, red and black. To the left, you can see the electrical converter box I salvaged, approximately where it will live permanently.

Image

Here is the bed, installed. A/C surround finished. You can see the solar charge controller and inverter mounted on the battery box on the right side. Those are DC wires on each side, where I plan to have USB and cig lighter type ports.

Image

In this next image, lower left, you can see that I've begun to build a couple boxes: One, over the wheel well, will house the converter I salvaged from the sacrificial popup; the other will house the Suburban propane heater likewise salvaged.

Image

Image

Image

Image

Here's a closeup of the battery box exterior

Image

Here's a closeup of the wiring chase cover:

Image

Image

Here's a closeup of the A/C surround:

Image

Here's a closeup of the little panel I made for DC access on each side:

Image

Image

I guess I took pics to prove to myself that my electrical work was successful, lol. I tested everything as I went along.

Image

Image

Front end of the cabin is looking finished (except for the ceiling, at this point). I painted the heater grill red, painted the converter panel cover black.

Image

Image

Image

Next, I turned to the wall around the door. Radiused top to the door, yuck. Finally came up with a plan to make it look okay.

Image

Image

Painted the fridge from the sacrificial popup to match our other appliances that will go in galley

Image

Getting serious about installing the ceiling now.

Image

But the exterior "porch" lights have arrived, so ...

Image

Image

Back to the ceiling ...

Image

Had to rip up some insulation and glue it in to do the ceiling.

Image

Image

Image

Finished up the interior wall around the door

Image

And I love this detail ... there is a snap-in trim for these Lippert doors to hide the installation screws. The door came without that trim, but my wife located and purchased some for me. We really like things to look neat and finished!

Image

Paint as I go ..

Image

A barn wren apparently finds this camper comfortable. Wasted effort here, though, because I clean out any crap she brings in, lol.

Image

And now, time to frame up the rear bulkhead and build the upper cabinet!

Image

Image

Image

Finally took time out to rout out the fan opening

Image

And this brings us up to date!

Image

Today, I'll build the cabinet doors.

Once that cabinet is complete, and some more moldings installed and some more paint, I'll begin work on the hatch door. Gonna leave the bulkhead in frame form only, so I can get to the hatch door frame from both sides while I set it up and start the build in place.

Bye for now.
I'm a happy man, I love my life!

My Gunter Li’l Standy build journal:
https://www.tnttt.com/viewtopic.php?f=50&t=75291
User avatar
Mark Gunter
Teardrop Advisor
 
Posts: 76
Images: 211
Joined: Tue Nov 29, 2022 9:54 am
Location: Cleburne, Texas
Top

PreviousNext

Return to Build Journals

Who is online

Users browsing this forum: No registered users and 23 guests