Homemade locker for 10 lb propane tank
Hello, my hubby and I have been waiting to start our build for several months now ( seems like forever). We have hit a delay , our custom built aluminum chassis has not been started yet due to parts that the fabricators need not being delivered in a timely manner.  Grrrrrrr. But enough of that unpleasantness now. In the midst of ordering items for the build we purchased a couple of 10 lb Worthington aluminum propane tanks at a good price off Amazon. We excitedly unpacked them and admired their aluminum loveliness (ooh so pretty!!).
Imagine our chagrin when we started a search for a decent lockable bracket to attach them to the trailer and found nada . (Not entirely true , a website in Australia had them and were willing to ship their 25$ brackets for 150$). Our tanks measure 10 ½ inches diameter. We found lots of brackets for 8 inch diameter tanks and for the 20 lb and even the 5 lb tanks.
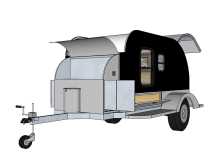
One day while driving to work, a light bulb came on over my head ( an old fashioned incandescent - not one of those sickly colored energy saving ones). I mean I had an idea. I remembered reading about the propane lockers found on many boats. I thought to myself -who is this fool driving so slow in the left hand lane in front of me and why can’t we build containers to lock the tanks in, something sturdy, and made out of materials to match the trailer?
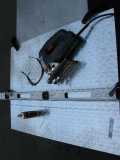
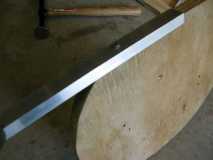
By the time I arrived at work I had the plan roughed out in my head, and by the end of my lunch break and a trip to Lowes and HD I was the proud owner of a 2" x 4" sheet of diamond plate, 2 -4' lengths of l-shaped aluminum trim, a bunch of rivets, and a stainless steel piano hinge. Once home I fired up my trusty Google sketch-up and worked out the needed dimensions.
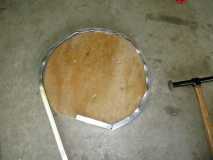
The next weekend I started my project. I cut some forms for the top and bottom out of leftover ¾†plywood. From the diamond plate I cut out the body, top and bottom plates, and back plate. I placed a line of oil over the cut line to lubricate the saw blade and it seemed to work well. Everything stayed nice and cool.
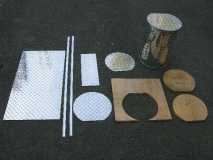
Parts is parts
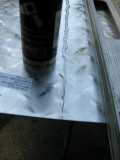
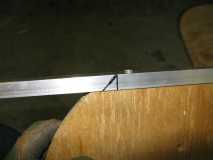
I had spent some time on the forum and had learned how to anneal the trim. That was the next step. Then I attached the trim to the edge of the form and after finding my husbands auto-body working hammers, started pounding that trim into submission. After initial forming , I had to re-anneal and beat on it some more until it decided my way was best. Soooo satisfying. Very Happy
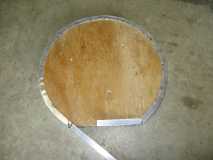

After forming the top ring I fit it to the top plate and decided that the diamonds that ended under the ring kept it from fitting tight, they needed to go. I quickly found my hubby's grinder and plugged it in. I secured my piece. Turned the grinder on (so loud!) started removing diamonds (not a girl's best friend) and ouch! Shocked I had let my index finger relax and quickly ground off part of my knuckle. At that point I notice my gloves lying neglected on the work table and that I was bleeding Crying . After placing a bandage over my finger I put on my gloves and started back to work. Luckily my husband arrived home from work and took over grinding duties (he's this girl's best friend) Smile .
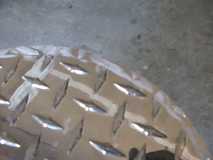
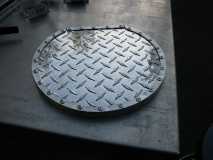
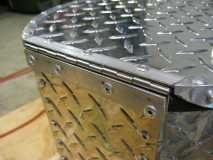
I then marked the top ring every 1 1/2 inches and used the drill press to drill holes around the top. We placed rivets in the holes and riveted it together. Voila! One propane tank lid done.

Over the next day we bent the body into a cylindrical shape. Using our trusty crusty work bench as a break. ( Unfortunately it did actually break by the time we got the second one formed) Sad .
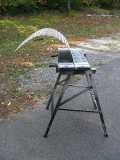
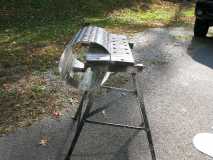
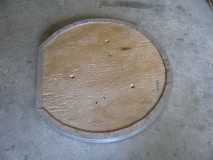
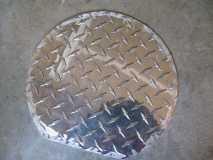
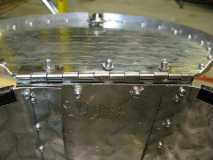
Then it was a simple thing of repeating the forming for the bottom ring , more grinding, and riveting. Then we assembled the bottom to the body , more drilling and riveting.
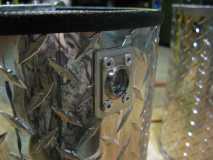
Then the back was attached .
I ordered push on trim and stainless steel locking hasps from McMaster-Carr . In the meantime we made another trip to Lowes to buy materials for the second locker. I cut, formed, and assembled the parts of the second. Once again my hubby took over the grinding duties.
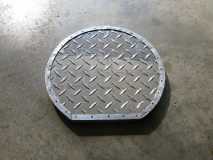
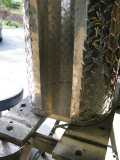
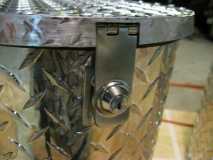
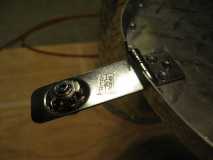
The order from McMaster-Carr arrived and we attached the hinges and latches. The trim finished it nicely. We plan on using expanding spray foam in the bottom that will form to the bottom of the tank and keep it from rattling.

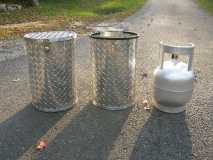
We are happy with the end result . My husband says that people who see them will wonder why we keep our garbage locked up Wink . Okay, they look a little like trash cans, but they are shiny, cool-looking, trash cans and it should help keep our propane tanks from walking away.

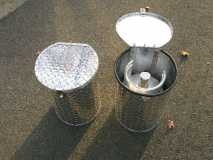
The locker as it will look on the trailer ( hopefully).

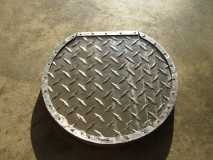
The second locker.
Grrrrrrr. But enough of that unpleasantness now. In the midst of ordering items for the build we purchased a couple of 10 lb Worthington aluminum propane tanks at a good price off Amazon. We excitedly unpacked them and admired their aluminum loveliness (ooh so pretty!!).Imagine our chagrin when we started a search for a decent lockable bracket to attach them to the trailer and found nada
. (Not entirely true , a website in Australia had them and were willing to ship their 25$ brackets for 150$). Our tanks measure 10 ½ inches diameter. We found lots of brackets for 8 inch diameter tanks and for the 20 lb and even the 5 lb tanks.One day while driving to work, a light bulb came on over my head ( an old fashioned incandescent - not one of those sickly colored energy saving ones). I mean I had an idea. I remembered reading about the propane lockers found on many boats. I thought to myself -who is this fool driving so slow in the left hand lane in front of me and why can’t we build containers to lock the tanks in, something sturdy, and made out of materials to match the trailer?
By the time I arrived at work I had the plan roughed out in my head, and by the end of my lunch break and a trip to Lowes and HD I was the proud owner of a 2" x 4" sheet of diamond plate, 2 -4' lengths of l-shaped aluminum trim, a bunch of rivets, and a stainless steel piano hinge. Once home I fired up my trusty Google sketch-up and worked out the needed dimensions.
The next weekend I started my project. I cut some forms for the top and bottom out of leftover ¾†plywood. From the diamond plate I cut out the body, top and bottom plates, and back plate. I placed a line of oil over the cut line to lubricate the saw blade and it seemed to work well. Everything stayed nice and cool.
Parts is parts
I had spent some time on the forum and had learned how to anneal the trim. That was the next step. Then I attached the trim to the edge of the form and after finding my husbands auto-body working hammers, started pounding that trim into submission. After initial forming , I had to re-anneal and beat on it some more until it decided my way was best. Soooo satisfying. Very Happy
After forming the top ring I fit it to the top plate and decided that the diamonds that ended under the ring kept it from fitting tight, they needed to go. I quickly found my hubby's grinder and plugged it in. I secured my piece. Turned the grinder on (so loud!) started removing diamonds (not a girl's best friend) and ouch! Shocked I had let my index finger relax and quickly ground off part of my knuckle. At that point I notice my gloves lying neglected on the work table and that I was bleeding Crying . After placing a bandage over my finger I put on my gloves and started back to work. Luckily my husband arrived home from work and took over grinding duties (he's this girl's best friend) Smile .
I then marked the top ring every 1 1/2 inches and used the drill press to drill holes around the top. We placed rivets in the holes and riveted it together. Voila! One propane tank lid done.
Over the next day we bent the body into a cylindrical shape. Using our trusty crusty work bench as a break. ( Unfortunately it did actually break by the time we got the second one formed) Sad .
Then it was a simple thing of repeating the forming for the bottom ring , more grinding, and riveting. Then we assembled the bottom to the body , more drilling and riveting.
Then the back was attached .
I ordered push on trim and stainless steel locking hasps from McMaster-Carr . In the meantime we made another trip to Lowes to buy materials for the second locker. I cut, formed, and assembled the parts of the second. Once again my hubby took over the grinding duties.
The order from McMaster-Carr arrived and we attached the hinges and latches. The trim finished it nicely. We plan on using expanding spray foam in the bottom that will form to the bottom of the tank and keep it from rattling.
We are happy with the end result . My husband says that people who see them will wonder why we keep our garbage locked up Wink . Okay, they look a little like trash cans, but they are shiny, cool-looking, trash cans and it should help keep our propane tanks from walking away.
The locker as it will look on the trailer ( hopefully).
The second locker.


