My build: Finally underway!

Canvas covered foamies (Thrifty Alternatives...)

Moderator: eaglesdare

Re: My build: Finally underway!

Postby GPW » Thu Jun 30, 2016 6:46 am

V, The Foamie roof is a great place for a Solar array ... :thinking:
There’s no place like Foam !
User avatar
GPW
Gold Donating Member
 
Posts: 14920
Images: 546
Joined: Thu Feb 09, 2006 7:58 pm
Location: New Orleans

Re: My build: Finally underway!

Postby videographer » Thu Jun 30, 2016 7:57 am

GPW wrote:V, The Foamie roof is a great place for a Solar array ... :thinking:

Hey, let me get it covered first. <g> I was actually thinking about reinforcing the slanted front panel with a sheet of 1/4" ply to stiffen that for a panel.

Sent from my SM-G900P using Tapatalk
videographer
Teardrop Advisor
 
Posts: 54
Images: 77
Joined: Mon Jun 29, 2015 3:30 pm

Re: My build: Finally underway!

Postby GPW » Thu Jun 30, 2016 3:46 pm

You guys and the Love of plywood ... :roll: For those who have never experienced just fabric covered foam , it is Quite Stiff ...
There’s no place like Foam !
User avatar
GPW
Gold Donating Member
 
Posts: 14920
Images: 546
Joined: Thu Feb 09, 2006 7:58 pm
Location: New Orleans
Top

Re: My build: Finally underway!

Postby videographer » Thu Jun 30, 2016 5:32 pm

GPW wrote:You guys and the Love of plywood ... :roll: For those who have never experienced just fabric covered foam , it is Quite Stiff ...

Don't love it, but I have a 6' 4" span. Better safe than stupid, I always say!

Sent from my SM-G900P using Tapatalk
videographer
Teardrop Advisor
 
Posts: 54
Images: 77
Joined: Mon Jun 29, 2015 3:30 pm
Top

Re: My build: Finally underway!

Postby GPW » Fri Jul 01, 2016 5:26 am

You must build it the way YOU think best !!! .... That’s what this is all about !!! ;)
There’s no place like Foam !
User avatar
GPW
Gold Donating Member
 
Posts: 14920
Images: 546
Joined: Thu Feb 09, 2006 7:58 pm
Location: New Orleans
Top

Re: My build: Finally underway!

Postby videographer » Sat Jul 16, 2016 11:19 pm

Another two weeks of stop&start progress has gotten me to the point of covering Campy McCampface. It's been exciting...hang on:

I had progressed to the point where I had to build the rear roof panel with the hole for a Fantastic Vent. Maybe I'm just a chicken, but the idea of just mounting the vent in un-reinforced foam never crossed my mind.

I had the rear panel all marked up...
143555

...and routed the slots for two 3/4" oak stringers...
143556

Isn't it funny how a 3/4" piece of lumber and a 3/4" router bit aren't the same size at all? I hassled around with that for a long time. I finally got the fan box constructed and glued into the hole.
143557

...and test-fit the Fan.
143558

Before I could glue in the back panel I had to insert any cabinetry we might want. We went to the Habitat Restore and got this Techline cabinet for $40. It's excellent quality, has two drawers and two doors and weighs by itself about half of what the entire trailer weighs. (Very slight exaggeration.)
143559

I glued in the roof and rear panels at the same time, and made a jack to take a bit of sag out of the roof while it glued up.
143560

Today was crack-filling, sanding and the first wall of canvas. I used Great Stuff to hide all my mistakes.
143562
143563
143564
143565

Interestingly, even though Great Stuff doesn't sand really very well, once we got the Harbor Freight canvas on most of the imperfections were hard to see. I jacked the cabin up off the trailer a few inches, put plastic sheet on the trailer,and glued the crap out of the canvas and stuffed it between the floor and the plastic. I lowered the cabin and the canvas/glue mixture was trapped for a good cure.
143566

The canvas went on better than expected, and I hope tomorrow has decent weather so we can get to the driver's side wall.
143567

As darkness descended I got brave and started trimming and gluing down the odd corners. It's working great, I hope I can keep this up!
143568

More details soon!
videographer
Teardrop Advisor
 
Posts: 54
Images: 77
Joined: Mon Jun 29, 2015 3:30 pm
Top

Re: My build: Finally underway!

Postby GPW » Sun Jul 17, 2016 5:46 am

Thanks for the Pics !!!! Looking Good !!! :thumbsup: 8)
There’s no place like Foam !
User avatar
GPW
Gold Donating Member
 
Posts: 14920
Images: 546
Joined: Thu Feb 09, 2006 7:58 pm
Location: New Orleans
Top

Re: My build: Finally underway!

Postby ghcoe » Sun Jul 17, 2016 9:48 pm

Looking good. :thumbsup:
George.

Gorrilla Glue, Great Stuff and Gripper. The three G's of foamie construction.

My build viewtopic.php?t=54099
Working with flashing for foamie construction viewtopic.php?f=55&t=60303
Making a hot wire http://tnttt.com/viewtopic.php?f=55&t=55323
User avatar
ghcoe
1000 Club
1000 Club
 
Posts: 1982
Joined: Fri Dec 11, 2009 11:20 pm
Location: SW Idaho
Top

Re: My build: Finally underway!

Postby videographer » Mon Sep 05, 2016 9:25 pm

Well, it's been a busy summer, both in foamie construction and away from it. Lots of progress, especially this Labor Day weekend, so let's jump right in...

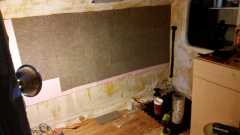
Back in June my wife and I covered Campy McCampface with several sheets of HF canvas dropcloth, a process that went far, far better than I had anticipated. The only problem I really battled with was stray threads getting away from me (and there are a LOT) but from 15 feet you'd never know. I covered the canvas with two coats of Glidden Gripper, and decided to buy really good paint to go over that. Of course, when I bought the really good paint, it was emblazoned with big signs saying "NO PRIMING NEEDED!" Oh well, I suppose it can't hurt.

144471

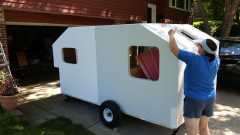
My wife is a far better painter than I. I wanted a gray color and was pretty surprised that it came out less gray than I had anticipated.

I had previously glued old hotel bedsheets to the inside with Titebond 2. I confess to doing a less-than-perfect job, but OTOH it isn't there to be pretty, right?

144472
144473

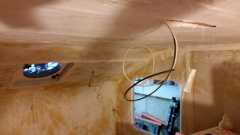
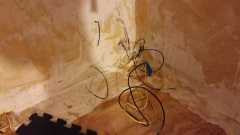
Not long after the paint job I was pulling wire thru slots in the foam for both the trailer lights and 12v LED interior lighting. This was really not much fun at all.

144474

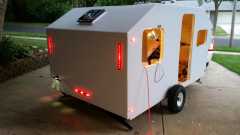
It was pretty exciting to see the trailer lights working for the first time. (The front marker lights were not wired in yet, but they are now.)

144475

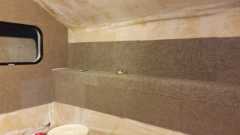
I decided the easiest way to get a decent interior was to use carpet squares. I used my Gorilla-Glue-and-Anchor technique to screw 1/4" fanfold foam to the walls so I could remove it if necessary and stuck the carpet squares to that surface. Interestingly, while the squares stuck to the foam like a scared kitten, they wouldn't adhere at all to the sheets I had glued to the interior with titebond2, even after it had been dry for two weeks.

144477
144478

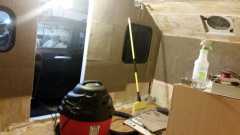
Note the Fantastic Vent in the picture. It works fine.

The carpet squares were quite successful, but while I had originally planned to put them on the ceiling as well, I changed my mind. It would have looked like an actual cave in there if I had continued down that path. Suggestions for a good ceiling surface? 12' x 6'4", hopefully light-colored and not a total pain to install, please...

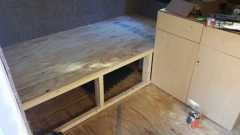
So here we are now, it's Labor Day, and labor I did. This weekend I installed the framing and preliminary surface for both the front and rear bunks. This is the rear...

144479
144480

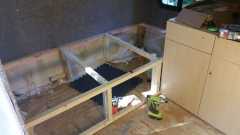
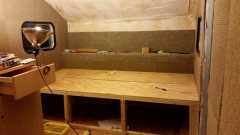
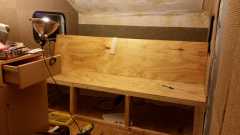
...and this is the front.

144482
144481.

There will be two slide-out drawers under each bunk, and you'll notice that the front bunk folds up into a couch. The passenger side under-bed compartments will have cargo doors open to the outside, and will be insulated with the leftover 2" foam from the main construction to keep out at least some of the cold.

I don't have any pictures of installing the four windows, but I gotta tell ya, butyl tape is the BEST. Now that I have all the plywood inside for the beds, I'm thinking of installing the main door soon.

So: What remains? Before I can even think of road-testing I have to bolt down the Techline cabinet (thru the floor and directly through a crossbeam on the trailer.) Also need fenders, and I'm having a surprisingly hard time finding a fabricator. Inside I have to find drawer slides for four units and then build the drawers. I have to sort out the inside electrical, and farther down the list is installing the air conditioner. I have a question about electrics I'll post in that section, but it boils down to: DIY or buy a commercial, prebuilt unit that has all the functions you need (lithium batteries, 120v and/or solar panel charging, and built-in 120vac, 12vdc and USB outputs *plus* all kinds of metering). Not free by any means, but it is compact and comes with a warrantee...

Example: http://www.goalzero.com/p/165/goal-zero-yeti-400-solar-generator

Hope that wasn't too overwhelming... but I can feel the open road calling!
videographer
Teardrop Advisor
 
Posts: 54
Images: 77
Joined: Mon Jun 29, 2015 3:30 pm
Top

Previous

Return to Foamies

Who is online

Users browsing this forum: No registered users and 10 guests