FoamStream...

Canvas covered foamies (Thrifty Alternatives...)

Moderator: eaglesdare

Re: FoamStream...

Postby GPW » Tue Jul 09, 2013 12:26 pm

Well Duh !!! :duh: What about the trim ring ???... :o Had to go in and cut some more away...the trim ring serving as the final template :roll: ... leaving a slightly loose fit , which is perfect because we’ll still canvas inside the hole ... ;)

Ps. We do plan on using some type of caulk around those windows , not trusting just the rubber gasket ... Could just foam (GS) the whole trim ring in place for the final assembly ... don’t plan on ever removing it ... no leaks ... :thinking:
Attachments
DSCF0067x.JPG
DSCF0067x.JPG (236.19 KiB) Viewed 1342 times
There’s no place like Foam !
User avatar
GPW
Gold Donating Member
 
Posts: 14920
Images: 546
Joined: Thu Feb 09, 2006 7:58 pm
Location: New Orleans

Re: FoamStream...

Postby GPW » Tue Jul 09, 2013 12:44 pm

Beginning covering of the inside of the door ... T2 slightly thinned ...
Attachments
DSCF0068x.JPG
DSCF0068x.JPG (184.8 KiB) Viewed 1342 times
There’s no place like Foam !
User avatar
GPW
Gold Donating Member
 
Posts: 14920
Images: 546
Joined: Thu Feb 09, 2006 7:58 pm
Location: New Orleans

Re: FoamStream...

Postby GPW » Tue Jul 09, 2013 1:22 pm

Here’s the edge trimmed and glued down , and the finished inside ... save the window cutout ... :thumbsup: You can see where I used a bit of painters tape to keep the edges butted up solid till the glue sets ... For the next few minutes we’ll be going around checking the smoothing till we’re sure the canvas won’t move .... Don’t want any wrinkles now eh !!! :o

Sorry for all the boring pics , was just thinking if someone’s never done this covering business before , it may (or may not ) help ... :thinking:
Attachments
DSCF0069.JPG
DSCF0069.JPG (192.78 KiB) Viewed 1338 times
DSCF0070.JPG
DSCF0070.JPG (214.67 KiB) Viewed 1338 times
DSCF0071.JPG
DSCF0071.JPG (191.97 KiB) Viewed 1338 times
There’s no place like Foam !
User avatar
GPW
Gold Donating Member
 
Posts: 14920
Images: 546
Joined: Thu Feb 09, 2006 7:58 pm
Location: New Orleans
Top

Re: FoamStream...

Postby GPW » Tue Jul 09, 2013 2:26 pm

Window cuts made , trimmed and glued down ... Now it’s LUNCHTIME !!! ... and a well deserved nap ... :D
Attachments
DSCF0072x.JPG
DSCF0072x.JPG (170.15 KiB) Viewed 1334 times
DSCF0073x.JPG
DSCF0073x.JPG (164.53 KiB) Viewed 1334 times
There’s no place like Foam !
User avatar
GPW
Gold Donating Member
 
Posts: 14920
Images: 546
Joined: Thu Feb 09, 2006 7:58 pm
Location: New Orleans
Top

Re: FoamStream...

Postby KCStudly » Tue Jul 09, 2013 2:34 pm

Nice. :thumbsup:
KC
My Build: The Poet Creek Express Hybrid Foamie

Poet Creek Or Bust
Engineering the TLAR way - "That Looks About Right"
TnTTT ORIGINAL 200A LANTERN CLUB = "The 200A Gang"
Green Lantern Corpsmen
User avatar
KCStudly
Donating Member
 
Posts: 9640
Images: 8169
Joined: Mon Feb 06, 2012 10:18 pm
Location: Southeastern CT, USA
Top

Re: FoamStream...

Postby tac422 » Tue Jul 09, 2013 4:10 pm

GPW,
Looking Good ! :thumbsup:
I appreciate the pictures as i should be doing mine very soon.
Did you size the canvas ? It looks stiff in the picture ?
Why did you thin the T2 ?
User avatar
tac422
500 Club
 
Posts: 639
Images: 224
Joined: Sun Mar 17, 2013 11:39 am
Top

Re: FoamStream...

Postby GPW » Tue Jul 09, 2013 4:26 pm

KC, Thanks !!! That means a Lot !!! :)

Tac, canvas is right off the roll .. the reason it looks so stiff is cause’ it is !!! Thick stuff... :o Not like working with thin canvas at all which you can stretch and pull ... this stuff you just lay it down and smooth it out ... that’s it ...
Thinned the T2 with just a little water to make it more brush-able ... One thing we found , only put the glue on the foam and apply the canvas dry ... it soaks up the water (solvent) in the T2 and grabs and dries quicker ... ;)

Outside skin going on ...
Attachments
DSCF0074.JPG
DSCF0074.JPG (228.91 KiB) Viewed 1325 times
There’s no place like Foam !
User avatar
GPW
Gold Donating Member
 
Posts: 14920
Images: 546
Joined: Thu Feb 09, 2006 7:58 pm
Location: New Orleans
Top

Re: FoamStream...

Postby GPW » Tue Jul 09, 2013 5:05 pm

Did the corners a little differently this time using a fold we use on Artist canvas all the time ... This will seal off (encapsulate) the butt join of the underlying layer ... a single staple holds it down ...

Nothing like old sweaty Gorilla hands eh ... :frightened:
Attachments
DSCF0075.JPG
DSCF0075.JPG (180.03 KiB) Viewed 1323 times
DSCF0076.JPG
DSCF0076.JPG (202.8 KiB) Viewed 1323 times
DSCF0077.JPG
DSCF0077.JPG (173.11 KiB) Viewed 1323 times
There’s no place like Foam !
User avatar
GPW
Gold Donating Member
 
Posts: 14920
Images: 546
Joined: Thu Feb 09, 2006 7:58 pm
Location: New Orleans
Top

Re: FoamStream...

Postby GPW » Tue Jul 09, 2013 5:35 pm

Just added a little glue around the exposed edges to harden them up and when dry , they’ll be trimmed flush and ironed down ... Set the door under the fan to help dry ... Tomorrow we’ll cut out the other window side and add the final trim strip inside there... That should about do it for the door covering , aside from trimming for the locks , and a paint job ... and yes .... adding a kick plate (KC) ... :thumbsup:

You know , the door is actually the trickiest part of the covering job ... It’s the one thing everybody is going to see... :o Covering the walls should be relaxing after this ... :relaxing:


Well that’s about enough for one day ... Time for another shower and a Cold One ... or two ... or ? :beer:
Attachments
DSCF0078.JPG
DSCF0078.JPG (240.03 KiB) Viewed 1323 times
There’s no place like Foam !
User avatar
GPW
Gold Donating Member
 
Posts: 14920
Images: 546
Joined: Thu Feb 09, 2006 7:58 pm
Location: New Orleans
Top

Re: FoamStream...

Postby wagondude » Tue Jul 09, 2013 7:28 pm

That is one beerworthy door! The paper really gave a nice smooth surface. :beer:
Bill

TnTTT ORIGIONAL 200A LANTERN CLUB
101137
User avatar
wagondude
1000 Club
1000 Club
 
Posts: 1535
Images: 35
Joined: Sun Jan 16, 2011 7:41 pm
Location: Land of the Jayhawks
Top

Re: FoamStream...

Postby kudzu » Tue Jul 09, 2013 8:15 pm

wagondude wrote:The paper really gave a nice smooth surface.


Curious. Was it really the paper or was it mainly the thick canvas that gave such a smooth surface?
kudzu
Donating Member
 
Posts: 439
Images: 16
Joined: Wed Mar 27, 2013 3:20 pm
Top

Re: FoamStream...

Postby dodgedartgt » Tue Jul 09, 2013 8:15 pm

wagondude wrote:That is one beerworthy door!


I was pretty sure it is a two or three beerworthy door. :lol:

Mike in FL
dodgedartgt
Teardrop Advisor
 
Posts: 69
Joined: Fri Jun 24, 2011 6:19 pm
Top

Re: FoamStream...

Postby KCStudly » Tue Jul 09, 2013 8:21 pm

I wondered at first why you hadn't "pre-canvased" the edges, but now I see it was all part of the master plan of double overlapping one side to the other.

Cagey. :thumbsup:
Last edited by KCStudly on Wed Jul 10, 2013 6:14 am, edited 1 time in total.
KC
My Build: The Poet Creek Express Hybrid Foamie

Poet Creek Or Bust
Engineering the TLAR way - "That Looks About Right"
TnTTT ORIGINAL 200A LANTERN CLUB = "The 200A Gang"
Green Lantern Corpsmen
User avatar
KCStudly
Donating Member
 
Posts: 9640
Images: 8169
Joined: Mon Feb 06, 2012 10:18 pm
Location: Southeastern CT, USA
Top

Re: FoamStream...

Postby GPW » Wed Jul 10, 2013 6:13 am

KC, It just seemed like the best way at the time ... :thinking: Originally was thinking about a door edging (Al) but I don’t think it will be necessary ... especially just two Old people , no kids to “abuse" anything .. :roll:

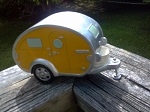
The door looks good this morning , everything dried nicely , no lifting , so we’ll get out the iron and start on the edges (as soon as it get’s light enough to see) ... Fitted the trim ring (just to check the fit) and that’s a nice tight fit .. so it’s all good ... so far ...
I got a 36” Al piano hinge from Frank the Bear ... the idea was to cut it in half and have two 18” hinges on the door ... that should work huh? ... Actually I got Two hinges (36”) and the other one will replace the corroded steel piano hinge on the Foamie #1 ... the only thing that’s suffered over time ... and that PINK HF frame ... grrrr!!!
Got a question ... should we use SS or brass screws with the Al hinge ??? ... dissimilar metals and all ... :NC

Forecast for today ... No rain ... :dancing

I think the smooth door finish is a combination of the kraft paper and the extremely thick canvas... and vacuuming the bits off before covering ... That canvas is possibly the heaviest canvas we’ve ever used , except maybe Fire Hose ... :o 18oz. #8 ... Thick stuff ... It should make a really long lasting and Sturdy skin .. unaffected by the occasional idiots who like to poke on the foam .. :lol: Really, my test Foamie (#1) used a very Thin linen canvas , and has survived all this time in remarkably good shape ... with ZERO maintenance ... ;)

We still have the window skin cutout to do , today , with the side cuts overlapping the exposed areas left by the other side ...
There is still that door center brace which is visible slightly through the canvas , but think we’ll just put a nice trim molding over that ... just a decoration really , serving no other purpose than hiding that center brace ... :D
There’s no place like Foam !
User avatar
GPW
Gold Donating Member
 
Posts: 14920
Images: 546
Joined: Thu Feb 09, 2006 7:58 pm
Location: New Orleans
Top

Re: FoamStream...

Postby KCStudly » Wed Jul 10, 2013 6:39 am

Bimetallic Corrosion Check out Para. 3.1 and Table 2 on pg 6. Basically, the further apart on this chart, the more likely you are to have galvanic corrosion; so SS screws on Alum are better than brass.

Unless you have soaking wet and salt, it really won't likely be much of an issue for a long time.

If you want to hedge your bet you can passivate the SS: degrease well by washing with soap and water then rinsing really well, or soak in a thin solvent (such as IPA ...isopropyl alcohol) that will evaporate readily (don't touch with bare hands after this, it will only get oil on them); soak in a 10/ct solution of citric acid for at least 1/2 hr (150 deg F is best); rinse really well then allow to sit dry undisturbed for 72 hrs. This establishes a fresh uninterrupted corrosion layer (similar to the concept of anodizing aluminum) so that the SS is much less reactive on its surface.

Or don't bother (I wouldn't). :D

Really, by the time you bed the fasteners in (paintable/removable) sealant water intrusion should be at bay and corrosion is probably much less of a concern.
KC
My Build: The Poet Creek Express Hybrid Foamie

Poet Creek Or Bust
Engineering the TLAR way - "That Looks About Right"
TnTTT ORIGINAL 200A LANTERN CLUB = "The 200A Gang"
Green Lantern Corpsmen
User avatar
KCStudly
Donating Member
 
Posts: 9640
Images: 8169
Joined: Mon Feb 06, 2012 10:18 pm
Location: Southeastern CT, USA
Top

PreviousNext

Return to Foamies

Who is online

Users browsing this forum: No registered users and 15 guests