Page 2 of 16

Re: New Build: A canned ham in foam

PostPosted: Thu Feb 19, 2015 6:13 pm
by NMMarauder
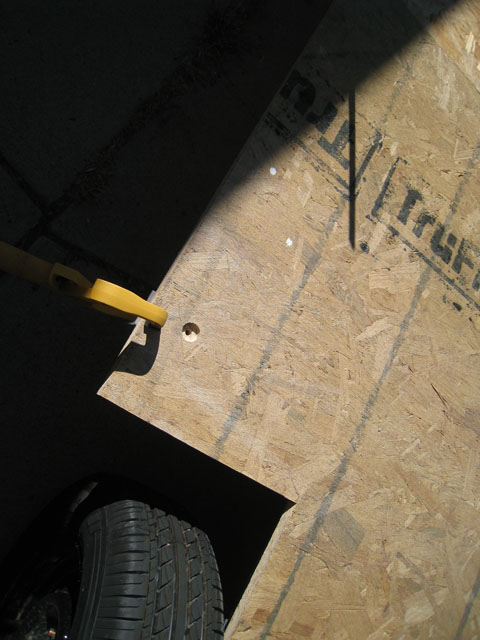
I started to use OSB for the trailer flooring. But the more I worked with it, the less I liked it. It is dimensionally stable and inexpensive but that's about all it has going for it. I use standard bolts and recess the head. You can see a bolt hole in the picture. On the plus side- I waterproofed the OSB using a mixture of polyurethane and mineral spirits and nothing else. When I set them aside, I accidentally put one in the path of our lawn sprinklers and it got watered twice a week for months with the bottom exposed to a pool of water. The waterproofing worked. No evidence of swelling or water infiltration.

Image

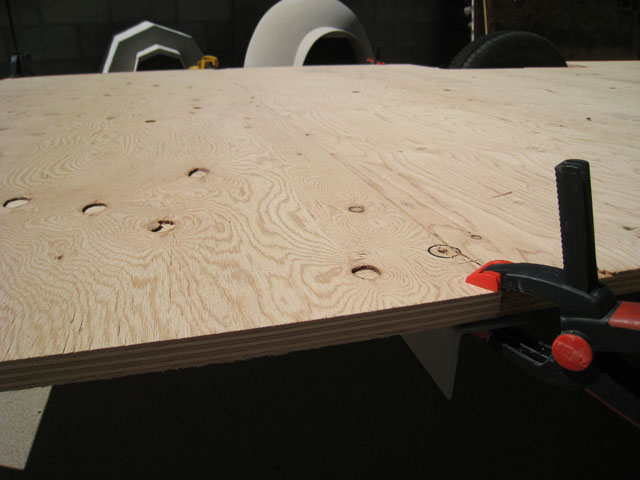
In the end, I purchased 3/4 inch 7 ply Douglas fur plywood and used it for the flooring instead. It was 3 times the price of OSB but it is lighter, stiffer and, if it somehow gets wet, less likely to cause problems. I put the 'A' side down and waterproofed it with a mix of mineral spirits and polyurethane until it wouldn't take any more, then I painted it with a high quality exterior paint. If that doesn't hold up as well as the black tar, I'll eat my shorts.

Image

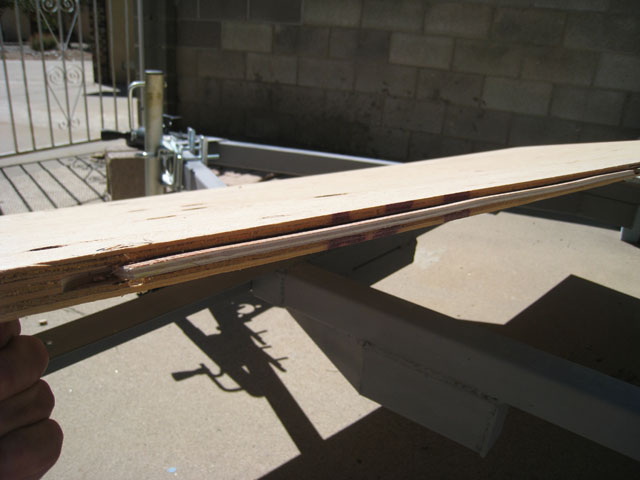
To help hold the flooring together, I created a groove and used a piece of plywood for the tongue. I glued the whole thing together with a liberal amount of tightbond 2. There is a cross member under the first seam that helps support it. The back seam is right at the edge of the bed so that is why the short piece of angle running between two cross beams exists. It is there to support the second seam in the plywood sheets.
Image

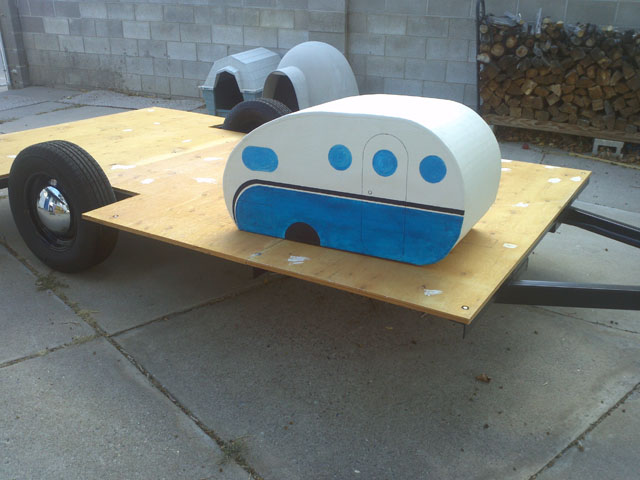
Then I filled all the knots with putty. Here is a shot of it with the trailer painted. I used Rustoleum high performance enamel thinned and rolled on in about 7 coats.
Image

Re: New Build: A canned ham in foam

PostPosted: Thu Feb 19, 2015 6:28 pm
by GPW
Ron , what about the wheel wells ... got anything special in mind ... ? :thinking:

Re: New Build: A canned ham in foam

PostPosted: Thu Feb 19, 2015 9:35 pm
by NMMarauder
GPW,

I haven't thought about the wheel wells too much so I am open to suggestions. My initial plan was to build them out of plywood and waterproof them the same way I waterproofed the underside of the flooring.

Re: New Build: A canned ham in foam

PostPosted: Thu Feb 19, 2015 9:45 pm
by NMMarauder
I think I have captured all my progress to this point. I apologize for not posting as I went along. I basically have the trailer base built, the walls built, the doors, door frames, and windows built. The next major steps are to get the walls up, the roof on and get it all covered in canvas. At that point the trailer will be weathered-in and I can leave it outside while I focus on building things for the interior.

I appreciate and encourage feedback. A wise person always listens to suggestions and there are quite a few brilliant builders on the board. If you see me about to shoot myself in the foot, please stop me. Actually if you have any suggestion at all, no matter how small don't hesitate to tell me. I may not use it but I still want to hear it.

I'll probably go back and add or edit a few of the pictures posted so far for clarification but from now on you are seeing building in real time.

Re: New Build: A canned ham in foam

PostPosted: Fri Feb 20, 2015 7:37 am
by GPW
Ron , everything is looking really Good !!!  :thumbsup: “in real time” ... Nice your floor is so low as to lower the entire height of the trailer, making entry and exit much easier ... How high is the floor off the ground ? Just curious ?

Re: New Build: A canned ham in foam

PostPosted: Fri Feb 20, 2015 7:35 pm
by NMMarauder
GPW- It currently sits at 16.5 inches. It should sink as more weight is added (no idea how much). The flexride is in the middle position of its range so I could lower it approx another 1.5 inches if I wanted.

Re: New Build: A canned ham in foam

PostPosted: Sat Feb 21, 2015 5:37 am
by GPW
Thanks Ron , That’s a nice height ... The FS is ~20” from ground to floor ... a little higher than I wanted and we need a step to get in ... :duh:

Re: New Build: A canned ham in foam

PostPosted: Sat Feb 21, 2015 11:34 am
by wagondude
I'm going to have to watch this one. Nice progress so far. Don't forget to report the dry weight and tongue weight after the build is complete. :thumbsup:

Re: New Build: A canned ham in foam

PostPosted: Tue Feb 24, 2015 12:04 am
by Mary C
I am really interested in your build Ron. any way we can help just let us know.. we're watching you 8) . just remember we are family, and like family we sometimes joke around and pick on each other. you are doing a great job so far!

Mary C.

Re: New Build: A canned ham in foam

PostPosted: Sun Mar 01, 2015 6:21 pm
by Jst83
:thumbsup: I'll be following this build as I'm left with a frame cause I tore down my duct tape fomie and really wanna build a standie.
Really like the profile and paint scheme

Re: New Build: A canned ham in foam

PostPosted: Mon Mar 02, 2015 11:34 am
by GPW
Mr. Scott... can you modify your existing frame ??? :thinking:

Re: New Build: A canned ham in foam

PostPosted: Mon Mar 02, 2015 1:04 pm
by Jst83
GPW wrote:Mr. Scott... can you modify your existing frame ??? :thinking:


I'm sure I can, maybe make it a little lighter. Part of me wants to cut it down to between the wheel wells and build a Foamie Vardo but the wife might leave me cause I'm going to look at an old Scotty this weekend and I've been talking to someone about a 1973 FAN. I really want a stand up one way or another I'll have one to camp in this summer :twisted:

Re: New Build: A canned ham in foam

PostPosted: Mon Mar 09, 2015 1:26 pm
by Ned B
very cool build, thanks for sharing your project!

Re: New Build: A canned ham in foam

PostPosted: Tue Mar 17, 2015 3:22 pm
by NMMarauder
Thank you to everyone for the encouragement. Lots of snow, a ski trip, a tweak to my back after skiing too hard have all delayed my progress but I'm finally back to building. My hope is that I can get the walls and roof up and then get it canvased before the spring winds pick up. Here is what I have accomplished since my last post.

Notches and cross beams:
Image

I got this idea from the post on the Big Pink being built and decided it was a great idea. I cut notches in the top of the walls and then cut some cross beams to go in them. This should help greatly when it comes time to glue the walls to the floor. Not only will it help to keep the walls parallel but it should provide a bit of support to the roof. You can see the notch in the edge as I am gluing the windows in the wall.

Installed a door handle in the door:

Image

This turned out to be more of an issue than I expected. Had I researched more thoroughly, I would have discovered that 1.75 inches is the normal maximum thickness of a household entry door. In my initial search I was led to believe that extension kits for thick doors are more common than they actually are. All the hole jigs that exist to help you are built for 1.75" or thinner door too. I finally found what I was looking for at a locksmith's shop. If I build another door, I'll make sure it is 1.75" or thinner and not the 2" that I built this door. Really I just picked 2" because it matched the wall thickness and I thought the extension kit was more common.

Cut and installed guide boards for the walls:
Image
I saw this in someone else's build. They glued guide boards to the floor to press the walls against. It gives a bit more glue surface, and since the inside of my walls are already canvased, it should help to hold the wall to the floor even better. As you can see I have taken the wheels off the trailer and it is sitting on rolling casters. I've measured at least 5 times to make sure I can get it back out the garage. Let's hope I didn't make a mistake :shock:

Kerfed roof pieces until I had foam dust in places the sun doesn't shine:
Image

I used a circular saw set to about 70% depth of the foam and I used math to estimate the number and spacing of the kerfs. There is a great post of how to do this on the board but basically you figure out the difference in circumference between the inside and outside of the piece you want to bend and then you cut enough kerfs to shorten the inside of the piece to match the outside. I let Sketch-up figure out this difference for me. Then assuming my saw blade took out 1/8" with each cut I could figure out how many cuts to make and how far apart to space them. I over estimated a bit. If the calculations said I needed 8 kerfs I would cut 10 just to be safe. Then I actually test fit the piece and had to adjust by cutting a few additional kerfs in areas where it felt like there was too much stress.

I did learn an important tip when kerfing with a circular saw. Pulsing the saw (pulling the trigger and then let the blade coast) it gives a cleaner cut. If you look closely at the kerfs you can see a few where the saw blade got hot enough that it melted the kerf and made it wider. That was before I figured out that pulsing the saw avoids that.

I'm gluing the windows in the walls now and the next step is to put up the walls.

Re: New Build: A canned ham in foam

PostPosted: Tue Mar 17, 2015 3:36 pm
by NMMarauder
One advantage of the foam is the ease of repair. In this picture you can see a section of my wall that was "customized" by our new puppy, as well as, the repair. The jig saw, a bit of sanding and Gorilla glue is all it took to repair it.

Image

here is a picture of the perpetrator.

Image

He is a handful. I've forgotten how much destruction puppies (especially big ones) can cause.