The Poet Creek Express - Foamie Hybrid

Canvas covered foamies (Thrifty Alternatives...)

Moderator: eaglesdare

Re: The Poet Creek Express - Foamie Hybrid

Postby KCStudly » Sun Jan 19, 2014 10:06 pm

GPW wrote:KC, you are weighing all these little bits eh ? :roll:

No. The jeep has 3000 lbs towing, and the Ford has 3500, so that's not a problem. I want it to be light overall compared to heavy plywood, but I still want to haul all of my gear, and stuff, and I have always wanted the interior to be "rich" with wood, so... I guess the creative process wins this time. I could probably quote my first post as saying something to the effect that I intend to build light weight, but not super light.

The wood splitting is done (about a cord or so of red and white oak split down to stove size pieces) and the splitter has been returned. My back is not happy about it... muscles ache. We'll see how things feel tomorrow, might stiffen up.

Couple of fingers of JWB are helping to loosen things up.

Thanks for the nod, Mel. I haven't used the foam brushes much, but when I did (on another project) I got some <edit>disintegration</edit... spell check error>. Maybe things have changed since then. :thinking:
KC
My Build: The Poet Creek Express Hybrid Foamie

Poet Creek Or Bust
Engineering the TLAR way - "That Looks About Right"
TnTTT ORIGINAL 200A LANTERN CLUB = "The 200A Gang"
Green Lantern Corpsmen
User avatar
KCStudly
Donating Member
 
Posts: 9640
Images: 8169
Joined: Mon Feb 06, 2012 10:18 pm
Location: Southeastern CT, USA

Re: The Poet Creek Express - Foamie Hybrid

Postby KCStudly » Mon Jan 20, 2014 10:31 pm

:thumbsup: Ever have one of those build sessions where you take one step forward only to find yourself walking in a circle to get back where you started? One step sideways and a bunch of steps getting back on track? :frightened:

How about this, have you ever plotted out your moves a few steps ahead; started by considering the easiest method; realized there was a small flaw in that method; thought of a modified/better way to avoid that flaw; let that idea simmer while you work on a few other things; then jump right in, forgetting the flaw and run head long straight into it taking the easy way? :x

That was me this evening. :? At least they were all small steps and I did not stray too far off of the track. :oops:

Connect the holes where the wires come thru the round hole under the light to the rectangular hole under the switch with a hidden wire way routed into the back of the block. Simple, right?

Just set the fence so the bit fits in the round hole; move the piece so the bit is in the big hole with plenty of clearance to start the router up (wouldn’t want to start it in the small hole for fear that it would bite and take off); use a push stick to route until the bit comes into the small hole; then shut the router off and let it coast down. No problem. Here it is after the first pass (operation shown on top centered over the router bit, result below).
Image

Make a few passes to get to the depth I want. No problem.
Image
See the problem yet?

How about now?

That’s right, if you do it the easy way one of the screws that mount each switch plate runs directly into the wire way from the other side. :x

No bueno. :thumbdown:

Solutions? Well the easy one is to just grind off the tips of the screws and run ‘em in. Easy peezy. But nooooo, that doesn’t sit well with me (remember, I am cursed with "The Knack"). Special fasteners for two locations? What if someone (perhaps me) comes along later, disassembles this and puts it back together without a clue (again… me :? ). What if I want to run a longer screw thru there into the paneling (temporarily) to hold the block to the wall during glue up (...if I decide to glue them at all).

No. I should have done it the way I had planned (…and forgotten to do) by making the wire ways hockey stick shaped running tangent to the rectangular opening, avoiding the screw holes, then turning into the round hole.

Now to put back whence should not have been taken. A bunch of little steps… easy, but fussy.

Custom fit Dutchmen cut from maple on the table and miter saws, dry fit and shaved flush with the little matchbox plane.
Image

Too cold to glue in the loft, and I hadn’t bothered to bring my glue with me anyway. However, these are small and easily portable, didn’t want to waste any more time, so I brought them home with a couple of spring clamps and some shims (to keep the clamps from marking the front faces) and glued them up right on the kitchen counter (love that combo stainless sink/washboard).
Image

And here we are back where we started. I’m reminded of a rhyme, “Here I sit all broken hearted… etc., etc.”
KC
My Build: The Poet Creek Express Hybrid Foamie

Poet Creek Or Bust
Engineering the TLAR way - "That Looks About Right"
TnTTT ORIGINAL 200A LANTERN CLUB = "The 200A Gang"
Green Lantern Corpsmen
User avatar
KCStudly
Donating Member
 
Posts: 9640
Images: 8169
Joined: Mon Feb 06, 2012 10:18 pm
Location: Southeastern CT, USA

Re: The Poet Creek Express - Foamie Hybrid

Postby KCStudly » Wed Jan 22, 2014 11:44 pm

Well the snow wasn't too bad; just 4 or 5 inches, or perhaps a bunch of it blew away. Delayed start at the plant was nice; got to sleep in a little and have a nice breakfast.

Now it is single digit temps, perhaps low teens during the day.

Before coming home to do snow removal duties (we just drove out this AM w/o clearing) I was able to make a new blank to replace the street side switch plate that I ruined in the iron worker. Used the shear at work.

Cold temps will continue until it gets above freezing again on Saturday. :roll:

Much below that and I just can't get the loft up to where I can work comfortably. With the heaters running, low 40's and I'm good, so long as I am working, moving around a bit. ...and that still does not get me to where I can glue or poly. :NC

Little moves for now.
KC
My Build: The Poet Creek Express Hybrid Foamie

Poet Creek Or Bust
Engineering the TLAR way - "That Looks About Right"
TnTTT ORIGINAL 200A LANTERN CLUB = "The 200A Gang"
Green Lantern Corpsmen
User avatar
KCStudly
Donating Member
 
Posts: 9640
Images: 8169
Joined: Mon Feb 06, 2012 10:18 pm
Location: Southeastern CT, USA
Top

Re: The Poet Creek Express - Foamie Hybrid

Postby GPW » Thu Jan 23, 2014 5:43 am

This weather is something huh ? Too Cold for just about anything ... BRRRRR!!! Nature’s way of saying “take a break from painting” ..
There’s no place like Foam !
User avatar
GPW
Gold Donating Member
 
Posts: 14920
Images: 546
Joined: Thu Feb 09, 2006 7:58 pm
Location: New Orleans
Top

Re: The Poet Creek Express - Foamie Hybrid

Postby KCStudly » Sat Jan 25, 2014 1:19 am

Off topic alert!

Again single digits on the way to work and never got above teens during the day. No point in going to Mecca as I would not be able to do much for long.

So I stayed after work to do a little project. I have two combination squares that I use at work; a 7 inch and a 12. These are great for layout work.

Well, the clamp that holds the straightedge tight to the square on my 7 inch, the little threaded dog that pulls the rule tight to the square, had sheared off the cleat that fits into the groove of the rule. The clamp was die cast aluminum (cheap!). It just could not stand the shear forces from tightening the clamp.

So, rather than just spend a few shekels for a new one, I decided that I would spend some time to make it better and “reuse/repair/recycle”.

So I made a new one out of stainless steel. 1/4 inch square key stock.

Here’s the plan and some bits.
Image
At the top you can see the rule; the brass nut; the spring that keeps some tension on the clamp so that the rule does not just slide out; the new clamp (left); the old clamp (right); and the square shoe part.

Kind of hard to see, but the hook (or tab) on the end of the die cast clamp (on the right) is mostly gone, having been sheared off by tightening the nut. The SS version on the left is the one I made. My first attempt at cutting threads on a lathe (took a few tries, but I got it :thumbsup: ).
Image
Image
1/4-28UNF and a little milling. Only took me a couple of evenings to get it right. :?

Here’s how the clamp fits the rule.
Image

And here it is installed in the square.
Image
Image

Didn’t scrap it, and made it better. Should last a long time now!

I am happy with the outcome.
KC
My Build: The Poet Creek Express Hybrid Foamie

Poet Creek Or Bust
Engineering the TLAR way - "That Looks About Right"
TnTTT ORIGINAL 200A LANTERN CLUB = "The 200A Gang"
Green Lantern Corpsmen
User avatar
KCStudly
Donating Member
 
Posts: 9640
Images: 8169
Joined: Mon Feb 06, 2012 10:18 pm
Location: Southeastern CT, USA
Top

Re: The Poet Creek Express - Foamie Hybrid

Postby GPW » Sat Jan 25, 2014 5:14 am

KC, you’re so Talented.... I’ll bet you could make anything , except warmer weather ... :thumbsup: 8) ;)
There’s no place like Foam !
User avatar
GPW
Gold Donating Member
 
Posts: 14920
Images: 546
Joined: Thu Feb 09, 2006 7:58 pm
Location: New Orleans
Top

Re: The Poet Creek Express - Foamie Hybrid

Postby Mary C » Sat Jan 25, 2014 9:42 am

KC, There are lots of things I can say, You do beautiful work, :thumbs up1: you are very smart, :eyebrows2: you are a great, skilled wood worker and metal worker , cook and a very nice guy there is just one thing that leaves the rest of us humbled people, :roll: We are, just a little: :envious: But heres to you :wine:

Mary C. :lady:
User avatar
Mary C
1000 Club
1000 Club
 
Posts: 1776
Images: 473
Joined: Mon Oct 15, 2012 6:29 pm
Location: Waco, Georgia
Top

Re: The Poet Creek Express - Foamie Hybrid

Postby KCStudly » Sat Jan 25, 2014 11:34 am

Mary, thank you so much for all of the very nice compliments.

GPW, I can make it warmer, but it will take a long, long time to see the result. ;)
KC
My Build: The Poet Creek Express Hybrid Foamie

Poet Creek Or Bust
Engineering the TLAR way - "That Looks About Right"
TnTTT ORIGINAL 200A LANTERN CLUB = "The 200A Gang"
Green Lantern Corpsmen
User avatar
KCStudly
Donating Member
 
Posts: 9640
Images: 8169
Joined: Mon Feb 06, 2012 10:18 pm
Location: Southeastern CT, USA
Top

Re: The Poet Creek Express - Foamie Hybrid

Postby Wolffarmer » Sat Jan 25, 2014 3:23 pm

Just keep driving and eating a mass -o-meat
"these guys must be afraid of the dark"
User avatar
Wolffarmer
Donating Member
 
Posts: 4612
Images: 309
Joined: Wed May 02, 2007 1:32 pm
Location: Idaho Rupert
Top

Re: The Poet Creek Express - Foamie Hybrid

Postby GPW » Sat Jan 25, 2014 6:14 pm

KC, and funny too ... :lol: :lol: :lol:
There’s no place like Foam !
User avatar
GPW
Gold Donating Member
 
Posts: 14920
Images: 546
Joined: Thu Feb 09, 2006 7:58 pm
Location: New Orleans
Top

Re: The Poet Creek Express - Foamie Hybrid

Postby KCStudly » Sat Jan 25, 2014 9:48 pm

Never really got warm at the shop today. Ran both the turd and the 228E. Karl had not run the woodstove yesterday, and only started it today when I arrived. Went from 31 deg F to 43 or so in the loft.

Also, some news that could affect the rest of the build; Ben has a new place and will be taking his table saw and work table (and, I assume, the miter table) within the next couple weeks. We will have to move TPCE off of the floor hatch in order to lower these down thru, and another piece of Karl’s equipment that is currently stored under the eaves.

I am certainly grateful for having been able to use these for the build to date, so no complaints. I will need to build a new work table. We will see about the table saw. The one at work is… um, pretty inaccurate. Larry generally keeps his portable unit at work (a decent Rigid with folding cart), and that might suit what I have left to do. The biggest thing I can think of right now is the lower edge of the hatch that needs to be ripped at a specific angle, and I’m sure that I will have some more shelf ledgers to rip and groove. I may have to buy a basic “job site” saw to get through the rest of the build.

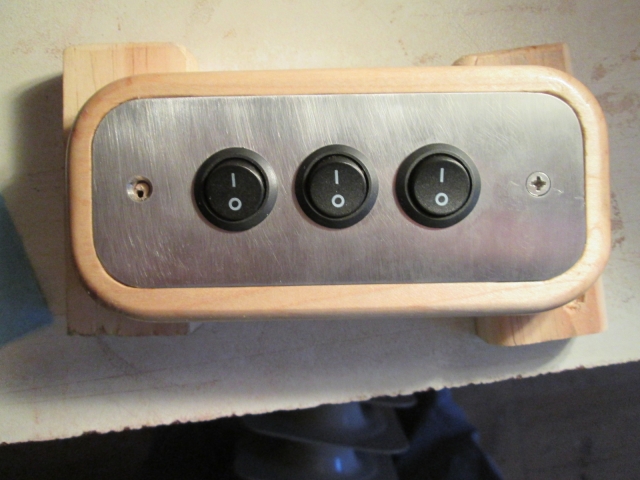
Anyway, I worked on switch plate details again today. Punched the replacement switch blank out.
Image

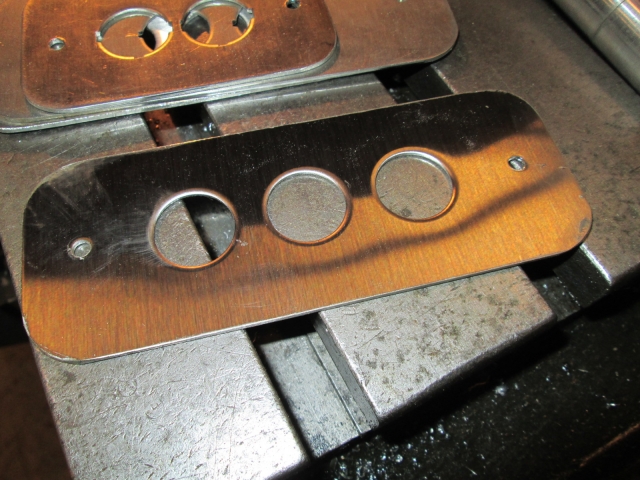
At first I started to drill the screw holes out; had one drift off location a tad (I think it was because I tried to leave the protective film on “the good side” and that let the bit wander some). Then I switched to the 1/8 inch punch in the iron worker, thought I recentered a fresh prick punch mark in the started hole. But we’ll get to that a little later. As you can see in the previous pic, I also punched out the 3/4 inch holes for the switches.

On Karl’s advice (invaluable!) I was able to flatten the warping from the punching operation simply by laying them on a rag on a piece of wood and tapping them with a small soft headed mallet.

Next I set them up in the mill with a counter sinking bit, setting the depth stop to suit the No. 6 flat head screws. You can see the countersunk hole on the right and the screw test fit on the left.
Image

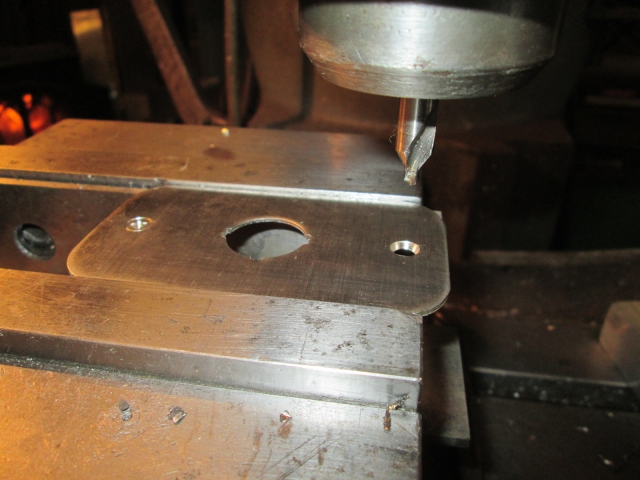
Here is a close up shot of the screw set just below flush.
Image

Some deburring, a little buffing of the grain, and a progress pic.
Image

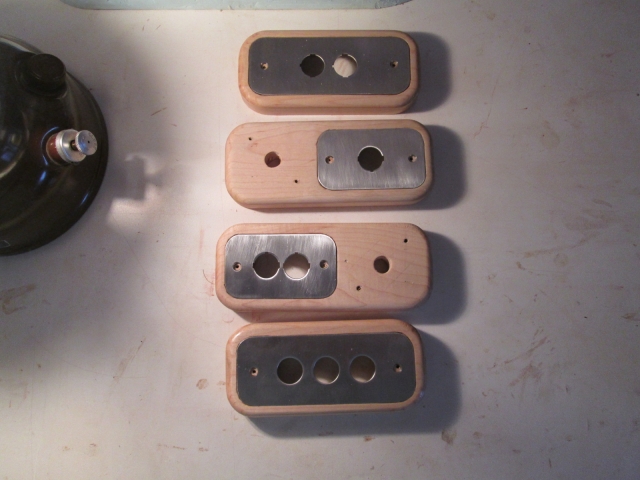
I spent a little time making an adjustment to one of the pillow light blocks because the plate didn’t want to sit down as well as it did before stain. Not sure if I had missed this or if something had changed.

<edit to add> Then I filed the switch key slots in the new switch plate. <end edit>

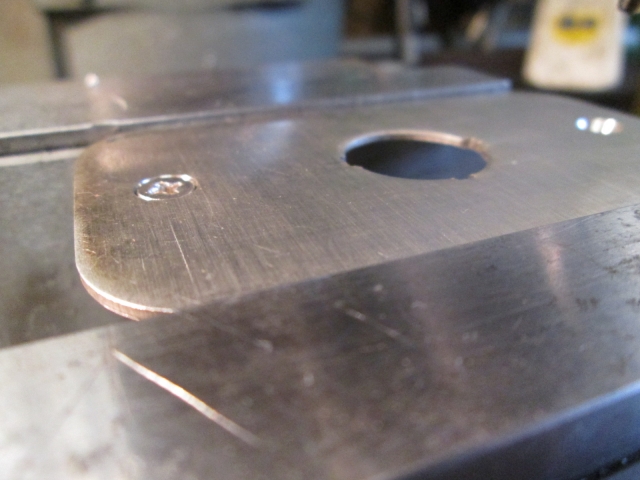
Next I found that one of the screw holes in the replacement switch plate was not centered on the previously drilled screw holes, shown here on the left after fitting the switches.
Image
Image

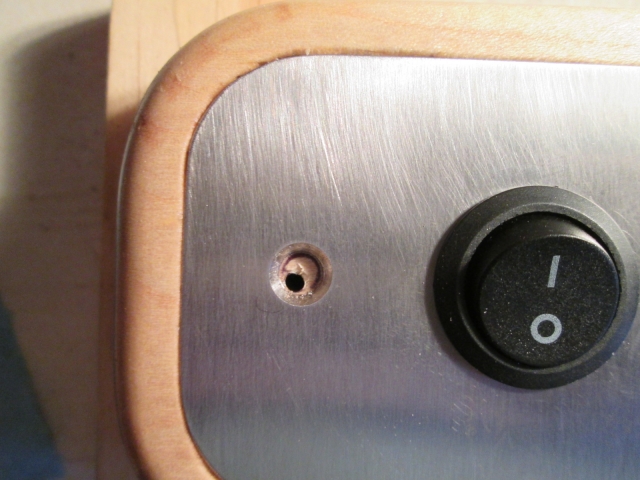
I ran a ball point pen around the inside of the hole as a reference.
Image

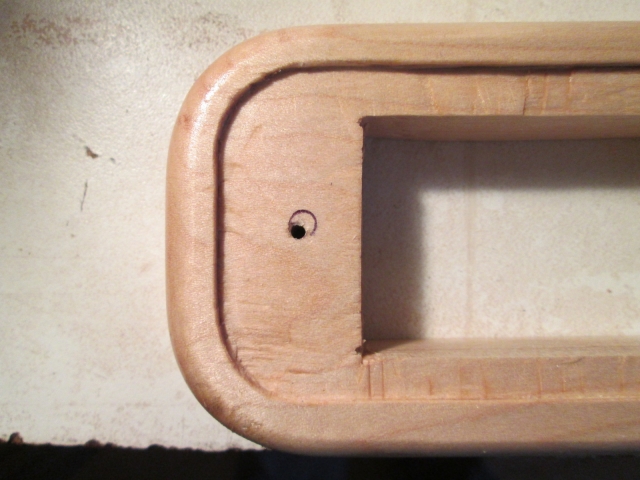
Back to the mill. Because it is very stable and the tools are short and stout, I used a 1/4 inch centering bit to pilot drill the screw hole oversize.
Image

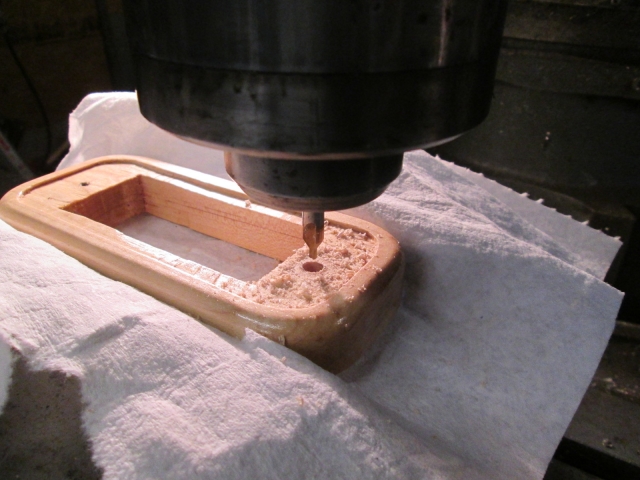
To get the hole a little deeper I switched to a 1/4 inch drill bit.
Image
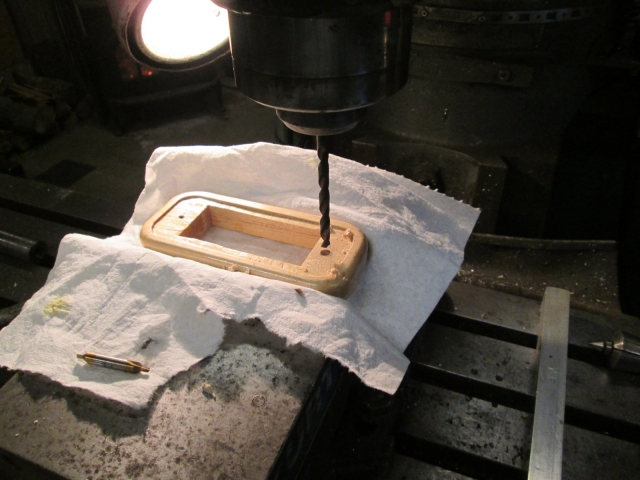
I didn’t drill thru the whole way.

This allowed me to stuff a hardwood dowel into the hole w/o it sticking thru.
Image

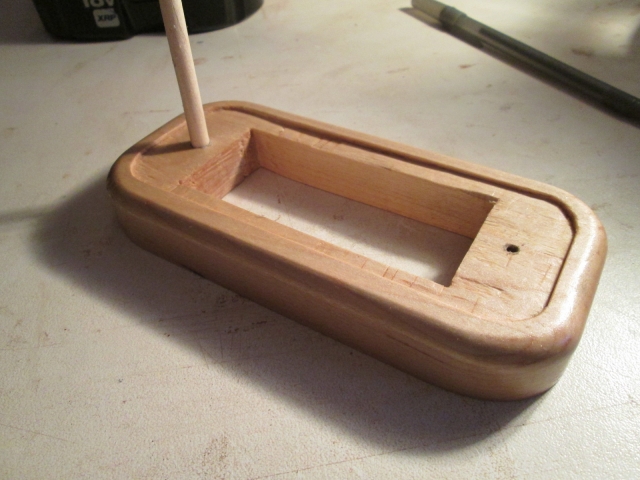
I cut a small piece of the dowel off by just rolling it on the table with the utility knife. Later, at home where it was warm, I glued the dowel into the hole. This will allow me to recenter the screw hole to the new plate so that the flathead screw sits flat.

Next, I went back to the pillow light switch blocks and routed the “hockey stick” wire ways. Note the blue tape with two reference lines.
Image

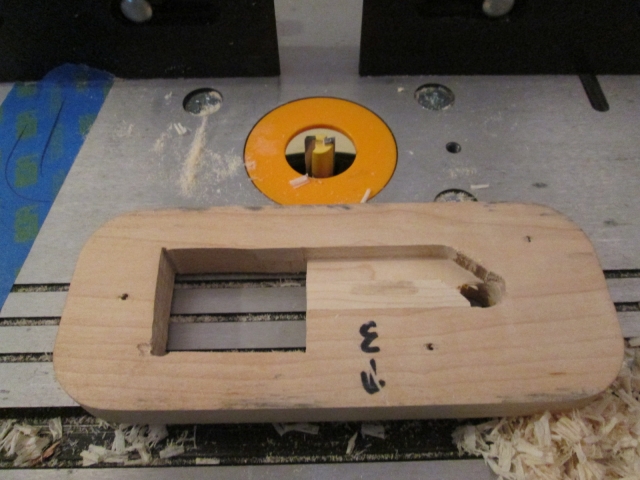
Here is the starting point.
Image

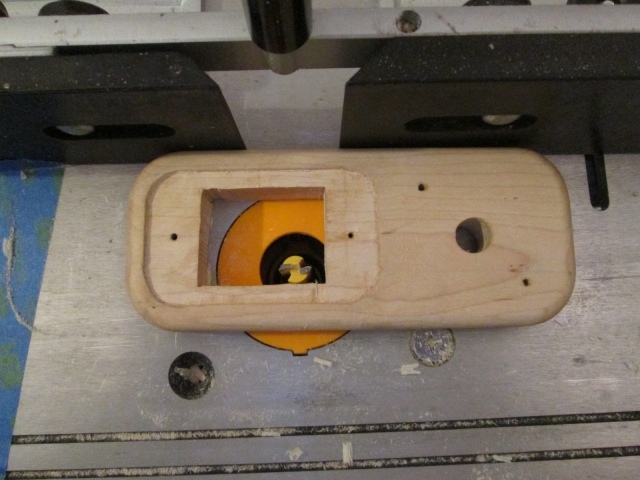
Ran it along the fence until it came to the first line on the tape.
Image

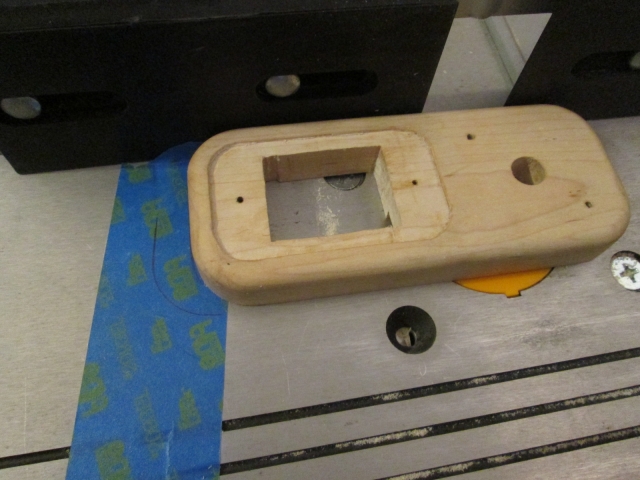
Then eyeballed it while rotating the trailing edge out from the fence until it lined up with the second line (which I had traced onto the tape while eyeballing the block with the hole centered over the bit).
Image

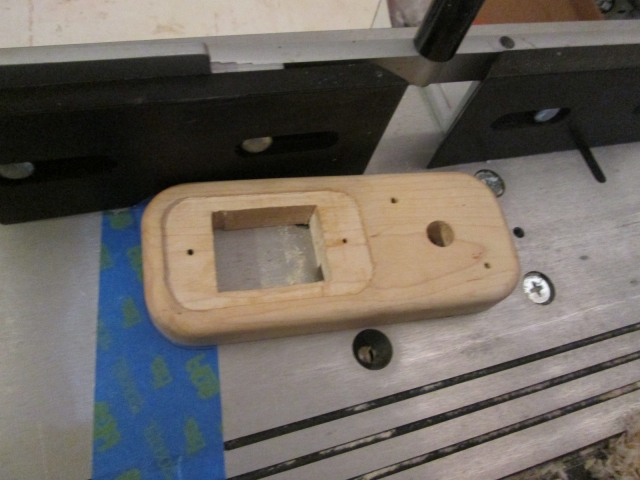
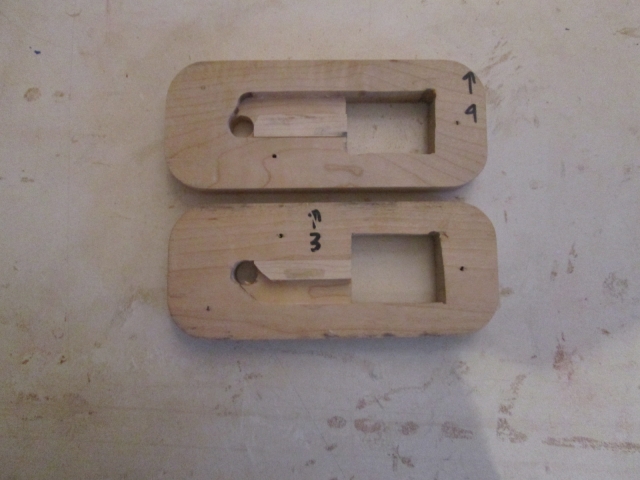
Second piece was done similarly, except opposite hand.
Image

And by this time (about 4 hrs later) the sun (overcast sky) was starting to dwindle, the temps began to drop, and I was cold. Enough for today.
Last edited by KCStudly on Mon Jan 27, 2014 9:17 pm, edited 1 time in total.
KC
My Build: The Poet Creek Express Hybrid Foamie

Poet Creek Or Bust
Engineering the TLAR way - "That Looks About Right"
TnTTT ORIGINAL 200A LANTERN CLUB = "The 200A Gang"
Green Lantern Corpsmen
User avatar
KCStudly
Donating Member
 
Posts: 9640
Images: 8169
Joined: Mon Feb 06, 2012 10:18 pm
Location: Southeastern CT, USA
Top

Re: The Poet Creek Express - Foamie Hybrid

Postby GPW » Sun Jan 26, 2014 5:30 am

After seeing those , ordinary switch plates will never do anymore ... :o NICE !!! 8)

KC, can’t you “adjust" that table saw to cut accurately ? :thinking:

Still waiting on that “make it warmer “ business, you can get on that any time eh ... :lol: :lol: :lol:
There’s no place like Foam !
User avatar
GPW
Gold Donating Member
 
Posts: 14920
Images: 546
Joined: Thu Feb 09, 2006 7:58 pm
Location: New Orleans
Top

Re: The Poet Creek Express - Foamie Hybrid

Postby Wolffarmer » Sun Jan 26, 2014 9:55 am

You could get a somewhat nice hand plane to do that angle cut.

Come to the dark side of hand tools. Goes good with Coleman

Image
"these guys must be afraid of the dark"
User avatar
Wolffarmer
Donating Member
 
Posts: 4612
Images: 309
Joined: Wed May 02, 2007 1:32 pm
Location: Idaho Rupert
Top

Re: The Poet Creek Express - Foamie Hybrid

Postby KCStudly » Sun Jan 26, 2014 10:03 am

Thanks, GPW. I'm happy with the way they are turning out. Takes time though.

The biggest issue with the saw at work is the horrible blade guard and splitter. The splitter is actually wider than the blade, so you really have to push hard to get wood to go thru (more dangerous than not having the splitter, IMO). That and the blade guard that is so sloppy that it swings into and out of the blade, and keeps the rip fence from being able to get very close to the blade.

As far as accuracy goes, maybe I misspoke. The inaccuracies I saw when ripping those slats for the galley wall hard edges was probably just as much due to the wood that I was pushing, as it was the saw.

I'll work something out, if and when the time comes.
KC
My Build: The Poet Creek Express Hybrid Foamie

Poet Creek Or Bust
Engineering the TLAR way - "That Looks About Right"
TnTTT ORIGINAL 200A LANTERN CLUB = "The 200A Gang"
Green Lantern Corpsmen
User avatar
KCStudly
Donating Member
 
Posts: 9640
Images: 8169
Joined: Mon Feb 06, 2012 10:18 pm
Location: Southeastern CT, USA
Top

Re: The Poet Creek Express - Foamie Hybrid

Postby KCStudly » Mon Jan 27, 2014 9:32 pm

Hey Randy, somehow I missed your post with the great picture of the planes and shavings (must have crossed in the electrons). I’m reminded of the story about the company that was trying to impress a client and showed him a perfectly clean and organized work area. The client commented, “yeah, that’s nice, but where does the work get done?”

The weatherman got it wrong and it was in the low 40’s today.

Not ideal conditions, but I decided to see if I could get away with putting a thinned coat of poly on the switch blocks (second coat for the main switches, first for the pillow lights). Used a cheap chip brush, too, and it seemed to do okay.
Image

Next I began installing the cabin lights, starting with the dome light mounting blocks. Curb side first.
Image

Then the street side.
Image

Next I shortened the wires some, soldered, cleaned away flux, and shrink wrapped the leads.
Image

From there I coiled the excess wire up into the recessed hole in the block and screwed the fixture down.
Image

Then I snapped the white trim bezel on.
Image
Karl doesn’t like the white and thinks I should paint the bezels black, but I think that could yield mixed results and just isn’t something I intend to do.

Then I repeated the same steps on the street side.
Image

Last for tonight, I did the finish wiring and mounted the red night vision light under the rear cabinets. (This pic is taken looking up at the underside of the cabinet with my head up against the bulkhead on the street side and my feet where our pillows will be.)
Image

There wasn’t hardly any room for excess wire behind this fixture, so I had to pull a bit of the zip cord back thru “Grand Central”. I’ll have to pull this back along the street side wire chase and get it to lay nice again.

The forecast looks to be above freezing (barely) for the rest of the week, so I should be able to make progress on the switches on Wednesday.
KC
My Build: The Poet Creek Express Hybrid Foamie

Poet Creek Or Bust
Engineering the TLAR way - "That Looks About Right"
TnTTT ORIGINAL 200A LANTERN CLUB = "The 200A Gang"
Green Lantern Corpsmen
User avatar
KCStudly
Donating Member
 
Posts: 9640
Images: 8169
Joined: Mon Feb 06, 2012 10:18 pm
Location: Southeastern CT, USA
Top

PreviousNext

Return to Foamies

Who is online

Users browsing this forum: No registered users and 10 guests