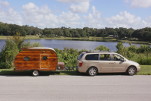
KC, your build is an absolute work of art and precision! And while I am not a "Bad Brad" fan, almost anyone winning over Kurt or Kevin works for me. I've been a NapCar fan since the 60s, you would not believe who taught me and some of my buddies how to drive a race car because he helped us in building one when we were 16.
dave
The Poet Creek Express - Foamie Hybrid
Moderator: eaglesdare
Re: The Poet Creek Express - Foamie Hybrid
*******
Dave and Regina - Enjoying old age, a LOT!
Build Journal - http://www.tnttt.com/viewtopic.php?f=50&t=62386
Dave and Regina - Enjoying old age, a LOT!
Build Journal - http://www.tnttt.com/viewtopic.php?f=50&t=62386
-

daveesl77 - Donating Member
- Posts: 871
- Images: 273
- Joined: Tue Jan 27, 2015 4:33 pm
- Location: Pocahontas County, West Virginia
Re: The Poet Creek Express - Foamie Hybrid
daveesl77 wrote:KC, your build is an absolute work of art and precision! <snip> ...you would not believe who taught me and some of my buddies how to drive a race car because he helped us in building one when we were 16. dave
Thank you for the very generous complement. I appreciate it greatly!
 I'm going to guess Ivan "Iron Man" Stewart?
It doesn't say it in your avatar, but I seem to recall that you are from down under, correct? Hence the Iron Man guess.
BTW, if you go to your user control panel and select "profile" you can add a location. It doesn't have to be specific, but it is nice to give people a general idea where you are from; helps with communication, parts sourcing advice, weather related advice, etc.
BTW, I've been meaning to ask about the image in your avatar. Looks like some ancient archeological ruin viewed from a rock cliff?
KC
My Build: The Poet Creek Express Hybrid Foamie
Poet Creek Or Bust
Engineering the TLAR way - "That Looks About Right"
TnTTT ORIGINAL 200A LANTERN CLUB = "The 200A Gang"
Green Lantern Corpsmen
My Build: The Poet Creek Express Hybrid Foamie
Poet Creek Or Bust
Engineering the TLAR way - "That Looks About Right"
TnTTT ORIGINAL 200A LANTERN CLUB = "The 200A Gang"
Green Lantern Corpsmen
-

KCStudly - Donating Member
- Posts: 9640
- Images: 8169
- Joined: Mon Feb 06, 2012 10:18 pm
- Location: Southeastern CT, USA


