The Poet Creek Express - Foamie Hybrid

Canvas covered foamies (Thrifty Alternatives...)

Moderator: eaglesdare

Re: The Poet Creek Express - Foamie Hybrid

Postby OP827 » Fri May 15, 2015 8:58 am

Yes KC, please ask the guy if any malfunction happens with one of the actuators, like the brush in the motor starts to fail or its power wire shorted or gets disconnected, will the LA controller monitor such situations and stop both actuators at once (and ideally since there are LEDs there then provide some indications which actuator is at fault)? If yes, then that should take care of uneven actuators operation damage concern. Cheers and thanks for posting the information :thumbsup: .
User avatar
OP827
Donating Member
 
Posts: 1561
Images: 405
Joined: Fri Apr 25, 2014 7:27 pm
Location: Bruce County Ontario

Re: The Poet Creek Express - Foamie Hybrid

Postby Sheddie » Fri May 15, 2015 4:14 pm

:thinking: :? I am really starting to like my gas struts even more.
User avatar
Sheddie
1000 Club
1000 Club
 
Posts: 1499
Images: 1129
Joined: Mon Jul 01, 2013 3:26 pm
Location: Whangarei, New Zealand

Re: The Poet Creek Express - Foamie Hybrid

Postby GPW » Fri May 15, 2015 5:07 pm

The more complicated something becomes ... The more complicated something becomes . :duh:

Foamlings will take note of this ... :roll:
There’s no place like Foam !
User avatar
GPW
Gold Donating Member
 
Posts: 14912
Images: 546
Joined: Thu Feb 09, 2006 7:58 pm
Location: New Orleans
Top

Re: The Poet Creek Express - Foamie Hybrid

Postby KCStudly » Sat May 16, 2015 12:09 am

On the flip side, I am expanding my knowledge base and challenging myself to learn new things.

If I don't like the actuator setup in use, I can revert to the more traditional struts. I planned for those, too, and installed blocking for them as a fall back plan.

I spent sometime after work today confirming that my Spal labelled actuators are in fact the exact same part number as the Classic Werks labelled units, and the Spal spec sheet I have is the very same art work as the Classic Werks version. Got my questions organized but I must have been too late in the day to reach them; no answer. The robot place that also sells their controller (linked before) wasn’t able to answers any technical questions for me either, so I will try again another day.

Back at Mecca I rearranged the tourniquet setup. The stretcher is clamped to the hatch hinge spars at the top. I needed something more under the rear edge of the floor to clamp the lower end of the stretcher to. So I used a couple of quick clamps on the draw latches to gently hold a 2x3 up to the floor, with the tourniquets taking the tension. This is looking along the curb side, back (ignore the foot light wires dangling in the foreground).
Image
Image

I had a few issues in the dry run not getting an even clamp and having clamps fall off whenever I tried to add another. To keep the doubled back Tyvek from popping the clamps off of the aluminum I rolled it up a wrap or two and clamped it with the green spring clamps to keep it from unrolling; a wooden stretcher with staples would have been better and not rolled out so much. Not sure that the aluminum tube wasn’t bending, and on and on.

In the end I went ahead and PL’d it, skewered it, stretchered it with just two larger clamps toward the ends and one in the middle. The loose looking Tyvek here is the extra length folded back on its self. The lap against the foam, visible above the packing tape seam, is all taut.
Image

On this larger panel I ran beads around the perimeter, did close vertical zigzags in the field, and made sure to put a dab on each screw head. Before placing the foam I spread the perimeter beads out to make sure I had it glued right to the edges.

Tomorrow is the Unimog/Pinzguaer meet, so a full day out wheeling.
KC
My Build: The Poet Creek Express Hybrid Foamie

Poet Creek Or Bust
Engineering the TLAR way - "That Looks About Right"
TnTTT ORIGINAL 200A LANTERN CLUB = "The 200A Gang"
Green Lantern Corpsmen
User avatar
KCStudly
Donating Member
 
Posts: 9617
Images: 8169
Joined: Mon Feb 06, 2012 10:18 pm
Location: Southeastern CT, USA
Top

Re: The Poet Creek Express - Foamie Hybrid

Postby Wobbly Wheels » Sat May 16, 2015 12:48 am

Looks like the Tyvek was definitely the key, eh?

With this discussion in mind, I checked out the hatch strut on a boat I was working on recently. I didn't get the info off the strut, but the boat was a 28' Regal so it's not garbage. While they generally have limit switches, this one sounded like it had some sort of clutch that disengaged when it reached either end of its travel. It was helpful to know from the helm when it was all the way down because you could hear the ratcheting through the hatch and all the cushions built into the top of it.
FWIW, I have seen a few boats with engine hatches on dual actuators rather than one in the center and haven't seen any sort of module between them that I can recall, just relays and solenoids. Not that one couldn't build one of course...
With the ones on the hatch of our new Escape, you can pull them open or push them closed to override the motor. Something with that action should negate the need for synchronization and cause them both to operate at the speed of whichever one is the slowest at the time.

Tomorrow is the Unimog/Pinzguaer meet, so a full day out wheeling.

You have GOT to be kidding ! :thumbsup: :thumbsup: :thumbsup:
Pics please ? :worship: :worship:
M35s are cool and all, but I'll wager I'm not alone in the dream to someday build an expedition rig on a Pinzgauer or Mog platform.....
User avatar
Wobbly Wheels
Donating Member
 
Posts: 1080
Joined: Tue Mar 15, 2011 9:51 am
Top

Re: The Poet Creek Express - Foamie Hybrid

Postby Wolffarmer » Sat May 16, 2015 3:27 am

For your information. Those actuators do not take fire to well. I think I found the remains of those two today. About the only thing left was the center screw. every thing else melted or burned off.

:cry: :cry:
"these guys must be afraid of the dark"
User avatar
Wolffarmer
Donating Member
 
Posts: 4612
Images: 309
Joined: Wed May 02, 2007 1:32 pm
Location: Idaho Rupert
Top

Re: The Poet Creek Express - Foamie Hybrid

Postby dales133 » Sat May 16, 2015 3:47 am

Can't beat a unimog I've wanted one forever
User avatar
dales133
4000 Club
4000 Club
 
Posts: 4605
Images: 1
Joined: Mon Oct 13, 2014 5:26 pm
Top

Re: The Poet Creek Express - Foamie Hybrid

Postby anon1 » Sun May 17, 2015 2:03 pm

Wobbly Wheels wrote:...
Pics please ? :worship: :worship:
M35s are cool and all, but I'll wager I'm not alone in the dream to someday build an expedition rig on a Pinzgauer or Mog platform.....


Yes, pics would be great. I'd abandon all TD forever, in an instant.
anon1
Teardrop Advisor
 
Posts: 57
Joined: Tue Jan 28, 2014 4:38 pm
Top

Re: The Poet Creek Express - Foamie Hybrid

Postby KCStudly » Tue May 19, 2015 12:52 pm

Sorry folks, I'm not ignoring you. I started loading some Mog Fest pics to a folder in my gallery, but it was going very slowly. I will get back to it ASAP.

In the meantime I have made small steps toward completing the first layer of foam on the hatch; update soon.
KC
My Build: The Poet Creek Express Hybrid Foamie

Poet Creek Or Bust
Engineering the TLAR way - "That Looks About Right"
TnTTT ORIGINAL 200A LANTERN CLUB = "The 200A Gang"
Green Lantern Corpsmen
User avatar
KCStudly
Donating Member
 
Posts: 9617
Images: 8169
Joined: Mon Feb 06, 2012 10:18 pm
Location: Southeastern CT, USA
Top

Re: The Poet Creek Express - Foamie Hybrid

Postby KCStudly » Tue May 19, 2015 8:23 pm

Wobbly Wheels wrote:Looks like the Tyvek was definitely the key, eh?

I don’t know yet. It has the needed width; it didn’t tear where it stuck a little; but it also seems a little stretchy compared to the paper; is not as stiff, so is a little harder to handle (but that could just be the larger size) and does not square up taut like the paper. Also, in looking at my pictures again I see now that it would be a lot easier to pull taut if I reposition the packing tape lap seam, let the lower stretcher board wrap under the bumper and just pull it directly with the tourniquets.

Wobbly Wheels wrote:… checked out the hatch strut on a boat I was working on recently. <snip>… haven't seen any sort of module between them that I can recall, just relays and solenoids.

That tips the scales back toward doing some bench testing with a simple switch set-up (my original plan). However, since the controller adds the ‘one touch’ feature I will probably go that way, not just for the peace of mind, but also for the convenience upgrade. Imagine walking over to the galley, passing by the switch, giving it a poke, continuing around to the back as the hatch finishes opening; vs. walk over to switch, holding switch down several seconds until hatch is fully open, then continuing on.

Wobbly Wheels wrote:With the ones on the hatch of our new Escape, you can pull them open or push them closed to override the motor. Something with that action should negate the need for synchronization and cause them both to operate at the speed of whichever one is the slowest at the time.

Interesting. I wonder how that works internally (it’s the Jack-in-the-box conundrum all over again :R ).

Re: Unimog/Pinzguaer meet
Wobbly Wheels wrote:You have GOT to be kidding ! :thumbsup: :thumbsup: :thumbsup:
Pics please ? :worship: :worship:

anon1 wrote:Yes, pics would be great. I'd abandon all TD forever, in an instant.


Stand back, comin’ thru…
First let me say I am terrible with names on a first time basis, so I apologize to the owners for any lack of credit or misinformation.
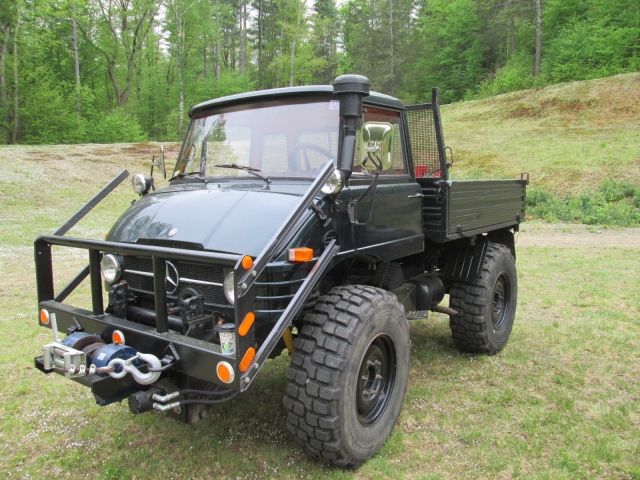
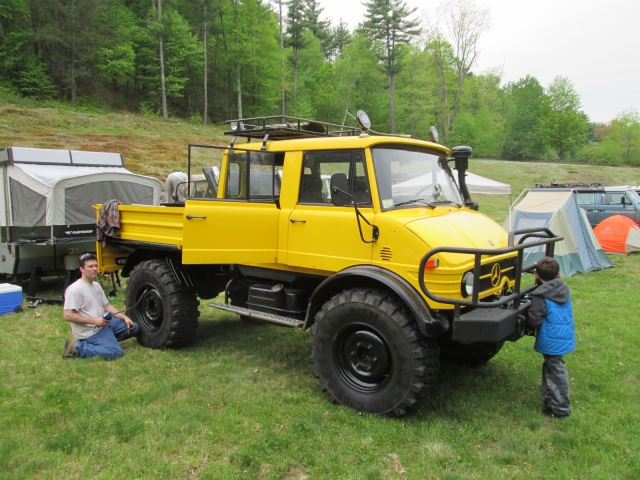
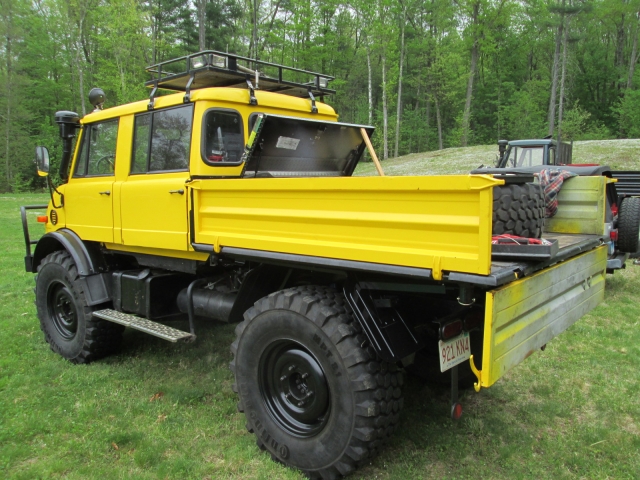
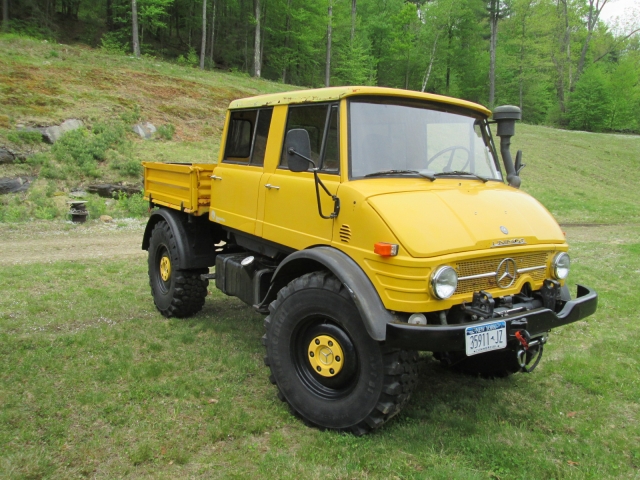
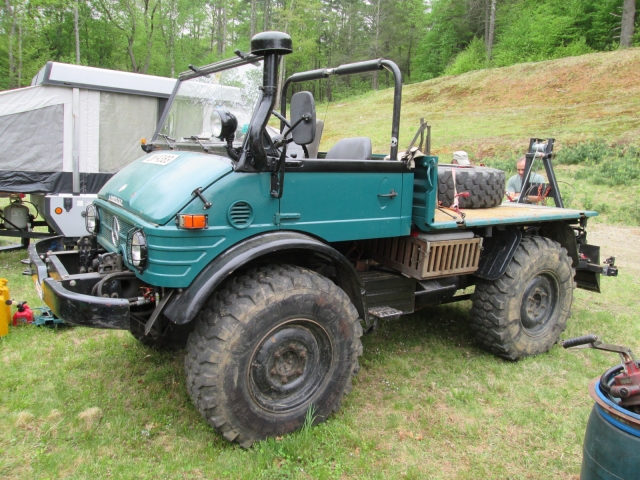
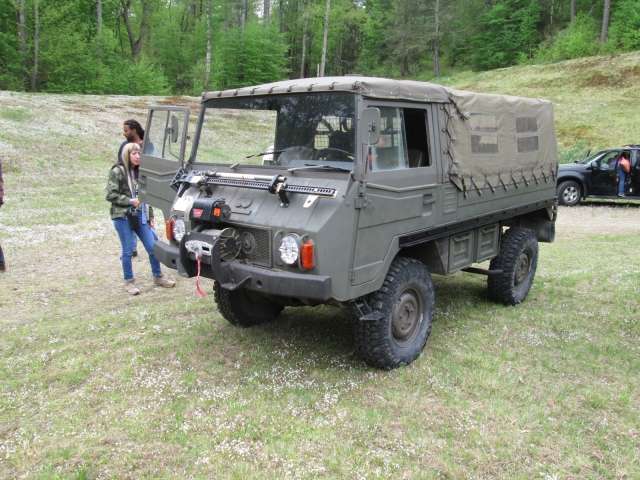
This was a really clean short bed with some nice additions/modifications made by the machinist/owner, including the custom front winch mount and brush deflectors.
Image

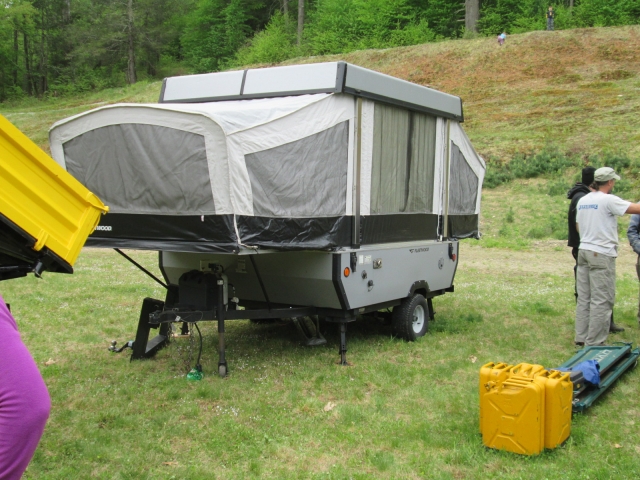
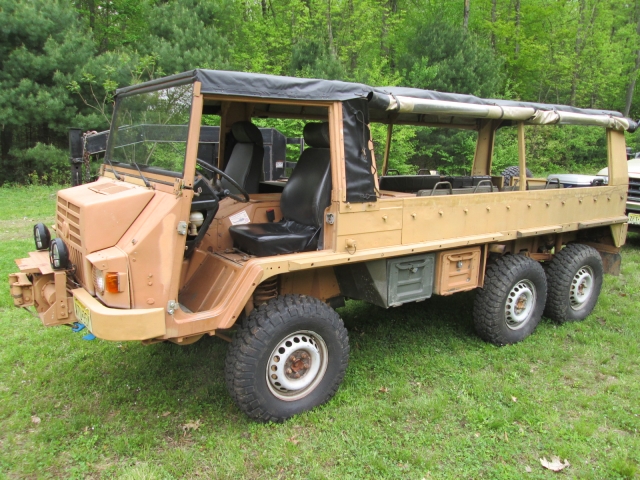
Given the terrain in our region it’s a tough call between the extra passenger room and extended wheelbase of the dual cab models, versus the maneuverability of the short WB, but this yellow zonker was probably my pick of the meet. Very clean condition all over; 3-way dump bed, nice big bed box, and room for a crowd. He has plans to mount the P/U camper box on the bed sideways. Note the removable drop hitch frame (leaning against the camper) for standard hitch height while still maintaining trail clearance.
Image
Image
Image
Image

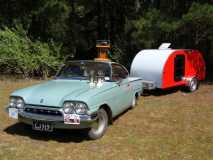
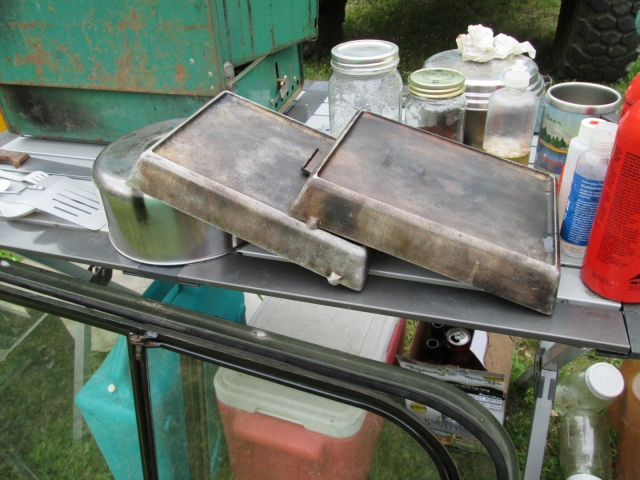
Some people came early or stayed late and camped. The owners of this grungy 425E had these really cool aluminum roasting trays.
Image
Image

One of the organizers and host of the event, Matt Domnarski (
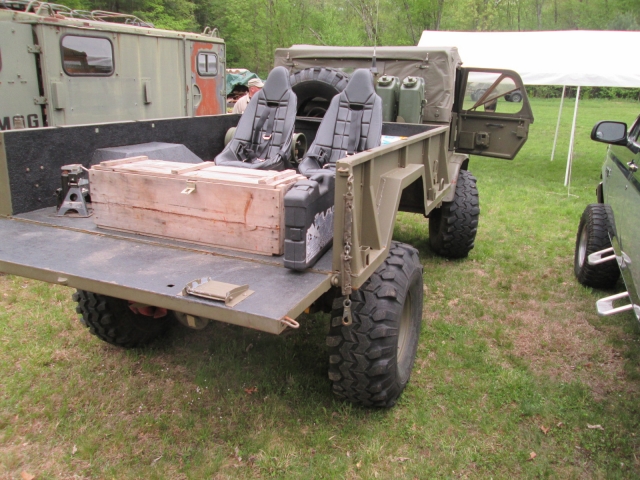
http://www.Domnarskifarm.com), took the radio box off of his Mog, and swapped it with the utility bed off of the adjacent military trailer. Other mods include propane injection, removal of unneeded equipment from along the frame rails (for better trail clearance), and re-centering custom wheels to allow mounting Super Swamper tires.
Image

The one on the right is a newer model (sorry, not familiar with the digits). It was the widest and tallest thing on the trail that day. The white long bed behind it rode around with the doors removed.
Image

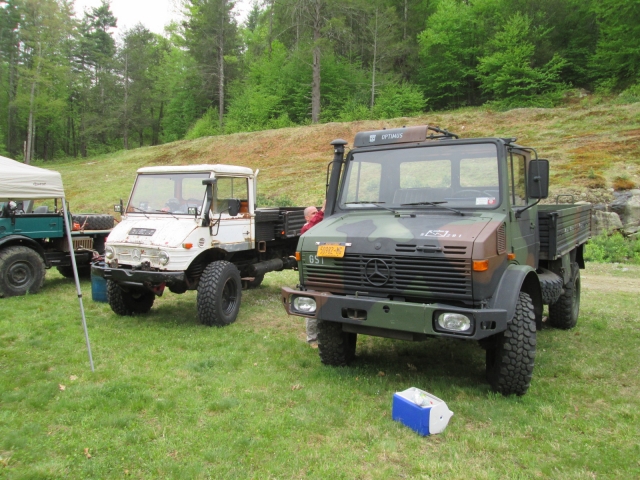
The other yellow twin cab was a little rougher in the cab, but I wouldn’t turn my nose up at any of these beauties.
Image

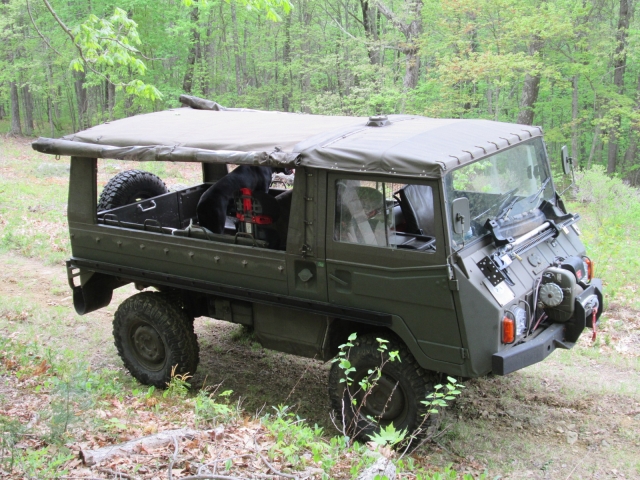
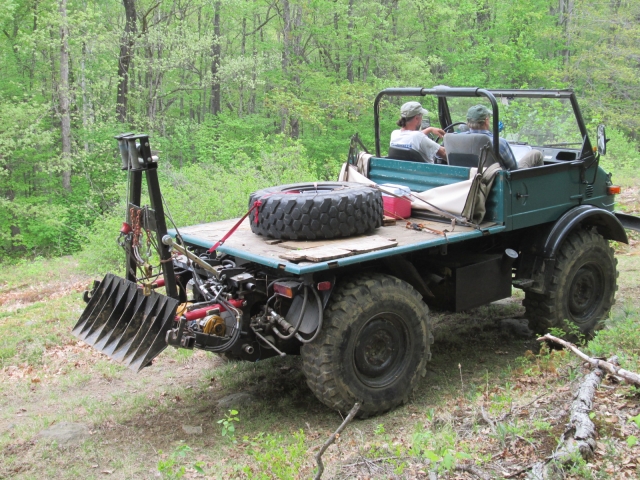
This short WB convertible had an owner built log skidding rig on the back and a custom cooler basket that sort of looked like a lobster pot (under the driver’s side of the bed).
Image

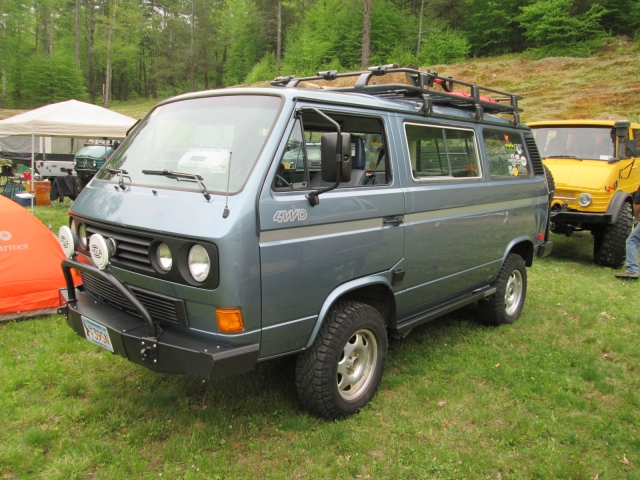
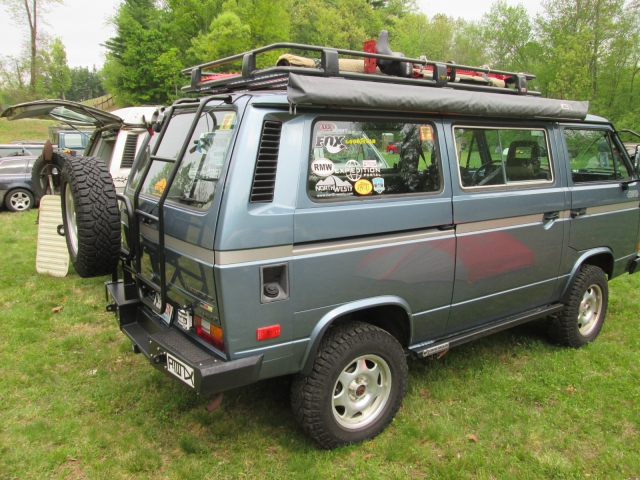
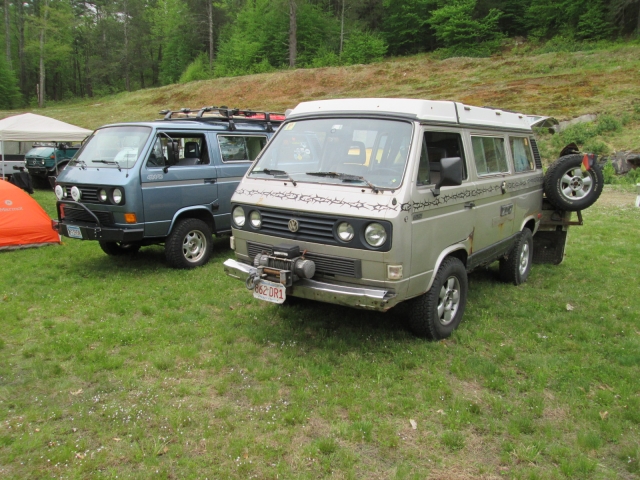
The event is open to all European makes. This year a couple of VW 4x4 campers joined in. I’m told that these are pretty rare. They have locking differentials (hydraulic or mechanical) and a granny low gear in lieu of a proper 2-speed transfer case. The blue one was very clean except for a little trail rash on the driver’s side, and was kitted out nicely. Due to its rarity and nice condition, the owner was convinced to park and ride along after the first gnarly stint on the trail.
Image
Image

The silver one was a lot rougher, but had more of a hardcore set-up with 1/4 inch skid plating under the engine and tranny, spare axle hub pulling double duty as a spare tire mount, Ford Focus engine swap with custom flywheel that allowed both Ford and VW starters to be maintained (used for crawling) and carried spare axles (that came into play when the going got very rough). We were all very impressed with how far up the trail this rig got.
Image

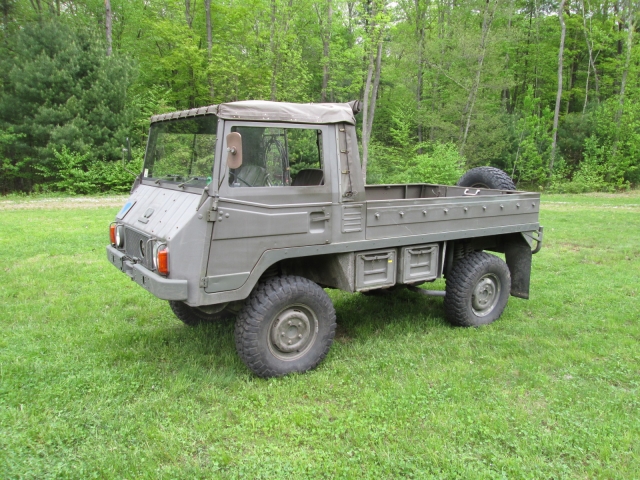
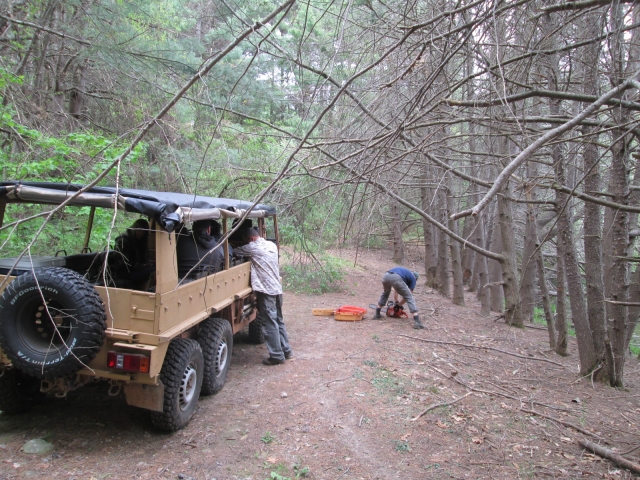
4-cyl air cooled Pinzguaer. These have a cast aluminum center spine drive train with rear transaxle. All of the weight is low in the drive, with just minimal lightweight body above.
Image

This is Shawn’s family hauler, carrying wife, two young kids and two 120 lb. Italian Mastiffs. Note the machine gun mount (I assume) sticking thru the roof in the 2nd pic.
Image
Image

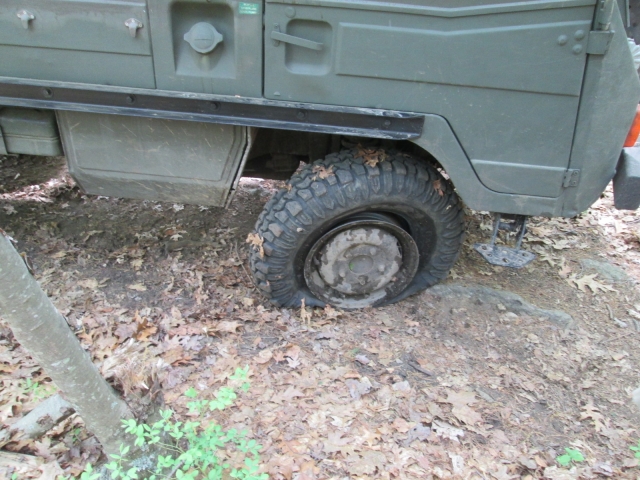
With tires aired down for better floatation/traction and a softer ride, it was easier to pop a bead, but with a couple of guys pitching in we had it swapped out and back on the trail in no time.
Image

I was riding along with Larry in his bone stock ’04 Rubicon. Stock tires, stock lift. The only mods were an electrical tweak that allows the factory lockers to stay engaged in 4-high and above the limited wheel speed, and a newly added front winch (which we didn’t need). Simply amazing the capability these things have. Larry dragged, crabbed, dug and clawed this thing across rocks and logs; and up and down ledges and slopes, one over 45 deg pitch, that no street car would ever have a hope of challenging.
Image

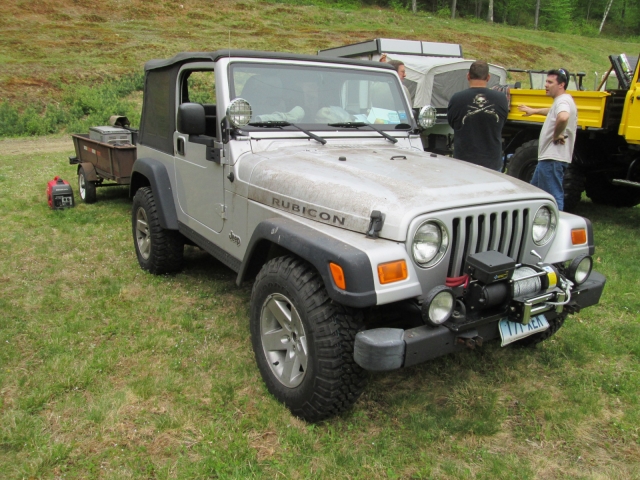
Note that this is not a European make. The inaugural event, 5 years ago, was opened to all 4x4’s and the jeep club that Larry had just joined participated. He didn’t much care for the “tear it up” yahoo antics of his fellow club members, and neither did the Mog Fest organizers. Larry was the only one invited back, having made an impression with his driving skills and accommodating demeanor. They are a great group of people; easy going and friendly.

There were occasional stops to clear fallen trees and brush. The 6-wheeler rode lead with us behind, then Von’s Mog (vonsmog.com) behind us. At some point, when the VW broke and the Pinz popped the bead the three of us made it the farthest up the trail, by far.
Image

It was amazing to see this long WB monster squeezing easily between pinch points and around tight turns w/o having to go around or back up. You can tell it is a water cooled diesel by the pug nose radiator shell.
Image
Image

Matt’s Mog out on the trail. Note the little white ball on stick “feeler gauge” located on the passenger side front bumper. At first I thought this was a gag, but then I realized that it was all that was needed for the driver to know where the corner of the front bumper was when viewed from the high forward driver’s seat.
Image

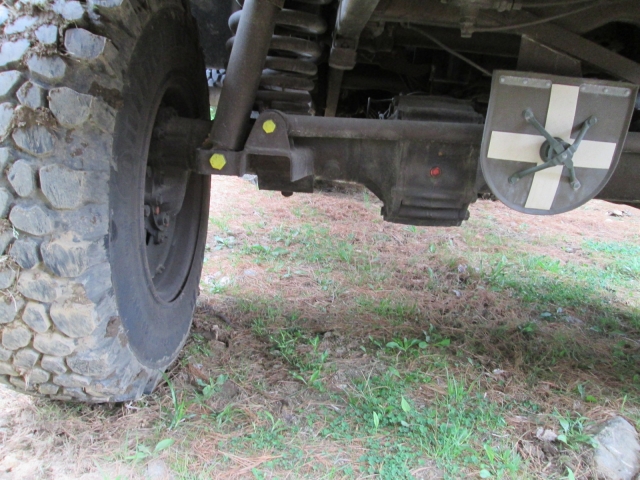
One of the most awesome things about these vehicles is the rugged portal style axles. The main axle shaft enters the wheel hub higher than center and the hub contains an extra set of reduction gears. The end result is high ground clearance and torque multiplication for large tires. Ring and pinon gears are limited in ratio because the pinion can only be so small before it becomes too weak; having the extra set of spur gears in the hubs increases the reduction with the added benefit of offsetting the axle tube higher up.
Image

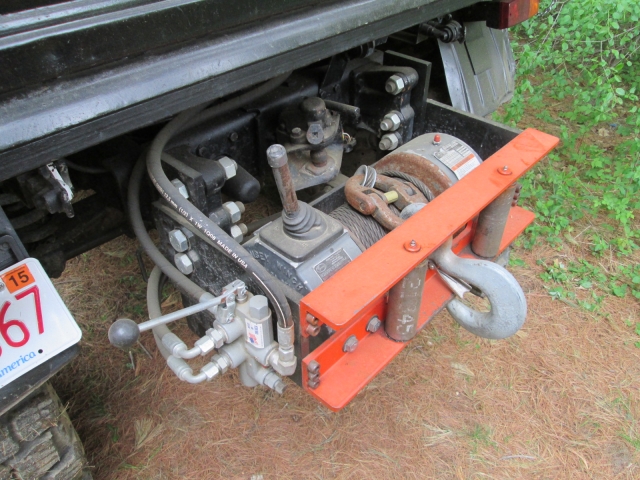
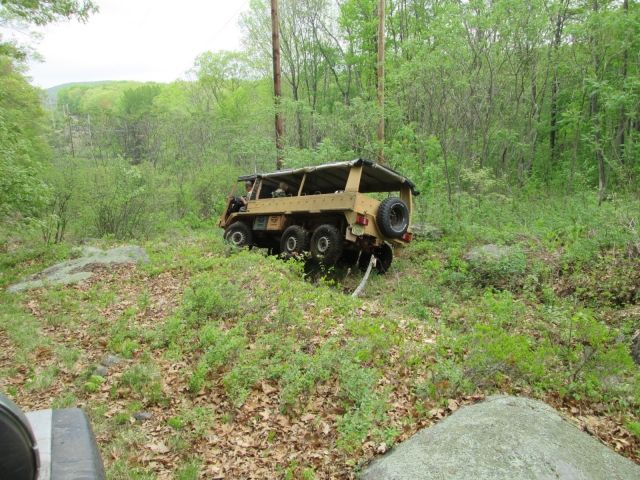
This is the rear winch on the green short WB Mog from the very first pic (above). Note the 1/2 inch thk angle iron, massive bolts and hinged clevis (connecting cable to hook eye) that was bigger than my hand.
Image

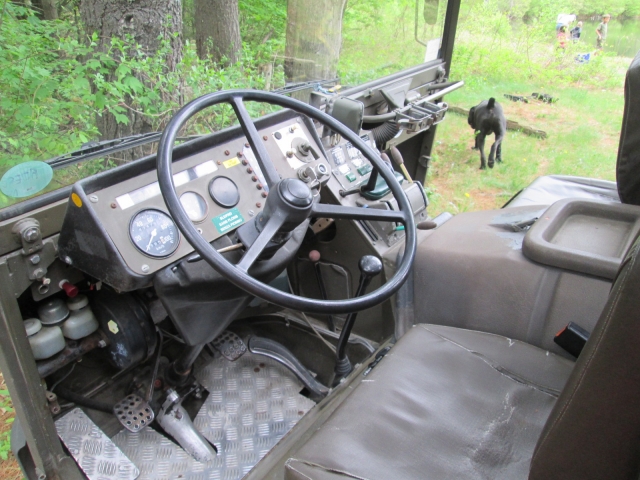
Inside the cab of one of the Pinz. Note the double rifle rack near the passenger side hand grab on the dash, the crescent shaped stamped steel gas pedal, tread plate floor panel and cast aluminum sector shaft housing. Sharp eyes might also be able to see the little toy plastic army guy sniper perched up near the windshield. (Pay no attention to the south end of the north going Mastiff. :lol: )
Image
Image

A better look at the log skidder rig.
Image

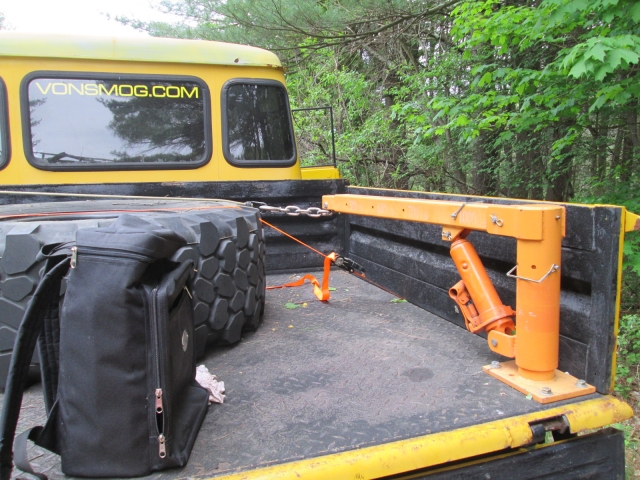
What do you do when your spare tire is too heavy to lift? Why install a davit, of course.
Image

Amazing capability. When the 6-wheeler headed down a gulley with no easy way out, he decided to try to back up one side, then drive up the other to climb out. Always seemed to have at least 4 out of the 6 driving wheels on the ground, but it maybe would have been a better idea to back straight out the way he came (once the rest of us had cleared a hole for him). The driver was never phased one bit, being fully aware of the vehicles capabilities.
Image

I have a bunch of video footage, mostly waving the camera around out the side window of the jeep capturing the A-pillar, roof skin, and dog nose smears on the inside of the windshield. I’ve provided them to Larry to share with the others, and when/if they get posted somewhere I will provide links. Fortunately/unfortunately we were mostly involved in tackling the obstacles and less involved in spectating, so I was not able to get very many vehicles on most of the tougher obstacles.

Back at camp we had a fine feast. BBQ pig roast; cracked potatoes well-seasoned with salt, pepper, and garlic powder; baked beans; and sautéed onions.
Image
Image

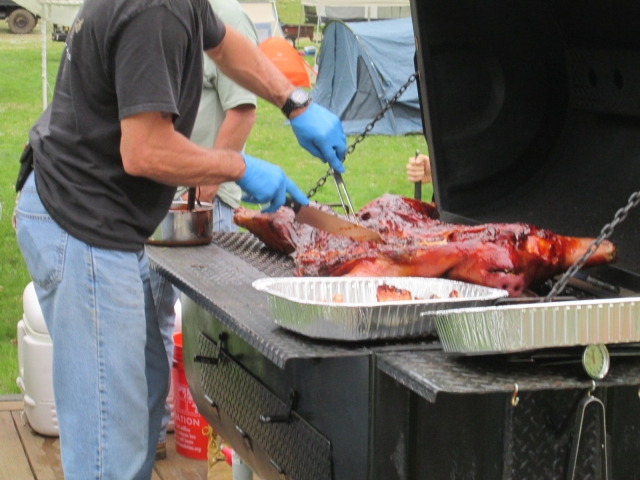
On the second go round there was a fresh veggie mix foil pouch steamed just enough (tender but firm) with butter and some herbs, and rolls to make pulled pork sandwiches. Lots of cookies, brownies and cupcakes for dessert.

After dinner we settled around the bonfire and shared bug spray to combat the hordes of mosquitoes.
Image

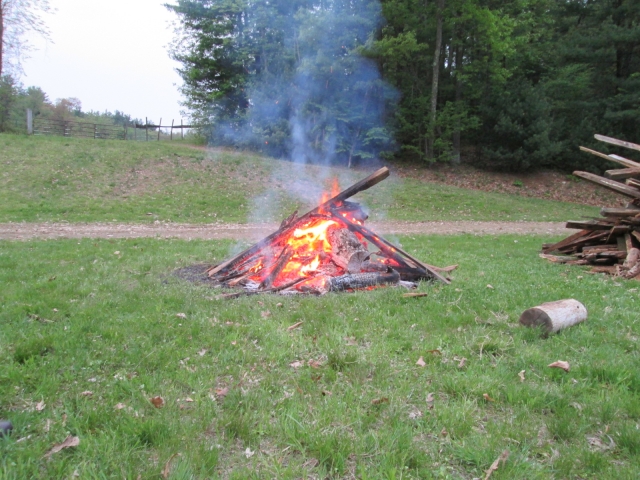
It was a really fun time.

Edited to reference cross post link in off road secrets forum here.
Last edited by KCStudly on Thu May 21, 2015 9:53 am, edited 1 time in total.
KC
My Build: The Poet Creek Express Hybrid Foamie

Poet Creek Or Bust
Engineering the TLAR way - "That Looks About Right"
TnTTT ORIGINAL 200A LANTERN CLUB = "The 200A Gang"
Green Lantern Corpsmen
User avatar
KCStudly
Donating Member
 
Posts: 9617
Images: 8169
Joined: Mon Feb 06, 2012 10:18 pm
Location: Southeastern CT, USA
Top

Re: The Poet Creek Express - Foamie Hybrid

Postby KCStudly » Tue May 19, 2015 10:49 pm

Okay, let’s get caught up on the build. Not a lot of progress, but one foot in front of the other.

The middle hatch foam piece went on a little hastily so there was some excess PL3 under the factory bead on the top edge.
Image

I used the extended blade on the cheap utility knife to cut and scrape (with the back edge), since the small scraper didn’t have the angle to get in under the bead.
Image

The PL3 is interesting. Kind of like a rubber skin, it tends to peel up when scraped, but holds well enough. Some of the thicker blobs and beads were still soft/wet in the middle.
Image

Started fitting the next (upper hatch) piece by kerfing the lower section.
Image

That allowed me to form it around the radius and press it onto the wooden wire hole washer/grommet to make a small impression. Highlighted the impression and free handed a counterbore with the trim router. The grommet.
Image

The counterbore for clearance. Hand twisted drill bit to make reference hole which will later be the start of the routed wireway for the taillights, etc.
Image

Dry fit result so far. Factory cove fits under bead on hatch middle foam.
Image

Bead is a snug fit to hatch hinge spar, but the panel proper falls short by the width of the bead.
Image

Overall looks pretty good.
Image
Image

A look down the wire hole.
Image

I didn’t like the idea of trying to fill the void around that bead, so I ripped the panel back and filled in with a 3/4 x 3/4 strip cut from drops. It will be much easier to glue this in with the panel than it would be to fill and sand. Here it is from each side with the stretcher spar resting on top.
Image
Image

I need to bring some more 550 cord from home. Instead of the clamps I’m going to use the cord to pull the stretcher down and into the hinge spar, clamping the top part of the foam down, then at the back I respliced the Tyvek packing tape seam making it long so that the lower part can be pulled forward under the bumper with tourniquets, rather than clamps. I also swapped out the small aluminum square tube for a stronger 2x3, shown here just hanging down until I can get the cord set up.
Image

The plan is to also lay a scrap of ply and some weights up on the flatter part of the hatch where the stretcher has less downward pull. The stretcher pulls nice and tight around the curves where the tension acts on a radial vector, but has the same problem as other methods on the straighter parts where, regardless of the amount of tension applied, it does not pull perpendicular to the plane. Think of it like a trampoline; when it is flat it has a lot of give, but when it is stretched into a depression (or curve) it starts to push (pull) back.
KC
My Build: The Poet Creek Express Hybrid Foamie

Poet Creek Or Bust
Engineering the TLAR way - "That Looks About Right"
TnTTT ORIGINAL 200A LANTERN CLUB = "The 200A Gang"
Green Lantern Corpsmen
User avatar
KCStudly
Donating Member
 
Posts: 9617
Images: 8169
Joined: Mon Feb 06, 2012 10:18 pm
Location: Southeastern CT, USA
Top

Re: The Poet Creek Express - Foamie Hybrid

Postby anon1 » Wed May 20, 2015 1:12 am

Thanks for the Unimog pics. :beer:

I had no idea that their were so many around the US until searching for mog fest. Probably shouldn't have looked, :thinking:

[add] Wait, are you saying that the two starter set-up is to use the starter to propel the vehicle? I've done it before in a jamb but didn't know it was a thing in rock crawling. (off to read about this)
anon1
Teardrop Advisor
 
Posts: 57
Joined: Tue Jan 28, 2014 4:38 pm
Top

Re: The Poet Creek Express - Foamie Hybrid

Postby KCStudly » Fri May 22, 2015 8:59 pm

Wednesday I had an appointment near home after work so it made more sense to head there afterwards and do a plumbing repair that I had been putting off for a few days (kitchen sink trap had sprung a leak).

On Thursday I finished a dry run thru with the new stretcher setup on the upper hatch foam (still the first layer); got it to where I was reasonably comfortable; and went ahead and stuck it down. Bamboo skewers at apposing angles to pin the seam with the middle panel, tourniquets pulling the top stretcher spar down and also clamped to the hinge spars; tourniquets pulling the bottom stretcher spar taut around the bumper and forward; wedge shims under the top stretcher spar to hold the top edge of the panel down (since it was a little thinner than the filler strip); and some 5 mm ply with gravity clamps to weigh down the flatter portion of the panel.
Image
Image

The current technique is to lay a bead around the perimeter, then zig-zag thru the field, put a dab on each screw head, then spread the perimeter bead out to the edge a good inch or so to make sure to get a good seal there. In this case I also made sure to spread the big bead along the top, making sure that it was more than wide enough to catch both the filler strip and the top edge of the panel.

I didn’t bother trying to fill the seam because it wanted to open up anyway, and there would have been a bunch of excess to make a mess on the stretcher; plus it would make sanding the joint fair much harder. I’ll fill the gap when I stick the top layer down. Also, I had already cleaned up the edge squeeze out with a stick and damp paper towel, but you can see a bit of it in between the kerfs.
Image

Tonight I pulled it all apart and faired the filler strip down to the edge of the upper panel (the 2nd layer will still land above the hinge spar and will also need to be faired down).
Image

Faired the seam.
Image

This is somewhat of a minor milestone, completing the first layer of foam over the hatch and cabin.

Recall that the wire ways in the hatch will be in the first layer of foam capped by the second layer. The plan is to use the space underneath the left clearance light and left taillight as pull boxes. That way if I ever have to pull new wires all I will have to do is pull the fixtures and I will have straight pulls.

So I spent a little time marking some guidelines and deciding how to most efficiently get to the galley light. The wireway on the left runs straight down from the grommet thru the back of the left clearance light, down to the left taillight where it turns across to the license plate marker (in the middle) and on to the right taillight.
Image
Image

The galley light hole didn’t quite line up with the left hand 3-light hole, and that seemed like more of a tortuous path, so it seemed better to bring that over and down on an angle from the left clearance light. There will also be another horizontal run from the same junction across to pick up the rest of the clearance lights, but I didn’t get to that yet.
Image

For the horizontal run I was able to clamp a guide across the edges of the hatch and cut nice straight lines. For the vertical and angled runs I just free handed them trying to follow the layout lines. Routing these got really messy fast without the shop vac (Karl had taken it into the house), so I will bring mine tomorrow and do some cleanup before finishing the last cut.

Off to look into cyclone and pre-filter mods for the shop vac; the foam dust clogs the pleated filter very rapidly.
KC
My Build: The Poet Creek Express Hybrid Foamie

Poet Creek Or Bust
Engineering the TLAR way - "That Looks About Right"
TnTTT ORIGINAL 200A LANTERN CLUB = "The 200A Gang"
Green Lantern Corpsmen
User avatar
KCStudly
Donating Member
 
Posts: 9617
Images: 8169
Joined: Mon Feb 06, 2012 10:18 pm
Location: Southeastern CT, USA
Top

Re: The Poet Creek Express - Foamie Hybrid

Postby OP827 » Fri May 22, 2015 10:07 pm

Looking good KC, did you consider making some sort of hot wire jig to cut these wire channels?
http://www.tnttt.com/viewtopic.php?f=55&t=54099&start=345#p1118978
User avatar
OP827
Donating Member
 
Posts: 1561
Images: 405
Joined: Fri Apr 25, 2014 7:27 pm
Location: Bruce County Ontario
Top

Re: The Poet Creek Express - Foamie Hybrid

Postby KCStudly » Sat May 23, 2015 9:44 am

Thanks for the suggestion.

You had me second guessing myself there for a second, but the thing is that the PL300 at the seams and that has squeezed up into the kerfs would stop any kind of hot wire cutter; so no that doesn't seem to be the best way for me, IMHO.

Where I plan to cut wire ways for the side clearance lights I have already applied spackle fairing, so it won't work there, either. No big deal.

Maybe if I had planned things out further in advance.
KC
My Build: The Poet Creek Express Hybrid Foamie

Poet Creek Or Bust
Engineering the TLAR way - "That Looks About Right"
TnTTT ORIGINAL 200A LANTERN CLUB = "The 200A Gang"
Green Lantern Corpsmen
User avatar
KCStudly
Donating Member
 
Posts: 9617
Images: 8169
Joined: Mon Feb 06, 2012 10:18 pm
Location: Southeastern CT, USA
Top

PreviousNext

Return to Foamies

Who is online

Users browsing this forum: No registered users and 8 guests