Another foam standie...

Canvas covered foamies (Thrifty Alternatives...)

Moderator: eaglesdare

Postby mikeschn » Mon Jun 13, 2011 5:50 pm

So if I were to apply canvas to the other side now, 3 weeks later, would it flatten things out?

Mike...
The quality is remembered long after the price is forgotten, so build your teardrop with the best materials...
User avatar
mikeschn
Site Admin
 
Posts: 19202
Images: 479
Joined: Tue Apr 13, 2004 11:01 am
Location: MI

Postby GPW » Mon Jun 13, 2011 5:59 pm

It should !!! And sooner than that .. :thumbsup: I've saved many a warped painting , by simply gluing Kraft paper on the back , then a coat of Gesso or common house paint over that ... Once it dries completely , it's straight again .. 8)

Actually the best results are obtained by applying the covering to both sides at the same time ... Avoids any warping at all ... ;)
There’s no place like Foam !
User avatar
GPW
Gold Donating Member
 
Posts: 14912
Images: 546
Joined: Thu Feb 09, 2006 7:58 pm
Location: New Orleans

Postby eaglesdare » Mon Jun 13, 2011 6:31 pm

i can't give anything of use on this. i think this is because my canvas went on after the shell was together. where you put it up before. so i am learning from you!

but i would think it would bend back once he is attaches to the bulk heads or spar, walls. whatever will be in there. i don't see it as something that will not bend back. but that is just my guess.
Louella
May the foam be with you.
User avatar
eaglesdare
Donating Member
 
Posts: 3168
Images: 13
Joined: Tue Aug 26, 2008 7:06 pm
Top

Postby Wobbly Wheels » Fri Jun 17, 2011 10:15 am

eaglesdare wrote:but i would think it would bend back once he is attaches to the bulk heads or spar, walls...


Busy week - haven't checked back on my own thread, lol.

Louella, that's exactly how it's done in building boats - the interior panels are used to stiffen and provide some fairness - mainly to the hull sides above the waterline where there's a lot of area that can 'oilcan', which will fatigue the glass.
The trick is in knowing it's there so you don't wind up scribing the bulkhead to fit the existing bow, d'oh !!

I plan to use foam spars for the roof that I'll shape to the camber I want - basically doing the same thing but in the other direction to induce a curve rather than straighten one. I'm going to need the spars to back up the holes I'll be cutting for a pretty extensive skylight over the bed...stay tuned.

If it'll work with your interior layout Mike, a vertical foam spar glassed in would also take out that bow. Since your panels are still flat I'd probably go with what GPW said and just canvas the inside too - quick and easy. I'd probably weight down the high spot while the glues cures. Even if it doesn't take it all out, it certainly ought to help.

Speaking of foam spars, I was looking around in the shop for a test piece I did years ago using a high density Divinycell and unidirectional cloth. It was about 1" X 2" X 4' long and I could sit the ends on scrap pieces of 1/2" ply, stand on the center and it wouldn't deflect enough to touch the floor. I recently met a guy who had an entire (1000') roll of 1" unidirectional carbon tape that would be about perfect for that. Then there's the guy who has a whole trailer's worth of parts he wants to get rid of: windows, appliances, etc.
I don't know if it's the lunar eclipse, but this build is all coming together...now I just have to do my part.

Looks like today or tomorrow morning I'll be picking up a few sheets of 1/4" ply and some foam to start the floor and keep moving forward.
I think I'm going to slope the back end to cheat another 2' or so out of the trailer length. I don't really see an advantage to having the rear wall come up from the back of the trailer frame versus sloping the back up to the height of the dinette seats. This will give me more length without the floor overhanging the back of the trailer frame.
I'll lose storage in the dinette seat that goes across the back wall, but that's minor since that will be where the mattress pad covering the table is stored when the dinette is up (that locker was going to be be a hassle to get into anyway)

Image


Like Proud Mary: big wheel keep on turnin'...
User avatar
Wobbly Wheels
Donating Member
 
Posts: 1080
Joined: Tue Mar 15, 2011 9:51 am
Top

Postby GPW » Fri Jun 17, 2011 12:29 pm

W2 , very Cool !!! 8) Can't wait to see your pics ... :thumbsup:
There’s no place like Foam !
User avatar
GPW
Gold Donating Member
 
Posts: 14912
Images: 546
Joined: Thu Feb 09, 2006 7:58 pm
Location: New Orleans
Top

Postby Wobbly Wheels » Sun Jun 19, 2011 10:58 am

I finally had to commit to some outside dimensions so I could start on the floor.

I also had to decide between using 1/4" or 3/8" for the first (bottom) layer of the sandwich floor. I wanted 1/4" to keep it as thin and light as possible but I'd have to use G1 (interior) ply and encapsulate it in epoxy. I have 3 sheets of 3/8" marine ply, but at $275 for the three of 'em, they're earmarked for boat planking now that I've got a 1960 Evinrude 18 that runs like brand new...
Sheathing is available down to 3/8" and uses exterior glue, so I opted for the glues despite the weight increase. This is exactly the kind of 'weight creep' I'm trying to avoid.

I have run a perimeter of 1X2 on edge that will be furred out to 1" to interlock with the walls. I did it this way so that the walls would be secured to the floor rather than just to the top ply of the SIP floor.
Unfortunately, it means I have to get the walls up before I build up the rest of the floor. I want to run the face grain vertically on the walls' interior, so I can't do just the bottom of the walls and continue with the floor.


Wall/floor joinery
**The floor is 1 1/2" foam, not 1"**
Image

My digi camera has finally packed it in, so it'll be phone pics for a while:
Image

The main floor is 65" wide and 110" long - for scale, those blocks are 8X16. What doesn't show on the pics is the 2' extension off the back - that will be built entirely of foam so it's unimportant at this stage. This will give me 62 3/4" inside width which, when combined with the 78" length, is almost a king bed while taking up only the back 4 1/2' of floor space !
The dinette benches will be wide enough to sleep on as two twins on their own for fishing/hunting trips with a buddy (24" or so with the seatback 'wedge' cushions removed).

The nose cone goes from 65" wide to 15" wide over 28". Those lines carry forward and end in a 4" radius right at the front. I checked out portapotti dimensions and most seem to be around 13-16" wide, so they will fit tight to the front and the typical depth dimensions will allow at least 12" of floor space as a footwell. Since I've added the rear overhang and have gained almost 2', I may use up some of that in this 'pod' to make a shower practical (solar heater on roof). At a typical portapotti's height of 12-14", it will be on a pedestal to get it comfortable sitting height: about 18-20" or so (we're both tall).

One consideration that hasn't shown it ugly head yet is that, while I have the donor trailer sitting here to measure from, I won't have it stripped until later in the summer. Though we aren't seeing much of a summer so far this year (the tomato plants are still spindly), I want to keep the tent trailer campable as long as possible. I want to get the major panels done so it will go together as quickly as possible once I strip the trailer down to its frame.

Speaking of the tent trailer, a thought occurred to me that the canvas folks might want to put in their box of tricks. When I picked up the TT, the canvas needed to be patched in a few spots. Being thrifty, I picked up a drop cloth and some fabric adhesive. The stuff is a bit runnier than toothpaste and comes in a squeeze tube. I cut it with water to make it brushable and painted the patches on. The patches seem to be holding really well at this point, despite the trailer being opened and closed probably a dozen times since then. I don't recall what the stuff cost and don't know how well it sticks to foam, but it sure stuck the canvas together as well as staying flexible...
User avatar
Wobbly Wheels
Donating Member
 
Posts: 1080
Joined: Tue Mar 15, 2011 9:51 am
Top

Postby GPW » Sun Jun 19, 2011 12:09 pm

W2 , looks like a great plan ... !!! It's going to be BIG ... :o 8)
There’s no place like Foam !
User avatar
GPW
Gold Donating Member
 
Posts: 14912
Images: 546
Joined: Thu Feb 09, 2006 7:58 pm
Location: New Orleans
Top

Postby Wobbly Wheels » Sun Jul 17, 2011 12:52 pm

Wow...almost a month since my last post :o

I've had a bunch of distractions from this build, all of which have required a "temporary reallocation of liquid assets". New computer, new fridge, truck repairs, unexpected vet bills, etc...still on track for using the trailer in the fall.

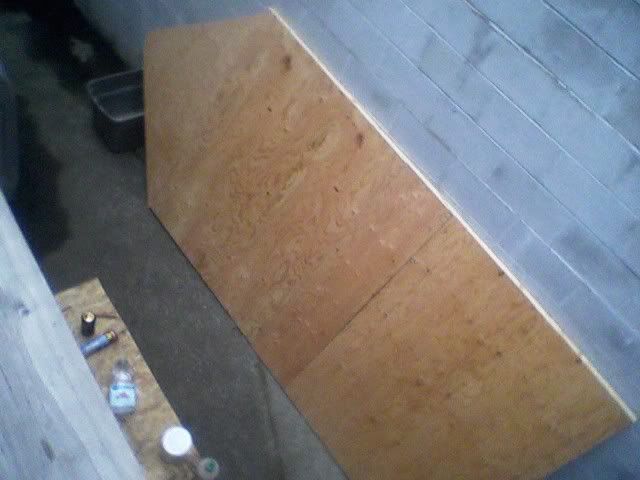
In order to keep moving forward, I'm working on a smaller job right now. I've taken off the nose cone in the pic above and laminated the floor (1"foam and 1'8" skin), now it's on the living room floor with a chair on it so that " 
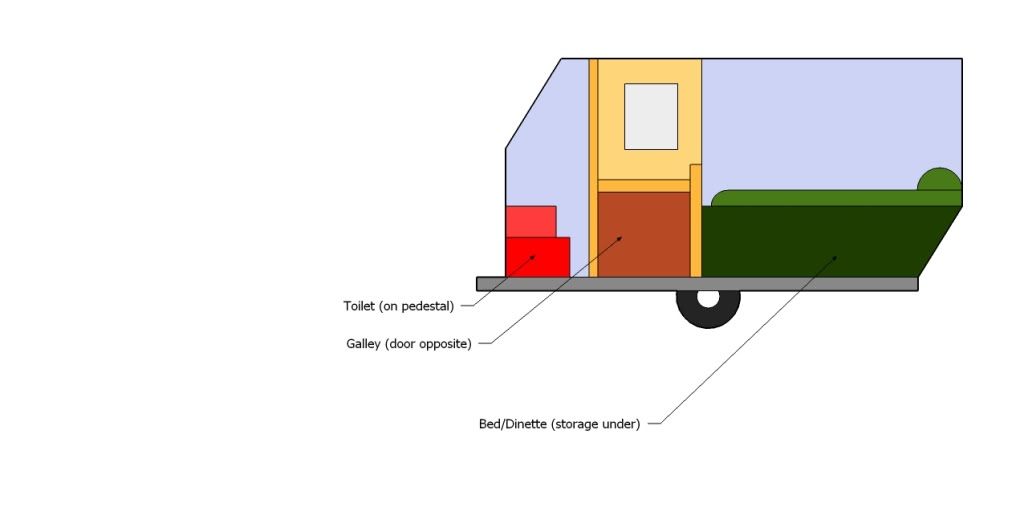
She who camps with me" (thx Tinksdad !!) can sit on it and I can take some inside measurements for the shape - I want as much room inside the nosecone/head & shower and I want the outside as small as possible.

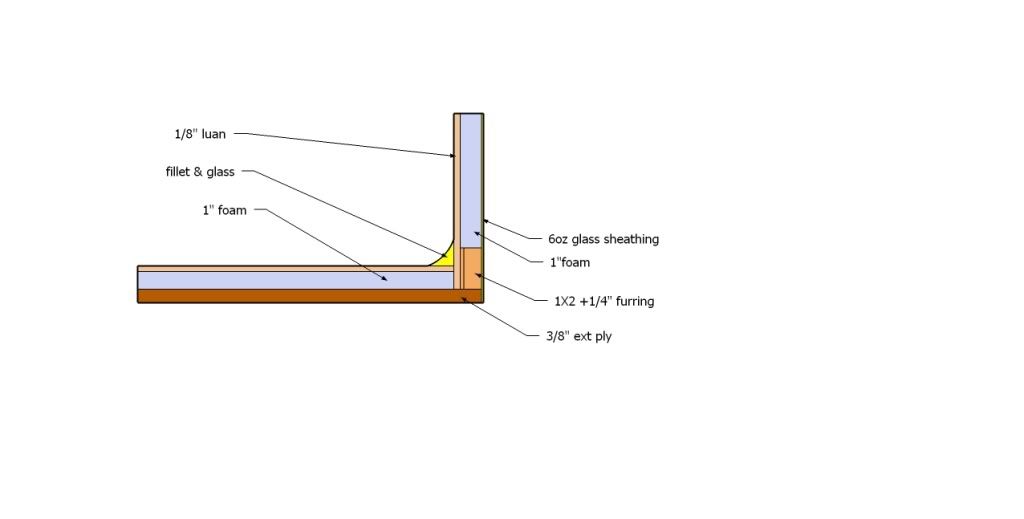
One thing I was surprised about was just how much it stiffened up the plywood to make a panel out of it. 3/8 Ext ply, 1" foam, and 1/8 luan skin make a panel that certainly seems stiffer than just the combination of the materials alone. have the edges supported and with a chair pushing down only at the legs, there is ZERO deflection at the center of the panel: none, nada zilch.
That's with the missus sitting on the chair, so NO...I'm NOT saying how much the 'test weight' was....never never never, lol.

That said, it's also a small triangle that will be sitting over the bridle so I don't expect the results to carry over completely to the full floor.
Still, pretty promising....

I'm still playing around with what to use to bond the wood skins onto the foam. I've tried PL300 but couldn't clamp it firmly enough and reliably enough to seal it up in glass (air pockets), even after spreading it with a notched putty knife. Thickened epoxy seems to work the best so far, but that's far from being a thrifty solution. Given that I'm using a solid sheet rather than cloth, I think the edge bonds I've seen on much of the glue & canvas work you all have done would eventually spell delamination with a solid sheet of 1/8" because the covering itself isn't as flexible as cloth.

Next on the list is latex based contact cement. The stuff is about as water resistant as toilet paper, but it'll be encapsulated in epoxy inside and out.

I will probably bag it when I do the layup on the outside, so maybe it would be worthwhile to bond the skins then too. Speaking of the outside, I'm thinking of one unit of 6oz cloth on the panel itself, then tabbing the shell together with 4" tape, then another unit of 6oz over the whole works. I'm still planning on laying up foam roof spars with a strip of ply on the bottom to carry compression loads to the walls.
Thoughts ?

This is one of those situations where I have to weigh 'towability' against creature comforts.
Considering that she's a fairweather camper at best, if I mess this up I'll probably be using the trailer myself...in which case I would have built a TD in the first place....

In terms of tying it all in, I'm actually thinking of taking a bit of artistic license here, given that we are working with such a cheap and easily-formed material. In looking forward from the rest of the cabin, imagine seeing the head/shower styled something like these:

Image

Image

Image

Image

While there would be no specific iconography involved, it would probably have a Buddhist/Sanskrit/Hindu flavor overall...just not entirely sure how to make it all work yet...
User avatar
Wobbly Wheels
Donating Member
 
Posts: 1080
Joined: Tue Mar 15, 2011 9:51 am
Top

Postby GPW » Sun Jul 17, 2011 7:51 pm

Pretty ambitious there W2 ... :o don't forget the Gong and the incense burner .... hahahahaha 8)
There’s no place like Foam !
User avatar
GPW
Gold Donating Member
 
Posts: 14912
Images: 546
Joined: Thu Feb 09, 2006 7:58 pm
Location: New Orleans
Top

Postby Wobbly Wheels » Mon Jul 18, 2011 8:33 am

Yeah it's ambitious all right and I don't what final form it will take, but part of the appeal of this build method is that we're working with a material that allows us to build more than just the boxes that commercial builders sell.

Seems a shame to build it and not take advantage of the possibilities.
User avatar
Wobbly Wheels
Donating Member
 
Posts: 1080
Joined: Tue Mar 15, 2011 9:51 am
Top

Postby GPW » Wed Jul 20, 2011 9:02 am

This starts a whole New category of Art Trailers ... Funny , I went to an RV dealer for a part ... ALL the trailers were just big ugly boxes , each with different decals ... :roll: No Imagination shown at all ...
There’s no place like Foam !
User avatar
GPW
Gold Donating Member
 
Posts: 14912
Images: 546
Joined: Thu Feb 09, 2006 7:58 pm
Location: New Orleans
Top

Postby Papi » Wed Jul 20, 2011 10:45 am

Wobbly Wheels wrote:Yeah it's ambitious all right and I don't what final form it will take, but part of the appeal of this build method is that we're working with a material that allows us to build more than just the boxes that commercial builders sell.

Seems a shame to build it and not take advantage of the possibilities.


Indeed! I feel the same way about cars. They all look like jelly beans. I plan to make my foamie just as unique as the tow vehicles! (A camouflage Nissan Sentra and a restored 1984 Dodge D100). I can't wait to make foamdust!

Thanks for the ideas shown on this build. I'm learning by leaps and bounds, so hopefully my trailer won't takes leaps and bounds! :thumbsup:
I dream of a day when a chicken can cross the road without having his motives questioned.
User avatar
Papi
Teardrop Master
 
Posts: 177
Images: 50
Joined: Thu Jul 29, 2010 9:07 am
Location: North GA
Top

Postby GPW » Wed Jul 20, 2011 3:19 pm

Papi, not to worry , all the other Foamie builds have worked just Fine ... :thumbsup:
There’s no place like Foam !
User avatar
GPW
Gold Donating Member
 
Posts: 14912
Images: 546
Joined: Thu Feb 09, 2006 7:58 pm
Location: New Orleans
Top

Postby Wobbly Wheels » Sat Jul 23, 2011 11:17 am

Hey Papi, thanks for your thoughts.

It's fun to be doing something new and solving the problems as they pop up and getting exactly what you want out the other side. I'm looking forward to seeing the ideas that your build brings to the table. No pressure though, lol.


Geep, part of my job sees me doing installations in RVs of all shapes and sizes. As I'm sure you've seen, the interior finishing in most units is cheap and bland, so if I'm going to start with a blank canvas I don't want to just throw some woodgrain mac tac on it and call it an 'oak finish'. It seems a shame not to take advantage of foam's 'sculptability' when it takes up so little weight and space. Boxes are boring.

Interesting to the eye and engaging to for the mind.
Or maybe it'll just be tacky...sometimes that line is pretty fine. :lol:
User avatar
Wobbly Wheels
Donating Member
 
Posts: 1080
Joined: Tue Mar 15, 2011 9:51 am
Top

Postby GPW » Sat Jul 23, 2011 5:19 pm

W2, it all comes down to just opinion , and the only one that really counts is Your own.... :thumbsup:

It's all how we choose to entertain ourselves... 8)
There’s no place like Foam !
User avatar
GPW
Gold Donating Member
 
Posts: 14912
Images: 546
Joined: Thu Feb 09, 2006 7:58 pm
Location: New Orleans
Top

PreviousNext

Return to Foamies

Who is online

Users browsing this forum: No registered users and 5 guests