The Poet Creek Express - Foamie Hybrid

Canvas covered foamies (Thrifty Alternatives...)

Moderator: eaglesdare

Re: The Poet Creek Express - Foamie Hybrid

Postby GPW » Thu Aug 27, 2015 3:56 pm

Gray primer in a can will likely melt foam .... test on scrap first ...
There’s no place like Foam !
User avatar
GPW
Gold Donating Member
 
Posts: 14920
Images: 546
Joined: Thu Feb 09, 2006 7:58 pm
Location: New Orleans

Re: The Poet Creek Express - Foamie Hybrid

Postby Atomic77 » Thu Aug 27, 2015 4:35 pm

I'm not thinking it will work either, you would have to just dust it on. Its just a guide coat so all you need is the dust anyway. Will the grey show up on your foam? I think I would go old school and cut up a t-shirt, put some chalk in the pouch that you make, rub the pouch over the surface and dust it on that way.
Michael

"The Strength is in the Sum of the Parts..."

The Astroliner

Follow The Astroliner Blog Here!

Check out our YouTube video
User avatar
Atomic77
1000 Club
1000 Club
 
Posts: 1463
Images: 309
Joined: Tue Oct 08, 2013 5:29 pm
Location: Fort Wayne Indiana

Re: The Poet Creek Express - Foamie Hybrid

Postby capnTelescope » Thu Aug 27, 2015 5:02 pm

:P Happy Birthday, KC. :new-bday:

Hey, sorry for the not-so-gentle chiding. It is your build, so you must do what you must do. We're all excited that you're getting so close to the goal line. We know TPCE is going to look fantastic, and we want to actually see it lookin' fantastic.

I've got that build another one itch, like everyone else. All those things I coulda done mo' betta, avoiding those CFs that added extra work, or maybe a foamie. :thinking:

Carry on! :beer:
I'll burn that bridge when I come to it.

Brad
ImageImageImage

Building the Bed & Breakfast
User avatar
capnTelescope
Lifetime member
 
Posts: 1222
Images: 368
Joined: Sun Jun 27, 2004 3:44 pm
Location: Round Rock, TX
Top

Re: The Poet Creek Express - Foamie Hybrid

Postby dales133 » Thu Aug 27, 2015 6:18 pm

Yes kc ive used irwin chalk on multiple surfaces and havnt fount anything except cloth that ive had issue getting it off.
A damp rag after its brushed off should be all you need.
Id do a test area if your planning on putting that amou t on just in case
User avatar
dales133
4000 Club
4000 Club
 
Posts: 4605
Images: 1
Joined: Mon Oct 13, 2014 5:26 pm
Top

Re: The Poet Creek Express - Foamie Hybrid

Postby KCStudly » Sat Aug 29, 2015 12:28 am

Started out Thursday taking a few pics and comparing my cheap steak knives over on the recent foamie cutting tools thread.

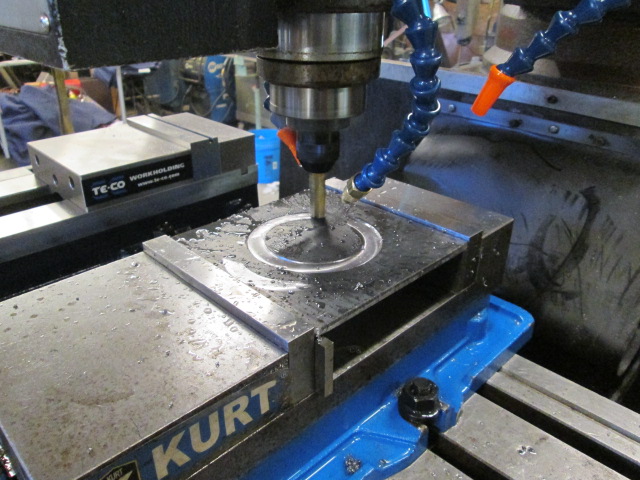
Karl was fiddling with the coolant setups on the new mill and was using the circle program I mentioned to test, so I took a shot of that.
Image

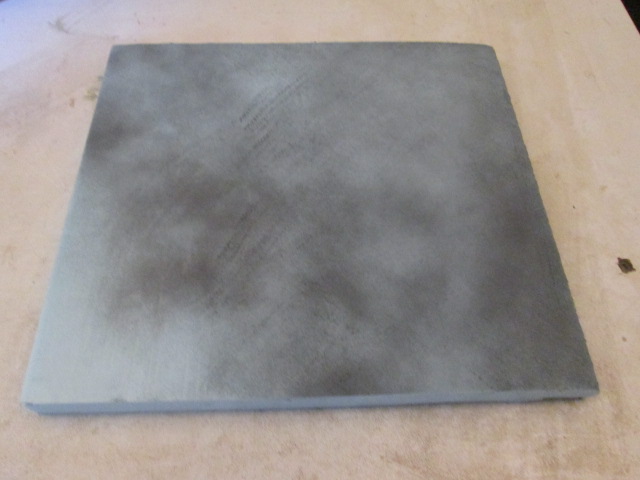
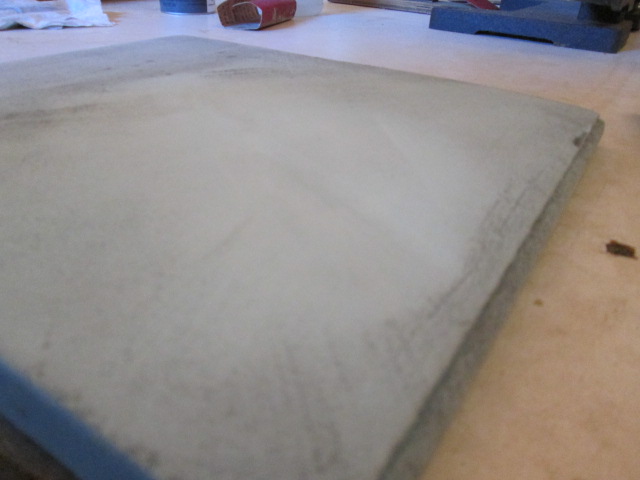
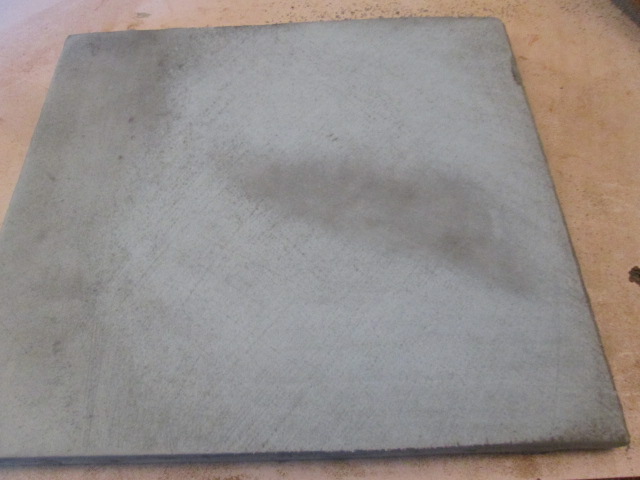
Next I did the primer fog test on a scrap. Forgot to take a pic of the spray can; it was Rustoleum 2X flat gray primer. Said it was good for “wood, metal, plastics and more”. To prep the panel I left the left hand side untouched, sanded the second two thirds with 100 grit on the small block, then hit the right hand third lightly with 220 grit. You can see the sanding scratches from the 100 grit in the middle. This is kind of a heavy application holding the can well back… except for the lower left hand corner where I was holding it and did not want to paint my thumb. :lol:
Image

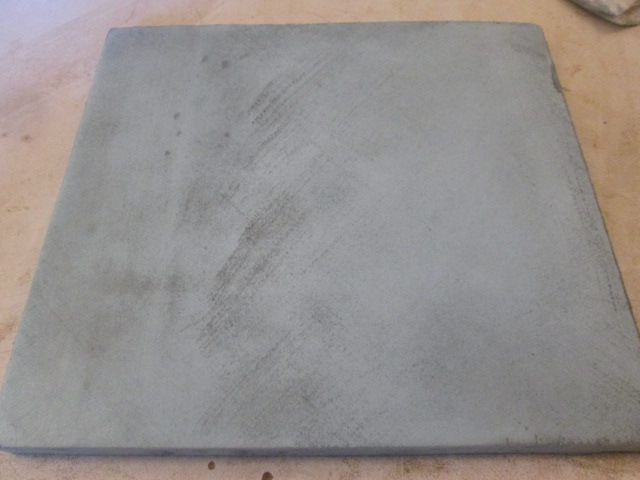
I didn’t see any real indication of melting as the paint seemed to dry very quickly; at least not anything more significant than the pores that are already there from sanding. At some point I found that less coverage is better because the color turns to dust and gets spread evenly as you sand. Unless you wipe it off quickly it defeats the purpose. With just a light coat (less than shown above) there is less tendency for that to happen.

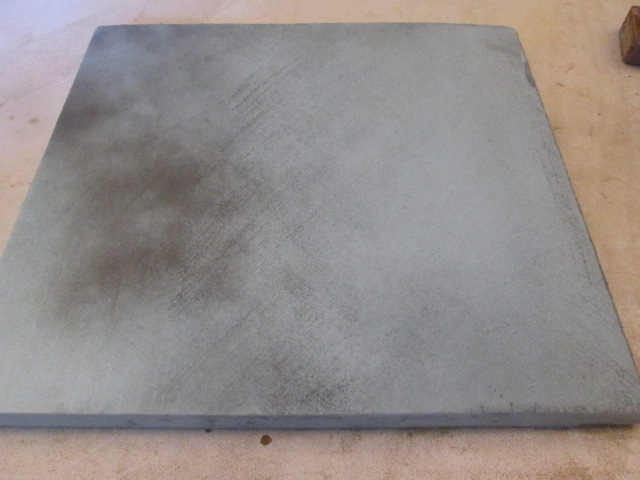
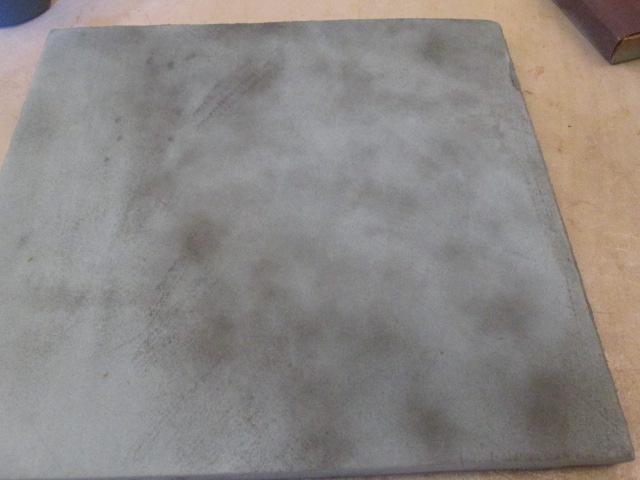
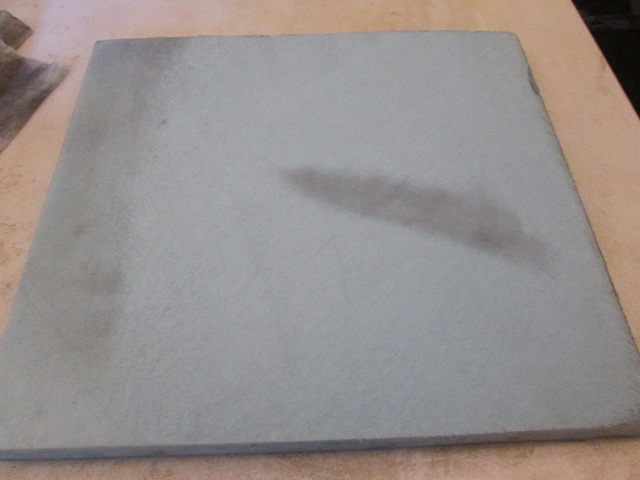
Started on the right sanding with 100 grit on the small block, then, in the second pic worked over to the left. You can see the darkness of the primer down in the original sanding scratches.
Image
Image

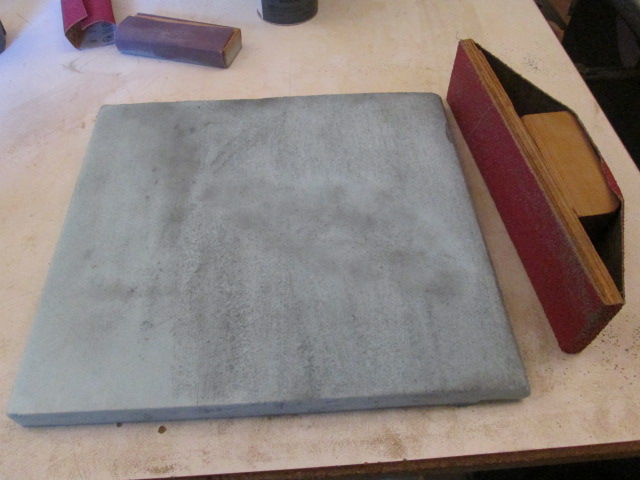
This didn’t really tell me much about getting rid of lumps, since the test panel was flat to begin with, so I sanded a shallow yet distinct valley into it.
Image

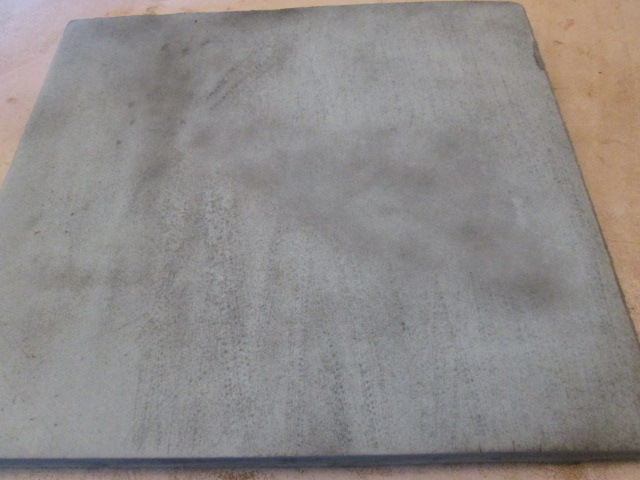
A lighter guide coat this time.
Image

The small block is really too small for the size of this panel test, and wouldn’t span the valley, so I used the medium length board. It had 80 grit on it and given the depth of the valley I just stuck with that grit for this test. Here you can see the difference between the ripped up coarse areas and the more ghostly appearance of the valley.
Image
Image

Since I wasn’t worried about taking too much material away on this test piece, I went ahead and sanded some more over the valley.
Image
Image

I also picked up a set of proper Bondo spreaders, thinking that the flexibility might work better than the relatively stiff plastic putty knives that I have been using. They did. I laid down some more spackle on the hatch trying to fill the obvious lows before bothering with a guide coat.

Now Friday night, I can’t tell you how much I appreciate Karl’s experience with body work and all of the different suggestions he has made, along with all of you. It may seem obvious to some what the steps should be, but I am learning new techniques as I get thru this, and it is not necessarily the same as working on a hard surface, like a car body. The suggestions have often helped me to decide which way to go to get a better result, and I appreciate all of the support. This is new territory for me.

(On a side note, Karl is a good listener and lets me dump the stress from my day job on him frequently, almost like he is addicted to the nonsense like a soap opera fan! :frightened: I was especially animated today, and it felt good to dump all of that stress.)

Anyway, tonight I wanted to switch my medium length flat board over to a finer grit, but was reminded that it is quite a bit narrower than a std 3 inch wide belt. That and the block I have been using to stuff in the back to make the sander belt taut was too narrow and didn’t give an optimum hand hold; so I made another one at the full 3 inch width with an improved (?... yet to be seen) tensioner block set up (forgot to take a pic.). I used that judiciously to take some of the highs on top of the hatch down a little before misting with a guide coat. Not sure why, as I wasn’t planning on doing anymore sanding until I got some more filler into the lows, but it ended up being helpful in a way.

I am sure you have heard of the technique of using a flexible spline or slat to conform to a curve and drag filler along a contour. Well I tried that tonight for the first time and it seemed to work pretty well once I got a little better idea of how the spackle wanted to be treated. The trick was to put a lot more on than would be needed. The spline didn’t seem to want to place, or plow material down into the lows, but it did a good job of dragging the excess off. With only a little excess filler it seemed to want to peel it up off of the surface (says right on the spackle label not to try and skim coat), so the trick was to butter it on, then drag most of it back off again… and don’t over work it. Like making delicately delicious biscuits, as soon as you get the butter and flour roughly combined, stop mixing. You’re done. Same with the spackle; strike it a time or two and you are done. You can get a little more with just a tiny touch of water mist, but the more you try to work it the worse things get. Just walk away.

I can tell that the solution to finishing this up is going to be: get some material on there and rough it in quick (don’t worry if it isn’t perfect, just get it on there close so that it has time to setup for next time); let dry then knock down the really gross stuff; use a guide coat to help decide what is a high and what is a low; knock down the highs and do another round to fill the lows. Repeat until it is good enough.

The slat I used was just the mill edge that had been sawed off of a 2x piece of fir, a scant 1/8 inch thk, maybe even only 3/32 and about 2 ft long (enough to reach from the hinge spar to the point on the hatch where the radius started to drop off more abruptly). I used the new medium length block to make sure the working edge was relatively flat and splinter free, then used the low spot at the back of the hatch hinge spar as a reference guide point. I didn’t bother keeling the cabin over, so I couldn’t quite reach the center, but I figure I can get that area easier from the rear once the outer side areas are set up. With the guide coat under the spackle it was interesting to see where the spline was touching off and leaving a gray spot, vs. where it stayed white indicating areas that had been low; so even tho I didn't sand on the guide coat much at all, it was still providing indications and visual aid.

Now here’s that same camera view as before where I took the lumpy bustle pic from, except things are looking much flatter now.
Image

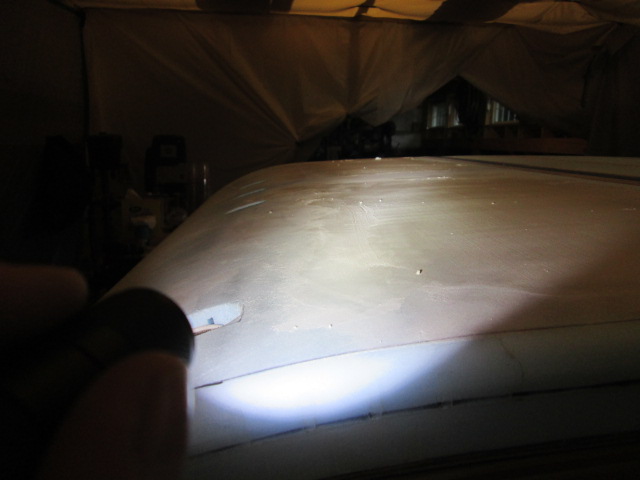
… and another from up higher by the hinge looking more straight across. I can work with this and see a big improvement.
Image

Having a bunch of excess spackle slopping around, I tried to use this technique on the front roof, too, but I think those biscuits may have come out tough from over working. I'll have some more work to do up there tomorrow.

No matter, I think I can get where I “need” to be with the techniques that I am learning here as I go.

I’m happy with where I got tonight. Not for the amount of work that got done, but for the skills that I am developing, and the fact that it seems like I am moving in the direction I want to go, not backwards.

I keep forgetting to bring my line chalk; have to remember to try that, too.
KC
My Build: The Poet Creek Express Hybrid Foamie

Poet Creek Or Bust
Engineering the TLAR way - "That Looks About Right"
TnTTT ORIGINAL 200A LANTERN CLUB = "The 200A Gang"
Green Lantern Corpsmen
User avatar
KCStudly
Donating Member
 
Posts: 9640
Images: 8169
Joined: Mon Feb 06, 2012 10:18 pm
Location: Southeastern CT, USA
Top

Re: The Poet Creek Express - Foamie Hybrid

Postby OP827 » Sat Aug 29, 2015 3:13 pm

KC, I support your effort and willingness to make it right to your liking.
You need to get the surface to the point where you are happy with it. Good on you, you are exploring the skill of foam fairing craftmanship for all of us here :thumbsup: :applause: Before you know it, it will be perfect! Keep it going and don't forget to enjoy the process!
User avatar
OP827
Donating Member
 
Posts: 1596
Images: 414
Joined: Fri Apr 25, 2014 7:27 pm
Location: Bruce County Ontario
Top

Re: The Poet Creek Express - Foamie Hybrid

Postby KCStudly » Sat Aug 29, 2015 6:39 pm

OP, thanks for the support. It's not rocket science, and I do tend to over analyze (compared to some people). I haven't really done a cost comparison on spackle vs. epoxy/filler, but like Karl says, "most of it hits the floor anyway", so in a way I suppose I can discount that portion from the build budget. :lol:

Capn, no hassles, no worries, and no hard feelings at my end here. You and Tony both make a good argument from a different perspective. Sometimes I get mired down in the details and lose sight of the forest for the trees (pun?). I'm sure that is obvious to you all and I can't fault you for trying to jerk me out of it, so to speak. It's all good. :thumbsup: And yet I am reminded of my first comments in this thread, one of my stated goals was a certain level of quality attempting to rival the inspiration that I have received from so many here (now including you, too). It is a challenge I set for myself as part of my commitment to get off the couch and use the inspiration of my dad's memory to work for my goals rather than let them slip away. That's what I said I would do, and that is what I am trying to do. It would be too easy for me to just say, "well, that looks like crap, but it's good enough". When I get to the point of, "well, that doesn't look too bad (... or maybe it even looks pretty good...) and I put every reasonable effort into making it come out the way I want it to, so we can move on now", then I move on. If it doesn't get there, sometimes I "have" to back up and try again, but I can usually get there... eventually. :D

I guess it really all just depends on what your goals are. If someone wants to go camping fast, they either need to stick with a simple plan, have mad skills and/or deep pockets, or they may have to cut a few corners and compromise here and there.

If a person has no intention of going camping at all, just loves the creative process and has an addiction for building a variety of campers, we all know and love a guy like that, too.

Me? I want it all; the challenge of a creative design; pushing, expanding and developing my own skills; and the eventual pay off of a really meaningful trip. This is my "journey". This is my build.

Enough of my dribble. Please, no one take offense by anything I have said, it's just stuff oozing out from the space between my ears and isn't intended to be criticism on anyone else. :lol:
KC
My Build: The Poet Creek Express Hybrid Foamie

Poet Creek Or Bust
Engineering the TLAR way - "That Looks About Right"
TnTTT ORIGINAL 200A LANTERN CLUB = "The 200A Gang"
Green Lantern Corpsmen
User avatar
KCStudly
Donating Member
 
Posts: 9640
Images: 8169
Joined: Mon Feb 06, 2012 10:18 pm
Location: Southeastern CT, USA
Top

Re: The Poet Creek Express - Foamie Hybrid

Postby Atomic77 » Sat Aug 29, 2015 10:39 pm

Looks like your guide coat worked out nicely. The one I use is made by Bondo and it's the only Bondo product I use. It's called Hot Rod Black. It's a flat black primer that goes on nice and dry. You can sand it almost immediately. I get it by the case and use it for guide coat exclusively.

http://bondo.com/bondo-hot-rod-black-fi ... r-721.html
Michael

"The Strength is in the Sum of the Parts..."

The Astroliner

Follow The Astroliner Blog Here!

Check out our YouTube video
User avatar
Atomic77
1000 Club
1000 Club
 
Posts: 1463
Images: 309
Joined: Tue Oct 08, 2013 5:29 pm
Location: Fort Wayne Indiana
Top

Re: The Poet Creek Express - Foamie Hybrid

Postby Wobbly Wheels » Sun Aug 30, 2015 12:02 am

There's a latex spray paint - I think it's made by Krylon - that I tried a while back. The coverage on foam (as a paint) was terrible, but it would probably work great as a sanding coat. Being a latex, it's inert and doesn't eat the foam. It's still boxed up from the move but if I see it I'll take a pic.

Sounds like you've got it figured though :thumbsup:
User avatar
Wobbly Wheels
Donating Member
 
Posts: 1080
Joined: Tue Mar 15, 2011 9:51 am
Top

Re: The Poet Creek Express - Foamie Hybrid

Postby KCStudly » Sun Aug 30, 2015 10:21 pm

Just fogging the gray primer on from a greater than normal distance seems to be doing the job w/o any risk... perhaps due to mainly being on spackled areas, but also from test results... so I won't bother experimenting further; but thanks to all for the alternate suggestions. I'm sure they will benefit others that follow.

I won't bore you with the trials and tribulations of doing body work with spackle, but suffice to say that I am yo-yo'ing between almost good enough and building on more that seems like a step backward, before, hopefully, moving forward to a better place. I believe this is the "hell" that is referred to as bodywork.

I have loaded pics in the gallery, including a failed attempt at "back skinning" the license plate recess with bed sheet. This my first attempt at skinning with fabric. I spritzed the fabric until damp to help eliminate wrinkles; had a struggle getting it to stay adhered into the relieved corners; had trouble keeping my tacky fingers/gloves from lifting it once it started to tack up; used a damp chip brush to push it back down and shove it back into the recess corners; had what I thought was some success rolling bubbles out using a bamboo skewer as a mini rolling pin; then watched as it dried and bubbles started sprouting up in too many spots that would not stick back down. To wit I pealed the fabric back up in mild frustration; including bits of spackle that lifted up (as reported by Dale... IIRC); but was happy that it did not do much damage when I did peel it up. I know that I could have tried to iron the bubbles back down, but I was also not happy with the symmetry of the recess nor the blending of the radii that I had thought would be adequate before covering. Granted this was linen not canvas, but it was discouraging.

The biggest thing that I have resolved is that I am not happy with the front of the roof where the profile inverts between the gentle roof arc and the front wall to roof small radius. I will either need to fill this depression or use the arced long board to blend this area in more.

Generally, today I went from happy with the fairing process to completely deflated.

My best advice to anyone following is to heed the advice of the successful builders that you admire. A long time ago some folks suggested that I go exclusively with epoxy, glass and related fillers. After investing in several tubs of spackle, I can't help but consider that they may have been more experienced and wiser. Sometimes the more expensive appearing option may be the best one. I can't be sure, but I am having my doubts. I can't help but think that a more rigid medium might be easier to deal with in the long run.

Then again I am not a bodyman.

:NC :frightened: :roll: :thumbdown: :oops: :worship: :(

On the other hand, every time I have gone with another application of filler, no matter how crude or rough that it looks initially, I have ultimately ended up happier with the result; it just seems like it takes more work and more material than it should to achieve the desired results. I wish that I could get it right the first time.

I hate bodywork. It is so much different than woodwork; at least when working with soft materials like foam and spackle.

Pics:
Image
Image
Image

Had an area at the front chunk out. Seemed like it was still wet and had not adhered underneath, perhaps from uneven spraying with the spritz bottle.
Image

Back to jambing out the license plate.
Image
Image

I folded the fabric in half (bottom shown to the right) and nipped an X with the scissors where the marker light wires needed to pass thru.
Image
Image

It looked pretty good at first, after dealing with the lifting and stickiness.
Image
Image

But after watching it bubble up as it dried, not taking the time to take a pic, considering how difficult it would be to attempt to iron the scope of the bubbles I was seeing when extrapolated to the whole scope of the project, I decided that it would be better to rip it up before it set up too hard, than it would be to deal with the bubbles.
Image
Image

At least it didn’t do any serious damage when peeled up.
Image

Today I did some more filler work, but did not seem to have the same “touch” that I have had previously. Seems like all I did was make more of a mess, with more work to do to get back to a happy place.
Last edited by KCStudly on Tue Aug 11, 2020 5:10 pm, edited 2 times in total.
KC
My Build: The Poet Creek Express Hybrid Foamie

Poet Creek Or Bust
Engineering the TLAR way - "That Looks About Right"
TnTTT ORIGINAL 200A LANTERN CLUB = "The 200A Gang"
Green Lantern Corpsmen
User avatar
KCStudly
Donating Member
 
Posts: 9640
Images: 8169
Joined: Mon Feb 06, 2012 10:18 pm
Location: Southeastern CT, USA
Top

Re: The Poet Creek Express - Foamie Hybrid

Postby capnTelescope » Mon Aug 31, 2015 12:14 am

I'm beginning to think spackle isn't such a great idea. :NC But I don't have a better one. :fb It sure is costing you a lot of work.
I'll burn that bridge when I come to it.

Brad
ImageImageImage

Building the Bed & Breakfast
User avatar
capnTelescope
Lifetime member
 
Posts: 1222
Images: 368
Joined: Sun Jun 27, 2004 3:44 pm
Location: Round Rock, TX
Top

Re: The Poet Creek Express - Foamie Hybrid

Postby dales133 » Mon Aug 31, 2015 12:28 am

Sorry to hear of your frustrations mate i certainly know how that feels.
These contraptions challenge all our skills and if we didnt know where our weaknesses lay beforehand we soon find out.
Body work does suck and im far from an expert but over the years ive dabbled in a fair bit and the only real advice i can offer that i think would be benificial to you is build up layers gradualy.
If you try to over fill and then knock it back all in one go youll find it incredibly frustrating as you end up with mountains and valleys.
Its far far easier to block it back with a guide coat the skim and repeat ,hope it dosnt sound like im trying to teach you to suck eggs but from my experience its by far the best method for us novices
User avatar
dales133
4000 Club
4000 Club
 
Posts: 4605
Images: 1
Joined: Mon Oct 13, 2014 5:26 pm
Top

Re: The Poet Creek Express - Foamie Hybrid

Postby OP827 » Mon Aug 31, 2015 12:33 am

I tend to agree with Capn on spackle. I personally try to first sand or shape things and the foam and then use epoxy mix filler with micro balloons over the foam. It works for me, but I never had to do a thick layer.. yet. It becomes easier to sand, the more micro balloons are added. When I had to fill holes or cavities I either used the epoxy mix with micro balloons or Great Stuff for large once, whatever works. It is OK, when me personally comes across these kind of difficulties and rework, me just takes a break and relaxes a bit, it'll all come together.
User avatar
OP827
Donating Member
 
Posts: 1596
Images: 414
Joined: Fri Apr 25, 2014 7:27 pm
Location: Bruce County Ontario
Top

Re: The Poet Creek Express - Foamie Hybrid

Postby GPW » Mon Aug 31, 2015 6:54 am

Spackle is Not made to fill in large areas , just tiny holes , small cracks , etc. :roll: If you test it by itself , it doesn’t have the strength of a corn flake ...
The idea with foam is , if you have a compressed hole or depression , heat it to expand back .... for a filler (hole, large crack ) use Great Stuff or just cut away the damaged piece and insert a new fresh piece... ;)
There’s no place like Foam !
User avatar
GPW
Gold Donating Member
 
Posts: 14920
Images: 546
Joined: Thu Feb 09, 2006 7:58 pm
Location: New Orleans
Top

Re: The Poet Creek Express - Foamie Hybrid

Postby KCStudly » Mon Aug 31, 2015 7:27 am

KC
My Build: The Poet Creek Express Hybrid Foamie

Poet Creek Or Bust
Engineering the TLAR way - "That Looks About Right"
TnTTT ORIGINAL 200A LANTERN CLUB = "The 200A Gang"
Green Lantern Corpsmen
User avatar
KCStudly
Donating Member
 
Posts: 9640
Images: 8169
Joined: Mon Feb 06, 2012 10:18 pm
Location: Southeastern CT, USA
Top

PreviousNext

Return to Foamies

Who is online

Users browsing this forum: No registered users and 8 guests