The Poet Creek Express - Foamie Hybrid

Canvas covered foamies (Thrifty Alternatives...)

Moderator: eaglesdare

Re: The Poet Creek Express - Foamie Hybrid

Postby dales133 » Tue Sep 22, 2015 12:06 pm

If it's bothering you fix it mate or you'll regret it later
User avatar
dales133
4000 Club
4000 Club
 
Posts: 4605
Images: 1
Joined: Mon Oct 13, 2014 5:26 pm

Re: The Poet Creek Express - Foamie Hybrid

Postby Atomic77 » Tue Sep 22, 2015 6:54 pm

dales133 wrote:If it's bothering you fix it mate or you'll regret it later


I second that.
Michael

"The Strength is in the Sum of the Parts..."

The Astroliner

Follow The Astroliner Blog Here!

Check out our YouTube video
User avatar
Atomic77
1000 Club
1000 Club
 
Posts: 1463
Images: 309
Joined: Tue Oct 08, 2013 5:29 pm
Location: Fort Wayne Indiana

Re: The Poet Creek Express - Foamie Hybrid

Postby KCStudly » Fri Sep 25, 2015 9:14 am

I hear you guys. It will bug me, and with your encouragement I had decided to just jump in and fix it; but then I looked at it again... and again, and I just couldn't pull the trigger. On the one hand I want it straight, but then I look at how long it has taken me to get the hatch happy, and how much more of a blend the wall would be... it's a small dip but it extends out in all directions in a huge taper. I'll probably waffle on the decision right up until the point of no return.

Okay, it may seem like I have been slacking off, but it just isn’t so. I have been gradually working away at the hatch top surface and finally have it to where I consider it to be acceptable! Whoo-hoo! I even got Karl's seal of approval. (It's always nice to have a second set of eyes and a second opinion. Of course he would have signed off on the original situation, so to speak, just to keep me going, but it is nice that he recognizes the huge improvement that has come from all of the hard work.)

After re-contouring the edge radii I had to do a little more pickup there, but that should fall into place now. I also did some very minor touch-up sanding and some more pickup around the license plate recess.

I still need to fill the heads of the deck screws that hold the hatch hinge spar to the hatch rib tops, and jamb out the license plate recess with canvas (both of which I will try to do tonight), but then I think the hatch is ready for canvas.

I’m thinking about using the hinge as a cleat to clamp the canvas to the cabin spar, then flip it back and start gluing at the top, working my way down using the hinge as an anchor. I can use bull dog clamps to hold the canvas back on itself while I work, or roll it on a stick and clamp (as described on another canvas build, I forget who to credit at the moment). Once the main surface is covered and set, I can razor cut excess at the top from under the hinge, remove the hatch to the bench and wrap the edges under; also make the cutouts and tucks for the trailer light wiring pockets and license plate.

Then the hatch goes back on to double check the seal gap and see if I need to make any adjustments there. I think that’s going to come down to how many overlaps are needed to wrap the edges up neatly. One or two layers probably won’t cause a bind, but if I get three or four at the corners I may have to make an adjustment to the galley wall edges. Once that is settled I can route the seal notch and get on with covering the walls; then the roof.

Before covering the walls, I think I will need to add some blocking for the top edge of the stone guard where it will wrap down the side walls, but that should be fairly straight forward; just a couple of hard points for a couple of screws just to make sure that the top edge of the guard pulls up to squeeze whatever sealant I end up using. Plan is to run a bead around the inside edge of the guard, fasten, then caulk the edge (or smear the squeeze out with my finger), all after painting the canvas. I will probably make a chipboard template for the guards before canvas, just to make sure I don’t lose track of the blocking (although I expect that it will likely project thru the canvas whether I want it to or not… haven’t really worried about that in most cases). Either way the template will be useful for fabricating the guards.

At this point I have more or less decided not to try and flatten the curb side wall (…thou no guarantee that I won’t continue to waffle on this decision). It is really only noticeable when you are looking straight down the wall and it is one of those things where it could get worse before it gets better.

(Let the waffling continue.)
KC
My Build: The Poet Creek Express Hybrid Foamie

Poet Creek Or Bust
Engineering the TLAR way - "That Looks About Right"
TnTTT ORIGINAL 200A LANTERN CLUB = "The 200A Gang"
Green Lantern Corpsmen
User avatar
KCStudly
Donating Member
 
Posts: 9640
Images: 8169
Joined: Mon Feb 06, 2012 10:18 pm
Location: Southeastern CT, USA
Top

Re: The Poet Creek Express - Foamie Hybrid

Postby ghcoe » Fri Sep 25, 2015 11:21 am

Hey KC, I was just working on my foamie and was thinking about the problems you were having with the application of the spackle. I was thinking that application for me has not been all that bad and then it hit me :shock: . I use tools designed to apply plaster to walls not tools to apply bondo to cars. I usually use a 8" and a 3" knife. Most of the time I scoop out some plaster with my 3" knife and put it on the 8" knife. This makes it easy to grab small amounts for small touch up areas, but if I have a large area to fill I will apply a bunch of spackle with the 3" and then go across the area with the 8" which picks of the extra spackle and I am back to where I have spackle on the 8" to pick up with the 3". This makes for quick and easy application. Also, I have a squirt bottle of water handy so that I can hit the spackle with a mist of water. This will allow the plaster to smooth with the knife without dragging and makes for a nice smooth surface that is easy to knock down with sanding. Just thought I would share. Good luck. :thumbsup:
George.

Gorrilla Glue, Great Stuff and Gripper. The three G's of foamie construction.

My build viewtopic.php?t=54099
Working with flashing for foamie construction viewtopic.php?f=55&t=60303
Making a hot wire http://tnttt.com/viewtopic.php?f=55&t=55323
User avatar
ghcoe
1000 Club
1000 Club
 
Posts: 1982
Joined: Fri Dec 11, 2009 11:20 pm
Location: SW Idaho
Top

Re: The Poet Creek Express - Foamie Hybrid

Postby capnTelescope » Fri Sep 25, 2015 12:06 pm

KCStudly wrote:Still thinking about flattening that curb side wall. :thinking: :?

and
KCStudly wrote:(Let the waffling continue.)


I feel your pain. Honest, I do. :crying2:

Just for the record, how deep is that dip at its deepest? Just guessing, if it's a shallow dip, you'll end up spackling most of the wall to get it straight. Same story if it's kinda deep, only it'll take enough spackle to wear out the curbside tire prematurely. :roll:

(edited)
With a full-length sanding block, could you sand off enough at the front or rear (or both) to get it straight or at least manageable? :NC

Press on relentlessly. :beer:
I'll burn that bridge when I come to it.

Brad
ImageImageImage

Building the Bed & Breakfast
User avatar
capnTelescope
Lifetime member
 
Posts: 1222
Images: 368
Joined: Sun Jun 27, 2004 3:44 pm
Location: Round Rock, TX
Top

Re: The Poet Creek Express - Foamie Hybrid

Postby KCStudly » Fri Sep 25, 2015 3:19 pm

George, Thanks for the tips. I do keep a spritz bottle handy, but it always seems to sputter larger drops with the finer spray, and that usually makes things too wet. I guess I need a better sprayer as I just don't seem to be able to find the sweet spot between large drops or nothing at all. :NC

I do the same thing with the spreaders, either use the small one to get the product moving, or just use the end of the larger one and plop it down before laying into it with the longer edge. I'm pretty sure my issues are self induced and not any fault of the tools I am using (except maybe the spritz bottle could be improved). As you know, the spackle doesn't seem to handle water the same way that plaster does. It doesn't remodel and reset with moisture, but with a fine mist you can sometimes get that little bit more work time. Seemed to me that if it got too wet it wouldn't set up properly; sort of stayed pithy and peeled up when sanded. For me it has been so marginal and I have done more harm with droplets that I just stopped using it. If I'm going to have to rework an area I would rather have it be sound and chunky, and have to add or sand more, than worry if I am affecting the integrity. I have tried both spritzing the surface and wetting the spreader; never seemed to be able to dial either technique in. Mileage may vary.

Capn, thanks for understanding. I'll check the dip again tonight, I wanna say that it is a strong 1/8 inch or more. Worst is located between the door frame and the front end of the galley wall edge near the top; I think I had a short spar that shifted flush to the street side reference and that pulled this side in at the top. The taper runs all the way forward past the top of the door frame, down about half way down the door, and back to the wall edge/hinge area. Only way to fix it is to add filler and try to blend it in. I don't think I would try for perfectly flat. That would get messy with the door frame, but I think I could at least get the roof edge straight and blend/cheat the rest. It's the roof edge that stands out to the eye. It doesn't have to be perfect. The foam straight off isn't perfectly flat to begin with, at least none of my panels are; but it would be nice to restrict things to gentle undulations with slight pluses and minuses, rather than kinks, bumps, and wacky edges.

If I knew for sure that I could straighten the top edge and just blend the rest without making a ridge or too big of a suck out (dish shape) behind the door frame, I'd be all over it. We'll see.
KC
My Build: The Poet Creek Express Hybrid Foamie

Poet Creek Or Bust
Engineering the TLAR way - "That Looks About Right"
TnTTT ORIGINAL 200A LANTERN CLUB = "The 200A Gang"
Green Lantern Corpsmen
User avatar
KCStudly
Donating Member
 
Posts: 9640
Images: 8169
Joined: Mon Feb 06, 2012 10:18 pm
Location: Southeastern CT, USA
Top

Re: The Poet Creek Express - Foamie Hybrid

Postby OP827 » Fri Sep 25, 2015 4:59 pm

I concur with George that drywall 8" knife worked better vs. bondo spreader for my build laminating fiberglass down with epoxy on a large surface and then fairing with filler.
User avatar
OP827
Donating Member
 
Posts: 1596
Images: 414
Joined: Fri Apr 25, 2014 7:27 pm
Location: Bruce County Ontario
Top

Re: The Poet Creek Express - Foamie Hybrid

Postby capnTelescope » Fri Sep 25, 2015 11:45 pm

Could you sand enough high foam off one (or both) ends to get it looking good, instead of adding spackle to the low foam and sanding it down?

I'm thinking something like the "new flat board" in your post of Sat Sep 12, 2015 11:02 pm, only long enough to span the length of the trailer body plus enough extra for a sanding stroke. Or maybe just from the far side of the dip to one end or the other. Did that make any sense at all?

Also, you wouldn't want sandpaper the full length of the board, just maybe half of it. Then work down one end of the high foam. Maybe contact or TB2 the sandpaper to the board to keep the sanding surface free of lumps from staples.

You might be able to at least reduce the width/depth of the spackle zone.

---> This way to exit Spackle Hell ---> ;) :beer:
I'll burn that bridge when I come to it.

Brad
ImageImageImage

Building the Bed & Breakfast
User avatar
capnTelescope
Lifetime member
 
Posts: 1222
Images: 368
Joined: Sun Jun 27, 2004 3:44 pm
Location: Round Rock, TX
Top

Re: The Poet Creek Express - Foamie Hybrid

Postby KCStudly » Sat Sep 26, 2015 12:59 am

Okay, if I do decide to go after the wall, I will look at that style of spreader. Thanks for the shove. :thumbsup:

Capn, I don’t think taking away from the wall would be viable. The hard edge of the galley wall and edge of the hatch are good/where they are supposed to be, and most of the spars forward aren’t that bad. You can just see in the pics that follow (and looks worse to me in person) that what catches your eye is where the taper from the front and the taper from the rear meet and change direction; the dip. If I were to sand the highs the whole wall would be leaning... which you might not notice either, but it would be a hell of a lot more work to sand 80/ct of the wall than to fill 20/ct. Not sure I would want to try slinging an 8 ft sanding board by myself.

At the moment I’m back to waffling away from doing anything with it.

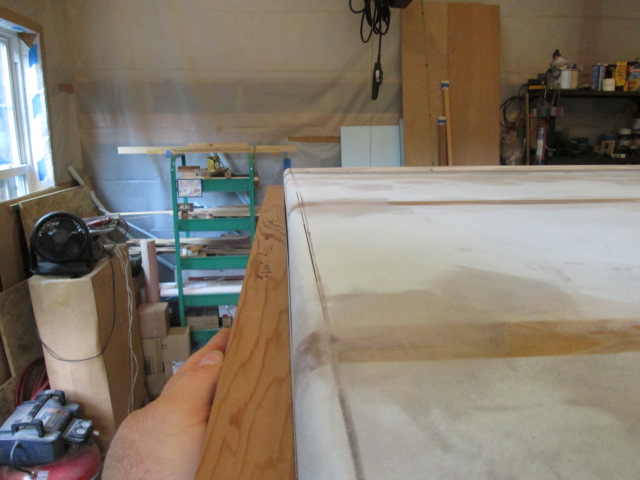
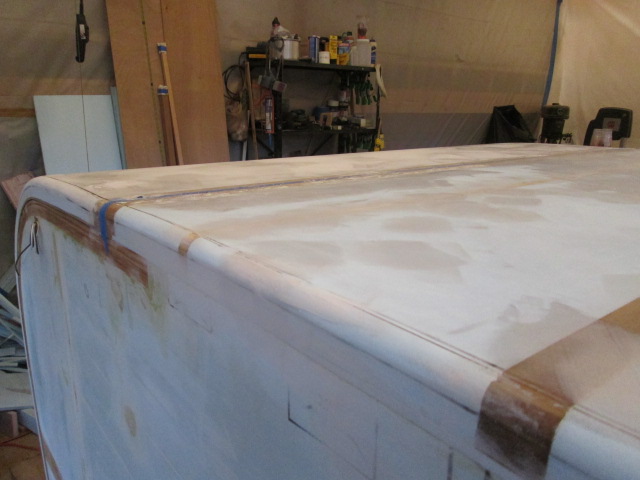
So let’s take a closer look at that wall. In this pic looking from rear to front you can see the hinge spars (with dark dots that are the recessed deck screws). A little further forward there is a hazy area of spackle skimmed over the next spar, then the next spar with just some spackle near the edge. Right about at that 2nd spar forward is the dip, or kink. You can just barely make it out in the pic.
Image

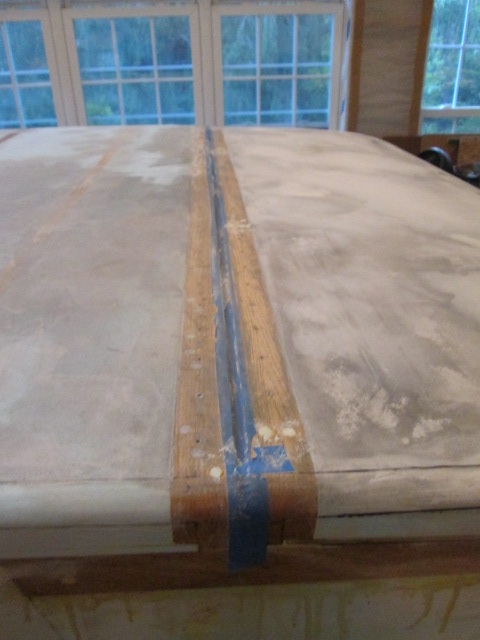
Here looking rearward with a mostly straight cedar 2x2 you can see the kink a little better, and the shadow line that is about 1/8 inch at the worst. The kink is a little more obvious in this pic.
Image

Slightly shifted camera angle showing the shadow line a little better.
Image

You are probably saying to yourself, “self, he’s crazy, that’s nothing”, and you might be correct, but just remember to magnify what you see in the picture by 3 or 4 fold to get an idea of what you see in person.

I sanded out the hatch edge radii again (using the round over block) and they are in pretty good shape now. Then I used the little pancake compressor dialed down to about 50 psi to blow out all of the sanding junk from the hinge spar screw holes and the wiring recesses for the clearance lights; a lot of sanding “rubble” had settled in there.

Then I mixed up a small batch of the foam dust/spackle/TB2 mix and packed it into the screw holes using my gloved hands. I’ll sand the excess back tomorrow once it sets up.
Image

Even though this area will be capped by canvas and the hinge, the idea was to at least fill the holes over the deck screws so that there won’t be void spaces for water to collect, in the unlikely event that it gets that far. I thought about using thickened epoxy or wood putty, but figured I could dig the soft filler out easier if need be, and all it has to do is fill the hole; nothing sturdy required here.

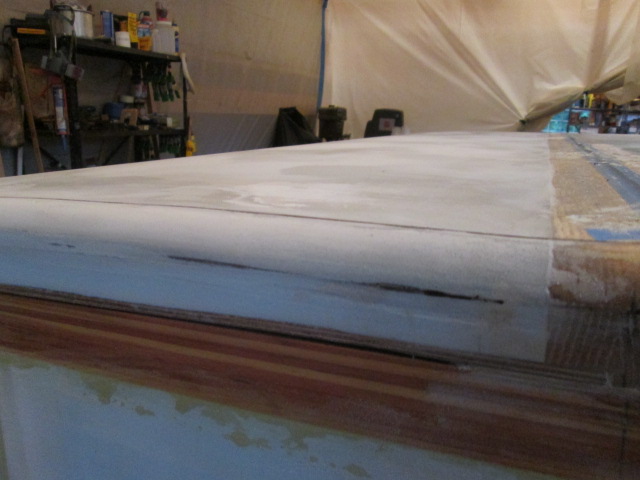
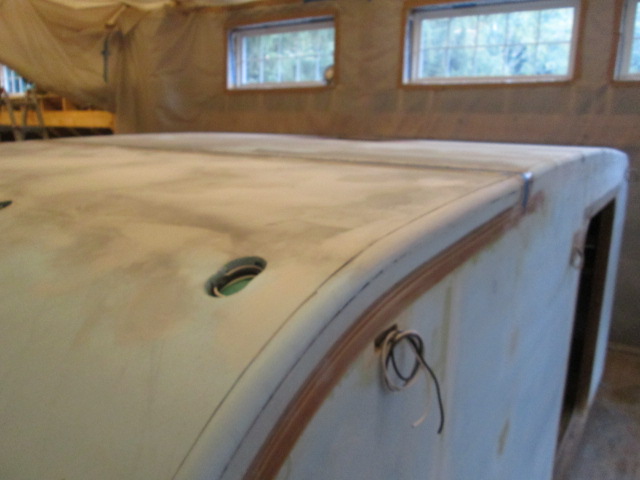
After sanding the hatch edges I hope you can see the improvement in the shape of the hatch.
Image
Image
Image

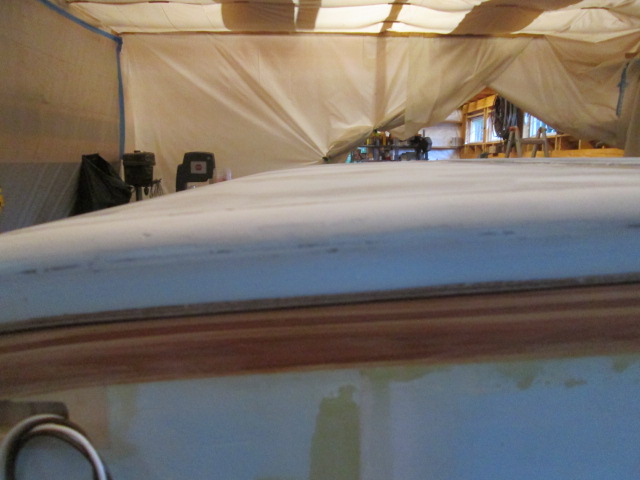
In this last pic you can see (or not see) how the kink in the wall more or less disappears at off angles. My concern is that after it gets a semi-gloss paint job it will likely pop out worse than ever.
Image

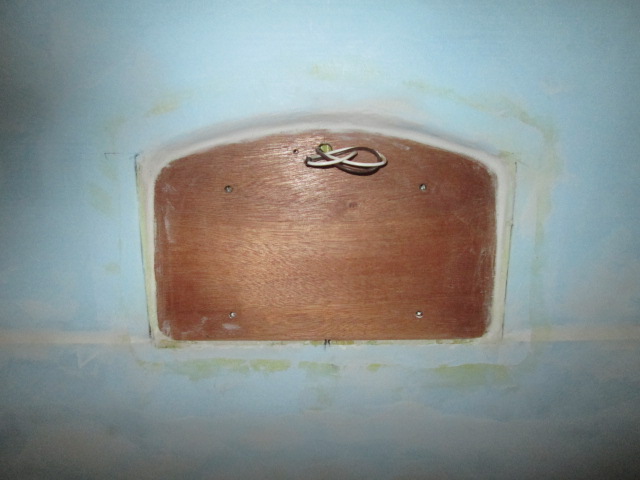
I didn’t get the plate area jambed out like I had hoped, but the last little contouring I did looks better to me.
Image

Going to try to get an earlier start tomorrow.
KC
My Build: The Poet Creek Express Hybrid Foamie

Poet Creek Or Bust
Engineering the TLAR way - "That Looks About Right"
TnTTT ORIGINAL 200A LANTERN CLUB = "The 200A Gang"
Green Lantern Corpsmen
User avatar
KCStudly
Donating Member
 
Posts: 9640
Images: 8169
Joined: Mon Feb 06, 2012 10:18 pm
Location: Southeastern CT, USA
Top

Re: The Poet Creek Express - Foamie Hybrid

Postby Ned B » Sat Sep 26, 2015 3:48 am

KC, I'm going to invoke Alton Brown... His oft voiced admonition to 'walk away, just walk away...' (Usually stated when he was using the Muffin Method). Your masterpiece is a Masterpiece... And speaking as a Maker... I Feel your angst, I get it, perfection is ' ' that close., but you're chasing that infinitesimal curve of corrections. While your incredible documentary of your build is inspiring to us all, Nobody in your fan base will ever be so bold as to point out any flaw. We will all be too busy lauding your triumphs and admiring the end product instead. Check that item as done and get to the next item.
User avatar
Ned B
1000 Club
1000 Club
 
Posts: 1036
Joined: Sat Apr 16, 2011 10:25 am
Location: Syracuse NY (ish)
Top

Re: The Poet Creek Express - Foamie Hybrid

Postby dales133 » Sat Sep 26, 2015 5:32 am

Just glue a 1/8th skin over the sides with loads of polyurethane adhesive behind it and job done.... im Ony half joking
User avatar
dales133
4000 Club
4000 Club
 
Posts: 4605
Images: 1
Joined: Mon Oct 13, 2014 5:26 pm
Top

Re: The Poet Creek Express - Foamie Hybrid

Postby KCStudly » Sat Sep 26, 2015 9:52 am

Thanks Ned. It is pretty obvious that what you state is one side of the waffle, and I definitely agree with your opinion... at least half of the time. The other argument, as Atomic and Dale encouraged, is that if I'm going to fix it now is the best time. Still don't have to decide yet, but the time is getting very close.

Dale, I have definitely considered skinning, maybe even with chipboard as GPW has championed, but I don't know what I would do to wrap the radius edges. :thinking:

Factor in the more I hear about torn seams and rips in canvas, the more I lean toward epoxy (at least for the overcoat), and maybe even taken the plunge to glass, as Mel/atahoekid did.
KC
My Build: The Poet Creek Express Hybrid Foamie

Poet Creek Or Bust
Engineering the TLAR way - "That Looks About Right"
TnTTT ORIGINAL 200A LANTERN CLUB = "The 200A Gang"
Green Lantern Corpsmen
User avatar
KCStudly
Donating Member
 
Posts: 9640
Images: 8169
Joined: Mon Feb 06, 2012 10:18 pm
Location: Southeastern CT, USA
Top

Re: The Poet Creek Express - Foamie Hybrid

Postby OP827 » Sat Sep 26, 2015 11:17 am

"...You are probably saying to yourself, “self, he’s crazy, that’s nothing”, and you might be correct, but just remember to magnify what you see in the picture by 3 or 4 fold to get an idea of what you see in person. ..."

KC,

It feels you are not happy with what you see. It is your build and your call and I am sure all here will respect your decision. In my build I started to think that a lot if not everything is fixable when it comes to foam and composites.

So, if you choose to fix it.. did you think of spreading a thin layer of knocked-down Great Stuff foam over the area and sand it down? This is what I would probably try first if I had a 1/8" gap like that, but I would do some scrap piece testing first. I did not have the exact situation like this, but I had some big cavities/damages to fill with (knocked down) Great Stuff and it worked good. Other option I can think of could be to rip and glue some thin strips of polyiso(yellow) or XPS strips foam in the low area, polyiso foam just sands easier. If it is only ~1/8" thick then I would not put glue in between the strips to allow for better quality sanding. The gaps would be filled with skin glue or otherwise later. The glue should be sandable and I do not know which is the best in this case. You could probably try epoxy with micro balloons (NOT a thickener,cabosil/fumica) to glue the strips to make the epoxy easier to sand at the feathered edge area. Test piece is also prescribed so you feel comfortable doing it on a real thing.

I would not consider using any filler for this area, I do not feel it is suitable for this.

I am not an expert, those are just my thoughts, maybe some experts who are done such one-off foam shapes fairing like boats/planes/cars with foam can chime in here. There must be some one-off builds on the web that could show some of possible solutions. Hope it helps in your build. Just want to help you move it forward. Cheers :thumbsup:
User avatar
OP827
Donating Member
 
Posts: 1596
Images: 414
Joined: Fri Apr 25, 2014 7:27 pm
Location: Bruce County Ontario
Top

Re: The Poet Creek Express - Foamie Hybrid

Postby GPW » Sat Sep 26, 2015 11:30 am

Ok , no reason to go “mental “ :roll: ... The canvas splitting ( one case) , and stretched seams (2 cases) were logically all due to NOT pre shrinking the canvas eh !!! ... Pre-shrunk canvas will not tighten up as much as the stock stuff that’s already stretched and smoothed to the max , and then has the natural tendency to shrink over time (which I suspect the latex paint helping that too ) ... Wash the canvas first ... If the canvas is too big , either cut it in sections or take it to the Laundromat where BIG machines are available ... and whilst there you might as well dry it all in a big clothes dryer, which will cause maximum shrinkage and cure all ills ... ;)


There are special foam glues (usually European in origin) , that are more like plastic cement but do not melt foam ... They were never suggested because they are Wildly Priced , but we used them on model planes and the glue sanded like it wasn’t there ... once “cured’ which was a couple days really ... sanded too early was like sanding Gum .. :o Tiny tubes , Big bucks ... GWS also made a similar glue .. cheaper when ordered in quantity ...

KC, Please let me mark your card .... You chose this path , so “NO WHINING, and More Sanding !!!” ... We want to see it Perfect just as much as you do ... OK !!! ;) :thumbsup: Get to it , it’s still a long way from the Creek .... :beer:
There’s no place like Foam !
User avatar
GPW
Gold Donating Member
 
Posts: 14920
Images: 546
Joined: Thu Feb 09, 2006 7:58 pm
Location: New Orleans
Top

Re: The Poet Creek Express - Foamie Hybrid

Postby Ned B » Sat Sep 26, 2015 11:32 am

KC my main concern is that you may be approaching the limit of precision of the materials which you long ago selected for TPCE. Chasing the next degree of precision beyond the materials ability to provide it.
User avatar
Ned B
1000 Club
1000 Club
 
Posts: 1036
Joined: Sat Apr 16, 2011 10:25 am
Location: Syracuse NY (ish)
Top

PreviousNext

Return to Foamies

Who is online

Users browsing this forum: No registered users and 9 guests