The Poet Creek Express - Foamie Hybrid

Canvas covered foamies (Thrifty Alternatives...)

Moderator: eaglesdare

Re: The Poet Creek Express - Mite-E-Er Hatch Ribs

Postby Wolffarmer » Mon May 28, 2012 11:43 pm

Here it is between a 242 and a 220F for size.

Image

All that is left to do is let the gunk soak in this week, have it setting in a vehicle I am not driving so it will get nice and warm during the day. Sunday morning polish it with a cloth and deliver it. The thing is 1 inch thick, give or take. The dark on the left side is a finger grip put in with a bowl bit. The other side is done on the other end so the board can be used on either side. Kind of my little touch, have not seen any body else do that. It is a cutting board, not a chopping block. Then there are cheese boards, bread boards.

:lol:

The first one I made i keep in the trailer. Keep hoping someone will steal it. Then I made 6 more and gave 5 away and keep the worse of those in the house.

Randy
"these guys must be afraid of the dark"
User avatar
Wolffarmer
Donating Member
 
Posts: 4612
Images: 309
Joined: Wed May 02, 2007 1:32 pm
Location: Idaho Rupert

Re: The Poet Creek Express - Mite-E-Er Hatch Ribs

Postby KCStudly » Tue May 29, 2012 3:29 pm

That's really nice. Thanks for sharing. Is it two different species to get the different colors, or did you stain half of the boards before gluing? If stain, any special precautions taken against getting stain on the glue edge? :thinking:

It is nice to be able to use both sides of the board, however, I keep a large cutting board on my kitchen counter next to the sink and I find that if I screw five (5) of those little rubber feety things (one near each corner and one in the middle, you know the ones...I call them "those little rubber feety things" :lol: ) then the board is much less susceptible to water damage, is more sanitary (doesn't trap moisture and grind junk underneath in between clean ups), and I don't need to put a towel underneath to keep it from sliding around. Then again, that's just my main food prep surface that is out all of the time. The other smaller boards for cheese service, meat prep and whatnot don't get the rubber feet treatment.

Again, nice work. I like. :thumbsup:
KC
My Build: The Poet Creek Express Hybrid Foamie

Poet Creek Or Bust
Engineering the TLAR way - "That Looks About Right"
TnTTT ORIGINAL 200A LANTERN CLUB = "The 200A Gang"
Green Lantern Corpsmen
User avatar
KCStudly
Donating Member
 
Posts: 9640
Images: 8169
Joined: Mon Feb 06, 2012 10:18 pm
Location: Southeastern CT, USA

Re: The Poet Creek Express - Mite-E-Er Hatch Ribs

Postby GPW » Tue May 29, 2012 4:37 pm

KC, just a tip .... common Vinegar does a great job of sanitizing a countertop or whatever, all Natural , no toxins, and it cleans Glass Super too ... Thrifty too ... :thumbsup:
There’s no place like Foam !
User avatar
GPW
Gold Donating Member
 
Posts: 14920
Images: 546
Joined: Thu Feb 09, 2006 7:58 pm
Location: New Orleans
Top

Re: The Poet Creek Express - Mite-E-Er Hatch Ribs

Postby KCStudly » Tue May 29, 2012 5:39 pm

Thanks GPW. We do use white vinegar around the house. Always seem to have a gallon around. :thumbsup:
KC
My Build: The Poet Creek Express Hybrid Foamie

Poet Creek Or Bust
Engineering the TLAR way - "That Looks About Right"
TnTTT ORIGINAL 200A LANTERN CLUB = "The 200A Gang"
Green Lantern Corpsmen
User avatar
KCStudly
Donating Member
 
Posts: 9640
Images: 8169
Joined: Mon Feb 06, 2012 10:18 pm
Location: Southeastern CT, USA
Top

Re: The Poet Creek Express - Mite-E-Er Hatch Ribs

Postby Wolffarmer » Tue May 29, 2012 9:25 pm

KC, guess I should have mentioned the wood. I used Cherry, maple and sycamore. First time I have used sycamore. Not sure what to think about it. The piece of board I have left is trying to turn into a propeller.

Randy

edit And where there is a wide light colored wood they are separated with a strip of walnut veneer. Not wide enough now that it is done. in future will plane it to 1/8 inch at least.

Randy
"these guys must be afraid of the dark"
User avatar
Wolffarmer
Donating Member
 
Posts: 4612
Images: 309
Joined: Wed May 02, 2007 1:32 pm
Location: Idaho Rupert
Top

Re: The Poet Creek Express - Mite-E-Er Hatch Ribs

Postby KCStudly » Wed May 30, 2012 9:50 pm

Earlier today while contemplating my next move for this evening, I figured that I needed to tune up the hatch rib template a little better because I wasn't happy with the fairness of the inside curve. I figured the screw lugs, or tabs, that I left on would only be in the way, so decided to use the double sided tape technique with the router template (should have just gone that way in the first place).

So a stop at W-mart for some Duck brand double sided carpet tape. Got the fiberglass reinforced variety. Used my employee of the month gift card again.

Once home I went straight to the garage; didn't even go in the house; didn't want to get distracted. Tried a piece of the tape on a scrap of luan and Red Grandis. I could shift it a little if I twisted it, but I don't think that will be an issue with multiple pieces of tape on the longer template. It peeled off okay w/o lifting any of the grain, so that seemed promising.

First I sawed the tabs off of the template, then I spent a couple of seconds on the belt sander smoothing where they had been on the outside. A while longer in the vise with the oak block and sand paper on the inside, feeling along the template for dips and high spots, sighting along the edges and tuning those out until I was happy.

Dragged out the old Stanley hand plane, and tuned the blade up some. Tried it on a scrap of the Grandis and got it running okay, but I'm no expert, so I think I'll just use the palm sander to even the miter joints.
Image
Image
Image
Note that both the handle and locking plate are broken.

I've come to the conclusion that the blade axis in my biscuit jointer must be ever so slightly askew from the face plate, as every butt joint I have made with it is just a little off. Even just a small amount would show up as double.

Next I traced the template on each of the hatch ribs, in turn, and used the band saw to cut them out rough to the line.
Image
Image
Image
Image
Image

I could tell the improvement in the template just from running the pencil along it; much smoother now.

Next up will be to router out the finished ribs.

Also ordered the rabbet kit that I plan to use to cut the seal groove into the wall edge caps.
part #P10-1034
http://www.eagleamerica.com/product/vp10-1025/pc_-_router_bit_sets
Last edited by KCStudly on Sun Jun 03, 2012 5:13 pm, edited 1 time in total.
KC
My Build: The Poet Creek Express Hybrid Foamie

Poet Creek Or Bust
Engineering the TLAR way - "That Looks About Right"
TnTTT ORIGINAL 200A LANTERN CLUB = "The 200A Gang"
Green Lantern Corpsmen
User avatar
KCStudly
Donating Member
 
Posts: 9640
Images: 8169
Joined: Mon Feb 06, 2012 10:18 pm
Location: Southeastern CT, USA
Top

Re: The Poet Creek Express - Mite-E-Er Hatch Ribs

Postby Wolffarmer » Wed May 30, 2012 11:23 pm

Nice. But your plane needs a new cap iron. :shock:

And a general de rusting and a new handle ( totes lumberjocks call them ).

Randy
"these guys must be afraid of the dark"
User avatar
Wolffarmer
Donating Member
 
Posts: 4612
Images: 309
Joined: Wed May 02, 2007 1:32 pm
Location: Idaho Rupert
Top

Re: The Poet Creek Express - Mite-E-Er Hatch Ribs

Postby KCStudly » Thu May 31, 2012 8:40 pm

Didn't actually get anything done on TPCE tonight (had to get home and take kitty to vet for a little elixir...she's fine), but I did make progress getting ready for the trip.

Here's a link to my new lantern.
KC
My Build: The Poet Creek Express Hybrid Foamie

Poet Creek Or Bust
Engineering the TLAR way - "That Looks About Right"
TnTTT ORIGINAL 200A LANTERN CLUB = "The 200A Gang"
Green Lantern Corpsmen
User avatar
KCStudly
Donating Member
 
Posts: 9640
Images: 8169
Joined: Mon Feb 06, 2012 10:18 pm
Location: Southeastern CT, USA
Top

Re: The Poet Creek Express - Mite-E-Er Hatch Ribs

Postby RandyG » Fri Jun 01, 2012 3:00 pm

KC, you are being very meticulous about every detail... I like that! You are building the same way I do all of my projects, try it out, if it don't work, try something else. Keep up the amazing craftsmanship, it will pay off and people will notice the time you put into your build.
Randy
Aircraft fabricator, novice carpenter, electrical apprentice, audio engineer dropout.
Build thread - http://www.tnttt.com/viewtopic.php?f=50&t=54126
User avatar
RandyG
500 Club
 
Posts: 695
Images: 115
Joined: Thu May 10, 2012 6:52 pm
Top

Re: The Poet Creek Express - Mite-E-Er Hatch Ribs

Postby KCStudly » Fri Jun 01, 2012 3:08 pm

Thanks RandyG. I do details. It can be a blessing and a curse all in one.

Yes, I will certainly be proud of it, regardless of how it turns out. The trick now is to get 'er done in time for the big trip, and that's where all of the details conflict with time. Time is the problem. I need a Tardis!

Tardis images

Tonight I will attempt to router out the finished hatch rib profiles.
KC
My Build: The Poet Creek Express Hybrid Foamie

Poet Creek Or Bust
Engineering the TLAR way - "That Looks About Right"
TnTTT ORIGINAL 200A LANTERN CLUB = "The 200A Gang"
Green Lantern Corpsmen
User avatar
KCStudly
Donating Member
 
Posts: 9640
Images: 8169
Joined: Mon Feb 06, 2012 10:18 pm
Location: Southeastern CT, USA
Top

Re: The Poet Creek Express - Mite-E-Er Hatch Ribs

Postby KCStudly » Fri Jun 01, 2012 11:03 pm

Okay, this is one of those took-longer-than-I-thought-it-would situations.

Figured I'd get the router table out, remove the fence, install the flush cutting bit with roller bearing on tip and run the hatch ribs thru. Turns out that the flush cutting bit that I have won't do a 3/4 inch thick board in one pass, cutter height is too short. Besides, with the router in the table, in order to have the bearing ride on the template and still have the cutter trim the edge of the board on the template side, the cutter shaft would barely be in the collet.

Okay, take the router out of the table and get a better grab on the cutter shank. Still, since there is a space between the edge of the cutter and the guide bearing, in order to have the cutter reach the face of the board against the template, the bearing was only riding on part of the 5 mm template. Worse, the difference between the shoulder of the cutter above the blade at the shank end, and the diameter of the bearing/cutter meant that the shoulder on the cutter rode on the extra meat of the rough cut, holding the bearing off of the template.

Also, with the head of the bolt holding the bearing to the cutter sticking out, it was not as simple as just laying the blank on a table with the template down and just running the router around the outside edge.

Had to clamp the blank to the edge of my makeshift table, supporting the free end with a makeshift prop and make several passes, fist with the bearing aligned low on the template, then again with it raised up a bit to follow the fresh cut. Back again for a fresh pass, then repeat.

Here you can see the template sitting on a few cardboard spacers to allow me to align it to the blank before the tape sticks. Also note the piece of 'no slip' mesh rubber carpet pad.
Image

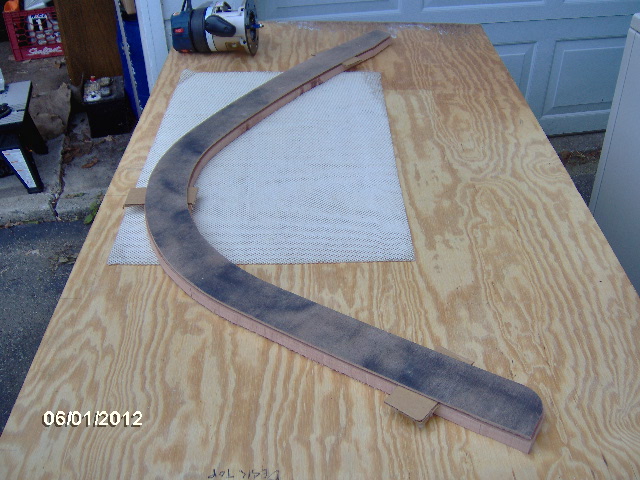
Here it is with the spacers pulled out and stuck.
Image

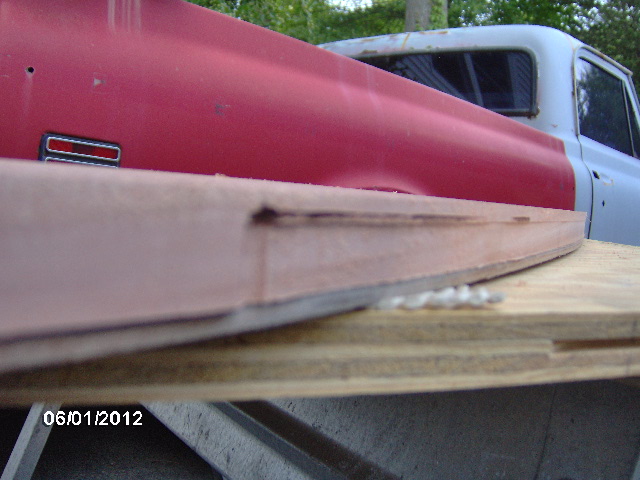
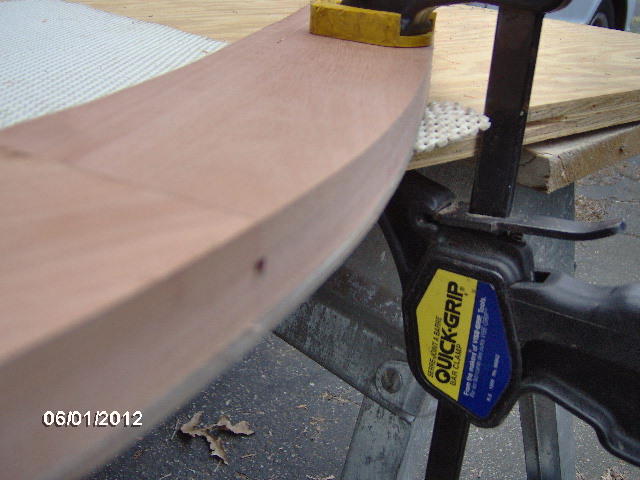
And here you can see where the shoulder of the cutter left a burn mark and ledge where it was too short to do the job in a single pass.
Image

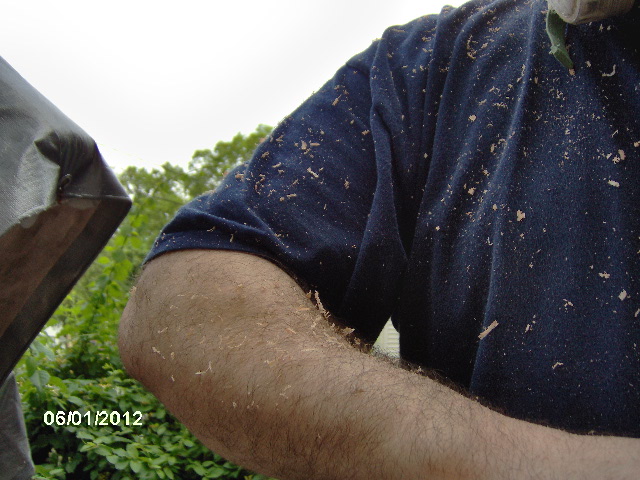
Managed to sling plenty of chips (wear your safety glasses).
Image

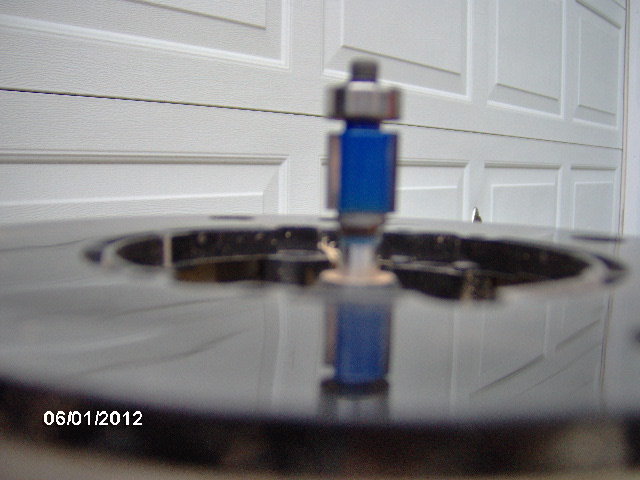
Here's a look at the cutter (blurry). Note the space between the cutter edge and the bearing race, and the gap between the face plate and shoulder at the cutter shank.
Image

I started on the outside arc thinking that if I messed anything up it would be easier to hide up against the hatch skin. Was also worried about end grain chipping out at the corners of the tips. However, The Red Grandis is such nice wood that the router just ran along fairly easily with no problems on the end grain and only some minor fuzz that will easily go away with some sandpaper.

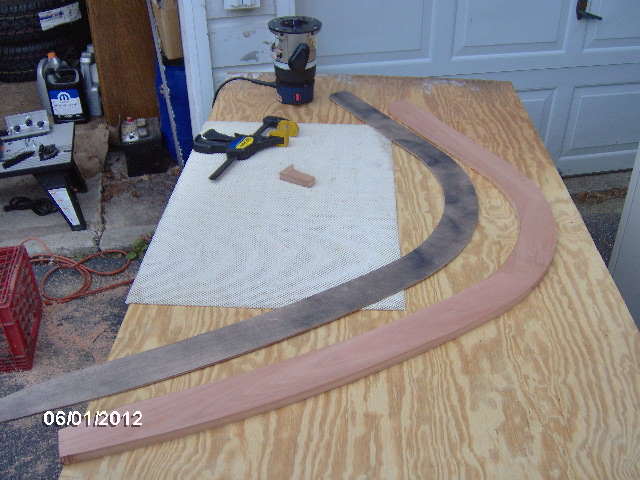
Here's the outside edge. The little dark 1/8 x 1/8" square is where the biscuit slot got exposed on the skin side.
Image

And here's the finished rib once the template was popped off.
Image

Tomorrow I plan to finish the other three ribs!
Last edited by KCStudly on Sun Feb 14, 2021 3:22 pm, edited 1 time in total.
KC
My Build: The Poet Creek Express Hybrid Foamie

Poet Creek Or Bust
Engineering the TLAR way - "That Looks About Right"
TnTTT ORIGINAL 200A LANTERN CLUB = "The 200A Gang"
Green Lantern Corpsmen
User avatar
KCStudly
Donating Member
 
Posts: 9640
Images: 8169
Joined: Mon Feb 06, 2012 10:18 pm
Location: Southeastern CT, USA
Top

Re: The Poet Creek Express - Mite-E-Er Hatch Ribs

Postby KCStudly » Sat Jun 02, 2012 9:13 pm

Today was spent on Rover Mike's project Rover. About 6 hrs. bringing the total to about 29 hrs. The plywood has sat in the local UPS warehouse since Tuesday. Apparently asking them to set a delivery appointment combined with a holiday weekend adds a week to the delivery time. :cry: :x :shock: :thumbdown:

On the Rover project we did get the seat pan support members tack welded in, fixed the passenger side firewall outrigger height by pie cutting and rewelding, and Mike did a great job of fitting and forming some gusset plates to reinforce the firewall outriggers, which also got tack welded in.

I finished fitting and welding the passenger side seat pan support tabs and gusset, and lent a hand wherever I could while we each stepped on each other trying to work in the same space at the same time.

Lots of work left to do though: another frame xmbr to support the rear of the rock sliders and the rear roll bar hoop, the rock sliders themselves, the double hoop roll bar, and relocating the cab bulkhead to the rear of the half cab.

I'm not sure how much more time I can afford to spend on this side project, but if the pay off in traded labor in wood work is there, then I could see putting a little more time in. If not, I need to keep building on TPCE. "Daylight's wasting" (-John Wayne in The Cowboys, IIRC)

On the way home I bought a 1" long flush cutting bit, and when I got home I found the rabbeting bit in the mailbox.
Image

So the rest of the hatch rib routering should go much smoother (no pun intended).

My chunker friend Dave suggested a flush router collar, but I did not see any router collars on display at the Ho-De-Po. I think the longer flush bit will do much better than the one I had. There were two 1" long cutters available with 1/4" shanks. The 1/2 inch diameter one that I got has only (estimated about) 1/8" gap between the cutter edge and bearing (so it should follow the thin 5 mm template the same as the cutter I had), while the other one was only 3/8" diameter and had a much larger gap and thicker washer under the bearing that would have been marginal following my thin template.

Just me paying attention to the details. :D 8) :thumbsup:
Last edited by KCStudly on Sun Jun 03, 2012 5:24 pm, edited 2 times in total.
KC
My Build: The Poet Creek Express Hybrid Foamie

Poet Creek Or Bust
Engineering the TLAR way - "That Looks About Right"
TnTTT ORIGINAL 200A LANTERN CLUB = "The 200A Gang"
Green Lantern Corpsmen
User avatar
KCStudly
Donating Member
 
Posts: 9640
Images: 8169
Joined: Mon Feb 06, 2012 10:18 pm
Location: Southeastern CT, USA
Top

Re: The Poet Creek Express - Mite-E-Er Hatch Ribs

Postby KCStudly » Sun Jun 03, 2012 2:36 pm

Procrastinated a bit this morning before heading out to the garage this afternoon. Got set up and routed the second rib about half way when a random rain shower broke out. Dragged everything in, waited a few minutes for it to clear, dragged everything back out, a few more spits; bah. Wanted to watch the race anyway. Raining again now. I suppose I could pack everything in the car and go make a sawdust mess at Fab Mecca, or run into the wood shop at work, but I'm feeling like I need a short break.

I did try a little different technique. After popping the template off of the first rib the tape stuck to the rib, not the template. Could be just the smooth sanded texture of the Red Grandis vs. the open grain of the luan, but I decided to stick the tape down to the rib blank first then set the template on top. That also made it easy to see where not to put the temporary cardboard churches. I had seen a tiny bit of lifting on the template before, so I also used 4 pcs. of tape instead of just 3.

Other thing I did (or didn't do) was to not bother hauling the chunk of 3/4 ply out to use as a table. I just clamped the rib right to the saw horses (still using the carpet mat as a cushion), leaving a lot more rib hanging off and less changes in set-up to get to it all. The longer cutter was the big time saver. If the rain would just let up I could bang out the rest of the ribs in no time.
KC
My Build: The Poet Creek Express Hybrid Foamie

Poet Creek Or Bust
Engineering the TLAR way - "That Looks About Right"
TnTTT ORIGINAL 200A LANTERN CLUB = "The 200A Gang"
Green Lantern Corpsmen
User avatar
KCStudly
Donating Member
 
Posts: 9640
Images: 8169
Joined: Mon Feb 06, 2012 10:18 pm
Location: Southeastern CT, USA
Top

Re: The Poet Creek Express - Mite-E-Er Hatch Ribs

Postby RandyG » Sun Jun 03, 2012 11:12 pm

I always bought the cheap router bits from online, but the only thing I have cut is softer wood like pine. Not sure how much difference a more expensive bit will do so tell me your opinion on that new bit. (They do get pricey)
Randy
Aircraft fabricator, novice carpenter, electrical apprentice, audio engineer dropout.
Build thread - http://www.tnttt.com/viewtopic.php?f=50&t=54126
User avatar
RandyG
500 Club
 
Posts: 695
Images: 115
Joined: Thu May 10, 2012 6:52 pm
Top

Re: The Poet Creek Express - Mite-E-Er Hatch Ribs

Postby KCStudly » Mon Jun 04, 2012 10:22 am

I have always had poor luck with the super plain el cheapo bits gumming up and burning.

The 1 inch carbide flush cutting was about $17-19 at Ho-De-Po and the less expensive Rabbet kit with bearing assortment was about $50 (haven't used that one yet).

The Ho-De-Po bit seemed to work fine, although it did tend to grab on my relatively thick rough cut. So to combat that I just took a swipe or two free hand without forcing the bearing up against the template for a pass or two, before making the final cut.
KC
My Build: The Poet Creek Express Hybrid Foamie

Poet Creek Or Bust
Engineering the TLAR way - "That Looks About Right"
TnTTT ORIGINAL 200A LANTERN CLUB = "The 200A Gang"
Green Lantern Corpsmen
User avatar
KCStudly
Donating Member
 
Posts: 9640
Images: 8169
Joined: Mon Feb 06, 2012 10:18 pm
Location: Southeastern CT, USA
Top

PreviousNext

Return to Foamies

Who is online

Users browsing this forum: No registered users and 15 guests