Before jumping into the layup, I had to remember that I hadn’t rough cut the glass pieces for the back section of the rim, or made the plastic prepreg sheets for it. I took a corner off of that extra yard of 60 wide, again cut on a 45 deg bias. Conserving a little bit of the big piece, rather than cutting the corner off then taking two 5 inch wide strips, I only cut in as far as I needed to get one full length piece, then cut two shorter lengths out of the cut off corner, planning to butt those for the first ply, then cap with the full length piece. Another of the deciding factors to do it this way is the fact that I plan to lay the first layer on the galley hatch on a bias and I wanted to get a little experience butt joining seams. No special technique used here, just laid the edges as straight and close together as I could and tried not to disturb the alignment during the wet out and placement stages. The PMPP technique used here really helped with that, so I guess I didn’t get as much experience as I could have, but it came out good and I am getting more and more practice.
First I calculated the batch size for the rim pieces, all of them are two plies, remembering to divide the length x width calculation for the triangle shaped prepreg (the front and side pieces of the rim) in half when calculating its area. Here’s a previous pic of the bottom plastic sheet with the pattern tracings on it as a reminder.
It came out at just under 8oz’s of resin. Eleven pumps ended up just over 8oz’s, so that’s what I mixed. Then I poured most of it out on the big triangle piece and the rest along the long narrow back piece. After working it into the triangle piece I realized that I probably needed less on it and more on the back piece, so it was a simple thing to scoop up the excess with the credit card and move it over to the other layup.
I had to keep moving here, so no pictures along the way. Once all of the rim pieces were wet and cut out, I mixed another 3 pump batch of wet and brushed that all along the rim and down both the inside and outside by the width of a 2 inch wide chip brush. Also, shoved some in that little loose flap that I had at one of the rim corners, and a few little spots inside the box that needed a little touch-up.
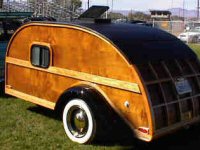
Then I started at the front and worked my way toward the back, shingling the pieces on one at a time, peeling the top plastic off, wrapping them down the sides and overlapping at the corners.
As I was going around tapping out the little air pockets with the credit card, the rear corners where the rear rim piece overlapped the sides by about 1/8 inch kept sticking out. Where the other parts wrapped around 1-1/2 (on the outside) to 2 inches (around the rim contour on the inside) it was no problem going over the 1/4 inch radius because there was plenty stuck down to keep it from pulling back up again; but here where I had intended for it to be flush with the edge, and it had run long by just a bit, it kept springing back up.
So after going around and making sure I was happy with everything else, trying to accelerate the cure a little with a hairdryer, and still having it lift, I figured I could either just sand it off later or try a little poor man’s peel ply; packing tape. It’s hard to see the tape at all, and I hope it comes back off easy later, but it seemed to do the trick… at least so far.
All in all I’m very pleased with how this layup went!


 Yup, we're on the same page. The axe is sharp.