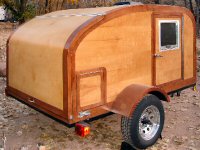
Truck cap/Camper cap build

Canvas covered foamies (Thrifty Alternatives...)

Moderator: eaglesdare

Re: Truck cap/Camper cap build

Postby retep » Wed Aug 28, 2019 4:07 pm

Your project is looking really great. Thinking about this for a future build.

Peter


Sent from my iPad using Tapatalk
retep
Teardrop Master
 
Posts: 106
Joined: Wed Mar 16, 2016 3:55 pm

Re: Truck cap/Camper cap build

Postby RJ Howell » Fri Aug 30, 2019 1:14 pm

Think I have now reached a system I like and very possibly a primer.. Early results of tests look good. I'll get into that later as it cures a bit more.
I moved ahead and primed the roof with enough still in the pan to do one side (except where my set is).

Image

The test is part of the system I'm really starting to like. What I'm looking for is a tight material and when I pul it back it has good resistance. I really don't wish to see all the primer pulled off (unless there's a dent from foam being removed), but a good combination.

Image

The on on the left is what I'm hoping for. The one on the right, not so much.. If that had left a dent, then WHOA, yet it did not, just pealed the primer off.
So far I'm headed towards a great primer coat and let it dry and 50/50 TB2 on the material. I am going to test a lower ratio of water before I proceed, which my mind says 80/20. I like wetting the material and stretching as applying so that would cut the TB2 even further. Doing that seems to draw the TB2 through the material and really stiffens it.

That brings me to the canvas.. I bought the canvas at Harbor Freight and went through the pile but all the had was the 'seam in the middle' canvas.. This gets me real close for doing the roof without that seam.. I wasn't going to pre-shrink the canvas, but now I feel I need to and see if I have enough..

Image

So far it's still damp (had it soaked) and I've lost 4" in width and 6" in length. I can't afford much more (2" more only)...

I have always wanted to wrap the nose and the roof as one piece and will be able to do this. I will have enough to get down the back (hatch area) but not all the way. As I prep canvas, I'll decide where and how that back seam happens.

I hope none of you see this until the weekend is over and your out enjoying and camping somewhere. For me, I'm retired and I'll go once you all are done.. LOL
Safe weekend and travels all!
RJ Howell
1000 Club
1000 Club
 
Posts: 1166
Images: 36
Joined: Sat Jul 27, 2019 6:08 am

Re: Truck cap/Camper cap build

Postby RJ Howell » Tue Sep 03, 2019 7:46 am

First piece of canvas now on and drying! I thought I wanted to flip it over and not work any canvas upside down. Oh was that a good move!

It has gone overnight and still fairly damp to the touch. Nice sunny dry day today so I may just bring it out into the sun. I did re-prime and let it dry about 3-4hrs before wetting the canvas with a 80/20 mix of Pro-cryl/water. The canvas drinks it up so fast I do feel it's a good idea to mix it. Not sure yet if I will do a second priming on the next section I cover.

I'm thinking it could be a day or two before I can flip it and continue.. We'll see.

Image

Back to watching paint dry.. :beer:
RJ Howell
1000 Club
1000 Club
 
Posts: 1166
Images: 36
Joined: Sat Jul 27, 2019 6:08 am
Top

Re: Truck cap/Camper cap build

Postby GPW » Wed Sep 04, 2019 5:14 am

Patience “grasshopper" !!! :lol: Looking Good !! And yes canvasing upside down makes really good sense , as overhead canvasing is a PIA … JMHO
There’s no place like Foam !
User avatar
GPW
Gold Donating Member
 
Posts: 14912
Images: 546
Joined: Thu Feb 09, 2006 7:58 pm
Location: New Orleans
Top

Re: Truck cap/Camper cap build

Postby GPW » Wed Sep 04, 2019 5:16 am

As I was told by an “ Old Timer” some time ago , “ Covering should be an Unhurried job !!! “ :thumbsup:
There’s no place like Foam !
User avatar
GPW
Gold Donating Member
 
Posts: 14912
Images: 546
Joined: Thu Feb 09, 2006 7:58 pm
Location: New Orleans
Top

Re: Truck cap/Camper cap build

Postby me&z » Wed Sep 04, 2019 6:43 am

GPW wrote:As I was told by an “ Old Timer” some time ago , “ Covering should be an Unhurried job !!! “ :thumbsup:


Talking to yourself again, GPW? :FNP
me&z
Teardrop Master
 
Posts: 128
Joined: Sat Apr 23, 2016 4:46 am
Top

Re: Truck cap/Camper cap build

Postby RJ Howell » Wed Sep 04, 2019 9:00 am

I did the small area outback yesterday using the system another has spoken of. Pre-priming the canvas and letting it dry a bit before coating again and apply. Worked much better and happy with the result this am. Primer does take longer to dry (I knew this going in) and really wish to try TB2 again over the primer. I have another small section to do and just came from pre-priming the canvas.

Re-priming the foam just before applying is not working.. Could be several reasons for this and most being operator error. Personally, I think I'm trapping too much moisture between the foam and canvas.. What I saw before was the canvas lifted, I'm not seeing this now by only coating the canvas (foam has been pre-primer and dried for a couple days).

I'll update again tomorrow when I can see how the TB2 did.
RJ Howell
1000 Club
1000 Club
 
Posts: 1166
Images: 36
Joined: Sat Jul 27, 2019 6:08 am
Top

Re: Truck cap/Camper cap build

Postby RJ Howell » Wed Sep 04, 2019 3:11 pm

I've been fighting between TB2 and the primer.. Think I have figured this out now.

Pre-priming the foam is my best so far. Also not adding again to the foam. Seems to trap too much moisture and just doesn't hold. Priming the canvas, allowing it to dry a bit and going again is working well. At this point of re-mixing as I go, I figure I'm somewhere around a 90/10 to 80/20 mix.. Get's harder to stay on track as you go..

By tomorrow I hope to flip it back over and possibly do the sides. We'll see..

As much as I've tried the TB2, I still like the PC better. I just have to learn patience.
RJ Howell
1000 Club
1000 Club
 
Posts: 1166
Images: 36
Joined: Sat Jul 27, 2019 6:08 am
Top

Re: Truck cap/Camper cap build

Postby RJ Howell » Fri Sep 06, 2019 1:57 pm

Off to Harbor Freight and picked up the spray gun. $15.99 on sale. Sprays the cut primer nicely! This allowed me to prep the entire side at once vs. 1 foot roll at a time. For the roof, I'm hoping to enlist a third set of hands.. Yes, wifey helped with the side! :D Without her I couldn't have done that way! I did wet and re-roll the canvas to make certain the primer was still tacky/wet. On all the wrap-overs, we brushed extra primer, stretched and pinned in place. That worked real well.

By the time I finish this project.. I'll be a pro at PMF.. LOL.
RJ Howell
1000 Club
1000 Club
 
Posts: 1166
Images: 36
Joined: Sat Jul 27, 2019 6:08 am
Top

Re: Truck cap/Camper cap build

Postby RJ Howell » Sat Sep 07, 2019 1:06 pm

Side canvas went on yesterday early afternoon. I checked it around 9pm and all looked good.

What a mess of bubbling I found this morning.. May just tear it off and go at it again.. I am so dis-appointed. :cry:

Having the sprayer now, I went at the other side quite differently. I'll explain tomorrow if all comes out well.
RJ Howell
1000 Club
1000 Club
 
Posts: 1166
Images: 36
Joined: Sat Jul 27, 2019 6:08 am
Top

Re: Truck cap/Camper cap build

Postby GPW » Sun Sep 08, 2019 5:32 am

You may ( or may not ) be “ waterboarding" your covering … wet canvas and even a bedsheet doesn’t “breathe” … you HAVE to get any and all the air out underneath … bubbles are just trapped air ( or surface contamination ) …. You can punch a tiny air hole in the bubble and try ironing it back down ( don’t use the wife’s Iron !!! :frightened: ) otherwise stick some thinned glue in there and just glue the bubbles down … easy … Try one , lots easier than tearing it off and starting over , possibly creating foam damage and making things much more difficult … A few of us have already had to deal with bubbles. ;)
There’s no place like Foam !
User avatar
GPW
Gold Donating Member
 
Posts: 14912
Images: 546
Joined: Thu Feb 09, 2006 7:58 pm
Location: New Orleans
Top

Re: Truck cap/Camper cap build

Postby RJ Howell » Sun Sep 08, 2019 7:01 am

As for the bubbles.. I did fix the smaller ones, but the BIG ones I tried making a slit, filling, and rolling back on. It worked yet now I have these ugly slits on the side wall. I never though of trying heat to relax the canvas.. I still have a few real small ones I will try that one.

Here's my theory on what happened:
I do think some of the smaller ones may have been trapped air yet I doubt it due to the amount of rolling I'm doing as applying, I mean everything was flat for hours.. I'm leaning more towards the sizing and pre-priming of the canvas, letting that dry a bit (hour) and then wetting and applying. The canvas won't stretch as well. I just did the opposite side yesterday and this morning I see no bubbling! WHOA! I did not size, I did not allow primer to sit and dry. I'm using the spray gun now and can cover a larger area pretty quickly. Doing about 14"-16" at a time this way. Coat the canvas, coat the foam, re-coat the canvas and apply. Stretching and rollering as I apply. This worked very well.

You can see what I'm left with..

Image

Image

Here's the other side. Sorry it's so dark. It's very smooth!

Image
RJ Howell
1000 Club
1000 Club
 
Posts: 1166
Images: 36
Joined: Sat Jul 27, 2019 6:08 am
Top

Re: Truck cap/Camper cap build

Postby RJ Howell » Sun Sep 08, 2019 12:00 pm

Yup, I tore it off, and replaced. I just couldn't see patching this.. Especially when I'm in build process anyway.
RJ Howell
1000 Club
1000 Club
 
Posts: 1166
Images: 36
Joined: Sat Jul 27, 2019 6:08 am
Top

Re: Truck cap/Camper cap build

Postby RJ Howell » Mon Sep 09, 2019 8:11 am

Just went out to check the overnight dry. Much better and very happy I re-did it! Only winkles are where the window opening is.

Image

I'll trim it and fold over the edges today. Might even get to the roof.
RJ Howell
1000 Club
1000 Club
 
Posts: 1166
Images: 36
Joined: Sat Jul 27, 2019 6:08 am
Top

Re: Truck cap/Camper cap build

Postby RJ Howell » Mon Sep 09, 2019 12:34 pm

About 4hrs spent out in the shop today and trimmed excess, glued and clamped as required. The underside of the overhang just wanted to be clamped, it asked nicely, so I did it. Windows are cut out and canvas folded in. Good day so far! :beer:

Image

Image

Now this I will say about the difference out sizing or not. I say not.
This is sized:

Image

Image

This is not:

Image

Image

You decide for yourself what looks better. :roll: I know what I like better! :D

I'm not about to trip and re-do that side again.. I do believe it will look fine once top coated. I just really like that non-sized side!
RJ Howell
1000 Club
1000 Club
 
Posts: 1166
Images: 36
Joined: Sat Jul 27, 2019 6:08 am
Top

PreviousNext

Return to Foamies

Who is online

Users browsing this forum: No registered users and 14 guests