The Poet Creek Express - Foamie Hybrid

Canvas covered foamies (Thrifty Alternatives...)

Moderator: eaglesdare

Re: The Poet Creek Express - Foamie Hybrid

Postby GPW » Sat May 11, 2013 6:24 am

Sure is NICE to have Tools !!!! :thumbsup:

Hot glue doesn’t sand at all .... but you can smooth the surface while it’s still hot ... and it’s Quick ... Good for little spot repairs , where you can stick the hot tip into the foam and pump in some glue ... like that crack ... ;)
There’s no place like Foam !
User avatar
GPW
Gold Donating Member
 
Posts: 14912
Images: 546
Joined: Thu Feb 09, 2006 7:58 pm
Location: New Orleans

Re: The Poet Creek Express - Foamie Hybrid

Postby Ned B » Sat May 11, 2013 7:25 am

oh man, those Kreg flip-stops are just too cool! I'm about to dive into a set of adirondack chairs for the household, and I've got a Bunch of repetitive cuts to make.
User avatar
Ned B
1000 Club
1000 Club
 
Posts: 1036
Joined: Sat Apr 16, 2011 10:25 am
Location: Syracuse NY (ish)

Re: The Poet Creek Express - Foamie Hybrid

Postby KCStudly » Sat May 11, 2013 9:12 am

Thanks for the input Geep.

Ned, The stop is pretty cool, eh, I agree! But the block of wood and a clamp worked pretty good, too! I think the trick with this one is that you can slip the board under it, make your first squaring end cut, then slide the board down and back up against the stop (which falls down), and make your second cut to length. Speeds things up in a production situation. I have no idea how much the set up costs, but I will not look a gift horse in the mouth.

Thanks to all for watching.
Last edited by KCStudly on Mon Jul 01, 2013 6:30 pm, edited 1 time in total.
KC
My Build: The Poet Creek Express Hybrid Foamie

Poet Creek Or Bust
Engineering the TLAR way - "That Looks About Right"
TnTTT ORIGINAL 200A LANTERN CLUB = "The 200A Gang"
Green Lantern Corpsmen
User avatar
KCStudly
Donating Member
 
Posts: 9616
Images: 8169
Joined: Mon Feb 06, 2012 10:18 pm
Location: Southeastern CT, USA
Top

Re: The Poet Creek Express - Foamie Hybrid

Postby KCStudly » Sat May 11, 2013 7:20 pm

Rain on and off today. Thank goodness for my best friend Karl and his network of friends! I must express again how lucky I am to be in the situation that I am in with the loft, the tools, and the guiding inspiration. That includes the people here on the forum, too. This is truly a group effort!

The fix is in! I put about 3-1/2 to 4 hrs. in today. Seems like I didn’t get much done for that time, but it is all progress, even if it was mostly spent fixing a booboo.

I modified my tracing of the wall crack to make the plug an easier shape to form, sanded a sliver of 1-1/2 thick foam scrap that was a fairly true 3/4 inch wide with a nice rounded tip to resist further crack propagation, then traced that onto another piece of scrap luan (that I cut from the edge of the window template).
Image
Seems an appropriate shape for a d**k up! (er… a mistake).

Here are the tools that I used to make the template. The back of the hand saw as a straight edge, the compass for the round end, razor knife to score the line and prevent splintering, the clamp and jigsaw to make the cutout, and the small block and sandpaper wrapped around the handle of the chisel to smooth out the jigsaw cut.
Image

The router template in position using carpet tape.
Image

The recess is cut.
Image

A little adjustment and the plug is dry fit.
Image
Not happy with the marks that the carpet tape left on the foam, so will go back to using the drywall screw method on the foam in future.

Thin layer of GG applied on all sides.
Image

And stuffed it in there.
Image
I’ll trim the excess off later during the cleanup stage.

Here’s a pic of the marker light recess template that I mentioned, piggybacked onto the border of hatch actuator strut block template.
Image
Image

Next I started to spackle the rough sanded areas, factory score lines, dings and dents in the front section of the street side wall.
Image
Image

The spackle seemed a bit dry and hard to spread (old tub) so I used a spritz of water here and there to help smooth it down a bit. Still, it was not very consistent, so I will pick up a new tub next time and see if that works a little easier.

On the way home I stopped at RadiosHack to get some flag style spade connectors that will allow the hatch actuator switch mounting depth to be as shallow as possible. Next I stopped at JoAnn’s Fabrics to get some dyes to try (see my query on the aniline dye thread in Techniques).
Image
Image

Once home I called mom to set up plans for mom’s day tomorrow (note to mom: reservations are set for 6:00pm). Mentioned the dyes and she said that she had used them before for her basket weaving projects, so that is reassuring. We got to talking about an arty crafty studio community in an old velvet mill in Stonington, colors, art, quilts and whatnot; one thing led to another and I got to talking about Doug Hodder’s work, so am posting a link here to help mom find it easily.
KC
My Build: The Poet Creek Express Hybrid Foamie

Poet Creek Or Bust
Engineering the TLAR way - "That Looks About Right"
TnTTT ORIGINAL 200A LANTERN CLUB = "The 200A Gang"
Green Lantern Corpsmen
User avatar
KCStudly
Donating Member
 
Posts: 9616
Images: 8169
Joined: Mon Feb 06, 2012 10:18 pm
Location: Southeastern CT, USA
Top

Re: The Poet Creek Express - Foamie Hybrid

Postby GPW » Sun May 12, 2013 5:50 am

Getting close now KC !!! :thumbsup: 8) ;)
There’s no place like Foam !
User avatar
GPW
Gold Donating Member
 
Posts: 14912
Images: 546
Joined: Thu Feb 09, 2006 7:58 pm
Location: New Orleans
Top

Re: The Poet Creek Express - Foamie Hybrid

Postby KCStudly » Sun May 12, 2013 10:43 pm

Happy mother’s day to my mom, and all of the mothers out there in TNTTT land!

GPW wrote:Getting close now KC !!!

Thanks GPW. We all keep thinking that, and I keep being asked, “when do you think you’ll get (insert: walls up... box done... just plain done, etc.)?”

I’m too busy trying to think 2 and 3 steps ahead that I can’t even begin to think of the time frames in the bigger picture.

Here is my to-do list for the near term, not necessarily in order:
- Fair both wall outside surfaces with spackle
- Finalize the hatch actuator switch mounting and fail-safe circuit
- Skin both wall inner surfaces
- Layout and predrill the floor for the wall mounting screws
- Fair the radius corners of the floor
- Seal the bottom and sides of the floor (I will probably use slightly thinned TB2 since I have a bunch of it on hand)
- Make cut outs in inner skins for electrical stuff (light switch pockets and bulkhead fan)
- Trim walls to final finished profile
- Apply finish to top of floor, inside of walls and bulkhead (decide whether to mask all the little spots where the cabinet frames should be glued to the walls)
And on it goes.

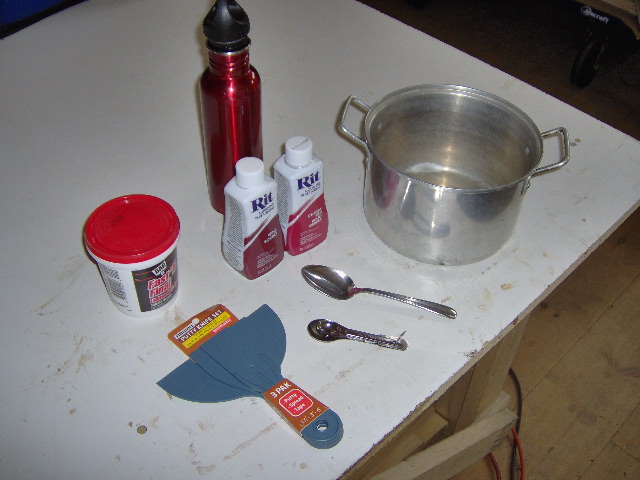
Stopped and got some fresh spackle and plastic putty knives. Also stopped at Goodwill and got stuff for mixing and storing dye: pot for heating; measuring spoons for accurate measuring; large soup (or small serving) spoon for stirring; and a large sealed top aluminum drink bottle for storing). The only thing I couldn’t find was a funnel.
Image

Pulled the weights, trimmed the excess, and sanded the Dutchman patch down fair.
Image
Image

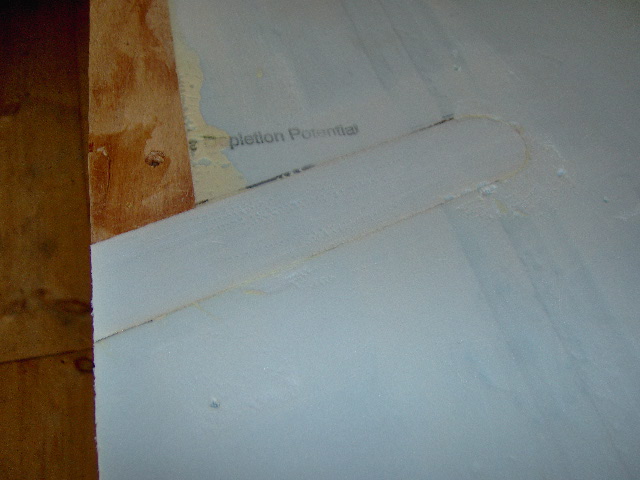
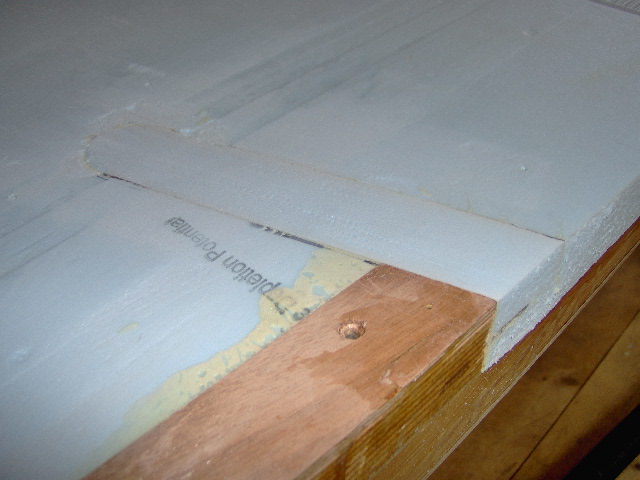
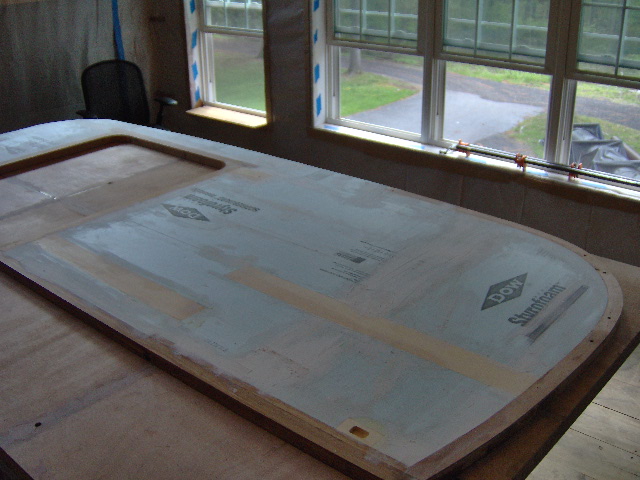
The fresh spackle behaved much better, light and fluffy, and, after making a pass with the sanding block on the stuff I put down earlier, I was able to lay down a first pass on the rest of the street side wall.
Image

The area around the Dutchman took a little bit.
Image
Image
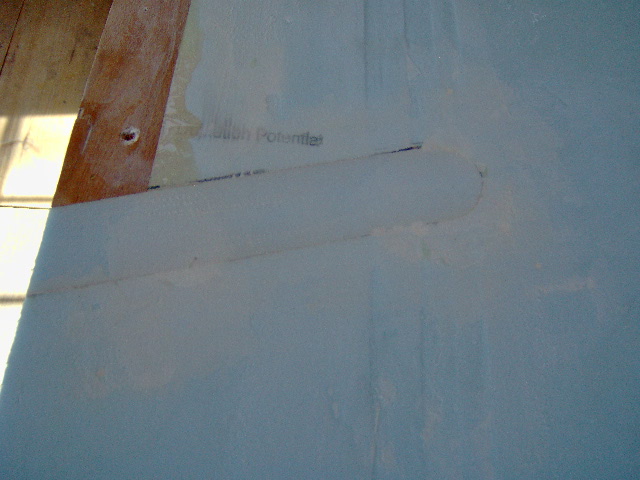
The dark area is something that I haven’t seen with the GG. I expected it to be gooey, but it was solid, and not very foam like.

The repair seems to have worked. The wall still has a slight “wave” there but no longer flexes like it did with the crack.

Here’s a shot looking up from the bottom of the front section of the street side wall showing how the fairing work is going.
Image

Next I experimented with the dyes. I didn’t bother heating it, nor did I add any more salt or vinegar. I used the plastic mixing cup (that I had bought previously) to measure 4 oz of water into a Dixie cup. Then I added 1 tsp of the Wine color dye. I did the same for the cherry color, and then I mixed “quarter” samples from each of these by taking 8 tsp from one and 2 tsp from the other, both ways.
Image

Using white paper Scott towels I saturated sections of a scrap test piece of the Okoume.
I had some bleed under the tape between the sections, and the pictures look blotchier than it does in person, not to mention that the colors are not even close to what I want. They’re neat colors, just not what I want for the camper.

Here is the test piece. It is barely dry without any top coat. From left to right is: straight wine; 4 to 1 wine over cherry; 4 to 1 cherry over wine; straight cherry. (Also shown are the previous test pieces with gunstock oil stain and a couple of coats of poly on the Okoume, and the “natural” oil and poly on the maple.)

First pic with flash.
Image

Second pic without flash.
Image

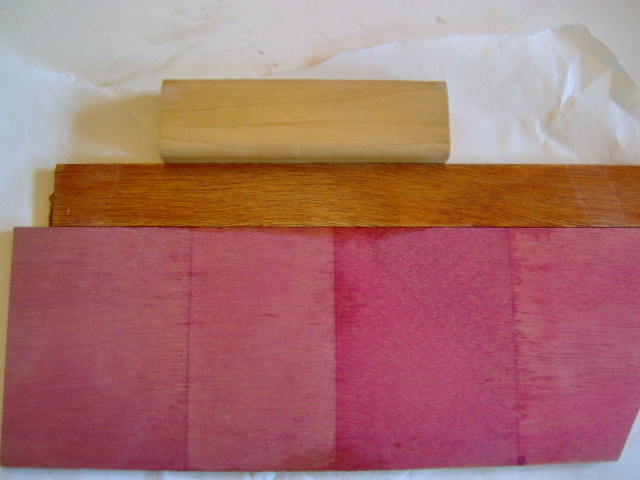
Not much difference in the quarter shades. In the pic they all look pretty much the same, but in person the wine is more toward purple (Merlot) and the cherry is more like fuchsia (a pink shade of purple).

I stopped back by Joann’s and got a bottle of the dark brown to see if I can get it a lot closer. I’ll give it another try or two, but if I still don’t have any luck getting a color I like, I’m going to go with the oil stain.

I like purple, but I don't want it (or pink!) to overwhelm me. I want that warm wood feeling inside. I guess I was thinking that the wood would contribute more of the brown color, and that the dyes would just be tone on that, but it looks like the dye took over and the wood didn't fight back much.
Last edited by KCStudly on Sun May 12, 2013 11:08 pm, edited 1 time in total.
KC
My Build: The Poet Creek Express Hybrid Foamie

Poet Creek Or Bust
Engineering the TLAR way - "That Looks About Right"
TnTTT ORIGINAL 200A LANTERN CLUB = "The 200A Gang"
Green Lantern Corpsmen
User avatar
KCStudly
Donating Member
 
Posts: 9616
Images: 8169
Joined: Mon Feb 06, 2012 10:18 pm
Location: Southeastern CT, USA
Top

Re: The Poet Creek Express - Foamie Hybrid

Postby _Ryan_ » Sun May 12, 2013 10:59 pm

Very cool on the okoume test panels! I can't tell much difference between the wine colors but then again I am red/green colorblind.

I would really recommend the Mosers or Transfast dyes I used in my testing. They aren't all that expensive and come in many nice colors.

Also, okoume is used often in boat building so it might be worth your while to look into how they finish their okoume, you might get some inspiration. I've seen some beautiful work with not only dyes, but straight varnish, gels and many others. If you find something great I might steal it from you!

Good work!

Ryan
User avatar
_Ryan_
Teardrop Master
 
Posts: 241
Images: 356
Joined: Fri Nov 16, 2012 6:24 pm
Top

Re: The Poet Creek Express - Foamie Hybrid

Postby KCStudly » Sun May 12, 2013 11:12 pm

Thanks Ryan!
KC
My Build: The Poet Creek Express Hybrid Foamie

Poet Creek Or Bust
Engineering the TLAR way - "That Looks About Right"
TnTTT ORIGINAL 200A LANTERN CLUB = "The 200A Gang"
Green Lantern Corpsmen
User avatar
KCStudly
Donating Member
 
Posts: 9616
Images: 8169
Joined: Mon Feb 06, 2012 10:18 pm
Location: Southeastern CT, USA
Top

Re: The Poet Creek Express - Foamie Hybrid

Postby GPW » Mon May 13, 2013 5:53 am

KC, that patch came out very nice !!! that’s the beauty of foam , just cut out the offending piece , glue in a new one ... Ideal for repairs .. :thumbsup:

You dyeing wood with Rit ? You are going to varnish over that eh ?
There’s no place like Foam !
User avatar
GPW
Gold Donating Member
 
Posts: 14912
Images: 546
Joined: Thu Feb 09, 2006 7:58 pm
Location: New Orleans
Top

Re: The Poet Creek Express - Foamie Hybrid

Postby bonnie » Mon May 13, 2013 6:40 am

KC,The Cherry over wine is a nice shade. Almost matches my cushions. :lol:
Remember, the turtle won. :)
User avatar
bonnie
Donating Member
 
Posts: 1390
Images: 107
Joined: Sun Jul 24, 2011 4:14 pm
Location: Roxana, IL
Top

Re: The Poet Creek Express - Foamie Hybrid

Postby KCStudly » Mon May 13, 2013 2:50 pm

Thanks, G, Not sure if I am going to use the Rit or not. If I do use it, it will get poly over it. More color experiments tonight.

Thanks, Bonnie. To clarify, I mixed each of the colors together with water; 4 oz water to 1 tsp color. Then I blended the colored water together in a 4 to 1 ratio and used that as a single application. When I said "over" I was referring to the color with the higher ratio. I did not put one color down and then the other, although I suppose that could work, or yield a different result.

When I was done I mixed all four cups together to get a 50/50 mix which I will now try blended with the dark brown, and compare to the dark brown by itself.

Thanks for your interest. :thumbsup:
KC
My Build: The Poet Creek Express Hybrid Foamie

Poet Creek Or Bust
Engineering the TLAR way - "That Looks About Right"
TnTTT ORIGINAL 200A LANTERN CLUB = "The 200A Gang"
Green Lantern Corpsmen
User avatar
KCStudly
Donating Member
 
Posts: 9616
Images: 8169
Joined: Mon Feb 06, 2012 10:18 pm
Location: Southeastern CT, USA
Top

Re: The Poet Creek Express - Foamie Hybrid

Postby aggie79 » Mon May 13, 2013 3:53 pm

KC,

Finishing wood can be like alchemy in that there are so many materials, approaches and variations. To get the color you want, you may be able to tint the finish coat rather than the would itself. The first test will be to see if the dye is compatible with the finish. Since the dye is water soluble, I'd try adding the dye (undiluted) to water-based polyurethane. Before applying the tinted polyurethane, I would use a sanding sealer on the okume. (Sanding sealer helps prevent "blotchiness" and will keep the water-based polyurethane from raising the grain.) Then I would apply one coat of the tinted polyrethane. Follow this with 2-3 coats of untinted polyurethane.

As you can tell, I'm still hanging around in the background enjoying your build.

Take care,
Tom
Tom (& Linda)
For build info on our former Silver Beatle teardrop:
Build Thread

93503
User avatar
aggie79
Super Duper Lifetime Member
 
Posts: 5405
Images: 686
Joined: Tue Aug 07, 2007 5:42 pm
Location: Watauga, Texas
Top

Re: The Poet Creek Express - Foamie Hybrid

Postby KCStudly » Mon May 13, 2013 10:35 pm

Thanks for sticking with me Tom. I appreciate your input and would welcome any additional info or rebuttal to my reflected thoughts below. Remember, I have very little wood finishing experience, but it does seem as though there are just about as many methods and techniques as there are woodworkers.

Finishing wood can be like alchemy in that there are so many materials, approaches and variations.

Yup, and other than my mother’s basket weaving, I have not heard of anyone using these dyes for wood. It’s an experiment, but the info I have found on aniline dyes says that they are used for fabrics, so I am assuming that the fabric dyes will work fine for wood, even if they aren’t specifically labeled as aniline (I seem to recall having read that the industry has gotten away from referring to the synthetic versions as aniline because that has some negative health or safety connotation in the traditional organic based versions).

To get the color you want, you may be able to tint the finish coat rather than the (wood) itself.

The reason that I am looking at applying the dyes directly to the wood is because they are reported to be much more forgiving than oils or one stage finish tints, especially on big panels. Did I misunderstand Doug Hodder’s description of the process? It is my understanding that tinting the “finish” (clear coat) makes it very hard to correct uneven color, or depth of color in the final product. Wouldn’t that be more like paint and tend to hide the grain, or am I just showing my inexperience? I did have better luck with the colors in my tests tonight, and I'll follow up this post with more on that.

The first test will be to see if the dye is compatible with the finish.

Funny you should mention that. Earlier tonight, after the samples had plenty of time to dry, I slapped a coat of oil based poly on the purple/pink test piece. I’ll post a pic of it (although still wet) later tonight, and we’ll see what it looks like dry on Wednesday.

Since the dye is water soluble, I'd try adding the dye (undiluted) to water-based polyurethane.

Hmm, I bought a quart of oil based poly because I had originally planned on using oil stains. I was thinking I would stick with the oil base in case I decide to brew up some of “The Mix” for general sealing duties. Other than cleanup, is there a big advantage to the water based poly (assuming I do not decide to tint it with the water based dyes)?

Before applying the tinted polyurethane, I would use a sanding sealer on the okoume. (Sanding sealer helps prevent "blotchiness" and will keep the water-based polyurethane from raising the grain.)...

Even with my very limited experience, I think I can see that the dyes go on very evenly and are very easy to adjust, even if the pictures don’t always look that way, in person it looks pretty good to me so far. What I have noticed is that it looks very even going on, but there do seem to be an even spread of fine fibers that look like they didn’t take color; sort of a shimmery pattern of fibers that have a different rate of absorption interspersed within the grain. These stand out more (visually, not physically) when looked at from a glancing angle to the grain, so I suppose it could be the grain raising, but it’s not like some other woods where the different growth rings pop at different rates causing texture issues (at least not that I can tell). I suppose it could be the grain shrinking? I’m actually more concerned that the water base may cause warping issues; the purple/pink sample appears to have curled some.

Thanks again for the input and for letting me bounce all of these thoughts off someone.

Let’s see if I can hang in there this evening and get tonight’s pics posted.
KC
My Build: The Poet Creek Express Hybrid Foamie

Poet Creek Or Bust
Engineering the TLAR way - "That Looks About Right"
TnTTT ORIGINAL 200A LANTERN CLUB = "The 200A Gang"
Green Lantern Corpsmen
User avatar
KCStudly
Donating Member
 
Posts: 9616
Images: 8169
Joined: Mon Feb 06, 2012 10:18 pm
Location: Southeastern CT, USA
Top

Re: The Poet Creek Express - Foamie Hybrid

Postby KCStudly » Mon May 13, 2013 11:52 pm

I had a bunch of pic’s of the Rover project progress and the auction lots of press break dies that Karl bought, plus a bunch of new dye color samples in various lighting and angle of view situations, but I appear to have maxed out my picture storage quota here on the forum.

Not sure how to proceed without starting to dump some of the superfluous stuff (and punching a few holes in my earlier posts in the process). The error message said to contact admin, so I guess I’ll do that next.

Anyway, I have thousands of words I can use for now!

Out to Mecca. Started by helping out my neighbor by enlisting Karl’s help to re-weld a bunch of broken welds on his portable folding aluminum utility trailer/garden tractor ramp.

Then some quickie sanding of the spackle on the street side wall, and another application of same.

Then more color testing of the Rit fabric dyes on okoume.
Image

Shown are:
At top, the same slat of okoume, gun stock oil stain, 2 coats oil based poly (the flash washed it out in the middle a lot).
From left to right;
2 tsp Dark Brown Rit in 4 oz water ("dark brown mix")
Dark brown mix 4 to 1 with the 50/50 Wine and Cherry mix (the leftovers from yesterdays tests blended together... 8 oz water, one each tsp Wine and Cherry)
Dark brown mix 2 to 1 with the 50/50 Wine and Cherry mix
50/50 Wine and Cherry mix 4 to 1 with dark brown mix
At bottom, the same maple with “natural” oil and two coats oil poly.

I like the 50/50 Wine Cherry 4 to 1 over dark brown. It is a little darker than the gun stock (which is good for more contrast with the maple) and is actually a little more red/purple than the gun stock (which I like... the gun stock is a bit more yellow/orange than the red that I had in mind).

After these are good and dry let’s see how it looks with a couple of coats of poly, and we just might have something!
Last edited by KCStudly on Tue May 14, 2013 6:13 pm, edited 1 time in total.
KC
My Build: The Poet Creek Express Hybrid Foamie

Poet Creek Or Bust
Engineering the TLAR way - "That Looks About Right"
TnTTT ORIGINAL 200A LANTERN CLUB = "The 200A Gang"
Green Lantern Corpsmen
User avatar
KCStudly
Donating Member
 
Posts: 9616
Images: 8169
Joined: Mon Feb 06, 2012 10:18 pm
Location: Southeastern CT, USA
Top

Re: The Poet Creek Express - Foamie Hybrid

Postby GPW » Tue May 14, 2013 5:39 am

NICE colors KC !!!! 8)
There’s no place like Foam !
User avatar
GPW
Gold Donating Member
 
Posts: 14912
Images: 546
Joined: Thu Feb 09, 2006 7:58 pm
Location: New Orleans
Top

PreviousNext

Return to Foamies

Who is online

Users browsing this forum: No registered users and 5 guests