Utility Trailer Top Tent - Foamie version
I've been wanting to make a teardrop for years. I had ideas for a version that would include a bunk for my small children. Children who are now 19 and 14. Other things always were more important, but the ideas are still there. This thread is where I'm going to document the process of building what I'm currently calling the Utility Trailer Top Tent - Foamie version. The Roof Top Tents that every Overlanding rig on reddit seems to be sporting these days (for the low low price of between $1500 and Holy COW!) are one inspiration. I also watched this video series and thought it could be done, perhaps better, with foam. At one point I had read all of the big thread, and I continued stopping by for a long time just to read and be inspired by KCStudly's Poet Creek Express build. (Not that I am the right person to poke a man who got distracted by life, but KC, if you read this, I'd love to see you get that piece of art on the road.) Much of the work I'm going to cover to begin with was done years ago, but I took photos, with good intentions of posting it ... somewhere, just never got around tuit. So in an effort to explain some of the decisions that come later, I'm going to add them here at the beginning.
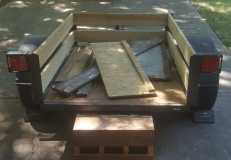
I still don't yet have the money that I can justify spending on a trailer - but several years ago, I acquired a home built utility trailer from my Dad. It is not an ideal trailer, but has the decided benefit of existing, in my possession. The lights were sketchy, and I managed to knock one apart while backing the trailer up at one point. So I bought a new set of LED boat trailer lights, and a pair of steel light protectors from Agri-Supply, along with a new wiring harness. I stripped all the wood from the trailer, replaced the deck and tailgate with new treated 3/4 plywood (additionally treated with some Thompsons water seal from the clearance rack), and the side rails with new treated 5/4 decking. Stainless hardware was used everywhere, and I sanded, primed and rattle-can painted what I could easily access of the trailer frame in the process.
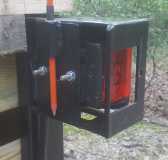
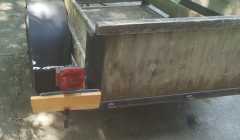
I wanted to add a couple things to the trailer light protectors - since they were going to stick out away from the trailer, I knew I would be brushing up against them frequently, and the sharp corners on the outsides looked like Greek Sirens - begging pant legs and flesh to come just a little closer. So I welded a section of 1/4" rod over them, taming their teeth. I also welded a pair of 3/8" coupling nuts in a vertical orientation to the back of the mounting plate. These are exactly the right size for the ubiquitous fiberglass marking poles available at your local hardware store for $2.50 apiece to slide right in place. A couple wraps of electrical tape keep them from falling any lower, and gravity holds them quite well in place. I've put many miles on these and never had them fall out even with lots of bumping (LOTS of bumping, more on that later) around. These provide the only reference that the trailer is behind the tow vehicle, and until I got cars with backup cameras, was the only possible way to back the trailer up. These were bolted to the frame with the same stainless bolts that hold on the top rails in the back of the trailer.
The lights were wired with a dedicated ground run along with the signal wires. Yes, the chassis is grounded at the tongue, but a soldered, sealed and shrink wrapped splice (as indeed all of the splices are) adds a ground wire for each side. The lights are boat trailer LED style, and as such come with a ground wire, rather than hoping, praying, or making sacrifice to whatever indifferent deity light manufacturers think will keep chassis grounds functional. The wires were run inside either split tubing, or where possible, flexible plastic conduit, which was fastened regularly on the underside of the trailer while replacing the deck. While I had the welder out, I added a brace to keep the front side mount of the aluminum sheet metal fenders approximately 90 degrees to the trailer. This had the added benefit of being a form of brush guard, a step, and another handy tie down location.
I still don't yet have the money that I can justify spending on a trailer - but several years ago, I acquired a home built utility trailer from my Dad. It is not an ideal trailer, but has the decided benefit of existing, in my possession. The lights were sketchy, and I managed to knock one apart while backing the trailer up at one point. So I bought a new set of LED boat trailer lights, and a pair of steel light protectors from Agri-Supply, along with a new wiring harness. I stripped all the wood from the trailer, replaced the deck and tailgate with new treated 3/4 plywood (additionally treated with some Thompsons water seal from the clearance rack), and the side rails with new treated 5/4 decking. Stainless hardware was used everywhere, and I sanded, primed and rattle-can painted what I could easily access of the trailer frame in the process.
I wanted to add a couple things to the trailer light protectors - since they were going to stick out away from the trailer, I knew I would be brushing up against them frequently, and the sharp corners on the outsides looked like Greek Sirens - begging pant legs and flesh to come just a little closer. So I welded a section of 1/4" rod over them, taming their teeth. I also welded a pair of 3/8" coupling nuts in a vertical orientation to the back of the mounting plate. These are exactly the right size for the ubiquitous fiberglass marking poles available at your local hardware store for $2.50 apiece to slide right in place. A couple wraps of electrical tape keep them from falling any lower, and gravity holds them quite well in place. I've put many miles on these and never had them fall out even with lots of bumping (LOTS of bumping, more on that later) around. These provide the only reference that the trailer is behind the tow vehicle, and until I got cars with backup cameras, was the only possible way to back the trailer up. These were bolted to the frame with the same stainless bolts that hold on the top rails in the back of the trailer.
The lights were wired with a dedicated ground run along with the signal wires. Yes, the chassis is grounded at the tongue, but a soldered, sealed and shrink wrapped splice (as indeed all of the splices are) adds a ground wire for each side. The lights are boat trailer LED style, and as such come with a ground wire, rather than hoping, praying, or making sacrifice to whatever indifferent deity light manufacturers think will keep chassis grounds functional. The wires were run inside either split tubing, or where possible, flexible plastic conduit, which was fastened regularly on the underside of the trailer while replacing the deck. While I had the welder out, I added a brace to keep the front side mount of the aluminum sheet metal fenders approximately 90 degrees to the trailer. This had the added benefit of being a form of brush guard, a step, and another handy tie down location.


